
在 Windows Vista 的扩展玻璃区域上绘制平滑的文本和图片
本文介绍如何在 Vista 窗体的扩展玻璃区域正确绘制文本和图片。
引言
Windows Vista 有一种新的 Aero 主题,其中包含我们称之为“玻璃效果”(由桌面窗口管理器提供支持)。虽然所有窗口的非客户区都可以免费获得玻璃效果,但将玻璃效果扩展到客户区并在玻璃上绘制文本或图片是开发者需要努力才能实现的功能。
[此介绍文本摘自 Daniel Moth:Windows Vista: Get the glass effect in your C# applications <-您可以访问此链接,了解更多关于 Vista 玻璃效果的信息 ^_^]
[版权归 Daniel Moth 所有,2006 年 8 月 22 日。保留所有权利。]
演示是用 C# 编写的,并在 Windows Vista Beta 2.5472 上进行了测试。
如何将框架扩展到客户区?
桌面窗口管理器 (DWM) 提供了一组称为 DWM API 的 API,其中有两个可以帮助我们:DwmIsCompositionEnabled 和 DwmExtendFrameIntoClientArea。
DwmIsCompositionEnabled 用于检查用户是否启用了玻璃效果。
[System.Runtime.InteropServices.DllImport("dwmapi.dll")]
public extern static int DwmIsCompositionEnabled(ref int en ) ;
而 DwmExtendFrameIntoClientArea 用于将框架扩展到窗口的客户区。
[System.Runtime.InteropServices.DllImport("dwmapi.dll")]
public extern static int DwmExtendFrameIntoClientArea(IntPtr hwnd,
                         ref MARGINS margin ) ;
DwmExtendFrameIntoClientArea 的第二个参数是一个 MARGINS 结构,它表示框架应扩展到客户区的距离。如果要将整个客户区和非客户区渲染为无缝的玻璃片,只需将任何边距设置为 -1。
int en=0;
MARGINS mg=new MARGINS();
mg.m_Buttom = -1;
mg.m_Left = -1;
mg.m_Right = -1;
mg.m_Top = -1 ;
//make sure you are not on a legacy OS
if (System.Environment.OSVersion.Version.Major >= 6)
{
    DwmIsCompositionEnabled(ref en);
    //check if the desktop composition is enabled

    if(en>0)
    {
          DwmExtendFrameIntoClientArea(this.Handle, ref mg);

    }else{
          MessageBox.Show("Desktop Composition is Disabled!");

    }
}else{
     MessageBox.Show("Please run this on Windows Vista.");
}
如果现在运行您的应用程序,您将看不到任何效果。因为系统会自动用窗口的背景色绘制客户区。所以我们必须用实心黑色画笔(碰巧 RGB 黑色 (0x00000000) 的位模式与 100% 透明 ARGB 的位模式相同)来绘制它,或者只需将 TansparencyKey 属性设置为窗体的 BackColor。然后运行您的应用程序,就会出现所需的效果。

问题
但很快您就会发现一些问题。
如果玻璃区域上有一个 Label,或者您使用 Graphics 对象绘制了一些文本,您会发现文本平滑处理的效果“很难看”。因为它使用窗体的背景来确定应该对其进行平滑处理的颜色——如果您设置了 TansparncyKey,那就是透明键颜色;如果您用黑色画笔绘制该区域,那就是黑色;更糟糕的是,所有黑色区域(通常是控件的文本)也都是透明的。

解决方案
解决这些问题的方法是:**不要**使用任何 Label,而是自己绘制文本。但不要直接在玻璃上使用 Graphics.DrawString() 方法绘制文本,因为那样文本平滑处理的效果会很难看。您必须先将文本“绘制”到一个 GraphicsPath 对象中,然后使用 Graphics.FillPath 方法将路径释放到玻璃表面。
Graphics g = this.CreateGraphics();
GraphicsPath blackfont = new GraphicsPath();
SolidBrush brsh = new SolidBrush(Color.White);
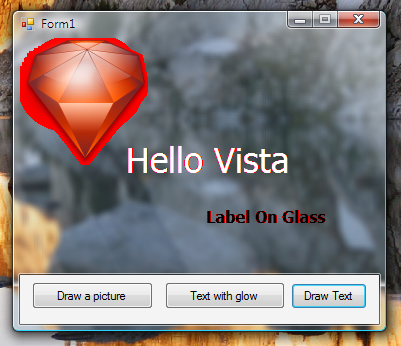
blackfont.AddString("Hello Vista",
new FontFamily("Tahoma", (int)FontStyle.Regular, 26,
new Point(0, 0), StringFormat.GenericDefault);
//SmoothingMode must be set, or text smoothing will not work
g.SmoothingMode = System.Drawing.Drawing2D.SmoothingMode.HighQuality ;
g.FillPath(brsh, blackfont); //Fill the font with White brush
这是效果:

或者在文本后面绘制一些“发光”效果也是可以的,要记住的唯一一点是使用 GraphicsPath 对象来完成。
Graphics g = this.CreateGraphics();

Rectangle r = new Rectangle(pictureBox1.Left, pictureBox1.Top,
              pictureBox1.Width, pictureBox1.Height);

GraphicsPath path = new System.Drawing.Drawing2D.GraphicsPath();

GraphicsPath fontpath = new GraphicsPath();

path.AddEllipse(r);

fontpath.AddString("Hello Vista", new FontFamily("Tahoma"),
    (int)FontStyle.Regular, 26,pictureBox1.Location ,
     StringFormat.GenericDefault );
PathGradientBrush pgb = new System.Drawing.Drawing2D.PathGradientBrush(path);

Color[] c ={ (Color.Transparent) };

//SmoothingMode must be set, or text smoothing will not work

g.SmoothingMode = System.Drawing.Drawing2D.SmoothingMode.HighQuality  ;
pgb.CenterColor = Color.FromArgb(255, Color.White);

pgb.SurroundColors = c;

g.FillEllipse(pgb, r);
g.FillPath(Brushes.Black  , fontpath);

在玻璃区域绘制带有 Alpha 通道的图片也很简单,如果您通过将其绘制为黑色来使窗体变成玻璃(这也是演示项目没有使用透明键方法来扩展玻璃的原因)。只需调用 Graphics.DrawImage() 方法即可正确工作。

一些技巧
顺便说一句,不要使用透明键方法来扩展玻璃区域。因为这种方法还有一个问题——点击穿透:当您单击玻璃区域时,您实际上是单击了窗口后面的内容。
使用 DrawThemeTextEx
上述方法很简单,但不是 Windows Vista 绘制文本的标准方式。Windows Vista 提供了一个 API DrawThemeTextEx 供我们绘制 Aero 玻璃上的发光文本。使用此 API 有点复杂。
首先,我们必须使用 P/Invoke API CreateCompatibleDC 创建一个内存 DC。其次,您需要使用 API CreateDIBSection 创建一个 32 位位图。第三,在创建的内存 DC 中选择位图和字体,并使用 DrawThemeTextEx 在内存 DC 中绘制文本。第四,使用 BitBlt 将文本绘制到屏幕上。第五……现在没有第五步了,就这样。

有关更多详细信息,请访问 Vista Goodies in C++: Using Glass in Your UI 或 Aero Glass from Managed Code,或者查看代码包中的GlassText.cs。
历史
- 2006.08.29 -- 初始发布
- 2008.07.10 -- 源文件已更新