
SharePoint 的 Facebook Web 部件 - 第 1 部分
4.38/5 (5投票s)
在本系列文章的兩部分中,我們將介紹如何創建 Facebook WebPart。在第一部分中,我們將開發 ShowWall WebPart,它能讓您在自己的 SharePoint 門戶網站上獲取用戶發布的牆面/帖子。在第二部分中,我們將開發向 Facebook 發布更新的 WebPart。


介绍
越來越多的企業正轉向使用 SharePoint 門戶作為其面向公眾的網站,因為通過 WebPart 添加功能非常方便。隨著 Facebook 和 Twitter 等社交網絡的興起,您經常會在這些網絡上發布更新,同時也在您的網站上展示這些更新。因此,在本系列文章的兩部分中,我們將向您展示如何創建 Facebook WebPart,讓您可以直接從 SharePoint 更新 Facebook,以及在您的門戶網站上查看更新。在第一部分中,我們將開發 ShowWall WebPart,它能讓您在自己的 SharePoint 門戶網站上獲取用戶發布的牆面/帖子。所有源代碼都可以從附加的 zip 文件下載,並且也可以在我們的開源項目中找到
您需要預先安裝的軟件
要跟隨本演示,您需要安裝以下要求
- SharePoint 2010
- Visual Studio 2010
创建项目
- 使用 Visual Studio 2010 創建一個名為
ShowWall的新空白 SharePoint 項目。

- 當 SharePoint 自定義嚮導提示時,提供一個站點 URL 並進行驗證。然後選擇部署為場解決方案的選項。單擊完成。

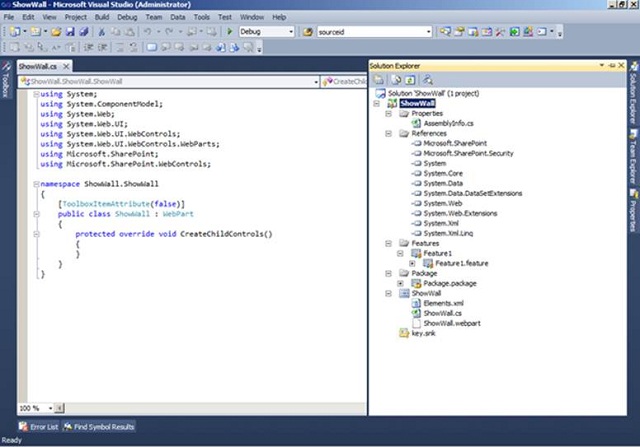
- 這將為您創建一個包含默認項目項的解決方案。最後,為解決方案添加一個類型為 WebPart 的新項。

- 這會創建一個解決方案。重要的文件是 Element.xml、ShowWall.cs 和 ShowWall.webpart。
實現主代碼
- 現在,我們開始將代碼放入 ShowWall.cs 類中。為了序列化目的,ShowWall.cs 類必須有一個默認的、無參數的構造函數。添加一個 Web 控件
Label lblMessage。這個Label控件用於顯示在檢索用戶牆面時發生的異常消息。我們需要添加三個命名空間:System.IO、system.Net和Microsoft.SharePoint.WebPartPages,因為此代碼將使用那些命名空間中提供的某些類。 - 我們將需要設置 Facebook 用戶 ID,以便獲取其更新。為了提供此功能,我們需要添加一個名為“
Webpart properties”的獨立區域,用於存儲所有 WebPart 屬性,如用戶 ID、牆面數量和是否顯示描述。這些設置將由 SharePoint 管理員用於更改 WebPart 設置和顯示。此部分是 ShowWall.cs 類的一部分。請查看下面的代碼片段,了解如何提供 WebPart 的 Facebook 設置部分。#region Webpart Properties [WebBrowsable(true), Category("Facebook Settings"), Personalizable(PersonalizationScope.Shared), WebPartStorage(Storage.Shared), DefaultValue(""), WebDisplayName("Code:"), WebDescription("Please enter authorization code")] public string OAuthCode { get; set; } ..... - 為了設計 WebPart 的 UI,我們需要重寫
Webpart基類的CreateChildControls()方法。此方法有兩個主要目的:一是創建將在 WebPart 上顯示的 UI 控件,二是獲取已驗證用戶發布的牆面並將其設置到創建的 UI 中。ShowPagedFeeds()方法被調用來配置 WebPart 上的分頁。try { if (!String.IsNullOrEmpty(this.OAuthCode)) ) { //first get the authentication token oAuthToken = CommonHelper.GetOAuthToken("read_stream", OAuthClientID, OAuthRedirectUrl, OAuthClientSecret, OAuthCode); this.Page.Header.Controls.Add(CommonHelper.InlineStyle()); ShowPagedFeeds(); } else { .... } } oAuthToken是用於獲取用戶認證令牌的字符串變量,該令牌將用於從 Facebook 獲取用戶動態。此方法編寫在一個通用的幫助類 CommonHelper.cs 中。public static string GetOAuthToken(string scope, string OAuthClientID, string OAuthRedirectUrl, string OAuthClientSecret, string OAuthCode) { string oAuthToken = string.Empty; string url = string.Format("https://graph.facebook.com/oauth/access_token?client_id={0}&redirect_uri={1}&client_secret={2}&code={3}&scope={4}", OAuthClientID, OAuthRedirectUrl, OAuthClientSecret, OAuthCode,scope); url = url.Replace(" ", string.Empty); //get the server certificate for calling https ServicePointManager.ServerCertificateValidationCallback = new System.Net.Security.RemoteCertificateValidationCallback(ValidateFacebookCertificate); WebRequest request = WebRequest.Create(url) as HttpWebRequest; using (HttpWebResponse response = request.GetResponse() as HttpWebResponse) { StreamReader reader = new StreamReader(response.GetResponseStream()); string retVal = reader.ReadToEnd(); oAuthToken = retVal.Substring(retVal.IndexOf("=") + 1, retVal.Length - retVal.IndexOf("=") - 1); } return oAuthToken; }現在,分頁已應用於 WebPart,以便管理員可以控制在 SharePoint 門戶網站上顯示的動態數量。
private void ShowPagedFeeds()
        {
            UpdatePanel refreshName = new UpdatePanel();
            ScriptManager scriptHandler = new ScriptManager();
            UpdateProgress updateProgress = new UpdateProgress();
            ......

            //Create the header
            if (this.ShowHeader)
            {
                trContent = new TableRow();
                tcContent = new TableCell();
                tcContent.Controls.Add(CommonHelper.CreateHeader(this.UserID, this.oAuthToken, this.ShowHeaderImage));
              ...
            }

            trContent = new TableRow();
            tcContent = new TableCell();

            //get the feeds here
            tcContent.Controls.Add(ShowFeeds(string.Empty));

           .......
            if (ScriptManager.GetCurrent(this.Page) == null)
            {
                this.Controls.Add(scriptHandler);
            }
            this.Controls.Add(refreshName);
            this.Controls.Add(updateProgress);
            lbtnNext.OnClientClick = pagingTable.ClientID + ".style.visibility='hidden';";
}
在上述方法內部調用了
ShowFeeds()方法,該方法負責顯示所有所需信息的實際表格,並且在單擊“更多帖子”按鈕時,它會將之前的動態與新的動態合併。此方法接受一個參數FeedUrl,此 FeedUrl 是 Facebook 的 URL,所有動態都將從該 URL 返回(根據分頁)。它還將之前的動態保存在 ViewState 中,這樣就不會對 Facebook 服務器進行額外的請求。private Table ShowFeeds(string FeedURL) { Table mainTable = null; int i = 0; TableRow tr; TableCell tc; TableCell tcImage; mainTable = new Table(); mainTable.Width = Unit.Percentage(100); mainTable.CellSpacing = 0; mainTable.CellPadding = 0; int feedsCount = 0; JSONObject me = GetFeeds(FeedURL); if (me.Dictionary["data"] != null) { JSONObject[] feedsprev = new JSONObject[1]; JSONObject[] feeds = me.Dictionary["data"].Array; feedsCount = feeds.Length; ... ViewState["html"] = mergedFeeds; foreach (JSONObject feed in mergedFeeds) { .... } } if (feedsCount < WallCount) { ViewState["next"] = ""; } else { ViewState["next"] = me.Dictionary["paging"].Dictionary["next"].String; } return mainTable; }- 現在我們來處理真正的核心部分,即從 Facebook 獲取更新。幸運的是,
GraphAPI 非常簡單。此方法將包含從 Facebook 返回的所有動態的 JSON 對象返回給 ShowFeeds 方法。private JSONObject GetFeeds(string FeedURL) { JSONObject obj = null; string url; HttpWebRequest request; try { if (string.IsNullOrEmpty(FeedURL)) { if (!String.IsNullOrEmpty(oAuthToken)) { if (IsPosts) { //if we need to show the user feeds only then call posts rest api url = string.Format("https://graph.facebook.com/{0}/posts?access_token={1}&limit={2}", this.UserID, oAuthToken, WallCount); } else { //else we need to call the feed rest api url = string.Format("https://graph.facebook.com/{0}/feed?access_token={1}&limit={2}", this.UserID, oAuthToken, WallCount); } } else { throw (new Exception("The access token returned was not valid.")); } } else { //this is the url that we got for next feed url...no need to generate the url from scratch url = FeedURL; } //now send the request to facebook request = WebRequest.Create(url) as HttpWebRequest; using (HttpWebResponse response = request.GetResponse() as HttpWebResponse) { ... } } } catch (Exception Ex) { LblMessage = new Label(); LblMessage.Text = Ex.Message; this.Controls.Add(LblMessage); } return obj; } 獲取動態後,我們需要根據需要在 WebPart 上顯示的信息來解析動態。每個信息都將根據 UI 設計添加到底部的新行/列中。
private Table ParseFeed(JSONObject feed, int counter) { Table feedTable; TableRow feedTableRow; TableCell feedTableCell; HyperLink objHyperLink; Table childTable = new Table(); TableRow childRow = new TableRow(); TableCell childCell; //first table row in main feed table feedTable = new Table(); feedTableRow = new TableRow(); feedTable.Rows.Add(feedTableRow); //first of all see what is the type of this feed switch (feed.Dictionary["type"].String) { case "status": if (feed.Dictionary.ContainsKey("message")) { //first cell and add table of status data .. childCell.Text = feed.Dictionary["message"].String; .... } if (feed.Dictionary.ContainsKey("story")) { //first cell and add table of status data .. childCell.Text = feed.Dictionary["story"].String; .... } break; case "photo": case "link": case "video": //create a feed table cell and add child table ... if (feed.Dictionary.ContainsKey("picture")) { ... image.ImageUrl = feed.Dictionary["picture"].String; ..... } if (feed.Dictionary.ContainsKey("message")) { //next row childRow = new TableRow(); childTable.Rows.Add(childRow); childCell = new TableCell(); childRow.Cells.Add(childCell); //Remove the link from the message string message = feed.Dictionary["message"].String; if(message.ToLower().Contains("http")) { message = message.Remove( message.IndexOf("http"), feed.Dictionary["link"].String.Length); } childCell.Text = message; } if (feed.Dictionary.ContainsKey("name")) { ... } if (feed.Dictionary.ContainsKey("description")) { //first cell and add table of status data //next row ... } break; } //second row in main feed table to display the additional information feedTableRow = new TableRow(); feedTable.Rows.Add(feedTableRow); //first cell for feed icon feedTableCell = new TableCell(); feedTableRow.Cells.Add(feedTableCell); ... if (feed.Dictionary.ContainsKey("icon")) { ... } if (feed.Dictionary.ContainsKey("created_time")) { ... } childRow = new TableRow(); childTable.Rows.Add(childRow); //Show Likes info if (feed.Dictionary.ContainsKey("likes")) { .... } else // Show only like image { childCell = new TableCell(); childRow.Cells.Add(childCell); System.Web.UI.WebControls.Image img_Like = new System.Web.UI.WebControls.Image(); img_Like.ImageUrl = ImagePath + "Likes.png"; ... } //show Comments Info if (feed.Dictionary.ContainsKey("comments")) { //Showing Comment image ... img_Comment.ImageUrl = ImagePath + "comments.png"; img_Comment.CssClass = "fbLikes"; childCell.Controls.Add(img_Comment); //Showing Text childCell = new TableCell(); childRow.Cells.Add(childCell); Label lbl_Comment = new Label(); lbl_Comment.Text = "View all " + feed.Dictionary["comments"].Dictionary["count"].String + " Comments"; lbl_Comment.CssClass = "fbLikes mrgn"; // get the story id string[] fbinfo = feed.Dictionary["id"].String.Split('_'); lbl_Comment.Attributes.Add("onClick", "javascript:window.open('https://#/" + this.UserID + "/posts/" + fbinfo[1] + "','_newtab');"); img_Comment.Attributes.Add("onClick", "javascript:window.open('https://#/" + this.UserID + "/posts/" + fbinfo[1] + "','_newtab');"); childCell.Controls.Add(lbl_Comment); } return feedTable; }- 以下方法使用相對時間,該時間如下獲取
private string RelativeTime(string pastTime) { DateTime origStamp = DateTime.Parse(pastTime.ToString()); DateTime curDate = DateTime.Now; TimeSpan ts = curDate.Subtract(origStamp); string strReturn = string.Empty; if (ts.Days > 365) //years { if (ts.Days == 365) strReturn = "about " + 1 + " year ago"; else strReturn = "about " + ts.Days / 365 + " years ago"; } else if (ts.Days >= 30) //months { if (ts.Days == 30) strReturn = "about " + 1 + " month ago"; else strReturn = "about " + ts.Days / 30 + " months ago"; } else if (ts.Days >= 7) //weeks { if (ts.Days == 7) strReturn = "about " + 1 + " week ago"; else strReturn = "about " + ts.Days / 7 + " weeks ago"; } else if (ts.Days > 0) //days { strReturn = "about " + ts.Days + " days ago"; } else if (ts.Hours >= 1) //hours { strReturn = "about " + ts.Hours + " hours ago"; } else { if (ts.Minutes >= 1) { strReturn = "about " + ts.Minutes + " minutes ago"; } else strReturn = "about " + ts.Seconds + " seconds ago"; } return strReturn; } - 現在,當單擊“顯示更多舊帖子”按鈕時(即
lbtnNext_Click),事件接收器被觸發。這會調用以顯示更多動態,包括之前的動態。void lbtnNext_Click(object sender, EventArgs e) { tcContent.Controls.Clear(); tcContent.Controls.Add(ShowFeeds(Convert.ToString(ViewState["next"]))); if (string.IsNullOrEmpty(Convert.ToString(ViewState["next"]))) { Literal ltrTxtMessage = new Literal(); ltrTxtMessage.Text = "There are no more posts to show."; tcpaging.Controls.Clear(); tcpaging.Controls.Add(ltrTxtMessage); } } - 最後,在單擊“更多帖子”按鈕時,它會被添加到進度模板中,這可以防止頁面發生回發並重新加載整個頁面。這是一個單獨的類文件 ProgressTemplate.cs,它繼承自 ITemplate 接口。
public void InstantiateIn(Control container) { Table tblProgress = new Table(); tblProgress.Width = Unit.Percentage(100); tblProgress.CellSpacing = 0; tblProgress.CellPadding = 0; TableRow trProgress = new TableRow(); TableCell tcProgress = new TableCell(); tcProgress.HorizontalAlign = System.Web.UI.WebControls.HorizontalAlign.Center; tcProgress.Height = 20; tcProgress.Attributes.Add("style", "background-color: #EDEFF4;border: 1px solid #D8DFEA;"); Image img = new Image(); img.ImageUrl = ImagePath; tcProgress.Controls.Add(img); trProgress.Controls.Add(tcProgress); tblProgress.Controls.Add(trProgress); container.Controls.Add(tblProgress); } - 如果發生任何異常,我們將在標籤中顯示此信息。
catch (Exception Ex)
{
    LblMessage = new Label();
    LblMessage.Text = Ex.Message;
    this.Controls.Add(LblMessage);
}
構建和部署 WebPart
- 現在在 Visual Studio 中生成解決方案,然後單擊“部署”來部署解決方案。
- 請確保在應用程序的 web.config 文件中為 ShowWall Project DLL 添加了 safecontrol 條目。
- 成功部署後,打開您的 SharePoint 網站。轉到“站點操作”->“站點設置”->“庫”->“Web 部件”。在這裡您應該能找到列出的 ShowWall WebPart。

- 要將其用於頁面,請按照上述步驟操作。打開您想使用 Show Wall WebPart 的頁面。讓我們創建一個名為
ShowWallTestPage的新頁面。為此,請先轉到“站點頁面”->“所有頁面”。

- 單擊“添加新頁面”鏈接,然後單擊“創建”來創建新頁面。

- 現在您看到一個空白頁面。單擊“編輯工具”標題下的“插入”選項卡,然後再次單擊“Web 部件”。

- 轉到“類別”部分中的“Brickred”。選擇 ShowWall WebPart 並單擊“添加”。ShowWall WebPart 已添加到頁面。單擊 ShowWall WebPart 標題右側的“編輯 WebPart”圖標,然後單擊“編輯 Web Part”。

- 這將在右側打開 Web Part 屬性窗口。請參閱下圖。

- 插入您的用戶 ID。這是必需的。在“牆面數量”中輸入一個整數。它將顯示您 WebPart 上發布的牆面數量。如果勾選“顯示描述”,它將顯示牆面的時間和日期,否則則不顯示。單擊頂部功能區中的“保存並關閉”按鈕。您完成了!您應該會在 WebPart 中看到填滿了您的 Facebook 帖子。

结论
在本文中,我們了解了構建與 Facebook 集成的 SharePoint WebPart 的過程。這是構建 Facebook 提供的幾乎任何功能的良好起點,包括通過圖譜 API 獲取好友、照片、點贊按鈕等。在本系列的第二部分中,我們將向您展示如何通過 WebPart 發布到 Facebook。但是,如果您想快速跳到後面,並且對代碼比較熟悉,您可以直接訪問 http://code.google.com/p/sharepoint-facebook-wall。
历史
- 2011 年 3 月 11 日:初始版本
作者
Nitin Gupta 是 SharePoint 架構師,並在 BrickRed Technologies 領導 Microsoft 小型企業部門。Abhinav Maheshwari 是 BrickRed 的首席技術官,對 SharePoint 和其他門戶框架有濃厚的興趣。他們都是 Brickred Technologies 的技術專家小組的成員,該公司是領先的小型和中型企業任務關鍵應用程序提供商。