
如何创建从项目窗口启动的 Visual Studio 插件
4.90/5 (3投票s)
一个关于如何创建从项目窗口启动的 Visual Studio 插件的逐步指南。
引言
在 Visual Studio 2010 中,有两种主要方法可以安装允许您修改 Visual Studio 项目的插件。第一种方法是使用 Visual Studio 模板。模板是复制您通常需要做的工作(例如将许可信息添加到每个类的顶部)的好方法。另一种方法是使用插件。 插件通常从 Visual Studio 工具菜单运行,并允许您运行程序来执行某些操作。在我们的例子中,我们正在为我们的客户编写一个组件,该组件将修改 Windows Azure 服务配置文件,并且插件似乎是完成此任务的最佳方式。 插件的主要问题是它们从“工具”菜单运行,因此,如果您希望能够更改用户选择的项目,除非您实际询问用户要修改哪个项目,否则无法执行此操作。 这会带来非常糟糕的用户体验。 最好的方法是用户可以右键单击项目以启动插件。 令人惊讶的是,我们几乎找不到关于该主题的任何信息。 幸运的是,这非常简单。 本教程将引导您完成整个过程。
Using the Code
要开始,请打开 Visual Studio 2010 并创建一个新项目,然后选择“其他项目类型”|“扩展性”|“Visual Studio 插件”。 将名称保留为默认名称 MyAddin1,然后按“确定”。

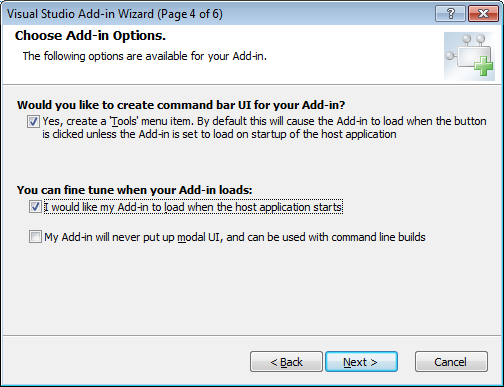
在您浏览向导时,您可以保留默认值(包括选择 C#),但在“选择插件选项”中,您需要确保选择了前两个选项
完成向导后,它将创建一个空白插件项目。
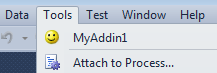
此时,您已经拥有一个可用的插件。 如果您要构建项目并运行它,您将在“工具”菜单中看到该插件。
注意:如果您发现插件未加载,您可以手动将两个文件MyAddin1.dll 和 MyAddin1.Addin 复制到您的 C:\Users\<USERNAME>\Documents\Visual Studio 2010\Addins 目录并重新加载 Visual Studio。
在许多情况下,这会很方便;但是,我们希望从解决方案资源管理器中的“项目”菜单启用此功能。为此,我们需要修改 Connect.cs 文件。从解决方案资源管理器中打开 Connect.cs 文件。找到 OnConnection 方法并将其替换为以下代码
public void OnConnection(object application, ext_ConnectMode connectMode,
                         object addInInst, ref Array custom)
{
    _applicationObject = (DTE2)application;
    _addInInstance = (AddIn)addInInst;
    if (connectMode == ext_ConnectMode.ext_cm_UISetup)
    {
        object[] contextGUIDS = new object[] { };
        Commands2 commands = (Commands2)_applicationObject.Commands;
        Microsoft.VisualStudio.CommandBars.CommandBar standardToolBar =
          ((Microsoft.VisualStudio.CommandBars.CommandBars)
          _applicationObject.CommandBars)["Project"];
        try
        {
            Command command = commands.AddNamedCommand2(_addInInstance, "MyAddin1",
                              "My Addin...", "Executes the command for My Addin",
                              true, 59, ref contextGUIDS,
                              (int)vsCommandStatus.vsCommandStatusSupported +
                              (int)vsCommandStatus.vsCommandStatusEnabled,
                              (int)vsCommandStyle.vsCommandStylePictAndText,
                              vsCommandControlType.vsCommandControlTypeButton);
            if ((command != null) && (standardToolBar != null))
            {
                CommandBarControl ctrl =
                  (CommandBarControl)command.AddControl(standardToolBar, 1);
                ctrl.TooltipText = "Executes the command for MyAddin";
            }
        }
        catch (System.ArgumentException)
        {
        }
    }
}
这里的真正技巧是包含 ["Project"] 的代码部分。 这会告诉 Visual Studio 从“项目”菜单加载插件。 这也是您如何更改插件以从解决方案资源管理器中的“解决方案”菜单加载的方式。
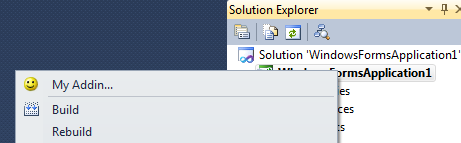
这就是全部内容。 现在,如果您构建并运行插件,它将允许您从“项目”菜单启动插件。 运行插件来尝试一下。 这将启动 Visual Studio 的新实例。 创建一个新的 Visual Studio 项目(例如 Windows 窗体应用程序)。 右键单击解决方案资源管理器中的“项目”菜单,您应该会看到您的新插件。
关注点
如果您想更改默认的笑脸图标,请找到这一行并将值从 59 更改为其他默认图标编号之一
Command command = commands.AddNamedCommand2(_addInInstance, "MyAddin1",
                  "My Addin...", "Executes the command for My Addin",
                  true, 59, ref contextGUIDS,
                  (int)vsCommandStatus.vsCommandStatusSupported +
                  (int)vsCommandStatus.vsCommandStatusEnabled,
                  (int)vsCommandStyle.vsCommandStylePictAndText,
                  vsCommandControlType.vsCommandControlTypeButton);
您还会注意到,当您单击插件时,调用的代码如下所示。 您可以在显示:handled = true; 的位置加载您自己的插件逻辑。
public void Exec(string commandName, vsCommandExecOption executeOption,
                 ref object varIn, ref object varOut, ref bool handled)
{
    handled = false;
    if(executeOption == vsCommandExecOption.vsCommandExecOptionDoDefault)
    {
        if(commandName == "MyAddin1.Connect.MyAddin1")
        {
            handled = true;
            return;
        }
    }
}
历史
- 2011 年 3 月 27 日:首次发布