
Simon:80 年代的记忆游戏
4.36/5 (8投票s)
2007年5月11日
3分钟阅读
71743
1534
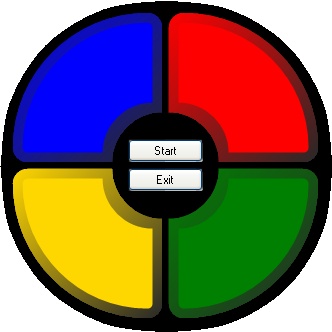
一个使用形状按钮的简单记忆游戏。
引言
我想能够创建非矩形的按钮,这仅仅出于兴趣。我在网上看到过几个复杂的版本,但我认为我可以想出更简单的东西。在网上搜索时,我偶然发现了一个 Simon 的 Flash 版本,我喜欢玩它,所以这里用我制作的异形按钮重现了它。
没有声音,但如果有人想添加它,请给我发一份更新后的代码。
异形按钮
这通过以下步骤实现
- 向您的应用程序添加一个新的
UserControl。 - 查看代码并将继承类型从
UserControl更改为Button。public partial class simonButton : Button { public simonButton() { InitializeComponent(); } } - 按钮的形状是通过使用两个
GraphicsPath对象实现的。在按钮类的顶部声明这些。public partial class simonButton : Button { private GraphicsPath path; private GraphicsPath innerPath; ...path表示按钮的轮廓,而innerPath表示按钮平面的形状。 - 现在覆盖按钮的
OnPaint方法,以处理绘图,使其看起来像以下代码。protected override void OnPaint(PaintEventArgs pevent) { Graphics g = pevent.Graphics; g.SmoothingMode = SmoothingMode.AntiAlias; }为了避免出现锯齿状的曲线,将SmoothingMode设置为AntiAlias。 path对象使用LinearGradientBrush填充。这可以通过提供一个矩形和一个新的LinearGradientBrush来简单地实现。// Create Rectangle To Limit brush area. Rectangle rect = new Rectangle(0, 0, 150, 150); LinearGradientBrush linearBrush = new LinearGradientBrush(rect, Color.FromArgb(40,40,40), this.ForeColor, 225);接下来,我们实例化path对象。path = new GraphicsPath();
将项目添加到path对象以创建所需的形状。path.AddArc(0, 0, 270, 270, 180, 90); path.AddArc(120, 0, 30, 30, 270, 90); path.AddLine(150, 0, 150, 85); path.AddArc(100, 100, 100, 100, -90, -90); path.AddLine(100, 150, 0, 150); path.AddArc(0, 120, 30, 30, 90, 90); path.AddArc(0, 0, 270, 270, 180, 90);
填充path.g.FillPath(linearBrush, path);
最后,释放画笔以释放内存。linearBrush.Dispose();
innerPath对象使用SolidBrush填充。Brush b = new SolidBrush(this.ForeColor);
接下来,我们实例化innerPath对象。innerPath = new GraphicsPath();
将项目添加到innerPath对象以创建所需的形状。innerPath.AddArc(10, 10, 250, 250, 180, 90); innerPath.AddArc(130, 10, 10, 10, 270, 90); innerPath.AddLine(140, 0, 140, 90); innerPath.AddArc(90, 90, 100, 100, -90, -90); innerPath.AddLine(90, 140, 10, 140); innerPath.AddArc(10, 130, 10, 10, 90, 90);
填充innerPath.g.FillPath(b, innerPath);
最后,释放画笔以释放内存。b.Dispose();
- 到目前为止,这绘制了我们的异形按钮,但是您可以在相关的矩形中的任何地方单击,所以要阻止这一点,只需将按钮的
Region属性设置为path。this.Region = new Region(path);
现在,按钮将仅接受形状区域内的单击。 - 为了让用户获得他们位于按钮上的反馈,更改光标是一件简单的事情。覆盖
OnMouseEnter和OnMouseLeave方法并在其中更改光标。protected override void OnMouseEnter(EventArgs e) { this.Cursor = Cursors.Hand; base.OnMouseEnter(e); } protected override void OnMouseLeave(EventArgs e) { this.Cursor = Cursors.Arrow; base.OnMouseLeave(e); } - 按钮还需要视觉反馈来表示它已被按下。在这种情况下,按钮希望看起来像后面有一盏灯亮起。这需要几个新项目以及对代码的一些更改。首先,需要一个布尔值来存储单击是否发生,以便可以在正确的状态下绘制它。
private bool _clicked = false; public bool Clicked { get { return _clicked; } set { _clicked = value; Invalidate(); } }现在覆盖OnMouseDown和OnMouseUp以相应地设置Clicked状态。protected override void OnMouseDown(MouseEventArgs mevent) { _clicked = true; base.OnMouseDown(mevent); } protected override void OnMouseUp(MouseEventArgs mevent) { _clicked = false; base.OnMouseUp(mevent); }添加一个新的画笔。PathGradientBrush pgbrush = new PathGradientBrush(innerPath); pgbrush.CenterPoint = new Point(75, 75); pgbrush.CenterColor = Color.White; pgbrush.SurroundColors = new Color[] { this.ForeColor };根据Clicked状态重新绘制按钮。if (_clicked == false) { g.FillPath(linearBrush, path); g.FillPath(b, innerPath); } else { g.FillPath(linearBrush, path); g.FillPath(pgbrush, innerPath); }请记住正确地释放画笔。
使用代码
构建应用程序后,只需将控件拖放到窗体上即可。按钮是固定大小的,因此它们不可缩放。同样,如果有人想改进这一点,请给我发一份代码的副本。
游戏逻辑
游戏逻辑相当简单,所以在这里我不会写,除了说只生成 1000 个序列。到目前为止,我的最佳得分是 18,所以我认为 1000 是合理的。
玩得开心。
历史
- 2007 年 5 月 11 日 - 发布原始版本