
带 WCF 服务和子窗口作为弹出窗口的 Silverlight 应用程序 - 第一部分
3.67/5 (3投票s)
用于安排会议的 Silverlight 应用程序
引言
在本应用程序中,我创建了一个会议调度程序,用户可以通过它来安排会议并邀请同事参加。该应用程序使用WCF服务来获取和保存记录。我还使用了Silverlight子窗口来获取保存的联系人信息,以便发送电子邮件。子窗口用作调度表单中添加联系人的弹出窗口。这个应用程序对于刚开始学习Silverlight,并且对如何仅通过WCF服务或Web服务与数据库进行交互的基础知识感到困惑的人来说非常有帮助。
开发此应用程序使用的工具和技术
- Visual Studio 2010
- C# 4.0
- Silverlight 4
- SQL Server 2008
- WCF 服务
应用程序分步说明
在Visual Studio 2010中创建一个新的Silverlight应用程序,操作路径为:文件->新建->项目 -> 在“Visual C#”下选择“Silverlight” -> 选择“Silverlight 应用程序”。将其重命名为Meetingschedule,然后点击“确定”。会弹出一个窗口,点击“确定”即可。
在解决方案资源管理器中,您可以看到两个项目:一个是Silverlight项目,另一个是用于托管Silverlight应用程序的Web项目。
现在,我们的主要目的是在Silverlight应用程序的MainPage.xaml中设计表单。下面您可以看到用于表单设计的XAML代码,以及它在浏览器中的显示效果。
<!--<UserControl x:Class="MeetingSchedule.MainPage"
    xmlns="http://schemas.microsoft.com/winfx/2006/xaml/presentation"
    xmlns:x="http://schemas.microsoft.com/winfx/2006/xaml"
    xmlns:d="http://schemas.microsoft.com/expression/blend/2008"
    xmlns:mc="http://schemas.openxmlformats.org/markup-compatibility/2006"
    mc:Ignorable="d" Height="500" Width="450" xmlns:
    sdk=<a href="http://schemas.microsoft.com/winfx/2006/xaml/presentation/sdk">
	http://schemas.microsoft.com/winfx/2006/xaml/presentation/sdk</a>
    xmlns:toolkit=
	<a href="http://schemas.microsoft.com/winfx/2006/xaml/presentation/toolkit">
	http://schemas.microsoft.com/winfx/2006/xaml/presentation/toolkit</a>
    Margin="300,100,0,0">

    <Grid x:Name="LayoutRoot" HorizontalAlignment="Center"
	Background="#9BEFD7C7" OpacityMask="#FF13B9D8">
        <Grid.RowDefinitions>
            <RowDefinition Height="60*" />
            <RowDefinition Height="52*" />
            <RowDefinition Height="50*" />
            <RowDefinition Height="48*" />
            <RowDefinition Height="52*" />
            <RowDefinition Height="52*" />
            <RowDefinition Height="80*" />
            <RowDefinition Height="52*" />
            <RowDefinition Height="54*" />
        </Grid.RowDefinitions>
        <Grid.ColumnDefinitions>
            <ColumnDefinition Width="123*" />
            <ColumnDefinition Width="258*" />
            <ColumnDefinition Width="19*" />
        </Grid.ColumnDefinitions>
        <TextBlock Height="60" HorizontalAlignment="Left"
        Name="textBlock1" Text="Meeting Schedule"
                   VerticalAlignment="Top" Grid.ColumnSpan="2"
                   Width="381" Padding="10" Foreground="#FF087B08"
                   FontFamily="Times New Roman" FontSize="40"
                   TextAlignment="Center" FontWeight="Bold"
                   FontStretch="Condensed" ></TextBlock>
        <TextBlock Grid.Row="1" Height="42" HorizontalAlignment="Right"
        Name="textBlock2" Text="Agenda of Meeting" VerticalAlignment="Top" Width="123"
        Padding="5,10,0,0" Foreground="#FF185218"
	FontSize="11" FontFamily="Arial Black" />
        <TextBox Grid.Column="1" Height="23" Grid.Row="1" HorizontalAlignment="Left"
        Margin="10,10,0,9" Name="txtAgenda" Width="240" />
        <TextBox Height="23" HorizontalAlignment="Left" Margin="10,10,0,0"
        Name="txtLocation" VerticalAlignment="Top" Width="240"
        Grid.Column="1" Grid.Row="2" />
        <TextBlock FontFamily="Arial Black" FontSize="11"
        Foreground="#FF185218" Height="42" HorizontalAlignment="Right"
        Name="textBlock3" Padding="15,10,0,0" Text="Location"
        VerticalAlignment="Top" Width="123" Grid.Row="2" />
        <TextBlock FontFamily="Arial Black" FontSize="11"
        Foreground="#FF185218" Height="42" HorizontalAlignment="Right"
        Name="textBlock4" Padding="15,10,0,0" Text="Start Time"
        VerticalAlignment="Top" Width="123" Grid.Row="3" />
        <TextBlock FontFamily="Arial Black" FontSize="11"
        Foreground="#FF185218" Height="42" HorizontalAlignment="Right"
        Name="textBlock5" Padding="15,10,0,0" Text="End Time"
        VerticalAlignment="Top" Width="123" Grid.Row="4" />
        <TextBlock FontFamily="Arial Black" FontSize="11"
        Foreground="#FF185218" Height="42" HorizontalAlignment="Right"
        Name="textBlock6" Padding="15,10,0,0" Text="Contacts"
        VerticalAlignment="Top" Width="123" Grid.Row="5" />
        <TextBlock FontFamily="Arial Black" FontSize="11"
        Foreground="#FF185218" Height="42" HorizontalAlignment="Right"
        Name="textBlock7" Padding="15,10,0,0" Text="Meeting Details"
        VerticalAlignment="Top" Width="123" Grid.Row="6" />
        <TextBox Height="66" HorizontalAlignment="Left" AcceptsReturn="True"
        Margin="10,6,0,0" Name="txtDetails" VerticalAlignment="Top"
        Width="240" Grid.Column="1" Grid.Row="6" />
        <Button Content="Schedule" Grid.Row="7" Height="30"
        HorizontalAlignment="Left" Margin="12,9,0,0" Name="btSchedule"
        VerticalAlignment="Top" Width="111" Click="btSchedule_Click" />
        <sdk:Label Grid.Column="1" Grid.Row="7" Height="28"
        HorizontalAlignment="Left" Margin="0,11,0,0" Name="lblMessage"
        VerticalAlignment="Top" Width="250" />
        <TextBox Height="52" HorizontalAlignment="Left" AcceptsReturn="True"
        Margin="10,0,0,0" Name="txtContacts" IsReadOnly="True"
        VerticalAlignment="Top" Width="240" Grid.Column="1" Grid.Row="5" />
        <toolkit:BureauBlueTheme Grid.Column="1" Grid.ColumnSpan="2"
        Grid.Row="8" Height="50" HorizontalAlignment="Left" Margin="228,62,0,0"
        Name="bureauBlueTheme1" VerticalAlignment="Top" Width="100" />
        <sdk:DatePicker Grid.Column="1" Grid.Row="3" Height="26"
        HorizontalAlignment="Left" Margin="10,6,0,0" Name="dateStart"
        VerticalAlignment="Top" Width="145" />
        <toolkit:TimePicker Grid.Column="1" Grid.Row="3" Height="22"
        Value="4:00 PM" HorizontalAlignment="Left" Margin="160,6,0,0"
        Name="timeStart" VerticalAlignment="Top" Width="95" Grid.ColumnSpan="2" />
        <sdk:DatePicker Height="26" HorizontalAlignment="Left"
        Margin="10,6,0,0" Name="dateEnd" VerticalAlignment="Top"
        Width="145" Grid.Column="1" Grid.Row="4" />
        <toolkit:TimePicker Height="22" HorizontalAlignment="Left"
        Value="5:00 PM"  Margin="160,10,0,0"  Name="timeEnd"
        VerticalAlignment="Top" Width="95" Grid.Column="1" Grid.Row="4" />
        <Button Content="+" Grid.Column="1" Grid.Row="5"
        HorizontalAlignment="Left" Margin="256,0,0,0" Name="button1"
        Width="34" FontFamily="Arial Black" FontSize="28" Click="button1_Click" />

    </Grid>

</UserControl>

-->


为添加到主页面的联系人添加弹出窗口的子窗口
在Silverlight项目中创建一个新文件夹并命名为view,然后右键单击它 -> 点击“添加” -> “新项” -> 选择“Silverlight 子窗口”并将其重命名为popup,然后点击“添加”。
以下是popup.xaml子窗口的XAML和设计,用于显示数据库中的所有联系人。在此,使用一个具有所有模板列的datagrid来显示所有联系人,并使用一个checkbox(包括表头)来选择应包含在会议中的记录。


会议调度的所有设计已完成。现在我们的下一个任务是从数据库中获取记录并填充子窗口中的datagrid。为此,我们使用了WCF服务,因为Silverlight不支持ADO.NET,所以我们不能直接与数据库进行交互。
使用WCF服务访问数据库并在Silverlight应用程序中调用WCF服务
要为托管Silverlight应用程序的Web项目添加WCF服务,请按照以下步骤操作。
右键单击您给Web项目起的名字(在我的例子中是meetingSchedule.web),然后会弹出一个窗口。在“Visual C#”下选择“Silverlight” -> 选择“启用Silverlight的WCF服务”。然后点击“确定”按钮。此时,您的项目中已添加了一个与Silverlight交互的WCF服务。
您可以在这个Service1.Svc WCF服务中编写方法,用于从Silverlight应用程序保存记录和获取记录。我在其中编写了两个方法:一个用于填充Silverlight子窗口中的datagrid,另一个用于保存主页面用于安排会议的数据,这些数据稍后将用于向所有添加的联系人发送邮件。
以下是WCF服务中用于填充Datagrid的代码。
向WCF服务添加以下命名空间
using System.Data;
using System.Data.SqlClient;
using System.Web.Configuration;
using System.Collections.Generic;
namespace MeetingSchedule.Web
{
    [ServiceContract(Namespace = "")]
    [AspNetCompatibilityRequirements(RequirementsMode =
		AspNetCompatibilityRequirementsMode.Allowed)]
    public class Service1
    {
        [OperationContract]
        public void DoWork()
        {
            // Add your operation implementation here
            return;
        }
        /// <summary>
        /// This class is used as datatype for generic list for
        /// sending the data over the network
        /// </summary>
        [DataContract]
        public class contacts
        {
            [DataMember]
            public string FName { get; set; }
            [DataMember]
            public string LName { get; set; }
            [DataMember]
            public string Address { get; set; }
            [DataMember]
            public string Email { get; set; }
        }

/// <summary>
        /// This Method is used to show all contacts
        /// in the gridview of silverlight popups
        /// </summary>
        /// Created By: Balwant
        /// <returns></returns>
  [OperationContract]
        public List<contacts> fetchContacts()
        {
        List<contacts> allContact= new List<contacts>();
        SqlConnection con = new SqlConnection();
        con.ConnectionString =
	WebConfigurationManager.ConnectionStrings["ConnectionString"].ConnectionString;
        SqlCommand cmd = new SqlCommand();
        cmd.Connection = con;
        cmd.CommandText = "select FirstName,LastName,Address,Email from Contact";
        SqlDataAdapter da = new SqlDataAdapter(cmd);
        DataTable dt = new DataTable();
        da.Fill(dt);
        if (dt.Rows.Count > 0)
        {
            for (int i = 0; i < dt.Rows.Count; i++)
            {
                var contacts = new contacts
                {
                    FName = dt.Rows[i]["FirstName"].ToString(),
                    LName = dt.Rows[i]["LastName"].ToString(),
                    Address = dt.Rows[i]["Address"].ToString(),
                    Email = dt.Rows[i]["Email"].ToString()
                };
                allContact.Add(contacts);
            }
        }

       return allContact;
}
以下是使用WCF服务从Silverlight保存会议调度数据到数据库的代码
[OperationContract]
        public string saveSchedule(string agenda, string location,
	DateTime StartTime, DateTime EndTime, string contacts, string details)
        {
            SqlConnection con = new SqlConnection();
            con.ConnectionString = WebConfigurationManager.ConnectionStrings
				["ConnectionString"].ConnectionString;
            SqlCommand cmd = new SqlCommand();
            con.Open();
            cmd.Connection = con;
            cmd.CommandText = "insert into Meeting values
		(@Title,@Location,@StartTime,@EndTime,@Contact,@Details,@CreatedDate)";
            cmd.Parameters.AddWithValue("@Title", agenda);
            cmd.Parameters.AddWithValue("@Location", location);
            cmd.Parameters.AddWithValue("@StartTime", StartTime);
            cmd.Parameters.AddWithValue("@EndTime", EndTime);
            cmd.Parameters.AddWithValue("@Contact", contacts);
            cmd.Parameters.AddWithValue("@Details", details);
            cmd.Parameters.AddWithValue("@CreatedDate", System.DateTime.Now);
            cmd.ExecuteNonQuery();
            return "Record is saved successfully,
		Thanks for submitting schedule for meeting.";
        }
如何在我们的Silverlight应用程序中调用此WCF服务
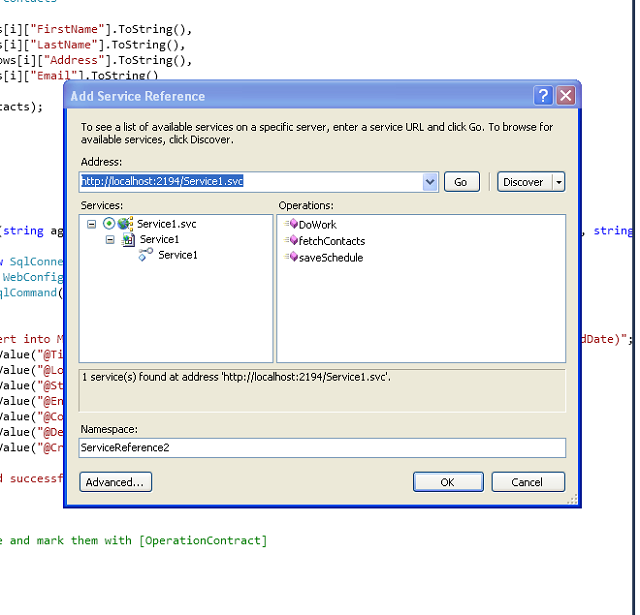
添加服务引用:右键单击Silverlight项目,然后点击“添加服务引用” -> 点击“发现”,这将发现所有WCF服务。请看下面
在我们向项目中添加WCF服务后,我们在Silverlight项目中将可以使用我们创建的所有方法。
在我们的Silverlight项目中调用WCF服务方法
为了在子窗口的datagrid中显示记录,我们在*.CS*页面中使用fetchContacts()方法的结果。以下是相关代码
use this namespace to access WCF service
using MeetingSchedule.ServiceReference1;
 public Popup()
        {
            InitializeComponent();
            ServiceReference1.Service1Client newclient =
			new ServiceReference1.Service1Client();
            newclient.fetchContactsCompleted +=
		new EventHandler<fetchcontactscompletedeventargs>
			(newclient_fetchContactsCompleted);
            newclient.fetchContactsAsync();
          //  this.Closed += new EventHandler(Popup_Closed);
        }
void newclient_fetchContactsCompleted(object sender, fetchContactsCompletedEventArgs e)
        {

            //throw new NotImplementedException();
            dataGrid1.ItemsSource = e.Result;
        }
现在,Datagrid已经通过WCF服务方法填充了来自数据库的数据。
点击按钮显示弹出窗口
主页面CS文件中的相关代码如下:
 private void button1_Click(object sender, RoutedEventArgs e)
        {
          Popup  myPopUp = new Popup();
           myPopUp.Show();
            //myPopUp.Closed += new EventHandler(myPopUp_Closed);

        }
结论
在本文中,我解释了如何使用WCF服务从数据库获取记录,并在datagrid和popup childwindow中显示数据,以及如何从主页面进行操作。
此应用程序尚未完成,但这构成了该应用程序的基础。第二部分将解释如何将子窗口中勾选的联系人添加到主页面,如何保存我自己的页面数据,以及如何向所有选定的联系人发送邮件。这将在下一篇文章中介绍。

感谢,并在几天内阅读本文的下一部分。我正在整理第二部分。
历史
- 2011年5月10日:初始版本