
使用 Microsoft Expression Blend 4.0 实现 MVVM
4.33/5 (3投票s)
如何使用 Microsoft Expression Blend 4.0 行为来实现 MVVM
引言
严格在 Silverlight 中实现 MVVM 有很多痛点。 其中一些是
- 处理 Silverlight 控件中的事件,例如
Loaded,MouseRightButtonDown,KeyDown等。 - 处理在 ChildWindow 或
Popup内部的事件和属性。 - 关闭 ChildWindow。
创建此项目的目的是为了使用以下 Microsoft Blend 4.0 行为来缓解使用 Silverlight 实现 MVVM 的许多痛点。
- InvokeCommandAction。
InvokeCommandAction操作指定包含要调用的命令的目标对象。(来源:Microsoft) - CallMethodAction。 您可以使用
CallMethodAction操作来调用为指定对象定义的方法。 要调用的方法必须是一个public方法,该方法不带任何参数,也不返回值,或者是一个其签名与事件处理程序的签名匹配的public方法。(来源:Microsoft) - ChangePropertyAction。 您可以使用
ChangePropertyAction行为轻松地更改或增加对象的属性,然后(可选)定义一个过渡。 默认情况下,过渡是瞬时的。
设置表单
- 在 Microsoft Blend 中创建一个名为
MVVMWithBlend的新的 Silverlight 应用程序 + 网站。 - 添加一个名为 childWindow1.xaml 的新的 ChildWindow。 单击 项目 选项卡,然后右键单击名为
MVVMWithBlend的项目文件。 单击 添加新项目... 并选择ChildWindow。 在名称中键入 ChildWindow1.xaml,然后单击“确定”。 这将创建一个ChildWindow控件。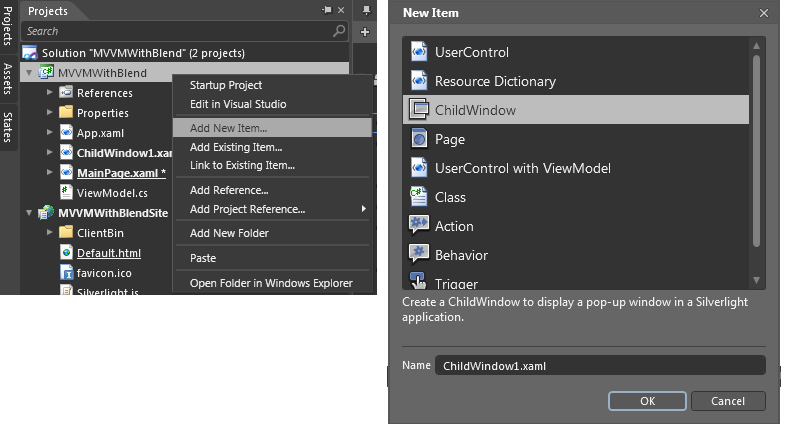
- 返回到 MainPage.xaml 并添加以下控件,如下所示
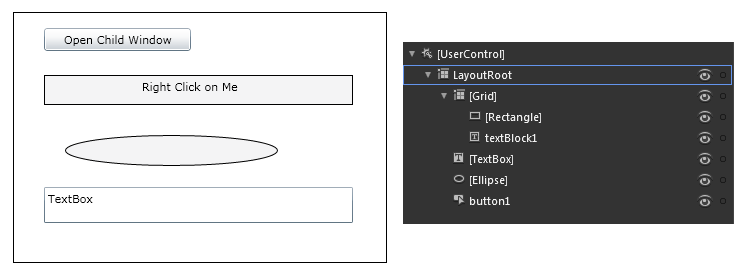
注意:您可以将以下代码粘贴在下面的 粗体 中以方便使用
<Grid x:Name="LayoutRoot" Background="White">
  <Grid Height="30" Margin="128,139,203,0" VerticalAlignment="Top">
     <Rectangle Fill="#FFF4F4F5" Stroke="Black"/>
     <TextBlock HorizontalAlignment="Left" Margin="98,4,0,3"
	x:Name="textBlock1" Text="Right Click on Me" />
  </Grid>
  <TextBox Height="36" Margin="128,0,203,193" TextWrapping="Wrap"
	Text="TextBox" VerticalAlignment="Bottom"/>
  <Ellipse Fill="#FFF4F4F5" Height="31" Margin="149,199,278,0"
	Stroke="Black" VerticalAlignment="Top"/>
  <Button Content="Open Child Window" Height="23"
	HorizontalAlignment="Left" Margin="128,92,0,0" x:Name="button1"
	VerticalAlignment="Top" Width="147" />
</Grid>
设置行为
- 单击“Assets > 行为”,并将 InvokeCommandAction 添加到控件,如下所示

- 在
Grid上设置以下InvokeCommandAction属性- Command 属性 = "
TextInputUpdateCommand" - EventName = "
MouseRightButtonDown"
- Command 属性 = "
- 在
TextBox上设置以下InvokeCommandAction属性- Command 属性 = "
TextInputUpdateCommand" - EventName = "
KeyDown"
- Command 属性 = "
- 在
Ellipse上设置以下InvokeCommandAction属性- Command 属性 = "
LoadedCommand" - EventName = "
Loaded"
- Command 属性 = "
注意:您可以将以下代码粘贴在下面的粗体中以方便使用
<Grid x:Name="LayoutRoot" Background="White"> <Grid Height="30" Margin="128,139,203,0" VerticalAlignment="Top"> <i:Interaction.Triggers> <i:EventTrigger EventName="MouseRightButtonDown"> <i:InvokeCommandAction Command="{Binding TextInputUpdateCommand}"/> </i:EventTrigger> </i:Interaction.Triggers> <Rectangle Fill="#FFF4F4F5" Stroke="Black"/> <TextBlock HorizontalAlignment="Left" Margin="98,4,0,3" x:Name="textBlock1" Text="Right Click on Me" /> </Grid> <TextBox Height="36" Margin="128,0,203,193" TextWrapping="Wrap" Text="TextBox" VerticalAlignment="Bottom"> <i:Interaction.Triggers> <i:EventTrigger EventName="KeyDown"> <i:InvokeCommandAction Command="{Binding TextInputUpdateCommand}"/> </i:EventTrigger> </i:Interaction.Triggers> </TextBox> <Ellipse Fill="#FFF4F4F5" Height="31" Margin="149,199,278,0" Stroke="Black" VerticalAlignment="Top"> <i:Interaction.Triggers> <i:EventTrigger> <i:InvokeCommandAction Command="{Binding LoadedCommand}"/> </i:EventTrigger> </i:Interaction.Triggers> </Ellipse> <Button Content="Open Child Window" Command="{Binding PopupVM}" Height="23" HorizontalAlignment="Left" Margin="128,92,0,0" x:Name="button1" VerticalAlignment="Top" Width="147" /> </Grid> - 在
- 打开 ChildWindow1.xaml 并将以下代码替换为 粗体 中的代码,如下所示
<controls:ChildWindow xmlns="http://schemas.microsoft.com/winfx/2006/xaml/presentation" xmlns:x="http://schemas.microsoft.com/winfx/2006/xaml" xmlns:controls="clr-namespace:System.Windows.Controls; assembly=System.Windows.Controls" xmlns:i=http://schemas.microsoft.com/expression/2010/interactivity xmlns:ei="http://schemas.microsoft.com/expression/2010/interactions" xmlns:d="http://schemas.microsoft.com/expression/blend/2008" xmlns:mc="http://schemas.openxmlformats.org/markup-compatibility/2006" mc:Ignorable="d" x:Name="childWindow" x:Class="MVVMWithBlend.ChildWindow1" Width="400" Height="296" Title="ChildWindow1"> <Grid x:Name="LayoutRoot" Margin="2,0,2,-35"> <Grid.RowDefinitions> <RowDefinition /> <RowDefinition Height="Auto" MinHeight="31" /> </Grid.RowDefinitions> <Button x:Name="CancelButton" Content="Cancel" Width="75" Height="23" HorizontalAlignment="Right" VerticalAlignment="Bottom" d:LayoutOverrides="Height" Margin="0,0,0,4" /> <Button x:Name="OKButton" Content="OK" Width="75" Height="23" HorizontalAlignment="Left" Margin="224,0,0,4" VerticalAlignment="Bottom" d:LayoutOverrides="Height"/> </Grid> </controls:ChildWindow> - 删除 ChildWindow1.xaml.cs 中的以下代码
private void OKButton_Click(object sender, RoutedEventArgs e) { this.DialogResult = true; } private void CancelButton_Click(object sender, RoutedEventArgs e) { this.DialogResult = false; } - 单击“Assets > 行为”,并将 CallMethodAction 和 ChangePropertyAction 添加到“确定”和“取消”按钮,如下所示

- 在
CancelButton中设置以下CallMethodAction属性EventName= "Click"TargetObject= "System.Windows.Controls.ChildWindow" (使用 Artboard 元素拾取器并单击 Child Window)MethodName= "Close"
- 在
CancelButton中设置以下ChangePropertyAction属性EventName= "Click"TargetObject= "System.Windows.Controls.ChildWindow" (使用Artboard元素拾取器并单击 Child Window)PropertyName= "DialogResult"Value=checkmark
- 在
OKButton中设置以下CallMethodAction属性EventName= "Click"TargetObject= "System.Windows.Controls.ChildWindow" (使用Artboard元素拾取器并单击 Child Window)MethodName= "Close"
- 在
OKButton中设置以下ChangePropertyAction属性EventName= "Click"TargetObject= "System.Windows.Controls.ChildWindow" (使用Artboard元素拾取器并单击 Child Window)PropertyName= "DialogResult"Value=checkmark
注意:您也可以复制并粘贴以下代码以方便使用
<controls:ChildWindow xmlns="http://schemas.microsoft.com/winfx/2006/xaml/presentation" xmlns:x="http://schemas.microsoft.com/winfx/2006/xaml" xmlns:controls="clr-namespace:System.Windows.Controls; assembly=System.Windows.Controls" xmlns:i="http://schemas.microsoft.com/expression/2010/interactivity" xmlns:ei="http://schemas.microsoft.com/expression/2010/interactions" x:Name="childWindow" x:Class="MVVMWithBlend.ChildWindow1" Width="400" Height="300" Title="ChildWindow1"> <Grid x:Name="LayoutRoot" Margin="2"> <Grid.RowDefinitions> <RowDefinition /> <RowDefinition Height="Auto" /> </Grid.RowDefinitions> <Button x:Name="CancelButton" Command="{Binding CancelCommand}" Content="Cancel" Width="75" Height="23" HorizontalAlignment="Right" Margin="0,12,0,0" Grid.Row="1" > <i:Interaction.Triggers> <i:EventTrigger EventName="Click"> <ei:CallMethodAction MethodName="Close" TargetObject="{Binding ElementName=childWindow}" /> <ei:ChangePropertyAction TargetObject="{Binding ElementName=childWindow}" PropertyName="DialogResult" Value="True"/> </i:EventTrigger> </i:Interaction.Triggers> </Button> <Button x:Name="OKButton" Command="{Binding OKCommand}" Content="OK" Width="75" Height="23" HorizontalAlignment="Left" Margin="224,12,0,0" Grid.Row="1"> <i:Interaction.Triggers> <i:EventTrigger EventName="Click"> <ei:CallMethodAction MethodName="Close" TargetObject="{Binding ElementName=childWindow}" /> <ei:ChangePropertyAction TargetObject="{Binding ElementName=childWindow}" PropertyName="DialogResult" Value="True"/> </i:EventTrigger> </i:Interaction.Triggers> </Button> </Grid> </controls:ChildWindow> - 在
设置 ViewModel
添加一个名为 ViewModel.cs 的新类。 单击 项目 选项卡,然后右键单击名为 MVVMWithBlend 的项目文件。 单击 添加新项目... 并选择 Class。 在名称中键入 ViewModel,然后单击“确定”。
using System;
using System.Net;
using System.Windows;
using System.Windows.Controls;
using System.Windows.Documents;
using System.Windows.Ink;
using System.Windows.Input;
using System.Windows.Media;
using System.Windows.Media.Animation;
using System.Windows.Shapes;
namespace MVVMWithBlend
{
    public class ViewModel
    {
        #region ICommands

        public ICommand TextInputUpdateCommand
        {
            get
            {
                return new InvokeTextUpdateCommand();
            }
        }

        /// <summary>
        /// Gets the loaded Event.
        /// </summary>
        /// <value>The loaded command.</value>
        public ICommand LoadedCommand
        {
            get
            {
                return new InvokeLoadedCommand();
            }
        }

        /// <summary>
        /// Gets the popup.
        /// </summary>
        /// <value>The popup VM.</value>
        public ICommand PopupVM
        {
            get
            {
                return new InvokeChildCommand();
            }
        }

        #endregion

        #region Classes

        public class InvokeTextUpdateCommand : ICommand
        {
            public bool CanExecute(object parameter)
            {
                if (parameter != null)
                {
                    CanExecuteChanged.Invoke(parameter, new EventArgs());
                }
                return true;
            }

            public event EventHandler CanExecuteChanged;

            public void Execute(object parameter)
            {
                MessageBox.Show("Text is Updated");
            }
        }

        public class InvokeLoadedCommand : ICommand
        {
            public bool CanExecute(object parameter)
            {
                if (parameter != null)
                {
                    CanExecuteChanged.Invoke(parameter, new EventArgs());
                }
            return true;
            }

            public event EventHandler CanExecuteChanged;

            public void Execute(object parameter)
            {
                MessageBox.Show("Loaded Event is Triggered");
            }
        }

        public class InvokeChildCommand : ICommand
        {
            public bool CanExecute(object parameter)
            {
                if (parameter != null)
                {
                    CanExecuteChanged.Invoke(parameter, new EventArgs());
                }
                return true;
            }

            public event EventHandler CanExecuteChanged;

            public void Execute(object parameter)
            {
                //Push the ViewModel into the Popup
                ChildWindow1 child = new ChildWindow1();
                ViewModelPopup pop = new ViewModelPopup();
                child.DataContext = pop;
                child.Show();
            }
        }

        /// <summary>
        /// View Model of Child Window
        /// </summary>
        public class ViewModelPopup
        {
            public ICommand OKCommand
            {
                get
                {
                    DialogResult = true;
                    return new InvokeOkCommand();
                }
            }

            public ICommand CancelCommand
            {
                get
                {
                    DialogResult = false;
                    return new InvokeCancelCommand();
                }
            }

            public class InvokeOkCommand : ICommand
            {
                public bool CanExecute(object parameter)
                {
                    if (parameter != null)
                    {
                        CanExecuteChanged.Invoke(parameter, new EventArgs());
                    }
                    return true;
                }

                public event EventHandler CanExecuteChanged;

                public void Execute(object parameter)
                {
                    MessageBox.Show("Ok is Clicked");
                }
            }

            public class InvokeCancelCommand : ICommand
            {
                public bool CanExecute(object parameter)
                {
                    if (parameter != null)
                    {
                        CanExecuteChanged.Invoke(parameter, new EventArgs());
                    }
                    return true;
                }

                public event EventHandler CanExecuteChanged;

                public void Execute(object parameter)
                {
                    MessageBox.Show("Cancel is Clicked");
                }
            }
        }
        #endregion
    }
}
历史
- 2011 年 6 月 1 日:初稿
- 2011 年 6 月 2 日:调整行并更正复制和粘贴错误