Firefox 插件的 OpenGL 示例
4.82/5 (17投票s)
2007 年 9 月 13 日
2分钟阅读
125881
2279
关于 Firefox 插件如何进行 OpenGL 渲染的教程

引言
本文档解释了如何在 Firefox 插件中渲染 OpenGL。 我不知道它是否有用。 我只是为了好玩才做的!
背景
我试图使用 OpenGL 作为 Firefox 插件来渲染一个 X3D 文件。我知道有很多这样的 X3D 文件查看器,但我的目标是处理触觉场……好吧,这个示例只是一个副产品。
代码探索
首先需要下载 Gecko 插件 API 和 Firefox 源代码。 下载 Gecko SDK 并将其解压到 \yourroot\gecko-sdk\。
从 这里 下载 Firefox 源代码,并将其解压到 \yourroot\mozilla。
然后我们从一个基本的插件示例开始。转到文件夹:yourroot\mozilla\modules\plugin\tools\sdk\samples\basic\windows.
这里有一个小技巧,我们需要在 npbasic.dsp 和 npbasic.dsw 文件上运行 unix2dos。 然后我们使用 Visual C++ Express 打开并构建项目,现在应该可以成功了。 在项目属性中,将附加包含目录更改为 yourroot\gecko-sdk\include;yourroot\mozilla\modules\plugin\tools\sdk\samples\include。 尝试构建,如果成功,我们继续...
打开 plugin.cpp,然后
#include "plugin.h"
加法
#include <gl/gl.h>
在以下行之后
static WNDPROC lpOldProc = NULL;
添加两个函数 EnableOpenGL 和 DisableOpenGL
void EnableOpenGL(HWND hWnd, HDC * hDC, HGLRC * hRC);
void DisableOpenGL(HWND hWnd, HDC hDC, HGLRC hRC);
添加 EnableOpenGL 和 SetTimer 如下所示
NPBool nsPluginInstance::init(NPWindow* aWindow)
{
.................

    //we add EnableOpenGL and SetTimer

    EnableOpenGL( mhWnd, &hDC, &hRC );
        SetTimer(mhWnd, 0,  1,  (TIMERPROC) NULL); // no timer callback

............
}
然后,添加 DisableOpenGL 如下所示
void nsPluginInstance::shut()
{
    // subclass it back


    // We add DisableOpenGL


    DisableOpenGL( mhWnd, hDC, hRC );
.... }
之后,在 PluginWinProc 中,我们需要像以下这样处理 WM_TIMER 消息
case WM_TIMER:
    theta += 1.0f;
    PostMessage( hWnd, WM_PAINT, NULL, NULL );
    break;
最后,在 WM_PAINT 的情况下进行 OpenGL 渲染,删除该情况下的原始代码,并将其替换为我们的代码,如下所示
glClearColor( 0.0f, 0.0f, 0.0f, 0.0f );
glClear( GL_COLOR_BUFFER_BIT );
glPushMatrix();
glRotatef( theta, 0.0f, 0.0f, 1.0f );
glBegin( GL_TRIANGLES );
   glColor3f( 1.0f, 0.0f, 0.0f );
   glVertex2f( 0.0f, 1.0f );
   glColor3f( 0.0f, 1.0f, 0.0f );
   glVertex2f( 0.87f, -0.5f );
   glColor3f( 0.0f, 0.0f, 1.0f );
   glVertex2f( -0.87f, -0.5f );
glEnd();
glPopMatrix();
SwapBuffers( hDC );
差不多完成了,但不要忘记定义 EnableOpenGL 和 DisableOpenGL
void EnableOpenGL(HWND hWnd, HDC * hDC, HGLRC * hRC)
{
    PIXELFORMATDESCRIPTOR pfd;
    int format;
    // get the device context (DC)

    *hDC = GetDC( hWnd ); // set the pixel format for the DC

    ZeroMemory( &pfd, sizeof( pfd ) );
    pfd.nSize = sizeof( pfd );
    pfd.nVersion = 1;
    pfd.dwFlags = PFD_DRAW_TO_WINDOW | PFD_SUPPORT_OPENGL |
                           PFD_DOUBLEBUFFER;
    pfd.iPixelType = PFD_TYPE_RGBA;
    pfd.cColorBits = 24;
    pfd.cDepthBits = 16;
    pfd.iLayerType = PFD_MAIN_PLANE;
    format = ChoosePixelFormat( *hDC, &pfd );
    SetPixelFormat( *hDC, format, &pfd );
    // create and enable the render context (RC)

    *hRC = wglCreateContext( *hDC );
    wglMakeCurrent( *hDC, *hRC );
}

// Disable OpenGL

void DisableOpenGL(HWND hWnd, HDC hDC, HGLRC hRC)
{
    wglMakeCurrent( NULL, NULL );
    wglDeleteContext( hRC );
    ReleaseDC( hWnd, hDC );
}
完成了!
构建项目
无需多言,只需 ![]()
测试插件
将 npbasic.dll 复制到 C:\Program Files\Mozilla Firefox\plugins\ 或 yourfolder\Mozilla Firefox\plugins\。
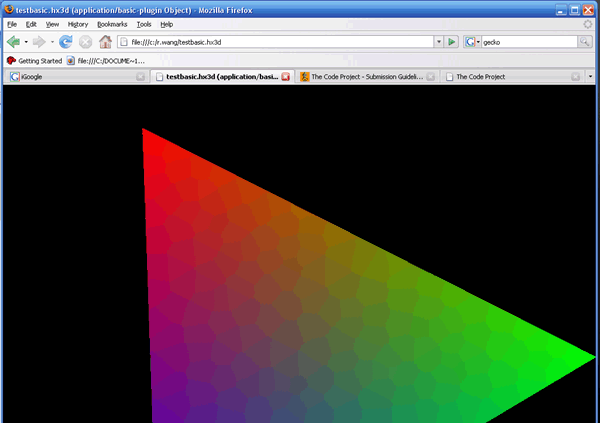
在文件夹 yourroot\mozilla\modules\plugin\tools\sdk\samples\basic\ 中,您将找到 test.html,双击它,您将看到一个旋转的三角形,色彩缤纷...
另一种测试插件的方法
如果打开一个插件已注册的文件类型,则会触发该插件。 使用文本编辑器打开 basic.rc,找到字符串 "FileExtents" 并更改其值为您想要的任何值。 我将其更改为 hx3d。 接下来,创建一个扩展名为 .hx3d 的空文件,我在我的文件夹下创建了 testbasic.hx3d。 在 Firefox URL 框中,键入 c:\r.wang\testbasic.hx3d,您也会看到插件三角形。
现在... 享受吧!
