
将图像绘制为 3D 曲面
4.88/5 (40投票s)
介绍了使用 OpenGL 将图像绘制为 3D 曲面图的代码。
引言
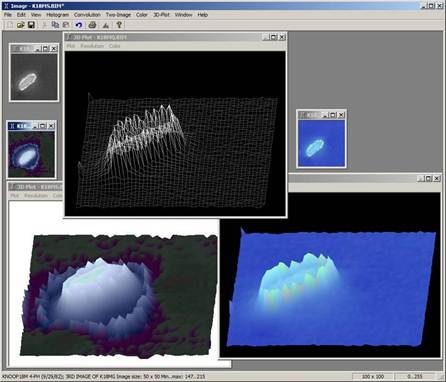
图像处理功能通常涉及像素和颜色的操作,并以典型的二维方式显示图像。对于科学应用,有时通过将图像绘制为 3D 曲面可以获得对图像特征更深入的洞察。本文将介绍为图像处理应用程序开发的、使用 OpenGL 在对话框窗口中绘制图像为 3D 曲面的代码,并支持交互式旋转和缩放。
背景
该图像处理应用程序构建为 MFC 多文档界面,并使用 Microsoft ATL 的 CImage 类,因为它已经内置了打开和保存最流行格式图像的功能。标准的 CImage 成员函数 CImage::Load 将图像文件读取为自底向上的 DIB。然而,这在访问像素时可能不方便,因此图像被重新格式化为自顶向下的 DIB 和 32 位(因为大多数显示适配器现在都是真彩色),以标准化像素处理。请参阅 Convert32Bit 代码。
//-----------------------------------------------------------------------
// This function converts 8, 24, & 32 bit DIBs to 32 bit top-down.
//-----------------------------------------------------------------------
void CImagrDoc::Convert32Bit()
{
    if (m_image.GetBPP() < 8) return;

    byte *t, r, g, b;
    int *p, *q, *buf;
    unsigned long i, j, nx, ny;
    RGBQUAD *pRGB = new RGBQUAD[256];   // For GetDIBColorTable()

    nx = m_image.GetWidth();
    ny = m_image.GetHeight();
    unsigned long n = nx * ny;   // No. of pixels

    // Allocate n sized buffer for temp storage
    if (!(buf = (int *)malloc(n * sizeof(int)))) {
       fMessageBox("Error - " __FUNCTION__, MB_ICONERROR,
                    "malloc() error for size: %d", n);
       return;
    }

    BeginWaitCursor();
    switch (m_image.GetBPP()) {
       case 8:
           if (!(i = GetDIBColorTable(m_image.GetDC(), 0, 256, pRGB))) {
               fMessageBox("Error - " __FUNCTION__, MB_ICONERROR,
                          "GetDIBColorTable() error");
               m_image.ReleaseDC();
               goto End;
           }
           //ATLTRACE2("*"__FUNCTION__" GetDIBColorTable(): %d\n", i);
           m_image.ReleaseDC();

           for (j = 0, q = buf; j < ny; j++) {
               t = (byte *) m_image.GetPixelAddress(0, j);
               for (i = 0; i < nx; i++, t++, q++) {
                  r = pRGB[*t].rgbRed;
                  g = pRGB[*t].rgbGreen;
                  b = pRGB[*t].rgbBlue;
                  *q = RGB(b, g, r);    // CImage is BGR
               }
           }
           break;
       case 24:
           for (j = 0, q = buf; j < ny; j++) {
               // Addr. next row (avoids 24 bit offset bottom-up calc.)
               t = (byte *) m_image.GetPixelAddress(0, j);
               for (i = 0; i < nx; i++, t++, q++) {
                  b = *t;        // CImage is BGR
                  g = *(++t);
                  r = *(++t);
                  *q = RGB(b, g, r);
               }
           }
           break;
       case 32:   // Just need to make top-down
           for (j = 0, q = buf; j < ny; j++) {
               // Addr. next row (avoids bottom-up calc.)
               p = (int *) m_image.GetPixelAddress(0, j);
               for (i = 0; i < nx; i++, p++, q++) {
                  *q = *p;
               }
           }
           break;
    }

    // Start a new CImage
    m_image.Destroy();
    if (!m_image.Create(nx, -(int)ny, 32, 0)) {
       fMessageBox("Error - " __FUNCTION__, MB_ICONERROR,
 "Failed bitmap .Create()");
       goto End;
    }
    p = (int *) m_image.GetBits();   // Ptr to new bitmap (top-down DIB)
    memcpy_s(p, n * sizeof(int), buf, n * sizeof(int)); // Copy buf to bitmap
    m_image.ptype = cRGB;        // Update pixel type

End:
    EndWaitCursor();
    free(buf);
}
一旦进入自顶向下模式,像素操作就变得简单得多。可以使用 CImage::GetBits() 返回指向第一个像素(左上角像素)的指针,然后可以通过在单个 for 循环中简单地递增指针来访问后续像素。
Pierre Alliez 的代码在如何为 OpenGL 对话框窗口设置设备上下文和像素格式方面非常有帮助(请参阅 www.codeproject.com/KB/openGL/wrl_viewer.aspx)。需要四个函数调用来建立设备上下文
GetSafeHwnd()获取窗口句柄GetDC(hWnd)获取hDCSetWindowPixelFormat(hDC)设置像素格式,以及wglCreateContext(hDC)创建 OpenGL 设备上下文
有关详细信息,请参阅 OnInitDialog() 和 SetWindowPixelFormat() 代码。
Using the Code
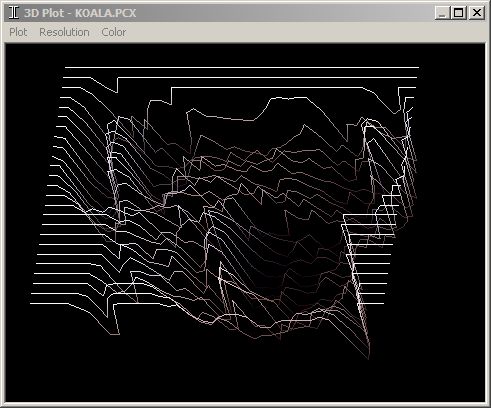
该应用程序通过选择的菜单项,以三种 OpenGL 绘图模式绘制 3D 图像
GL_LINE_STRIP(像素行绘制为线条)GL_QUADS(四边形),以及GL_TRIANGLES(三角形)
图像基底绘制在 x-z 平面上,像素值在 y 轴上显示为山丘或山谷。像素位置由行和列索引数组指定。由于每个像素都有红、绿、蓝 (RGB) 分量,因此需要将它们映射成一个单一的 y 值进行绘制。这通过使用灰度转换计算来完成,如下所示(但也可以通过简单计算三个 RGB 值的平均值来完成)。
y = RED(*p)*0.299 +
GRN(*p)*0.587 + BLU(*p)*0.114
RED、GRN 和 BLU 是宏,用于从 p 指向的 32 位整数像素值中分离出颜色分量。(**注意**:由于 CImage 类存储蓝色和红色位的方式,标准的宏 GetRValue 和 GetBValue 分别不会返回红色和蓝色分量,而是返回蓝色和红色;即 RED = GetBValue,BLU = GetRValue,GRN = GetGValue。)
在调用 glVertex3i 之前,像素值通过一个称为 NINT 的宏转换为最接近的整数(此处的负像素值已考虑在内,适用于某些成像应用)。
#define NINT(f)
((f >= 0) ? (int)(f + .5) : (int)(f - .5))
高分辨率图像,例如大于 1k 像素的正方形,可能会因为绘制的线条过多(取决于显示分辨率和窗口大小)而显得过于混乱。变量 m_Res 用于通过简单地跳过行和列中的像素来降低绘制分辨率。可以使用插值,但此方法更快,并且效果可接受。变量 m_Res 是跳过的行和列的计数器,因此随着它的增加,绘制分辨率降低。菜单选项通过将 m_Res 加倍或减半来处理(即,值通常以 1、2、4、8... 递增),因为这已被证明在快速减少线条方面效果可接受。


通过在 glBegin-glEnd 块中调用 glVertex3i 来完成绘制。GL_LINE_STRIP 模式将一行中的每个像素绘制为连接的线段。GL_QUADS 模式绘制四个像素(当前像素 (i, j)、其右侧的像素 (i+1, j)、其下方一行的像素 (i, j+1) 以及该像素右侧的像素 (i+1, j+1)),因此每个循环调用四次 glVertex3i。(**注意**:为方便阅读,此处使用了 +1,但代码实际上使用 + m_Res,如上所述)。GL_TRIANGLES 模式每个循环也需要相同的四个像素,但由于多边形的绘制和连接方式,需要六次调用 glVertex3i(绘制两组三边形)。请参阅 OnPaint() 代码。


void CPlotimDialog::OnPaint()
{
    CDialog::OnPaint();   			// Base class

    if (!m_pDoc) {
fMessageBox("Error - " __FUNCTION__, MB_ICONERROR, "Invalid document pointer");
       return;
    }

    HWND hWnd = GetSafeHwnd();
    HDC hDC = ::GetDC(hWnd);
    wglMakeCurrent(hDC, m_hGLContext);  	// Select as the rendering context

    CMyImage *image = &m_pDoc->m_image;
    int *p = (int *) image->GetBits();  	// Ptr to bitmap
    unsigned long nx = m_pDoc->GetImageCSize().cx;
    unsigned long ny = m_pDoc->GetImageCSize().cy;
    int r, r2, r3, r4, *q;
    unsigned long i, j;
    int min, max;
    GLfloat xscale, yscale, zscale;

    m_pDoc->GetImageMinMax(&min, &max);
    xscale = m_Scale/(GLfloat)nx;       	// Size may have changed
    zscale = m_Scale/(GLfloat)ny;
    yscale = m_Scale/((GLfloat)(max - min)*(GLfloat)2.); // Normalize

    if (m_New) {   // Begin with a nice rotated view
       glClearColor(m_Bkcolor, m_Bkcolor, m_Bkcolor, 0.0); // Set def. background
       glRotatef(m_xRotation, 0.0, 1.0, 0.0);  	// About y-axis
       glRotatef(m_yRotation, 1.0, 0.0, 0.0);  	// About x-axis
    }
    glClear(GL_COLOR_BUFFER_BIT | GL_DEPTH_BUFFER_BIT);
    glPolygonMode(GL_FRONT_AND_BACK, m_Fill);

    glPushMatrix();
    glEnable(GL_DEPTH_TEST); /* Enable hidden-surface-removal */

    glTranslatef(-((GLfloat)nx/(GLfloat)2.) * xscale,
                -((GLfloat)(max + min)/(GLfloat)2.) * yscale,
                 ((GLfloat)ny/(GLfloat)2.) * zscale);
    glScalef(xscale, yscale, zscale);

    //(Add if needed) BeginWaitCursor();
    switch (m_DrawMode) {
       case GL_LINE_STRIP:
           for (j = 0; j < ny; j += m_Res) {
               p = (int *)image->GetPixelAddress(0, j); // Inc. addr. for m_Res
               glBegin(m_DrawMode);
              for (i = 0; i < nx; i += m_Res, p += m_Res) {
                  //r = NINT((RED(*p) + GRN(*p) + BLU(*p))/3.);
                  //(Not much diff.)
                  r = NINT(RED(*p)*0.299 + GRN(*p)*0.587 + BLU(*p)*0.114);
                  MapColor(p);
                  glVertex3i(i, r, -(signed)j);
               }
               glEnd();
           }
           break;
       case GL_QUADS:
           glBegin(m_DrawMode);
           for (j = 0; j < ny; j += m_Res) {
               p = (int *)image->GetPixelAddress(0, j);
               for (i = 0; i < nx; i += m_Res, p += m_Res) {
                  r = NINT(RED(*p)*0.299 + GRN(*p)*0.587 + BLU(*p)*0.114);
                  if (i + m_Res < nx) {
                      r2 = NINT(RED(*(p+m_Res))*0.299
                             + GRN(*(p+m_Res))*0.587
                             + BLU(*(p+m_Res))*0.114);
                  }
                  else break;

                  if (j + m_Res < ny) {
                      q = p + nx*m_Res;
                      r3 = NINT(RED(*q)*0.299
                             + GRN(*q)*0.587
                             + BLU(*q)*0.114);
                      r4 = NINT(RED(*(q+m_Res))*0.299
                             + GRN(*(q+m_Res))*0.587
                             + BLU(*(q+m_Res))*0.114);
                  }
                  else break;

                  MapColor(p);
                  glVertex3i(i, r, -(signed)j);
                  MapColor(p+m_Res);
                  glVertex3i(i + m_Res, r2, -(signed)j);
                  MapColor(q+m_Res);
                  glVertex3i(i + m_Res, r4, -(signed)(j + m_Res));
                  MapColor(q);
                  glVertex3i(i, r3, -(signed)(j + m_Res));
               }
           }
           glEnd();
           break;
       case GL_TRIANGLES:
           glBegin(m_DrawMode);
           for (j = 0; j < ny; j += m_Res) {
               p = (int *)image->GetPixelAddress(0, j);
               for (i = 0; i < nx; i += m_Res, p += m_Res) {
                  r = NINT(RED(*p)*0.299 + GRN(*p)*0.587 + BLU(*p)*0.114);
                  if (i + m_Res < nx) {
                      r2 = NINT(RED(*(p+m_Res))*0.299
                             + GRN(*(p+m_Res))*0.587
                             + BLU(*(p+m_Res))*0.114);
                  }
                  else break;

                  if (j + m_Res < ny) {
                      q = p + nx*m_Res;
                      r3 = NINT(RED(*q)*0.299
                             + GRN(*q)*0.587
                             + BLU(*q)*0.114);
                      r4 = NINT(RED(*(q+m_Res))*0.299
                             + GRN(*(q+m_Res))*0.587
                             + BLU(*(q+m_Res))*0.114);
                  }
                  else break;

                  MapColor(p);
                  glVertex3i(i, r, -(signed)j);
                  MapColor(p+m_Res);
                  glVertex3i(i + m_Res, r2, -(signed)j);
                   MapColor(q);
                  glVertex3i(i, r3, -(signed)(j + m_Res));

                  MapColor(p+m_Res);
                  glVertex3i(i + m_Res, r2, -(signed)j);
                  MapColor(q);
                  glVertex3i(i, r3, -(signed)(j + m_Res));
                  MapColor(q+m_Res);
                  glVertex3i(i + m_Res, r4, -(signed)(j + m_Res));
               }
           }
           glEnd();
           break;
    }
    glPopMatrix();
    glFlush();
    SwapBuffers(hDC);

    if (m_New) {
       TextOut(0, 0, RGB(200,0,0), "Left click+drag to rotate view, "
                                 "right click+drag to zoom");
       m_New = false;
    }

    //EndWaitCursor();
    ::ReleaseDC(hWnd, hDC);
}
MapColor 函数负责将当前绘制颜色更改为传递像素的 RGB 值,并调用 glColor3f。值接近零的像素(山谷)在图像中显示为较暗的区域,值较高的像素(山丘)显示为较亮的区域。传递给 glColor3f 的三个值必须是 [0.0, 1.0] 范围内的 float 类型,因此每个字节颜色分量(范围 [0, 255])被转换为 float 并除以最大值 255。
glColor3f(RED(*p)/(GLfloat)255.,GRN(*p)/(GLfloat)255.,BLU(*p)/(GLfloat)255.)
默认情况下,应用程序以线框网格(GL_LINE 模式)绘制图像,但菜单选项会将变量 m_Fill 更改为 GL_FILL。将其传递给 glPolygonMode 以将模式更改为填充(实心)多边形。多边形的颜色由描述多边形或线条的像素决定,OpenGL 会平滑地变化颜色。
|
|
|
|
|
K18 图像
|
K18 线框
|
K18 实心多边形
|
|
|
|
|
|
K18 伪彩色
|
K18 线框
|
K18 实心
|


图像绘制完成后,能够从不同角度甚至从下方旋转和缩放以进行查看非常有益。左键单击并拖动用于旋转绘图,右键单击并拖动用于缩放。鼠标事件的处理方式与通常相同,并在成员变量中保存鼠标按下坐标以传递给 OnMouseMove。在鼠标捕获事件期间,OnMouseMove 函数通过调用 glRotatef 来处理 x、y 旋转。缩放通过更改比例变量 m_Scale 来实现,该变量在 OnPaint 中用于根据图像大小和最大最小像素值计算 x、y 和 z 的比例。请参阅 OnMouseMove。
//-----------------------------------------------------------------------
// The framework calls this member function when the mouse cursor moves.
//-----------------------------------------------------------------------
void CPlotimDialog::OnMouseMove(UINT nFlags, CPoint point)
{
    if (m_LeftButtonDown) { 		// Left : x / y rotation
       HWND hWnd = GetSafeHwnd();
       HDC hDC = ::GetDC(hWnd);
       wglMakeCurrent(hDC, m_hGLContext);
       glClear(GL_COLOR_BUFFER_BIT | GL_DEPTH_BUFFER_BIT);
       glLoadIdentity();

       m_xRotation += m_LeftDownPos.x - point.x;
       glRotatef(m_xRotation, 0.0, 1.0, 0.0); // About y-axis

       m_yRotation += m_LeftDownPos.y - point.y;
       glRotatef(m_yRotation, 1.0, 0.0, 0.0);	// About x-axis
       //ATLTRACE2("***"__FUNCTION__" (%f, %f)\n", m_xRotation, m_yRotation);

       m_LeftDownPos = point;   		// Save for next call
       InvalidateRect(NULL, FALSE); 		// (Faster) Invalidate();

       ::ReleaseDC(hWnd, hDC);
    }
    else if (m_RightButtonDown) {    	// Right : z translation (zoom)
       m_Scale += (m_RightDownPos.y - point.y)/(float)60.0; // 60.0 zoom rate
       m_RightDownPos = point;
       InvalidateRect(NULL, FALSE);
    }

    CDialog::OnMouseMove(nFlags, point);
}
结论
总而言之,OpenGL 已被用于基于 MFC 的 C++ 多文档应用程序中,将 2D 图像绘制为 3D 曲面。展示了应用程序的部分代码,以便在新应用程序中使用。拥有复杂数据的 3D 曲面图并且能够交互式地旋转和缩放图形,是在图像处理应用程序中非常有用的工具。
历史
- 2011 年 6 月 1 日:初始版本
- 2011 年 7 月 26 日:更新了源代码 - 为用户提供更完整的项目构建集