
MyFriends:一个使用 XLINQ/LINQ/WPF 的简单联系人管理器
4.56/5 (98投票s)
一个使用 XLINQ/LINQ/WPF 的简单联系人管理器。
目录
- 引言
- 本文内容
- 演示应用程序
- 3D
- 3D DataTemplate
- 单例模式如何力挽狂澜
- 遍历模板化对象的视觉树
- 文件系统树视图,支持惰性加载和图标
- 基于对象的 LINQ
- XLINQ 用法
- Xceed 数据网格的赞誉
- 一些有点隐秘的值转换器
- Vista 风格的对话框
- 参考文献
- 你觉得怎么样?
- 结论
引言
前几周,我上网冲浪时偶然发现了一些引起我兴趣的东西,这篇文章可以算是我的发现的成果。基本上,我来自数据库背景,所以我习惯了看到带有网格、列表和列表视图的表单,它们功能强大但看起来很无聊。这就是我如此喜欢 WPF 的原因之一,因为你可以制作功能性应用程序,同时让它们看起来非常性感。任何做过 WPF 的人可能都知道有几种数据类型控件,例如 ListBox 和 ListView,通过一些巧妙的绑定和一些模板/样式,我们很可能可以使它们看起来像一个网格。但事实是,根本没有 DataGrid 或类似的东西。

这个不足就是本文的主题,但我希望本文能有足够的额外内容来保持人们的兴趣。
本文内容
我刚刚提到本文将介绍 WPF 的 DataGrid,确实如此。这就是我在网上搜索时发现的小宝石。最棒的是它完全免费,你还能获得全面的支持,甚至免费升级。我简直不敢相信,但这是真的。我做了一些功课,联系了支持人员等等。所说的 DataGrid 来自 Xceed,可以在这里找到。我不得不说,在我看来,Xceed 做得非常出色。我的意思是,我不会浪费我的时间(如果你想知道的话,我的时间极其廉价)来写别人的东西,除非它值得。
但请不要担心,我不会一直夸赞某个 DataGrid。绝不。在本文中,我希望能演示以下概念:
- WPF 中的一些简单 3D
- 单例模式如何力挽狂澜
- 遍历模板化对象的视觉树
- 文件系统树视图,支持惰性加载和图标
- 基于对象的 LINQ
- XLINQ 用法
- 一些有点隐秘的值转换器
- Vista 风格的对话框
当然,会有一个部分专门介绍 Xceed DataGrid 的用法,因为我认为如果有人决定在自己的应用程序中使用它,这可能会有所帮助。我认为这里有足够多的内容来保持人们的兴趣,至少我希望如此。
演示应用程序
那么演示应用程序到底有什么作用呢?
附带的演示应用程序就像一个迷你 Outlook 联系人管理器;你可以通过添加、删除和更新朋友来管理他们。对于每个朋友,可以分配以下项目:
- 一个名字
- 一个电子邮件地址
- 一张图片
- 一个视频片段
- 一个音乐片段
我想唯一能开始的地方就是开头,所以我将直接切入主题。
我着手创建了多种事物的组合。我想要一个 UI,它可以通过增长和收缩来显示不同的组件(有点像 Infragistics WPF 展示 Tangerine),但我也想使用 3D 显示选项。这些 UI 模式是互斥的;我的意思是,如果你处于增长收缩模式,你不能使用 3D 方法,反之亦然。当前模式的选择是在 OptionsWindow 中进行的,但稍后会详细介绍。我还希望 UI 能够显示数据网格。
我认为展示一下各个屏幕的流程的小截图会很有帮助。我将在后面更详细地描述一些内部工作原理时展示更大的截图。

可以看到,有一个初始窗口 MaininterfaceWindow,从那里可以显示三个窗口(前提是您处于增长-收缩 UI 模式)。AddNewFriendControl 是您可以通过 AddFriendImageWindow 为您的朋友添加图像的地方。从 MaininterfaceWindow 也可以显示 ViewAllUsersControl,它在一个数据网格中显示所有您的朋友,从那里,如果您的朋友分配了视频,您将能够显示 VideoViewerWindow 来观看您的朋友关联的视频。还有一个 OptionsWindow,您可以从那里选择您想要的 UI 样式,增长-收缩或 3D,还可以选择 AddFriendImageWindow 用于图像的文件夹。
这就是演示应用程序的基本思想。本文的其余部分将描述一些更奇特的功能是如何实现的。
3D
我偶然发现了一位名叫 Ian G 的同行写的一篇很棒的博客文章,他有一篇关于 3D 翻转列表框的博客文章,在此。Ian 只是发布了一些代码,但没有解释它是如何工作的,这让我很感兴趣。所以我不得不把它拆开,找出它是如何工作的。这项分析的结果如下所述。
好的,Sacha,你说的所有这些 3D 东西到底是什么?很简单,UI 允许 3D 风格的交互,如下图所示。用户可以在添加新朋友 (AddNewFriendControl) 和查看所有朋友 (ViewAllUsersControl) 之间切换,方法是在 3D 视口中翻转当前显示的项目。
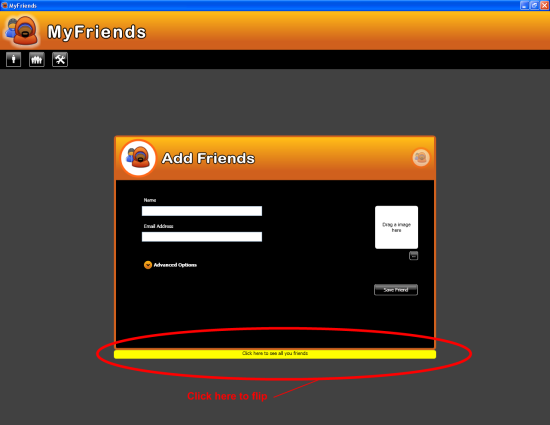

当前控件基本上是绕 Y 轴旋转的。但它是如何实现这一点的呢?
需要注意的一些初始事项
- 当前显示的控件实际上是
DataTemplate的一部分。 DataTemplate实际上应用于ItemsControl(代码中的Items3d)。ItemsControl(代码中的Items3d)始终只包含一个项目。其内容并不重要;它只是一个虚拟条目,只是允许ItemsControl中的第一个项目被分配 3D 翻转DataTemplate。实际上,在代码隐藏中,您会找到一行items3d.Items.Add("dont care");——这就是我们对ItemsControl中实际项目内容的关心程度。所有实际工作都在DataTemplate中完成。
基本内容已经讨论过了。那么这个为我们实现了所有这些很棒的 3D 功能的 DataTemplate 呢?它就在这里。别担心,我会更彻底地解释一下,因为它相当复杂。
<DataTemplate x:Key="frontTemplate">
<StackPanel Orientation="Vertical">
<local:AddNewFriendControl x:Name="addFriendsControl3d"
Width="750" Height="500"
SizeChanged="AddNewFriendControl_SizeChanged"/>
<Border Height="20" Background="Yellow"
Width="750" HorizontalAlignment="Center"
CornerRadius="5,5,5,5" BorderBrush="#FFD0601D">
<TextBlock TextAlignment="Center"
FontFamily="Tahoma" FontSize="11"
Text="Click here to see all you friends"/>
</Border>
</StackPanel>
</DataTemplate>
<DataTemplate x:Key="backTemplate">
<StackPanel Orientation="Vertical">
<local:ViewAllUsersControl x:Name="viewFriendsControl3d"
Width="750" Height="500"/>
<Border Height="20" Background="Yellow"
Width="750" HorizontalAlignment="Center"
CornerRadius="5,5,5,5" BorderBrush="#FFD0601D">
<TextBlock TextAlignment="Center"
FontFamily="Tahoma" FontSize="11"
Text="Click here to add new friends"/>
</Border>
</StackPanel>
</DataTemplate>
<DataTemplate x:Key="flipItemTemplate">
<!-- Note: Camera setup only works when this is square. -->
<!--<Grid Width="800" Height="800"
HorizontalAlignment="Center"
VerticalAlignment="Center">-->
<Grid Margin="0,0,0,0" Width="800"
Height="800" HorizontalAlignment="Center"
VerticalAlignment="Center">
<!-- Provides 3D rotation transition.
Hidden except for when animation is active. -->
<Viewport3D Grid.Column="0" x:Name="vp3D"
Visibility="Hidden" Width="Auto"
Height="Auto" Margin="0,0,0,0" >
<Viewport3D.Camera>
<PerspectiveCamera x:Name="camera"
Position="0,0,0.5"
LookDirection="0,0,-1"
FieldOfView="90" />
</Viewport3D.Camera>
<Viewport3D.Children>
<ModelVisual3D>
<ModelVisual3D.Content>
<Model3DGroup>
<DirectionalLight Color="#444"
Direction="0,0,-1" />
<AmbientLight Color="#BBB" />
</Model3DGroup>
</ModelVisual3D.Content>
</ModelVisual3D>
<ModelVisual3D>
<ModelVisual3D.Content>
<GeometryModel3D>
<!-- Simple flat, square surface -->
<GeometryModel3D.Geometry>
<MeshGeometry3D
TriangleIndices="0,1,2 2,3,0"
TextureCoordinates="0,1 1,1 1,0 0,0"
Positions="-0.5,-0.5,0 0.5,-0.5,0
0.5,0.5,0 -0.5,0.5,0" />
</GeometryModel3D.Geometry>
<!-- Front of shape shows the content of 'frontHost' -->
<GeometryModel3D.Material>
<DiffuseMaterial>
<DiffuseMaterial.Brush>
<VisualBrush
Visual="{Binding ElementName=frontHost}" />
</DiffuseMaterial.Brush>
</DiffuseMaterial>
</GeometryModel3D.Material>
<!-- Back of shape shows the content of 'backHost' -->
<GeometryModel3D.BackMaterial>
<DiffuseMaterial>
<DiffuseMaterial.Brush>
<VisualBrush
Visual="{Binding ElementName=backHost}">
<VisualBrush.RelativeTransform>
<!-- By default, this would come out
backwards because we're on the
back on the shape.
Flip it to make it right. -->
<ScaleTransform ScaleX="-1"
CenterX="0.5" />
</VisualBrush.RelativeTransform>
</VisualBrush>
</DiffuseMaterial.Brush>
</DiffuseMaterial>
</GeometryModel3D.BackMaterial>
<!-- Rotation transform used for transition. -->
<GeometryModel3D.Transform>
<RotateTransform3D>
<RotateTransform3D.Rotation>
<AxisAngleRotation3D
x:Name="rotate"
Axis="0,1,0" Angle="0" />
</RotateTransform3D.Rotation>
</RotateTransform3D>
</GeometryModel3D.Transform>
</GeometryModel3D>
</ModelVisual3D.Content>
</ModelVisual3D>
</Viewport3D.Children>
</Viewport3D>
<!-- We use a pair of nested Borders to wrap the content that's going
to go on each side of the rotating model.
The reason is that we need to be able to fade these real bits
of UI in and out as we transition from front to back, but we need
to make sure the VisualBrush in the 3D model doesn't also
get faded out. So the VisualBrush uses the inner Border,
while the fade is applied to the outer one.
-->
<Border x:Name="frontWrapper">
<!-- Note, it's important that this element has visuals
that completely fill the space, as otherwise it messes
with the VisualBrush's size in the 3D model. Setting the background
has that effect, even a transparent one. -->
<Border x:Name="frontHost" Background="Transparent">
<Border.Triggers>
<EventTrigger RoutedEvent="Grid.MouseDown">
<BeginStoryboard>
<Storyboard>
<!-- Make the Viewport3D visible only
for the duration of the rotation. -->
<ObjectAnimationUsingKeyFrames
Storyboard.TargetName="vp3D"
Storyboard.TargetProperty="Visibility">
<DiscreteObjectKeyFrame KeyTime="0:0:0"
Value="{x:Static Visibility.Visible}" />
<DiscreteObjectKeyFrame KeyTime="0:0:1.1"
Value="{x:Static Visibility.Hidden}" />
</ObjectAnimationUsingKeyFrames>
<!-- Make the background element visible.
(It won't actually appear
until it is faded in right at the end
of the animation.) -->
<ObjectAnimationUsingKeyFrames
Storyboard.TargetName="backWrapper"
Storyboard.TargetProperty="Visibility">
<DiscreteObjectKeyFrame KeyTime="0:0:1"
Value="{x:Static Visibility.Visible}"/>
</ObjectAnimationUsingKeyFrames>
<!-- Hide the foreground element.
It will already be invisible
by this time because we fade
it out right at the start
of the animation.
However, until we set its Visibility
to Hidden, it will still be
visible to the mouse... -->
<ObjectAnimationUsingKeyFrames
Storyboard.TargetName="frontWrapper"
Storyboard.TargetProperty="Visibility">
<DiscreteObjectKeyFrame KeyTime="0:0:0.05"
Value="{x:Static Visibility.Hidden}" />
</ObjectAnimationUsingKeyFrames>
<!-- Fade the front wrapper out.
The Viewport3D is behind us,
so it'll fade into view at this point. The reason
for fading is to avoid a visible step as we
switch from the real UI to the copy
projected onto the 3D model. -->
<DoubleAnimation To="0"
Duration="0:0:0.05"
Storyboard.TargetName="frontWrapper"
Storyboard.TargetProperty="Opacity" />
<!-- Fade the back wrapper in. Once the spin
completes, we fade the real back UI
in over the Viewport3D - using a fade to avoid
a sudden jolt between the slightly fuzzy 3D look
and the real UI. -->
<DoubleAnimation BeginTime="0:0:1.05"
Duration="0:0:0.05" To="1"
Storyboard.TargetName="backWrapper"
Storyboard.TargetProperty="Opacity" />
<!-- 3D animation. Move the camera out slightly
as we spin, so the model fits entirely
within the field of view.
Rotate the model 180 degrees. -->
<Point3DAnimation To="0,0,1.1" From="0,0,0.5"
BeginTime="0:0:0.05" Duration="0:0:0.5"
AutoReverse="True" DecelerationRatio="0.3"
Storyboard.TargetName="camera"
Storyboard.TargetProperty=
"(PerspectiveCamera.Position)" />
<DoubleAnimation From="0" To="180"
AccelerationRatio="0.3"
DecelerationRatio="0.3"
BeginTime="0:0:0.05"
Duration="0:0:1"
Storyboard.TargetName="rotate"
Storyboard.TargetProperty="Angle" />
</Storyboard>
</BeginStoryboard>
</EventTrigger>
</Border.Triggers>
<ContentPresenter Content="{Binding}"
ContentTemplate="{StaticResource frontTemplate}"
VerticalAlignment="Center"/>
</Border>
</Border>
<Border x:Name="backWrapper" Grid.Column="0"
Visibility="Hidden" Opacity="0">
<Border x:Name="backHost" Background="Transparent">
<Border.Triggers>
<EventTrigger RoutedEvent="Grid.MouseDown">
<BeginStoryboard>
<Storyboard>
<ObjectAnimationUsingKeyFrames
Storyboard.TargetName="vp3D"
Storyboard.TargetProperty="Visibility">
<DiscreteObjectKeyFrame KeyTime="0:0:0"
Value="{x:Static Visibility.Visible}" />
<DiscreteObjectKeyFrame KeyTime="0:0:1.1"
Value="{x:Static Visibility.Hidden}" />
</ObjectAnimationUsingKeyFrames>
<ObjectAnimationUsingKeyFrames
Storyboard.TargetName="frontWrapper"
Storyboard.TargetProperty="Visibility">
<DiscreteObjectKeyFrame KeyTime="0:0:1"
Value="{x:Static Visibility.Visible}"/>
</ObjectAnimationUsingKeyFrames>
<ObjectAnimationUsingKeyFrames
Storyboard.TargetName="backWrapper"
Storyboard.TargetProperty="Visibility">
<DiscreteObjectKeyFrame KeyTime="0:0:0.05"
Value="{x:Static Visibility.Hidden}" />
</ObjectAnimationUsingKeyFrames>
<DoubleAnimation To="0" Duration="0:0:0.05"
Storyboard.TargetName="backWrapper"
Storyboard.TargetProperty="Opacity" />
<DoubleAnimation BeginTime="0:0:1.05"
Duration="0:0:0.05"
Storyboard.TargetName="frontWrapper"
Storyboard.TargetProperty="Opacity" />
<Point3DAnimation To="0,0,1.1" From="0,0,0.5"
BeginTime="0:0:0.05" Duration="0:0:0.5"
AutoReverse="True" DecelerationRatio="0.3"
Storyboard.TargetName="camera"
Storyboard.TargetProperty=
"(PerspectiveCamera.Position)" />
<DoubleAnimation From="180" To="360"
AccelerationRatio="0.3" DecelerationRatio="0.3"
BeginTime="0:0:0.05" Duration="0:0:1"
Storyboard.TargetName="rotate"
Storyboard.TargetProperty="Angle" />
</Storyboard>
</BeginStoryboard>
</EventTrigger>
</Border.Triggers>
<ContentPresenter x:Name="backContent" Content="{Binding}"
ContentTemplate="{StaticResource backTemplate}"
VerticalAlignment="Center"/>
</Border>
</Border>
</Grid>
</DataTemplate>
那么这一切是如何运作的呢?基本思路如下:
3D DataTemplate
主要的 3D DataTemplate 是大部分操作发生的地方。基本思路是,有一个 Viewport3D,它为 3D 视觉内容提供渲染表面。Viewport3D 包含一个 Viewport3D.Camera 和初始的 GeometryModel3D,后者是一个由 MeshGeometry3D 和 Material 组成的 3D 模型。WPF 中的 3D 还公开了 GeometryModel3D.BackMaterial 属性。这在漂亮的 DataTemplate 中使用。DataTemplate 实际上构造了一个相当简单的 MeshGeometry3D,如下所示:
<!-- Simple flat, square surface -->
<GeometryModel3D.Geometry>
    <MeshGeometry3D
         TriangleIndices="0,1,2    2,3,0"
         TextureCoordinates="0,1 1,1 1,0 0,0"
         Positions="-0.5,-0.5,0     0.5,-0.5,0    0.5,0.5,0    -0.5,0.5,0" />
</GeometryModel3D.Geometry>
也许这需要一点解释。Positions 属性是 3D 空间 X、Y、Z 平面中的位置。我们可以看到,如果将它映射出来,我们会得到类似这样的东西:

TriangleIndices 属性是构成 GeometryModel3D.Geometry 的三角形的索引,在这种情况下是一个简单的正方形,由两个独立的三角形构成。这就是 3D 的工作原理。让我们看看这两个三角形:

这就是我们获得初始形状的方式,基本上是一个将容纳一些内容的正方形。内容呢?它从哪里来?
回想一下,我说过这个 3D Datatemplate 实际上允许我们绕 Y 轴旋转,所以应该有正面和背面。确实如此:

前部结构如下:
<!-- Simple flat, square surface -->
<GeometryModel3D.Geometry>
    <MeshGeometry3D
         TriangleIndices="0,1,2    2,3,0"
         TextureCoordinates="0,1 1,1 1,0 0,0"
         Positions="-0.5,-0.5,0     0.5,-0.5,0    0.5,0.5,0    -0.5,0.5,0" />
</GeometryModel3D.Geometry>

.......
.......
.......
.......

<!-- We use a pair of nested Borders to wrap the content that's going to go on
each side of the rotating model.
The reason is that we need to be able to fade these real bits of UI in and out
as we transition from front to back, but we need to make sure the VisualBrush
in the 3D model doesn't also get faded out. So the VisualBrush uses the inner
Border, while the fade is applied to the outer one.
-->
<Border x:Name="frontWrapper">
    <!-- Note, it's important that this element
      has visuals that completely fill the space, as
      otherwise it messes with the VisualBrush's size
      in the 3D model. Setting the background
      has that effect, even a transparent one. -->
    <Border x:Name="frontHost" Background="Transparent">
        <Border.Triggers>
            <EventTrigger RoutedEvent="Grid.MouseDown">
                <BeginStoryboard>
                    <Storyboard>
                        <!-- Make the Viewport3D visible only
                               for the duration of the rotation. -->
                        <ObjectAnimationUsingKeyFrames
                                 Storyboard.TargetName="vp3D"
                                 Storyboard.TargetProperty="Visibility">
                            <DiscreteObjectKeyFrame KeyTime="0:0:0"
                               Value="{x:Static Visibility.Visible}" />
                            <DiscreteObjectKeyFrame KeyTime="0:0:1.1"
                               Value="{x:Static Visibility.Hidden}" />
                        </ObjectAnimationUsingKeyFrames>

                        <!-- Make the background element visible.
                            (It won't actually
                             appear until it is faded in right
                             at the end of the animation.) -->
                        <ObjectAnimationUsingKeyFrames
                               Storyboard.TargetName="backWrapper"
                               Storyboard.TargetProperty="Visibility">
                            <DiscreteObjectKeyFrame KeyTime="0:0:1"
                               Value="{x:Static Visibility.Visible}"/>
                        </ObjectAnimationUsingKeyFrames>

                        <!-- Hide the foreground element.
                           It will already
                           be invisible by this time because
                           we fade it out right
                           at the start of the animation.
                           However, until we set its Visibility
                           to Hidden, it will still be visible
                           to the mouse... -->
                        <ObjectAnimationUsingKeyFrames
                               Storyboard.TargetName="frontWrapper"
                               Storyboard.TargetProperty="Visibility">
                            <DiscreteObjectKeyFrame KeyTime="0:0:0.05"
                                 Value="{x:Static Visibility.Hidden}" />
                        </ObjectAnimationUsingKeyFrames>


                        <!-- Fade the front wrapper out. The Viewport3D
                                is behind us, so it'll fade into view at this point.
                                The reason for fading is to avoid a visible step as we
                                switch from the real UI
                                to the copy projected onto the 3D model. -->
                        <DoubleAnimation To="0"
                            Duration="0:0:0.05"
                            Storyboard.TargetName="frontWrapper"
                            Storyboard.TargetProperty="Opacity" />

                        <!-- Fade the back wrapper in. Once the spin completes,
                                we fade the real back UI
                                in over the Viewport3D - using a fade
                                to avoid a sudden jolt between the slightly
                                fuzzy 3D look and the real UI. -->
                        <DoubleAnimation BeginTime="0:0:1.05"
                               Duration="0:0:0.05" To="1"
                               Storyboard.TargetName="backWrapper"
                               Storyboard.TargetProperty="Opacity" />

                        <!-- 3D animation. Move the camera out slightly as we spin,
                                so the model fits entirely within the field of view.
                                Rotate the model 180 degrees. -->
                        <Point3DAnimation To="0,0,1.1" From="0,0,0.5"
                               BeginTime="0:0:0.05" Duration="0:0:0.5"
                               AutoReverse="True" DecelerationRatio="0.3"
                               Storyboard.TargetName="camera"
                               Storyboard.TargetProperty=
                                     "(PerspectiveCamera.Position)" />
                        <DoubleAnimation From="0" To="180"
                          AccelerationRatio="0.3" DecelerationRatio="0.3"
                          BeginTime="0:0:0.05" Duration="0:0:1"
                          Storyboard.TargetName="rotate"
                          Storyboard.TargetProperty="Angle" />
                    </Storyboard>
                </BeginStoryboard>
            </EventTrigger>
        </Border.Triggers>
        <ContentPresenter  Content="{Binding}"
          ContentTemplate="{StaticResource frontTemplate}"
          VerticalAlignment="Center"/>
    </Border>
</Border>
其中 GeometryModel3D.Material 使用一个 VisualBrush,它绑定到主 DataTemplate 中现有的元素。这可以在以下行中看到:
<VisualBrush Visual="{Binding ElementName=frontHost}" />
其中元素 GeometryModel3D.Material 被绑定到其 frontHost。如果我们再深入一点,看看实际元素 frontHost(如上所示),我们可以看到它是一个 Border,它包含各种动画,针对各种元素,如 frontWrapper、backWrapper、camera 和 rotate。为了执行这些动画,使用了几种不同类型的动画;有 ObjectAnimationUsingKeyFrames、DoubleAnimation、Point3DAnimation,所有这些都针对主 DataTemplate 中的不同属性,允许 3D 模型旋转。各种动画的基本思想是,当点击当前显示的前端控件时,当前前端控件将逐渐旋转(绕 Y 轴)并变为不可见,在动画周期结束时,另一个(非当前)控件将显示。如果您对此更感兴趣,只需检查各种动画,您就会明白,实际上它相当好。
frontHost 元素中最后一个有趣的地方是有一个 ContentPresenter,它将其真实的 ControlTemplate 定位到另一个 DataTemplate。我们来看看这个:
<ContentPresenter
   Content="{Binding}" ContentTemplate="{StaticResource frontTemplate}"
   VerticalAlignment="Center"/>
而且,如果我们查看 frontTemplate DataTemplate(它位于主 DataTempate 完整源代码的顶部),我们可以看到它实际上使用了 AddNewFriendControl 的一个实例,这就是你看到的正面控件。
<DataTemplate x:Key="frontTemplate">
    <StackPanel Orientation="Vertical">
        <local:AddNewFriendControl x:Name="addFriendsControl3d"
           Width="750" Height="500"
           SizeChanged="AddNewFriendControl_SizeChanged"/>
        <Border Height="20" Background="Yellow" Width="750"
                HorizontalAlignment="Center"
                CornerRadius="5,5,5,5" BorderBrush="#FFD0601D">
            <TextBlock TextAlignment="Center"
               FontFamily="Tahoma" FontSize="11"
               Text="Click here to see all you friends"/>
        </Border>
    </StackPanel>
</DataTemplate>

这就是 AddNewFriendControl 最终出现在 3D 视口中的方式。同样的原理也适用于 BackMaterial,其中在 VisualBrush 上对 backHost 元素使用了一个单独的绑定。而 backHost 元素又使用 backTemplate DataTemplate 作为其自己的 ContentPresenter。
背面加载 ViewAllUsersControl

这就是 3D DataTemplate 的工作原理。很酷,是吧?
单例模式如何力挽狂澜
好的,我们已经了解了一些 3D 内容,这实际上只是讨论了 UI 在一种模式下的工作方式。但是 UI 到底做了什么呢?其实很简单,它做了以下事情:
- 有一个用户控件:
AddNewFriendControl,允许添加新朋友。 - 有一个用户控件:
ViewAllUsersControl,它在 Xceed WPF DataGrid 中显示所有朋友。
真的就是这样;当然,一路上还有一些辅助屏幕。但本质上就是这样。
那么,我为什么要在标题为“单例模式等等”的部分中讨论这个问题呢?是这样的。在应用程序中,存在不同类型的显示模式概念。您可以处于“增长和收缩”模式,在这种情况下,通常隐藏的 Grid (gridHolder) 会被移入作为主显示 Grid (mainGrid) 的子元素,并且 3D ItemsControl (items3d) 会从主显示 Grid (mainGrid) 中移除作为子元素,反之亦然。正如我们现在所知,我们上面讨论的 3D DataTemplate 也包含 AddNewFriendControl 和 ViewAllUsersControl 的副本。因此,这些控件的两个副本的内容肯定需要以某种方式保持同步,因为用户可能会在操作进行到一半时决定更改 UI 模式。所以,这就是我们需要单例模式的地方。它实际上是一个救星。有一个类 FriendContent,它为 AddNewFriendControl 提供单例内容。这是一个简单的类,它只存储 AddNewFriendControl 中所有可能条目的值。如果我们看一下 AddNewFriendControl,可能会更清楚地看到 FriendContent 类中提供了哪些属性。
可以看到有五个项目的属性可用
- 名称
- 电子邮件
- 图片网址
- 视频网址
- 音乐网址
所以,不足为奇,FriendContent 类提供了这五个相同的属性,这些属性可以被两个 AddNewFriendControl 控件使用,一个是增长-收缩模式下显示的,另一个是前面讨论的 3D DataTemplate 中使用的。你看,AddNewFriendControl 控件的增长-收缩副本存在于 Windows 逻辑树中,因为它是一个 Grid 控件的普通子项,所以可以在代码隐藏中访问。但是作为 3D DataTemplate 一部分的 AddNewFriendControl 控件的副本就有点棘手了,因为不能简单地通过名称引用它,因为它是一个控件的 DataTemplate 的一部分,因此不属于整个逻辑树。
无论如何,抛开这些,FriendContent 类看起来像这样,我认为它是自解释的。哦,需要注意的一点是,这个类使用了新的 C# 语法来自动属性。Josh Smith 在这个线程中提出了关于这种创建属性风格的有趣问题,我强烈建议大家阅读。
using System;
using System.Collections.Generic;
using System.Linq;
using System.Text;

namespace MyFriends
{
    public class FriendContent
    {
        public string FriendName { get; set; }
        public string FriendEmail { get; set; }
        public string PhotoUrl { get; set; }
        public string VideoUrl { get; set; }
        public string MusicUrl { get; set; }
        private static FriendContent instance;

        private FriendContent()
        {
        }

        public void Reset()
        {
            FriendName = string.Empty;
            FriendEmail = string.Empty;
            PhotoUrl = string.Empty;
            VideoUrl = string.Empty;
            MusicUrl = string.Empty;
        }

        public static FriendContent Instance()
        {
            if (instance == null)
            {
                instance = new FriendContent();
            }
            return instance;
        }
    }
}
所以,我们的想法是,我们使用这个单例类来告诉 AddNewFriendControl 根据 FriendContent 类中的单一值集更新其内容。
遍历模板化对象的视觉树
正如我刚才所说,对于属于窗口逻辑树的 UI 元素,简单地获取对正确项目的引用并直接更改其属性是没有问题的。然而,我也说过,其中一个副本实际上是 3D DataTemplate 的一部分,该模板应用于 ItemsControl 中的单个(虚拟)项目。所以要访问它们有点棘手。幸运的是,我们只需在显示模式更改为 3D 时关心更新 3D DataTemplate 中的这两个控件。因此,我寻找了一个事件,每当用户更改为 3D 模式时就会发生。巧合的是,每当显示模式更改为 3D 时,我注意到 AddNewFriendControl 的 SizeChanged 事件被触发了。太好了,所以我们可以用它来更新 3D DataTemplate 中两个控件的内容。
让我们花一分钟。我们想达到什么目标?我们正尝试让作为 3D DataTemplate 一部分的两个控件更新为最新内容,这些内容将由 AddNewFriendControl 和 ViewAllUsersControl 控件的增长-收缩副本填充。但要做到这一点,我们需要在代码隐藏文件中引用这两个控件。听起来很简单,对吧?错了,这有点棘手。我们来看看。我应该说,我想出这段代码花了不少时间,所以请读者仔细阅读。
void AddNewFriendControl_SizeChanged(object sender, SizeChangedEventArgs e)
{
    //obtaining the AddNewFriendControl is easy just
    //use the sender and get it to ReInitialise
    //which will fetch the latest content from the FriendContent singleton
    addfriendsControl3D = sender as AddNewFriendControl;
    addfriendsControl3D.ReInitialise();

    //Obtaining an instance of the ViewAllUsersControl
    //is a little tricker, as we need to
    //find it in the DataTemplate itself,
    //which means we need to walk its VisualTree

    DependencyObject item = null;
    //there will be only 1 item, we are simply using
    //the item as a sneaky way to apply
    //out custom 3d tempplate

    foreach (object dataitem in items3d.Items)
    {
        //get the UIElement for the ItemsControl item
        item = items3d.ItemContainerGenerator.ContainerFromItem(dataitem);
        int count = VisualTreeHelper.GetChildrenCount(item);
        for (int i = 0; i < count; i++)
        {
            DependencyObject itemFetched = VisualTreeHelper.GetChild(item, i);
            //look for a grid, which is the one
            //we need to allow use to find the relevant
            //ContentPresenter that hosts our ViewAllUsersControl
            if (itemFetched is Grid)
            {
                //do back content, and make sure all properties are copies across
                ContentPresenter cp = (itemFetched as Grid).FindName(
                                         "backContent") as ContentPresenter;
                DataTemplate myDataTemplate = cp.ContentTemplate;
                ViewAllUsersControl viewUsers = (ViewAllUsersControl)
                  myDataTemplate.FindName("viewFriendsControl3d", cp);
                viewUsers.Height = (sender as AddNewFriendControl).Height;
                viewUsers.DataBind();
                return;
            }
        }
    }
}
我认为为了让这部分代码有意义,我将不得不再次展示 3D DataTemplate 的一部分。

可以看到,首先要找到的是 Grid,然后尝试获取 backContent 的 ContentPresenter,然后从那里,只需获取 ContentPresenter 应用的 ContentTemplate,瞧,就有了:对模板中控件的引用。从那里,我们可以调用它的方法并设置它的属性。容易,对吧?
现在我们已经有了 3D DataTemplate 中这两个控件的引用,我们如何让它们更新内容呢?好吧,这部分其实很简单。对于 AddNewFriendControl,我们只需调用 ReInitialise() 方法,如下所示:
public void ReInitialise()
{
    friendContent = FriendContent.Instance();
    initialising = true;
    txtFriendName.Text = friendContent.FriendName;
    txtEmail.Text = friendContent.FriendEmail;
    //photo

    if (friendContent.PhotoUrl != null)
        if (!friendContent.PhotoUrl.Equals(string.Empty))
            photoSrc.Source =
               new BitmapImage(new Uri(friendContent.PhotoUrl));
    //video

    if (friendContent.VideoUrl != null)
        if (!friendContent.VideoUrl.Equals(string.Empty))
            videoSrc.Source = new Uri(friendContent.VideoUrl);
    //music

    if (friendContent.MusicUrl != null)
        if (!friendContent.MusicUrl.Equals(string.Empty))
            musicSrc.Source = new Uri(friendContent.MusicUrl);
    initialising = false;
}
如您所见,它使用了我们之前讨论过的 FriendContent 单例。对于 ViewAllUsersControl 控件,我们只需调用 DataBind() 方法,这将导致 Xceed WPF 数据网格重新绑定其内容。这在下面显示,并使用了稍后将讨论的第二个单例 FriendsList:
public void DataBind()
{
    dgFriends.ItemsSource = FriendsList.Instance();
}
文件系统树视图,支持惰性加载和图标
OptionsWindow 允许用户在显示样式之间切换,但它也显示了一个惰性加载的树视图,该树视图显示了主机计算机的目录结构。此树视图可用于选择 AddFriendImageWindow 所使用的源目录。

我已经写这篇文章一段时间了,所以我将树视图的实现拆分到另一篇文章中,这里有描述,它在很久以前就发布了。Josh Smith,作为 Josh(很酷),对这篇文章有一个建议,并发布了一个替代方法,这里有发布,然后更有趣的是,Karl Shiflett 也有一个替代方法,他将其发布在这里。所以,现在您选择的余地很大。我保持了我的实现与最初发布时相同,不过如果我要改变,我可能会选择 Josh 的建议,因为对我来说它最有意义。
基于对象的 LINQ
一旦您在 OptionsWindow 中选择了一个包含图片的目录,就会有一个额外的窗口,可以通过 AddNewFriendControl 上用户图片下方的按钮访问。点击此按钮会显示 AddFriendImageWindow,如下图所示:

我在此页面上使用了 Paul Tallet 出色的 Fisheye 面板。但我也允许用户使用 LINQ 滚动浏览在 OptionsWindow 中选择的图像文件夹,如下所示:
private void GetImages(int pageIndex)
{
    try
    {
        var imgs = (from fi in Files select fi.FullName).
                    IsImageFile().Skip(pageIndex * NumOfImageToFetch).
                    Take(NumOfImageToFetch);

        //NOTE : We could have also used the version of the IsImageFile()
        //custom LINQ string extension method
        //that expects a predicate, something like
        //IsImageFile(f => f.StartsWith("png") ||
        //            f.StartsWith("jpg").Skip

        fishPanel.Children.Clear();
        foreach (string filename in imgs)
        {
            if (UsingReflectiveImages.Value)
            {
                StoredImageControl si = new StoredImageControl
                {
                    OriginalFileUrl = filename,
                    Margin = new Thickness(5)
                };
                si.MouseDown +=
                  new System.Windows.Input.MouseButtonEventHandler(si_MouseDown);
                fishPanel.Children.Add(si);
            }
            else
            {
                StoredImage si = new StoredImage
                {
                    Source = new BitmapImage(new Uri(filename)),
                    Width = 100,
                    OriginalFileUrl = filename,
                    Margin = new Thickness(5)
                };
                si.MouseDown += new
                   System.Windows.Input.MouseButtonEventHandler(si_MouseDown);
                fishPanel.Children.Add(si);
            }
        }
        btnPrev.IsEnabled = pageIndex > 0;
        btnNext.IsEnabled =
          (Files.Length - (++pageIndex * NumOfImageToFetch)) >= 10;
    }
    catch (Exception ex)
    {
        MessageBox.Show(ex.Message);
    }
}
眼尖的读者可能会注意到,LINQ 查询中使用了略显奇怪的语法 IsImageFile()。嗯,这怎么可能呢?好吧,微软的好心人现在允许我们创建自己的 LINQ 扩展,而这个 IsImageFile() 正是如此。让我们看看这个例子:
using System;
using System.Collections.Generic;
using System.Text;
using System.Linq;
using System.Data.Linq;
using System.Xml.Linq;
using System.Xml;

namespace MyFriends
{
    public static class CustomStringExtensions
    {
        public static IEnumerable<string> IsImageFile(
                      this IEnumerable<string> files,
                      Predicate<string> isMatch)
        {
            foreach (string file in files)
            {
                if (isMatch(file))
                    yield return file;
            }
        }

        public static IEnumerable<string>
               IsImageFile(this IEnumerable<string> files)
        {
            foreach (string file in files)
            {
                if (file.Contains(".jpg") ||
                        file.Contains(".png") ||
                        file.Contains(".bmp"))
                    yield return file;
            }
        }
    }
}
可以看出,IsImageFile 有两个方法,它们都返回 IEnumerable<T>(本例中为字符串),这是 LINQ 扩展要求提供的扩展。另一个奇怪的地方是方法签名中有一个 this 关键字;这个语法允许将迄今为止查询的结果用于正在应用的新扩展(实际上是这个)。唯一需要注意的另一件事是 this 关键字后面的类型必须与当前查询结果匹配。因此在前面的示例中,我们正在执行:
(from fi in Files select fi.FullName)
这确实会产生 IEnumerable<string>,因此可以使用此扩展 IsImageFile。例如:
var imgs = (from fi in Files select fi.FullName).
           IsImageFile().Skip(pageIndex * NumOfImageToFetch).
           Take(NumOfImageToFetch);
XLINQ 用法
添加到演示应用程序中的朋友的持久化是 100% 使用 XLINQ 完成的。其工作原理如下:
- 点击
AddNewFriendControl上的“保存朋友”按钮时,会检查是否存在 XML 文件。如果不存在,则使用 XLINQ 创建一个新的 XML 文件。一个新的Friend对象被添加到数据网格使用的内部对象集合中。 - 当再次点击“保存朋友”按钮,并且内存中没有保存
Friend对象时,将追加到 XML 文件,并向数据网格使用的内部对象集合添加一个新的Friend对象。但是,如果不存在 XML 文件,则只需向数据网格使用的内部对象集合添加一个新的Friend对象。 - 在应用程序关闭时,将所有内存中保存的
Friend对象存储到一个 XML 文件中,该文件将覆盖现有 XML 文件(如果存在)。
这就是基本思想;首先写入 XML 文件,将文件的结果绑定到网格使用的内部集合,然后维护内部集合,并在退出时更新磁盘上的 XML 文件。同样,在加载时,将磁盘上的 XML 文件读入内存中的集合。
那么我们来看看一些代码吧?AddNewFriendControl 的“保存朋友”按钮的代码如下所示:
private void btnSave_Click(object sender, RoutedEventArgs e)
{
    string xmlFilename =
      (string)Application.Current.Properties["SavedDetailsFileName"];
    string fullXmlPath =
      Path.Combine(Environment.CurrentDirectory, xmlFilename);

    bool allRequiredFieldsFilledIn = true;
    allRequiredFieldsFilledIn = IsEntryValid(txtFriendName) &&
                                IsEntryValid(txtEmail);
    allRequiredFieldsFilledIn = IsEmailValid(txtEmail.Text);

    if (allRequiredFieldsFilledIn)
    {
        if (File.Exists(fullXmlPath))
        {
            try
            {
                //if there is currently no XML and no Friends in
                //memory, append to file. This should never happen
                if (FriendsList.Instance().Count == 0)
                {
                    Friend friend = new Friend
                    {
                        ID = Guid.NewGuid(),
                        Name = friendContent.FriendName,
                        Email = friendContent.FriendEmail,
                        PhotoUrl = friendContent.PhotoUrl,
                        VideoUrl = friendContent.VideoUrl,
                        MusicUrl = friendContent.MusicUrl
                    };
                    XMLFileOperations.AppendToFile(fullXmlPath, friend);
                    FriendsList.Instance().Add(friend);
                    RaiseEvent(new RoutedEventArgs(FriendAddedEvent));
                    friendContent.Reset();
                    this.Reset();
                    MessageBox.Show("Sucessfully saved friend");
                }
                //otherwise simply update the singleton in memory
                //collection of friends, which will be written
                //to disk at closure of the application
                else
                {
                    FriendsList.Instance().Add(new Friend
                                {
                                    ID = Guid.NewGuid(),
                                    Name = friendContent.FriendName,
                                    Email = friendContent.FriendEmail,
                                    PhotoUrl = friendContent.PhotoUrl,
                                    VideoUrl = friendContent.VideoUrl,
                                    MusicUrl = friendContent.MusicUrl
                                });
                    RaiseEvent(new RoutedEventArgs(FriendAddedEvent));
                    friendContent.Reset();
                    this.Reset();
                    MessageBox.Show("Sucessfully saved friend");
                }
            }
            catch
            {
                MessageBox.Show("Error updating friends details");
            }
        }
        else
        {
            try
            {
                Friend friend = new Friend
                {
                    ID = Guid.NewGuid(),
                    Name = friendContent.FriendName,
                    Email = friendContent.FriendEmail,
                    PhotoUrl = friendContent.PhotoUrl,
                    VideoUrl = friendContent.VideoUrl,
                    MusicUrl = friendContent.MusicUrl
                };
                XMLFileOperations.CreateInitialFile(fullXmlPath, friend);
                FriendsList.Instance().Add(friend);
                RaiseEvent(new RoutedEventArgs(FriendAddedEvent));
                friendContent.Reset();
                this.Reset();
                MessageBox.Show("Sucessfully saved friend");
            }
            catch(Exception ex)
            {
                MessageBox.Show("Error saving friends details");
            }
        }
    }
    else
    {
        MessageBox.Show("You need to either fill in one of the fields, " +
         "or correct it", "Error", MessageBoxButton.OK,
         MessageBoxImage.Error);
    }
}
回想一下,之前我提到 ViewAllUsersControl 使用了第二个单例,以使其能够维护要在数据网格中显示的正确数据。嗯,那就是下面显示的 FriendsList 单例:
using System;
using System.Collections;
using System.Collections.ObjectModel;
using System.Collections.Generic;
using System.Text;
using System.Windows;

namespace MyFriends
{
    public class FriendsList : ObservableCollection<Friend>
    {

        private static FriendsList instance;

        private FriendsList()
        {
            try
            {
                XMLFileOperations.XmlFilename =
                    (string)Application.Current.Properties["SavedDetailsFileName"];

                List<Friend> theList = XMLFileOperations.GetFriends();
                foreach (Friend friend in theList)
                {
                    this.Add(friend);
                }
            }
            catch { }
        }

        public static FriendsList Instance()
        {
            if (instance == null)
            {
                instance = new FriendsList();
            }
            return instance;
        }
    }
}
但是等等,这又调用了另一个类来获取数据,所以故事还没有结束。让我们沿着这条路走下去。还有一个名为 XMLFileOperations 的类。我们来看看那个类中的方法。
using System;
using System.Collections.Generic;
using System.Text;
using System.Linq;
using System.Data.Linq;
using System.Xml.Linq;
using System.Xml;
using System.IO;

namespace MyFriends
{
    public class XMLFileOperations
    {
        public static string XmlFilename { get; set; }

        public static List<Friend> GetFriends()
        {
            string fullXmlPath = System.IO.Path.Combine(Environment.CurrentDirectory,
                                                        XMLFileOperations.XmlFilename);

            var xmlFriendResults =
                from friend in StreamElements(fullXmlPath, "Friend")
                select new Friend
                {
                    ID = new Guid(friend.Element("ID").Value),
                    Name = friend.Element("name").SafeValue(),
                    Email = friend.Element("email").SafeValue(),
                    PhotoUrl = friend.Element("photo").SafeValue(),
                    VideoUrl = friend.Element("video").SafeValue(),
                    MusicUrl = friend.Element("music").SafeValue()
                };

            return xmlFriendResults.ToList();
        }

        //*************************************************************
        //    NOTE : THIS IS HOW YOU WOULD LOAD THE DOCUMENT IN ONE GO
        //           BUT IF YOU HAVE A LARGE XML DOCUMENT THE LOAD(..)
        //           METHOD MIGHT BE A BOTTLE NECK
        //*************************************************************

        //public static IEnumerable<XElement> GetFriendItems(string uri)
        //{
        //        var xmlDoc = XDocument.Load(uri);
        //        var xmlElement =
        //            xmlDoc.Root.Element("MyFriends").Elements("Friend");
        //        foreach (var xmlElement in xmlElement)
        //            yield return xmlElement;
        //}

        public static void CreateInitialFile(string fullXmlPath, Friend friend)
        {
            XElement friendsXmlDocument =
                new XElement("MyFriends",
                    new XElement("Friend",
                        new XElement("ID", friend.ID),
                        new XElement("name", friend.Name),
                        new XElement("email", friend.Email),
                        new XElement("photo", friend.PhotoUrl),
                        new XElement("video", friend.VideoUrl),
                        new XElement("music", friend.MusicUrl))
                );
            friendsXmlDocument.Save(fullXmlPath);
        }

        public static void AppendToFile(string fullXmlPath, Friend friend)
        {
            XElement friendsXmlDocument = XElement.Load(fullXmlPath);
                friendsXmlDocument.Add(new XElement("Friend",
                new XElement("ID", friend.ID),
                new XElement("name", friend.Name),
                new XElement("email", friend.Email),
                new XElement("photo", friend.PhotoUrl),
                new XElement("video", friend.VideoUrl),
                new XElement("music", friend.MusicUrl))
            );
            friendsXmlDocument.Save(fullXmlPath);
        }

        public static IEnumerable<XElement> StreamElements(string uri, string name)
        {
            using (XmlReader reader = XmlReader.Create(uri))
            {
                reader.MoveToContent();
                while (reader.Read())
                {
                    if ((reader.NodeType == XmlNodeType.Element) &&
                      (reader.Name == name))
                    {
                        XElement element = (XElement)XElement.ReadFrom(reader);
                        yield return element;
                    }
                }
                reader.Close();
            }
        }

        public static void SaveOnExit()
        {
            string xmlFilename = (string)
               System.Windows.Application.Current.Properties["SavedDetailsFileName"];
            string fullXmlPath = Path.Combine((string)
              System.Windows.Application.Current.Properties["SaveFolder"],
              xmlFilename);
            XDocument document = new XDocument(
               new XElement("MyFriends", getExistingElements()));
            document.Save(fullXmlPath);

        }

        private static List<XElement> getExistingElements()
        {
            List<XElement> elements = new List<XElement>();
            foreach (Friend friend in FriendsList.Instance())
            {
                elements.Add(new XElement("Friend",
                        new XElement("ID", friend.ID),
                        new XElement("name", friend.Name),
                        new XElement("email", friend.Email),
                        new XElement("photo", friend.PhotoUrl),
                        new XElement("video", friend.VideoUrl),
                        new XElement("music", friend.MusicUrl)));
            }
            return elements;
        }
    }
}
大部分代码都是标准的 XLINQ,除了一个小方法;StreamElements() 方法很特别。为什么它很特别呢?因为它允许我们将单个 IEnumerable<XElement> 一个元素一个元素地返回给标准的 XLINQ 查询。这对于加载时间可能是一个考虑因素的大型 XML 文件会有所帮助。它使用了相当新的 C# yield 关键字。
在这堆代码中,值得注意的还有另一个自定义 LINQ 扩展,即针对 XElement 对象的 SafeValue XLINQ 扩展。此 XLINQ 扩展如下所示:
using System;
using System.Collections.Generic;
using System.Text;
using System.Linq;
using System.Data.Linq;
using System.Xml.Linq;
using System.Xml;

namespace MyFriends
{
    public static class CustomXElementExtensions
    {
        public static string SafeValue(this XElement input)
        {
            return (input == null) ? string.Empty : (string)input.Value;
        }
    }
}
有了这个,我们就可以写出这样的东西:
friend.Element("name").SafeValue()
我们漂亮的小 SafeValue() XLINQ 扩展确保我们能得到一个好的值,而不是 null。
我希望您能看到 LINQ 将为我们开发者带来的价值。我认为,如果谨慎使用,它非常酷且强大。
Xceed 数据网格的赞誉
正如我在文章开头所说,我通常不会包含第三方产品,除非我认为它对我和你都有用。我不得不说,免费的适用于 WPF 的 Xceed 数据网格真是太棒了。你基本上可以做以下事情:
- 创建单元格模板
- 创建单元格编辑模板
- 创建单元格验证器
- 创建不同的视图
事实上,如果你喜欢,你可以完全重新设置它的样式。我只是想试用一下。基本上,我尝试了上面所有的事情,所以我将依次讨论它们。
首先要注意的是,Xceed 数据网格托管在 ViewAllUsersControl 控件中。因此,所有相关的标记都在 ViewAllUsersControl.xaml 文件中。另一件需要注意的事情是,Xceed 数据网格绑定到 FriendsList 对象的T结果,这是一个 ObservableCollection<Friend> 类型的对象。但是我们还没有看到 Friend 对象,是吗?最好快速看一下,这样我们就可以知道网格绑定是从哪里来的。
using System;
using System.Collections.Generic;
using System.Linq;
using System.Text;

namespace MyFriends
{
    public class Friend
    {
        public Guid ID { get; set; }
        public string Email { get; set; }
        public string Name { get; set; }
        public string PhotoUrl { get; set; }
        public string VideoUrl { get; set; }
        public string MusicUrl { get; set; }
    }
}
绑定的网格看起来像这样:

这很简单,不是吗?无论如何,我们继续吧。
创建单元格模板
这很简单;你所要做的就是创建一个列并为其定义一个模板。下面是针对 ImageUrl 绑定列的示例:
<!-- Photo Column-->
<xcdg:Column FieldName="PhotoUrl" VisiblePosition="3" Visible="True">
    <!-- Content Non-Edit mode -->
    <xcdg:Column.CellContentTemplate>
        <DataTemplate>
            <StackPanel Margin="5,5,5,5"
                       VerticalAlignment="Center"
                       HorizontalAlignment="Left">
                <Border BorderBrush="White" BorderThickness="2"
                         HorizontalAlignment="Center"
                         VerticalAlignment="Center">
                    <Image x:Name="img"
                           Source="{Binding}" Stretch="Fill"
                           Width="46" Height="46">
                        <Image.ToolTip>
                                <Border BorderBrush="White"
                                        BorderThickness="6"
                                        HorizontalAlignment="Center"
                                        VerticalAlignment="Center">
                                    <Image Source="{Binding}"
                                       Width="150" Height="150"
                                       Stretch="Fill"
                                       x:Name="imgTool"></Image>
                                </Border>
                        </Image.ToolTip>
                    </Image>
                </Border>
                <Border Width="50" Height="50"
                       BorderBrush="White" BorderThickness="2"
                       HorizontalAlignment="Center" >
                    <Border.Background>
                        <VisualBrush Visual="{Binding ElementName=img}">
                            <VisualBrush.Transform>
                                <ScaleTransform ScaleX="1" ScaleY="-1"
                                      CenterX="50"
                                      CenterY="25"></ScaleTransform>
                            </VisualBrush.Transform>
                        </VisualBrush>
                    </Border.Background>
                    <Border.OpacityMask>
                        <LinearGradientBrush
                                StartPoint="0,0" EndPoint="0,1">
                            <GradientStop Offset="0"
                                Color="Black"></GradientStop>
                            <GradientStop Offset="0.6"
                                Color="Transparent"></GradientStop>
                        </LinearGradientBrush>
                    </Border.OpacityMask>
                </Border>
            </StackPanel>
        </DataTemplate>
    </xcdg:Column.CellContentTemplate>
由于 Xceed 数据网格允许我们创建自己的 Template,我们可以简单地为特定单元格创建任何我们想要的内容,这就是我所做的。在这个例子中,我们使用反射在单元格中显示图像。它看起来像下面的单元格:

创建单元格编辑器模板
这实际上也很容易,因为 Xceed 通过创建另一种类型的 Template,即 EditTemplate,使其变得非常简单。我们来看看其中一个:
<xcdg:Column.CellEditor>
    <xcdg:CellEditor>
        <xcdg:CellEditor.EditTemplate>
            <DataTemplate>
                <StackPanel  Margin="0,0,0,0" Orientation="Vertical"
                       Background="{StaticResource blackLinearBrush}"
                       VerticalAlignment="Center" HorizontalAlignment="Left">
                    <Border BorderBrush="White" BorderThickness="2"
                            HorizontalAlignment="Center"
                            VerticalAlignment="Center">
                        <Image x:Name="imgNew"
                               Source="{xcdgWeb:CellEditorBinding}"
                               Stretch="Fill"
                               Width="46" Height="46">
                            <Image.ToolTip>
                                <Border BorderBrush="White"
                                        BorderThickness="6"
                                        HorizontalAlignment="Center"
                                        VerticalAlignment="Center">
                                    <Image Source="{Binding}" Width="150"
                                         Height="150"
                                         Stretch="Fill"></Image>
                                </Border>
                            </Image.ToolTip>
                        </Image>
                    </Border>
                    <Button x:Name="btnAssignNewImage" Content="`"
                       Template="{DynamicResource GlassButton}"
                       FontFamily="Webdings" FontSize="15"
                       FontWeight="Normal" Foreground="#FFFFFFFF"
                       ToolTip="Assign New Image" Width="50"
                       Height="25" Margin="0,5,0,0"
                       HorizontalAlignment="Center"
                       Click="btnAssignNewImage_Click"/>
                </StackPanel>
            </DataTemplate>
        </xcdg:CellEditor.EditTemplate>
    </xcdg:CellEditor>
</xcdg:Column.CellEditor>
当然,在这种情况下,由于我们实际上是在应用一个新值,我们需要一些代码隐藏功能来进行编辑,例如:
private void btnAssignNewImage_Click(object sender, RoutedEventArgs e)
{
    Point topleft = this.PointToScreen(new Point(0, 0));
    DisplayStyle newDisplayStle =
      (DisplayStyle)Application.Current.Properties["SelectedDisplayStyle"];
    double heightOffset = newDisplayStle == DisplayStyle.ThreeDimension ? 20 : 0;

    AddFriendImageWindow addImageWindow = new AddFriendImageWindow();
    (addImageWindow as Window).Height = this.Height + heightOffset;
    (addImageWindow as Window).Width = this.Width;
    (addImageWindow as Window).Left = topleft.X;
    (addImageWindow as Window).Top = topleft.Y;
    addImageWindow.ShowDialog();
    if (!string.IsNullOrEmpty(addImageWindow.SelectedImagePath))
    {
        StackPanel panel =
          VisualTreeHelper.GetParent(sender as DependencyObject) as StackPanel;
        Image image = panel.FindName("imgNew") as Image;
        if (image != null)
        {
            image.Source =
              new BitmapImage(new Uri(addImageWindow.SelectedImagePath));
        }
    }
}
还算可以,我个人觉得。没那么痛苦,是吧?
创建单元格验证器
我个人喜欢这个网格的另一个特点是,可以将验证器插入到某些单元格中。让我们看一个实际的例子。
所以我们这样定义一个带有验证功能的单元格:
<xcdg:Column FieldName="Email" VisiblePosition="2"
          CellErrorStyle="{StaticResource cell_error}" Visible="True">
    <xcdg:Column.CellValidationRules>
        <local:EmailValidationRule/>
    </xcdg:Column.CellValidationRules>
</xcdg:Column>
然后我们有一个验证器,例如:
using System;
using System.Collections.Generic;
using System.Text;
using Xceed.Wpf.DataGrid;
using Xceed.Wpf.DataGrid.ValidationRules;
using System.Windows.Controls;
using System.Globalization;
using System.Text.RegularExpressions;

namespace MyFriends
{

    public class EmailValidationRule : CellValidationRule
    {
        public override ValidationResult
               Validate(object value, CultureInfo cultureInfo,
                        CellValidationContext cellValidationContext)
        {
            string pattern =
              @"^([a-zA-Z0-9_\-\.]+)@([a-zA-Z0-9_\-\.]+)\.([a-zA-Z]{2,5})$";
            Regex regEx=new Regex(pattern);
            if (!regEx.IsMatch((string)value))
            {
                return new ValidationResult(false,
                       "You entered an invalid email");
            }
            return new ValidationResult(true, null);
        }
    }
}
然后,在运行时,我们有一个正在运行的验证器:

创建不同的视图
Xceed 网格开箱即用地支持多种不同的视图,例如表格和卡片。我提供了两个按钮来在这些视图之间切换。这些视图之间的切换很容易实现,如下所示:
private void btnTableView_Click(object sender, RoutedEventArgs e)
{
    TableView tv = new TableView();
    tv.Theme = new LunaMetallicTheme();
    dgFriends.View = tv;
}

private void btnCardView_Click(object sender, RoutedEventArgs e)
{
    CardView cv = new CardView();
    cv.Theme = new LunaMetallicTheme();
    dgFriends.View = cv;
}
以及查看数据网格在卡片视图中的样子:

总而言之,我对 Xceed 网格印象非常深刻,而且它免费的事实不容忽视。如果我的需求需要某种表格数据,我将在一个真实的项目中使用它。
一些有点隐秘的值转换器
作为此应用程序的一部分,我希望能够根据另一个元素的源是否为空来隐藏某个元素。为此,我设计了一个 ValueConverter 来实现这个技巧,如下所示。它在 Xceed 数据网格单元格模板中用于确保视频和音乐单元格的播放/停止/查看按钮仅在关联的 MediaElement 的源不为空时才显示。
using System;
using System.Globalization;
using System.Windows;
using System.Windows.Data;
using System.Windows.Media.Imaging;

namespace MyFriends
{
    [ValueConversion(typeof(Uri), typeof(Visibility))]
    public class SourceToVisibilityConverter : IValueConverter
    {
        #region Instance Fields
        public static SourceToVisibilityConverter Instance =
                      new SourceToVisibilityConverter();
        #endregion
        #region IValueConverter implementation
        public object Convert(object value, Type targetType,
                              object parameter, CultureInfo culture)
        {
            try
            {
                return (value as Uri).AbsolutePath.Equals(string.Empty) ?
                                      Visibility.Collapsed : Visibility.Visible;
            }
            catch
            {
                return Visibility.Collapsed;
            }
        }

        public object ConvertBack(object value, Type targetType,
                                  object parameter, CultureInfo culture)
        {
            throw new NotSupportedException("Cannot convert back");
        }
        #endregion
    }
}
所以我们可以在 XAML 中这样使用这个转换器:
Visibility="{Binding Path=Source, ElementName=videoSrc,
            Mode=Default,
            Converter={x:Static local:SourceToVisibilityConverter.Instance}}"
Vista 风格的对话框
最后一件事,然后我们就完成了……我偶然发现在这个应用程序中,一些常见的对话框,如打开/保存,没有像我自己的 Vista 对话框那样显示,所以我四处寻找,在 SDK 示例中找到了一些能解决这个问题的代码。这显示在下面:
using System;
using System.Windows;
using System.Windows.Interop;
using System.Text;
using System.Collections.Generic;
using System.Runtime.InteropServices;

namespace MyFriends
{
    /// <summary>
    /// One item in the common dialog filter.
    /// </summary>

    public class FilterEntry
    {
        private string display;
        private string extention;

        public string Display
        {
            get { return display; }
        }

        public string Extention
        {
            get { return extention; }
        }

        public FilterEntry(string display, string extension)
        {
            this.display = display;
            this.extention = extension;
        }
    }

    /// <summary>
    /// Displays the common Open and SaveAs dialogs using the Vista-style dialogs.
    /// </summary>

    class CommonDialog
    {
        #region fields

        // Structure used when displaying Open and SaveAs dialogs.

        private OpenFileName ofn = new OpenFileName();
        // List of filters to display in the dialog.

        private List<FilterEntry> filter = new List<FilterEntry>();
        #endregion

        #region properties

        public List<FilterEntry> Filter
        {
            get { return filter; }
        }

        public string Title
        {
            set { ofn.title = value; }
        }

        public string InitialDirectory
        {
            set { ofn.initialDir = value; }
        }

        public string DefaultExtension
        {
            set { ofn.defExt = value; }
        }

        public string FileName
        {
            get { return ofn.file; }
        }

        #endregion

        #region pinvoke details

        private enum OpenFileNameFlags
        {
            OFN_READONLY = 0x00000001,
            OFN_OVERWRITEPROMPT = 0x00000002,
            OFN_HIDEREADONLY = 0x00000004,
            OFN_NOCHANGEDIR = 0x00000008,
            OFN_SHOWHELP = 0x00000010,
            OFN_ENABLEHOOK = 0x00000020,
            OFN_ENABLETEMPLATE = 0x00000040,
            OFN_ENABLETEMPLATEHANDLE = 0x00000080,
            OFN_NOVALIDATE = 0x00000100,
            OFN_ALLOWMULTISELECT = 0x00000200,
            OFN_EXTENSIONDIFFERENT = 0x00000400,
            OFN_PATHMUSTEXIST = 0x00000800,
            OFN_FILEMUSTEXIST = 0x00001000,
            OFN_CREATEPROMPT = 0x00002000,
            OFN_SHAREAWARE = 0x00004000,
            OFN_NOREADONLYRETURN = 0x00008000,
            OFN_NOTESTFILECREATE = 0x00010000,
            OFN_NONETWORKBUTTON = 0x00020000,
            OFN_NOLONGNAMES = 0x00040000,
            OFN_EXPLORER = 0x00080000,
            OFN_NODEREFERENCELINKS = 0x00100000,
            OFN_LONGNAMES = 0x00200000,
            OFN_ENABLEINCLUDENOTIFY = 0x00400000,
            OFN_ENABLESIZING = 0x00800000,
            OFN_DONTADDTORECENT = 0x02000000,
            OFN_FORCESHOWHIDDEN = 0x10000000
        }

        [StructLayout(LayoutKind.Sequential, CharSet = CharSet.Auto)]
        private class OpenFileName
        {
            internal int structSize;
            internal IntPtr owner;
            internal IntPtr instance;
            internal string filter;
            internal string customFilter;
            internal int maxCustFilter;
            internal int filterIndex;
            internal string file;
            internal int maxFile;
            internal string fileTitle;
            internal int maxFileTitle;
            internal string initialDir;
            internal string title;
            internal Int16 flags;
            internal Int16 fileOffset;
            internal int fileExtension;
            internal string defExt;
            internal IntPtr custData;
            internal IntPtr hook;
            internal string templateName;
        }

        private static class NativeMethods
        {
            [DllImport("comdlg32.dll",
             CharSet = CharSet.Auto, SetLastError = true)]
            [return: MarshalAs(UnmanagedType.Bool)]
            public static extern bool
                   GetOpenFileName([In, Out] OpenFileName ofn);

            [DllImport("comdlg32.dll",
             CharSet = CharSet.Auto, SetLastError = true)]
            [return: MarshalAs(UnmanagedType.Bool)]
            public static extern bool
                   GetSaveFileName([In, Out] OpenFileName ofn);
        }

        #endregion

        public CommonDialog()
        {
            // Initialize structure that is passed to the API functions.

            ofn.structSize = Marshal.SizeOf(ofn);
            ofn.file = new String(new char[260]);
            ofn.maxFile = ofn.file.Length;
            ofn.fileTitle = new String(new char[100]);
            ofn.maxFileTitle = ofn.fileTitle.Length;
        }

        /// <summary>
        /// Display the Vista-style common Open dialog.
        /// </summary>

        public bool ShowOpen()
        {
            SetFilter();
            ofn.flags = (Int16)OpenFileNameFlags.OFN_FILEMUSTEXIST;
            if (Application.Current.MainWindow != null)
                ofn.owner =
                  new WindowInteropHelper(Application.Current.MainWindow).Handle;
            return NativeMethods.GetOpenFileName(ofn);
        }

        /// <summary>
        /// Display the Vista-style common Save As dialog.
        /// </summary>

        public bool ShowSave()
        {
            SetFilter();
            ofn.flags = (Int16)(OpenFileNameFlags.OFN_PATHMUSTEXIST |
                                OpenFileNameFlags.OFN_OVERWRITEPROMPT);
            if (Application.Current.MainWindow != null)
                ofn.owner = new WindowInteropHelper(
                                Application.Current.MainWindow).Handle;
            return NativeMethods.GetSaveFileName(ofn);
        }

        /// <summary>
        /// Set the low level filter with the filter collection.
        /// </summary>

        private void SetFilter()
        {
            StringBuilder sb = new StringBuilder();
            foreach (FilterEntry entry in this.filter)
                sb.AppendFormat("{0}\0{1}\0",
                                entry.Display, entry.Extention);
            sb.Append("\0\0");
            ofn.filter = sb.ToString();
        }
    }
}
参考文献
以下是我在本文中查阅、在某些情况下使用并修改的代码列表:
你觉得怎么样?
我只想问,如果您喜欢这篇文章,请投票并留下评论,因为这能让我知道文章的水平是否合适,以及它是否包含了人们需要了解的内容。
结论
希望您阅读本文后学到了一些东西。