
玩转物理:实现基于物理的布局管理器
4.93/5 (25投票s)
一篇关于如何使用简单的物理实现来活跃 WinForms UI 的文章。
引言
在这篇文章中,我决定尝试一种新型的 Windows 应用程序布局管理器。我想,如果我能不使用停靠、吸附或绝对定位来布局应用程序的控件,而是将我的控件悬挂在弹性的“橡皮筋”上,那该多酷啊。这也许不是大多数应用程序的最佳布局管理器,但对于某些 UI 来说,它肯定会非常酷。
我决定让我的物理实现保持相当简单,我会使用弹簧、重力和阻力作为运动约束,但不包括碰撞。
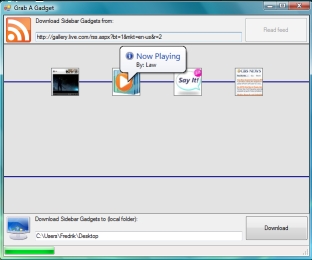
随附下载的示例应用程序读取 Windows Vista 边栏小工具的 RSS 提要,并允许您从“晾衣绳”中“挑选”它们,以此作为可视化下载小工具的方式。我认为它看起来和感觉都很酷。
注意:这是 2 篇文章中的第 1 篇;本文档是完整的实现,但不支持 WPF。在第 2 篇中,我将向您展示如何将此实现移植到 WPF。
免责声明:我是瑞典人,英语不是我的母语,所以如果我在文章中使用“bounciness”(弹跳性)而不是“coefficient of restitution”(恢复系数)之类的术语,请多包涵 :)
使用代码
由于这种实现会使控件移动很多,因此运行使用它的应用程序的计算机能够快速更新窗体非常重要。因此,建议使用 Windows Vista,因为它在更新 UI 控件方面做得非常好。
我使用 LINQ 来选择粒子和弹簧,因此需要 .NET Framework 3.0 或更高版本。
物理
我将介绍我的简单物理实现的基础知识。它相当直接,但我想其中一些部分对于那些几乎没有矢量数学知识或不知道如何使用欧拉积分进行牛顿物理模拟的人来说可能会令人困惑。我的目标是抽象掉物理实现的内部细节,以便每个人都可以使用这个布局管理器构建 UI,而无需先验的物理知识(尽管这仍然需要您理解橡皮筋和重力是如何工作的 :))。
粒子 (Particle)
我的物理实现中最基本的实体是 Particle 类。它代表二维空间中的一个点状实体,可以具有质量。Particle 的其他属性是位置、速度和力。位置和速度当然是粒子的当前位置和速度;力在积分过程中使用(我将在“ParticleSystem”章节中更详细地解释这一点),它是作用在粒子上的所有力的总和。另一个属性是 Control 成员;如果将其设置为非 null,则意味着每当 Particle 的位置发生变化时,它也会改变 Control 的位置。实际的 Particle 永远不会渲染到屏幕上,不像 Spring(弹簧)会渲染(如果启用)。
Control 属性是可选的(可以为 null)是因为,虽然您实际上看不到 Particle,但它们仍然用于构建弹簧系统,充当中介链接或锚点。
Particle 的质量决定了它如何受力影响;质量越重,移动就越困难,如果质量设置为 Single.PositiveInfinity(单精度浮点数的正无穷大),则 Particle 是不可移动的(至少从 ParticleSystem 的角度来看,它仍然可以被用户拖动其 Control 来移动)。
Particle 还包含一个内部临时状态,位于 ParticleState 成员中;这由 ParticleSystem 在计算过程中用于存储导数。
Particle 类实现如下
namespace Bornander.UI.Physics
{
    public delegate void ParticleMovedEventHandler(Particle particle);

    public class Particle
    {
        public event ParticleMovedEventHandler Move;

        public Particle(float mass, Vector position)
        {
            this.Mass = mass;
            this.Position = position;
            this.Velocity = Vector.Empty;
            this.Force = Vector.Empty;
        }

        private void FireMoveEvent()
        {
            if (Move != null)
                Move(this);
        }

        public void AddForce(Vector newForce)
        {
            Force += newForce;
        }

        public void ResetForce()
        {
            Force = Vector.Empty;
        }

        public void SnapControl()
        {
            // If a Control is associated with this Particle then snap


            // the Controls location so that it centers around the Particle


            if (Control != null)
            {
                Control.Location = new Point(
                    (int)Position.X - Control.Width / 2,
                    (int)Position.Y - Control.Height / 2);
            }
        }

        public void MovePosition(Vector delta)
        {
            if (!Single.IsInfinity(Mass))
                Position += delta;
        }

        public void SetPosition(Vector position)
        {
            this.Position = position;
            FireMoveEvent();
        }

        public float Mass
        {
            get; set;
        }

        public Vector Position
        {
            get; set;
        }

        public Vector Velocity
        {
            get; set;
        }

        public Vector Force
        {
            get; set;
        }

        public ParticleState State
        {
            get; set;
        }

        public Control Control
        {
            get; set;
        }
    }
}
Spring
一个未连接任何东西的 Particle 会因为重力而直接掉出屏幕,这时 Spring(弹簧)就派上用场了。Spring 类代表一个连接到两个 Particle 的弹簧。Spring 除了与 Particle 相关的属性外,还有三个属性:静止长度、弹簧常数和阻尼常数。
静止长度是 Spring想要达到的长度,这意味着如果没有其他力作用在 Spring 的两个 Particle 上,弹簧会移动 Particle,直到它们之间的距离为 Spring.RestLength。
弹簧常数是一个描述 Spring刚度的值;这个值越高,弹簧越硬。
阻尼常数是一个描述弹簧应该施加多少内部阻尼的值;值越高,阻尼越大。这用于防止不稳定的运动。
Spring 本身知道如何计算要添加到其 Particle 的力。ParticleSystem 在积分过程中调用 Spring.Apply,使 Spring 施加其力。对于没有矢量数学知识的人来说,Spring.Apply 方法的实现可能会有点吓人。它基本上实现了 此处 描述的函数,但以二维而不是一维的方式。
示例

红色的粒子悬挂在一个(紫色的)弹簧上,弹簧连接到一个不可移动的橙色粒子。黑箭头表示红色粒子的当前速度。蓝箭头是作用在粒子上的力的总和,包括弹簧力和重力。在这种情况下,弹簧比重力更强,将红色粒子拉向橙色粒子。绿箭头表示积分后红色粒子的速度。
Spring 类实现如下
namespace Bornander.UI.Physics
{
    public class Spring
    {
        public Spring(Particle from, Particle to, float restLength,
                      float springConstant, float dampingConstant)
        {
            this.From = from;
            this.To = to;
            this.RestLength = restLength;
            this.SpringConstant = springConstant;
            this.DampingConstant = dampingConstant;
            this.SpringPen = new Pen(Brushes.DarkBlue, 2.0f);
        }

        public void Apply()
        {
            Vector deltaX = From.Position - To.Position;
            Vector deltaV = From.Velocity - To.Velocity;

            float term1 = SpringConstant * (deltaX.Length - RestLength);
            float term2 = DampingConstant * (Vector.Dot(deltaV, deltaX) /
                                             deltaX.Length);

            float leftMultiplicant = -(term1 + term2);
            Vector force = new Vector(deltaX.X, deltaX.Y);

            force *= 1.0f / deltaX.Length;
            force *= leftMultiplicant;

            From.Force += force;
            To.Force -= force;
        }

        public void Render(Graphics graphics)
        {
            graphics.DrawLine(
                SpringPen,
                (int)From.Position.X,
                (int)From.Position.Y,
                (int)To.Position.X,
                (int)To.Position.Y);
        }

        public Particle From
        {
            get; set;
        }

        public Particle To
        {
            get; set;
        }

        public float RestLength
        {
            get; set;
        }

        public float SpringConstant
        {
            get; set;
        }

        public float DampingConstant
        {
            get; set;
        }

        public Pen SpringPen
        {
            get; set;
        }
    }
}
ParticleSystem (粒子系统)
ParticleSystem 负责跟踪所有 Particle 和 Spring,并负责进行积分。积分是计算模拟的下一步,它分一系列步骤进行
- 将作用在所有
Particle上的所有力设置为零。 - 给每个
Particle添加一个重力。 - 给每个
Particle添加一个阻力。 - 对于每个
Spring,计算并将其力添加到其关联的Particle。 - 为每个
Particle存储一个更新的ParticleState,其中包含刚计算出的导数。 - 将
ParticleState乘以每个Particle的经过时间。 - 使用导数更新每个
Particle的当前位置和速度。
这每帧模拟计算一次。整个过程听起来可能很复杂,但实际上发生的是:弄清楚作用在 Particle 上的力,计算这些力引起的位移和速度变化,然后将这些变化添加到 Particle 的当前位置和速度。为了估计下一步,实现使用了 欧拉积分,它在使用的时间步长下不够精确,但对于这个特定的实现来说已经足够了。
由于重力和阻力等是全局的模拟量,因此它们归 ParticleSystem 所有,并作为属性公开。
namespace Bornander.UI.Physics
{
    public class ParticleSystem
    {
        #region Private members

        private List<Particle> particles = new List<Particle>();
        private List<Spring> springs = new List<Spring>();

        #endregion

        public ParticleSystem()
        {
            this.DragFactor = 0.75f;
            this.Gravity = new Vector(0.0f, 20.0f);
        }

        public void CalculateDerivative()
        {
            foreach (Particle particle in particles)
            {
                // Clear all existing forces acting on the particle


                particle.ResetForce();

                // Add a gravity force


                particle.AddForce(Gravity);

                // Add world drag


                Vector drag = particle.Velocity * -DragFactor;
                particle.AddForce(drag);
            }

            foreach (Spring spring in springs)
            {
                // Apply what ever forces this spring holds


                spring.Apply();
            }

            foreach (Particle particle in particles)
            {
                particle.State = new ParticleState(particle.Velocity,
                                 particle.Force * (1.0f / particle.Mass));
            }
        }

        public void DoEulerStep(float deltaTime)
        {
            CalculateDerivative();

            foreach (Particle particle in particles)
            {
                particle.State.Position *= deltaTime;
                particle.State.Velocity *= deltaTime;

                particle.Position = particle.Position + particle.State.Position;
                particle.Velocity = particle.Velocity + particle.State.Velocity;
            }
        }

        public void Render(Graphics graphics)
        {
            foreach (Spring spring in springs)
            {
                spring.Render(graphics);
            }
        }

        public float DragFactor
        {
            get; set;
        }

        public Vector Gravity
        {
            get; set;
        }

        public List<Particle> Particles
        {
            get { return particles; }
        }

        public List<Spring> Springs
        {
            get { return springs; }
        }
    }
}
SimulationPanel (模拟面板)
为了方便使用这个基于物理的布局管理器,以上所有内容都由继承自 System.Windows.Forms.Panel 的 SimulationPanel 处理。这意味着添加使用这种布局的面板就像在 Visual Designer 中拖放一个组件一样简单。用于更新模拟的计时器内置在 SimulationPanel 中,因此这也为您处理好了。不幸的是,目前没有一种方法可以可视化地创建 Spring 和 Particle 系统,但这将是本文第 2 部分的范围。
SimulationPanel 是修改模拟中实体的首要接触点。要添加三个 Particle(两个不可移动的,以及一个中间的可移动的,它们通过弹簧连接到不可移动的粒子),您只需执行以下操作:
    ...

    // Create to fixed particles acting as immovable anchors, notice the
    // use of Single.PositiveInfinity to create a really heavy particle.


    Particle leftAnchor = new Particle(Single.PositiveInfinity, 0.0f, 100.0f));
    Particle rightAnchor = new Particle(Single.PositiveInfinity, 200.0f, 100.0f));

    // Create a particle in the middle of the the two anchors


    Particle center = new Particle(5.0f, 100.0f, 50.0f);

    // Create the two springs and attach them to the particles


    // The rest length is set to 25.0 so the spring will pull on the center particle


    Spring leftSpring = new Spring(leftAnchor, center, 25.0f, 3.0f, 2.0f);
    Spring rightSpring = new Spring(rightAnchor, center, 25.0f, 3.0f, 2.0f);

    // Grab a reference to the particle system and add the entities


    ParticleSystem particleSystem = simulationPanel.ParticleSystem;

    particleSystem.Particles.Add(leftAnchor);
    particleSystem.Particles.Add(rightAnchor);
    particleSystem.Particles.Add(center);

    particleSystem.Springs.Add(leftSpring);
    particleSystem.Springs.Add(rightSpring);

    // Enable rendering of the springs


    simulationPanel.RenderParticleSystem = true;

    ...
在此之后,您需要初始化模拟并启动它:
    ...

    simulationPanel.OwnerForm = this;

    simulationPanel.Initialize();
    simulationPanel.StartSimulation();

    ...
通过设置 SimulationPanel.OwnerForm 属性,模拟面板可以监听 Form.Move 事件。它这样做是为了在您移动窗口时,粒子能够相应地移动。这意味着您可以通过摇动窗口来摆动控件。
SimulationPanel.Initialize 方法会遍历所有子控件,并为它们添加鼠标监听器,以便它们可以通过鼠标移动。如果您不希望控件能被自己移动,则不需要此步骤。
最后一步是通过启动内部 Timer 来启动模拟。
例如,如果您想为中心粒子关联 Control,您需要使用 Particle.Control 属性显式设置它:
    Particle center = new Particle(5.0f, 100.0f, 50.0f);
    center.Control = new System.Windows.Forms.Button();
向量
我决定实现自己的二维向量,以避免对 DirectX 或 XNA 的任何依赖。我不会详细介绍这个类,因为互联网上有很多资源比我能描述得更好地解释二维矢量数学。
示例应用程序
为了测试这个布局管理器,我决定创建一个应用程序,让用户通过从弹性“晾衣绳”上抓取和拉动物品来从互联网下载东西。示例应用程序是一个允许用户下载 Windows Vista 边栏小工具精选内容的应用。它通过读取 RSS 流,将预览图片加载到一个与 Particle 关联的控件中,该 Particle 连接到屏幕顶部的多个 Spring。然后,通过将预览图片向下拖动到屏幕上,应用程序会从顶线断开 Spring,当控件被释放时,底线(代表某种形式的“购物车”)会创建 Spring,这些 Spring 会连接到那里的 Particle,将其拉到底部线。

然后,用户只需点击下载,即可将 .gadget 文件下载到他们选择的位置。我承认这可能不是世界上最有用的应用程序,但它肯定看起来很酷,而且我认为这是一种很棒的下载东西的方式。
制作断裂的弹簧 (Making Springs Snap)
示例应用程序中“晾衣绳”的断裂效果不幸没有魔法;Spring 本身没有内置的耐久性会导致其过度拉伸而断裂。很抱歉,所有这些都必须“手动”完成,通过检查 Particle 在被鼠标拖动时的坐标。Particle 公开一个名为 Particle.Move 的事件,当其位置通过 Particle.SetPostion 方法更改时会触发该事件。当 Particle 被拖动时,SimulationPanel 会调用此方法。通过监听此事件,示例应用程序可以检查粒子是否被拖动到面板的下半部分,在这种情况下,会移除固定它的 Spring。
class GadgetDownloadForm
{
    ...

    private void HandleParticleMoveByDrag(Particle particle)
    {
        if (sourceItemPickSystem.Particles.Contains(particle))
        {
            if (particle.Position.Y > (simulationPanel.Height / 2) + particle.Control.Height)
            {
                sourceItemPickSystem.RemoveParticle(particle);
            }
        }
    }
}
上面代码片段中的 sourceItemPickSystem 变量是一个辅助类,代表一个可以挂载和移除 Particle 的“晾衣绳”。它根据 SimulationPanel 的宽度和当前挂在线上的 Particle 数量来处理 Spring 的静止长度的重新计算。
读取 RSS 提要 (Reading RSS Feeds)
用于读取 RSS 提要的代码基本上是创建屏幕保护程序启动器项目时生成的代码的一个稍作修改和清理的版本。
要下载实际的 .gadget 文件,会加载并解析(以一种相当丑陋但功能的方式)RSS 项的 Link 元素指向的页面,然后使用 WebClient 下载文件。
未来改进
我计划在这一系列两篇文章的第二部分中添加的内容是:
- WPF 移植,以便它可以在 WPF 中使用,而不是 WinForms。
- 一个 WYSIWIG(所见即所得)的视觉设计器风格的应用程序,允许您创建弹簧-粒子系统。
关注点
如果您以前从未尝试过任何物理编码,我相信这个应用程序是一个非常简单的起点。
SimulationPanel 监听全局、跨组件鼠标事件的方式与我在 这篇文章 中所做的类似。
关于 LINQ 和 C# 中的 SQL 风格语法添加:我并不完全确信将 LINQ 关键字添加到 C# 语言是一个好主意,因为我觉得这会使语言臃肿。我不介意添加 LINQ,这都很好,但我对在语言级别添加对一组类的支持持怀疑态度。不过,在使用了一段时间之后,我必须说它非常易于使用,而且非常直观。我仍然不确定它是否没有使语言臃肿,但我已经不在乎了。我喜欢它。
非常欢迎所有评论。
历史
- 2007-12-03 - 初始版本。