
Windows 服务实战 I
4.73/5 (56投票s)
Explain windows service basics and deployment with details.
Download SimpleWindowsService.zip - 427 KB
引言
When we were developing our Corporate Portal, I was asked for a functionality to congratulate our staff on their birthdays by sending an email. There was a congratulating message doing the same task on the main page of Intraweb, but it was only for those who opened it. But we wanted that when they opened their mailbox, they would see a congratulating message for their own birthdays.
Therefore, I realized that this could not be accomplished with a web application and I decided to create a Windows Service that would run on the server and search once a day for staff birthdays, then send them the message if there was a match.
Briefly, the task is to search the database for the staff table and, if there are birthdays matching the day, send them a congratulatory message (email). I thought that this could best be achieved using a Windows Service.
The basics of Windows services are given in this article. If you feel your knowledge is sufficient, you can skip this one and proceed to the next article here. Windows Services in Action II.
背景
Some tasks can be effectively solved with only Windows services. So every developer should decide when to use them and how to use them. I searched about Windows services because I needed them in numerous cases. After all the coding work, I decided to share it with other coders.
Windows Services in .NET
First, I will try to give you basic information about Windows services in .NET and show how we can use them in a real-world task. Steps
1. What are Windows services?
2. The Architecture
3. The Methods
4. The Components
5. Create a Windows service application
6. Installation process
7. Monitoring and administration
1. What are Windows services?
Windows services are used to create long-running executable applications that run in their own Windows sessions in the background. Windows services do not have a user interface because they are not meant to interact with users. They can be configured to start automatically when the computer boots, we can start them manually, or some start when needed. They can be started, paused, restarted, or stopped using the Service Control Manager, which is the central utility provided to control them.
They must be installed on the system to run in a normal manner. We cannot run or debug Windows services without installation. We need a special component to install them or take special steps to have them ready to run. Windows service applications run in a different window station than the interactive station of the logged-on user. Because the station of the Windows service is not an interactive station, they should log to the Windows Event Log instead of using a user interface.
Windows service applications run in their own security context and are started before any users log on to the computer they are installed on. Some examples of Windows service applications:
Network Connections, Print Spooler, Net Logon… You can see them by typing services.msc in the Run menu item of Windows Start Menu if you have an NT-based OS like Windows 2000, XP, 2003 Server…
2. The Architecture of Windows services in .NET
- ServiceBase Class To create a new service class, it is inherited from the ServiceBase class. The methods of the class can be overridden to change their functionality if needed.
- ServiceProcessInstaller
A Windows service must be represented using the ServiceProcessInstaller class to communicate with and control the service.
ServiceInstaller
A Windows service must be expanded using the ServiceInstaller class to be able to use the standard .NET installation method.- The namespace of these classes is System.ServiceProcess and their assembly is System.ServiceProcess. So they can be found in system.serviceprocess.dll.
3. The Methods
There are several methods exposed by the ServiceBase class. These methods can be overridden to add custom behavior.
OnStart: This is called when the service starts running. So we can override it if we need to take an action at this step.
OnPause: This is called when the service is paused.
OnStop: This is called when the service is stopped.
OnContinue: This is called when the service is resumed after being paused.
OnShutdown: This is called just before your system shuts down.
OnCustomCommand: This is called when your service receives a custom command.
OnPowerEvent: This is called when a power management event is received.
4. The Components
- First of all, the service has some properties like CanStop (true by default), CanShutdown, CanPauseAndContinue, ServiceName (Service1 by default).
- The EventLog component is widely used in Windows services. Logs can be created by this component very simply. Log is the name of the log. The Source property is to specify the application name to use when writing to the event log. There will be some code examples related to the event log component.
- ServiceInstaller and ServiceProcessInstaller components are necessary to make the Windows service ready for use with a standard setup project. These two components are added automatically if we add an installer to the service. The most frequently set properties of ServiceInstaller are ServiceName, which is shown in the services tool, and StartType, which determines when the service is started. The most important property of the ServiceProcessInstaller component is account. Usually, this property is set to LocalService.
5. Create a Windows service application
We can create a Windows service by writing code or by using the Windows Service project template.
Creating a Windows Service
- Open Visual Studio 2005, click File, then New, and choose the Project menu item. You will see the window below.

- Select the Windows Service project template and rename the project name to “SimpleWindowsService” or whatever you want.
- Then VS will create all basic classes for you, and you will see an environment like below.

- You can change the name of service1 to SimpleService. If you do this, a small window will appear and ask you whether to change related references. Click yes.
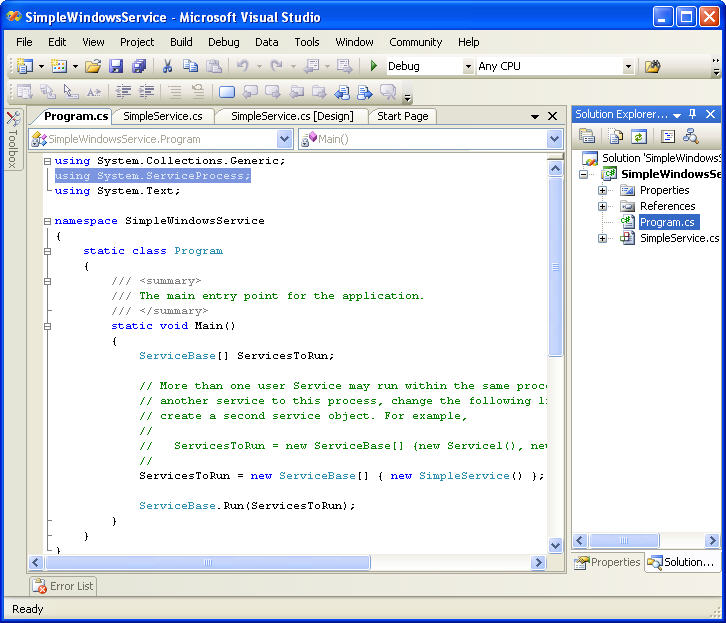
- If you double-click the workspace of SimpleService[Design], you can see the code page where you can work when necessary. Illustrated below.

- As you see, most of the code and classes are created automatically. Program.cs is where the service is created and run. It uses ServiceProcess. So you can see `using System.ServiceProcess;` code at the top.
- Usually, you don’t have to do anything here.
Now, our SimpleWindowsService is ready to go. You can build it (by pressing F6). But we cannot run it because it is not installed. And even if it is installed, it doesn’t have any functionalities except starting and stopping.
Therefore, we will add some simple functionalities to our SimpleService.
Adding some functionalities to a Windows Service
- Open SimpleService.cs in Design mode.
The task is to write to a log when the service starts and stops so that we will be simply informed using Windows standard Event Viewer. - When in Design mode of SimpleService.cs, drag an `EventLog` component from the Components tab in the Toolbox to the design area.
(To switch to Design mode, press Shift+F7, and to switch to code view, press F7)

- Rename the `eventLog1` component’s name to `eventLogSimple`. The event log component must be initialized in the `SimpleService` method, which is already created automatically in `SimpleService.cs`. After we modify the code, it will look like below:
public SimpleService()
{
            InitializeComponent();
    // Initialize eventLogSimple
    if(!System.Diagnostics.EventLog.SourceExists("SimpleSource"))
        System.Diagnostics.EventLog.CreateEventSource("SimpleSource","SimpleLog");
    eventLogSimple.Source= "SimpleSource";
    eventLogSimple.Log = "SimpleLog";
}
- Add the line below to the `OnStart` Method, which is already created.
eventLogSimple.WriteEntry("Hello world from Simple Service!");
- Add the line below to the `OnStart` Method, which is also already created.
eventLogSimple.WriteEntry("Simple Service stopped!");
- Press F6 to build our Windows service. If you see the “Build succeeded” message at the bottom on the status bar, you are done. Now, our Windows service is ready to be installed.
6. Installation process
Install the Windows Service
The easiest way to install a Windows service is by using the installer components and the Setup Project of Visual Studio 2005.
- Right-click `SimpleService.cs` in Solution Explorer and select View Designer.
- Right-click the design area and select Add Installer. Then the `ProjectInstaller.cs` page will appear in design view. And there will be two components replaced in it: `serviceProcessInstaller1` and `serviceInstaller1` like below:

- Rename them as `serviceProcessInstallerSimple` and `serviceInstallerSimple` respectively. Find the `ServiceName` property of `serviceInstallerSimple` in the Properties window.
- Rename its value to SimpleService. It is Service1 (default value). The service will be presented by this value. So it is better to set a meaningful name.
- Another important property of the `serviceInstallerSimple` component is `StartType`. It has three values: Manual, Automatic, and Disabled. It is set to Manual by default. This means we must start the Service manually. Let’s set the property to Automatic so that it starts when Windows starts.

- After that, select `serviceProcessInstallerSimple` in the designer and set the Account Property to LocalService. Therefore, the service will be installed and run under a local account.
- In Solution Explorer, select the `SimpleWindowsService` project, right-click it, and select Properties.
- The Property Designer of the project will appear. Choose `SimpleWindowsService.Program` from the Startup object on the Application page.

- In Solution Explorer, select Solution “SimpleWindowsService”, right-click it, and select Build Solution. If everything went OK, you will see the “Build succeeded” message at the bottom.
The service can now be installed. There are two installation methods:
- A Windows service can be installed on your system using `InstallUtil.exe`. The utility must be run from the Visual Studio 2005 Command Prompt (usually found in "C:\Program Files\Microsoft Visual Studio 8\VC\". For instance, C:\Program Files\Microsoft Visual Studio 8\VC\installutil C:\SimpleWindowsService\SimpleWindowsService\bin\Debug\ SimpleWindowsService.exe in our case.

And to uninstall the service, the utility must be used with the –u parameter: C:\Program Files\Microsoft Visual Studio 8\VC\installutil -u C:\SimpleWindowsService\SimpleWindowsService\bin\Debug\ SimpleWindowsService.exe
- Another method is to add a setup project to the solution and use the resulting package to install and uninstall the Windows service. In this case, the Add or Remove Programs tool in the Control Panel of the Windows system can be used to uninstall it.
Adding a setup project to our solution
- Right-click the `SimpleWindowsService` solution in Solution Explorer, select Add, New Project, and select Deployment project. Give a meaningful title to the project as seen below.

- Right-click `SetupSimpleWindowsService` in Solution Explorer, select Add, then choose Project Output.

- From the list box, select Primary Output, and click OK.

- To add a custom action, right-click the setup project in Solution Explorer, select View, and then click Custom Actions.

- Right-click the Custom Actions node and choose Add Custom Action.

- Double-click the Application Folder in the list box to open it, select Primary Output from SimpleWindowsService (Active), and click OK.

- The primary output is added to all four nodes of the custom actions — Install, Commit, Rollback, and Uninstall.

- In Solution Explorer, right-click the `SimpleWindowsServiceSetup` project and click Build. After building the solution, you can find the setup project `SetupSimpleWindowsService.msi` in the setup folder. (C:\SimpleWindowsService\SetupSimpleWindowsService\Debug in our case.)

- It can be double-clicked to run the setup program, and it is used to install, uninstall, commit, and rollback. Finally, the Setup Wizard of our solution will appear, and you will follow familiar setup steps.
- Or the setup project can be started by right-clicking the setup project in Solution Explorer and selecting Install.

- After finishing the installation, it can be seen in Services on our Windows System.
- To view Services, from Control Panel choose Administrative Tools and click Services.

- To start the service, right-click on it and select Start.

- To view the logs of our Windows service, click Event Viewer in Administrative Tools. You can see the SimpleLog item in the treeview on the left, which was created by our service, and this item is where our services logs are kept. If you started the service, you can see an event log on the right.

- Double-click on it to open, then you can see the message "Hello world from Simple Service!" here.

- To uninstall it, you can use Add or Remove Programs in Control Panel.

7. Monitoring and administration
We said that Windows services don’t need a user interface. Therefore, we have to manage them using other tools. There are three ways:
1. Microsoft Services: The Services tool in Administrative Tools is also used to monitor and manage services.
2. The console: Services can be managed by using the command prompt. The line below is used to start the service:
C:\net start SimpleWindowsService
3. Yes, we can manage them programmatically. I think this is out of the scope of this article.
结论
I think the solution is simple but, of course, should be improved to overcome your real-time problems. I am planning to improve my solution in the future and expect your help. I am planning to write another article to show you how a Windows service can be used.
历史
21 Aug 2007 Initial revision.