
ClipSpy+
4.91/5 (33投票s)
一个揭示剪贴板奥秘的实用工具,现在附带一个数据注入器,允许您将各种数据格式传递到剪贴板。

引言
我最初计划将此应用程序命名为 ClipSpy,但在项目进行到一半时,我想到最好在 Google 上搜索一下,看看是否有其他东西与此名称相关联,结果发现在 Code Project 上有一篇 Michael Dunn 撰写的优秀文章,题为 ClipSpy。在查看了 Michael 的文章后,我决定继续我的项目,因为他的文章写于 2001 年,而 Clipboard API 自那时以来已经发生了变化。我计划以不同的方式呈现数据,并深入探讨一些细节。这个实现是用 C# 编写的,我想了解 Clipboard 及其内部工作原理。
这就是 ClipSpy+ 的由来,希望本文能向您介绍 Clipboard 的所有魅力!
在以下部分中,我们将探讨 Clipboard 的内部工作原理,当我们对它有了基本了解后,我将解释如何使用 ClipSpy+ 应用程序。所以让我们把问题分解成可管理的小块
- 更新
- 剪贴板 101
- 剪贴板链和活动通知的注册/注销
- 基本 API
- 剪贴板 201
- 数据格式
- 高级 API
- 注入数据
- 使用 ClipSpy+
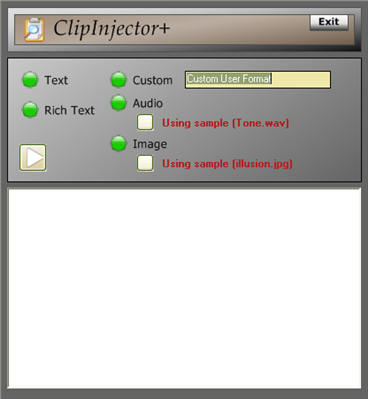
- 使用 ClipInjector+
- 参考资料 - 我在路上收集到的一些链接
一如既往,我希望您阅读本文的收获能像我撰写本文一样多!
更新
为了使应用程序更稳定并获取第一版中无法获取的数据,需要解决一些主要问题。
我需要一种方法来测试新版本,以确保我可以将不同的格式传递给 Clipboard 并使其接受任何类型的数据,所以我创建了 ClipInjector+ 来注入不同的格式。它运行得非常好,所以我决定将其作为文章的一个有用补充,也是一个很好的教学工具。我添加到注入器中的自定义数据格式选项将向您展示自定义格式以及数据传递方式的可能性。我使用一个结构,其中包含注入器中格式控件的状态以及 RichTextBox 中的文本作为 string 传递给 Clipboard。我也可以轻松地将其作为 string[] 或 MemoryStream 传递,但使用 StringBuilder 创建 string 很容易。
主屏幕的一个新增功能是右上角的带启动图像的按钮,它会启动注入器。在数据查看器中,我在左上角添加了一个按钮,用于播放遇到的 wave 文件。
剪贴板 101
Clipboard 类使用全局内存来存储和检索剪切、复制和粘贴操作以及拖放文件期间的数据。它通过以各种格式存储与对象相关的数据片段来表示正在操作数据的不同方面。我们将在以下部分中更详细地介绍不同的数据格式。
剪贴板链和活动通知的注册/注销
Windows 为任何有兴趣从 Clipboard 拦截数据的人提供了一个钩子,允许我们将自己添加到侦听器链或链表中。我们在这里唯一需要做的就是将传递给我们的数据转发给链中的下一个侦听器。不要打破链,否则你将如履薄冰!也就是说,根据 MSDN 文献,可能会发生不可预测的事情。我还没有勇气去尝试,至少是在知情的情况下!
要将自己注册为侦听器,我们必须求助于一些互操作。
[DllImport("User32.dll", CharSet = CharSet.Auto)]
public static extern
IntPtr SetClipboardViewer(IntPtr hWnd);
[DllImport("User32.dll", CharSet = CharSet.Auto)]
public static extern
bool ChangeClipboardChain(
      IntPtr hWndRemove,
      //handle to window to remove
      IntPtr hWndNewNext
      //handle to next window
);
SetClipboardViewer 调用用于 注册 为侦听器,使用方式如下
private IntPtr ClipboardViewerNext;

/// <summary>
/// Add this control to the Clipboard chain to receive notification events|
/// </summary>
private void RegisterClipboardViewer()
{
     ClipboardViewerNext =   SetClipboardViewer(this.Handle);
}
ClipboardViewNext 是链中下一个侦听器的指针,我们必须保留它,以便在我们从链中移除自身时使用,如下所示
/// <summary>
/// Remove this form from the Clipboard Viewer list
/// </summary>
private void UnregisterClipboardViewer()
{
     ChangeClipboardChain(this.Handle, ClipboardViewerNext);
}
现在来谈谈问题的核心!
我们已经注册为侦听器了,现在呢?嗯,我们必须重写 WndProc 方法
/// <summary>
/// Process window messages
/// <remarks>
/// This code was not entirely written by me but has been modified from
/// compiled from examples
/// found while researching the subject!
/// </remarks>
/// </summary>
/// <param name="m"></param>
protected override void WndProc(ref Message m)
{
     switch ((Msgs)m.Msg)
     {
     case Msgs.WM_DRAWCLIPBOARD: //0x308
          //Retrieve the data object and Process it
          IDataObject data = Clipboard.GetDataObject();
          ProcessClip(data);
           //
           // Each window that receives the WM_DRAWCLIPBOARD message
           // must call the SendMessage function to pass the message
           // on to the next window in the clipboard viewer chain.
           //
            SendMessage(ClipboardViewerNext, m.Msg, m.WParam, m.LParam);
            break;

           //
           // The WM_CHANGECBCHAIN message is sent to the first window
           // in the clipboard viewer chain when a window is being
           // removed from the chain.
           //
      case Msgs.WM_CHANGECBCHAIN: //0x30D
          // When a clipboard viewer window receives the WM_CHANGECBCHAIN message,
          // it should call the SendMessage function to pass the message to the
          // next window in the chain, unless the next window is the window
          // being removed. In this case, the clipboard viewer should save
          // the handle specified by the lParam parameter
          // as the next window in the chain.
          //
          // wParam is the Handle to the window being removed from
          // the clipboard viewer chain
          //Param is the Handle to the next window in the chain
          //following the window being removed.
          if (m.WParam == ClipboardViewerNext)
          {
                 //
                // If wParam is the next clipboard viewer then it
                // is being removed so update pointer to the next
                // window in the clipboard chain
                //
                ClipboardViewerNext = m.LParam;
          }
          else
          {
                 SendMessage(ClipboardViewerNext, m.Msg, m.WParam, m.LParam);
           }
           break;
     default:
           //
           // Just pass the message on.
           //
            base.WndProc(ref m);
           break;
}
代码应该不言自明。
基本 API
Clipboard 类定义了用于检查、获取和设置特定类型数据的方法,但我发现它们在可处理的数据类型方面具有限制性。如果您遵守规则并且只处理它理解的数据,那么您就没问题。下面列出了可用方法
- 对于音频 -
ContainsAudio/GetAudioStream/SetAudio - 对于通用数据 -
ContainsData/GetData/SetData - 对于下拉列表 -
ContainsFileDropList/GetFileDropList/SetFileDropList - 对于图像 -
ContainsImage/GetImage/SetImage - 对于文本 -
ContainsText/GetText/SetText
我不会详细介绍这些,因为它们在帮助文件和 MSDN 中都有详细说明。
如果您不关心处理任何不常见的东西,这些方法会很好用,但我需要查看任何抛给我的东西,并且我想以低级别呈现数据,所以我使用了与 IDataObject 对象相关的方法。这些将在下一节中详细讨论。
剪贴板 201
IDataObject 接口提供以下方法来处理其中包含的数据
GetDataPresent- 用于确定给定格式的数据对象是否可用或是否可以转换为该格式GetFormats- 返回此对象包含或可以转换的格式列表GetData-获取数据对象SetData-设置数据对象
GetFormats 方法返回与对象关联的格式列表。其中大多数不引人注目,似乎没有可用的规范来确定它们的用途,但相关的格式如下所列
- 文本 - 简单文本
- 富文本格式 - 富文本
- HTML 格式 - HTML
FileNameW- 描述对象所在位置的完整路径和文件名Bitmap- 位图数据DeviceIndependentBitmap- 通用位图数据
注意:随着我的研究继续,如果我发现更多,我将更新此列表,但目前这些是我检查的相关格式。
举个例子,如果我们复制一个 RTF 选择,会涉及到以下格式
System.String- 包含 .NETstring格式的文本- Unicode Text - 作为 Unicode 文本
- Text - 仅作为普通文本
- Rich Text Format - 这是富文本
- Hidden Text Banner Format - 未用于任何我们需要的东西,即我不知道
- Locale - 未用于任何我们需要的东西 - 我认为是与文化有关的东西?
如您所见,信息以多种格式提供,以适应可能使用该信息的应用程序。
在将数据渲染为原始形式时,我发现通过遍历 GetFormats 方法返回的格式列表,数据以以下方式之一存储
System.StringSystem.String[]MemoryStreamSystem.Bitmap(只是一个Stream)
下面的代码是我用来从 DataObject 中提取原始数据的代码。
注意:我尝试从多个应用程序复制了许多不同类型的数据等,到目前为止只发现了这些。如果我发现更多格式,我会进行更新。
public void ProcessRawData(IDataObject data, bool IsUnknowClip)
{
     string[] strs = new string[20];
     dataFormats = data.GetFormats(true);

     try
     {
         int index = 0;
         MemoryStream ms = null;
         foreach (string s in dataFormats)
         {
            switch (data.GetData(s, true).GetType().ToString())
            {
               case "System.String[]":
                   strs = (string[])data.GetData(s, true);
                   rawDataBuffers[index++] = strs[0];
                   break;
               case "System.IO.MemoryStream":
                   ms = (MemoryStream)data.GetData(s, true);
                   rawByteBuffers[index++] = ms.ToArray();
                   break;
               case "System.String":
                   rawDataBuffers[index++] = (string)data.GetData(s, true);
                   break;
             }
         }
     }
     //The catchall, there was an error processing the data
     catch
     {
         if (IsUnknowClip)|
            title = "ERROR - Processing data";
      }
}
学习这个的最佳方法是使用 ClipSpy+ 并检查您学到的东西。这让我们开始实际使用这个该死的东西,所以现在就开始吧!
注入数据
注入数据与检索数据相反。如果我们知道如何检索数据,并且希望读到这里您已经知道了,我们可以想象如何将数据传递到 Clipboard。我们看到有四个选项可用于构建我们的数据:string、string[]、MemoryStream 或 Bitmap。
注意:您可能传递的任何数据都必须是 Serializable。下面的代码是我在传递自定义格式数据时使用的类。
[Serializable]
public class CustomFormatStruct : Object
{
public bool textActive = true;
public bool rtfActive = true;
public bool audioActive = true;
public bool imageActive = true;
public string data = string.Empty;
public string name = string.Empty;
public CustomFormatStruct(bool ta, bool ra, bool aa, bool ia, string d, string n)
{
    textActive = ta;
    rtfActive = ra;
    audioActive = aa;
    imageActive = ia;
    data = d;
    name = n;
}

public override string ToString()
{
    StringBuilder sb = new StringBuilder();
    sb.Append("This is an example of the kinds of data that can be passed
                using the Clipboard\n\n");
    sb.Append("<CustomFormatStruct>\n");
    sb.Append("\t Text Data Sent: " + textActive.ToString() + "\n");
    sb.Append("\t Rtf data sent: " + rtfActive.ToString() + "\n");
    sb.Append("\tAudio data sent: " + audioActive.ToString() + "\n");
    sb.Append("\tImage data sent: " + imageActive.ToString() + "\n");
    sb.Append("</CustomFormatStruct>\n\n");
    sb.Append("<" + name + ">\n");
    sb.Append("\t" + data + "\n");
    sb.Append("</" + name + ">");
    return sb.ToString();
}
如果您查看下面的代码,您将看到如何根据数据类型以各种数据格式传递不同的数据,例如,如果我们要传递文本,我们使用 Text 格式等等。一开始看起来有点令人望而生畏,但一旦你开始使用它,它确实是一个容易理解的概念。
/// <summary>
/// Add data to the Clipboard
/// </summary>
/// <param name="sender"></param>
/// <param name="e"></param>
private void button1_Click(object sender, EventArgs e)
{
    if (richTextBox1.Text == string.Empty)
        richTextBox1.Text = "Tried to fool me didn't ya? Enter some text and try again!";

    DataObject data = new DataObject();
    //If we are going to send TExt set it here
    if (optionTextActive)
        data.SetData(DataFormats.Text, richTextBox1.Text);
    //Struct for our custom data
    CustomFormatStruct cfs = new CustomFormatStruct(
    optionTextActive,
    optionRtfActive,
    optionAudioActive,
    optionImageActive,
    richTextBox1.Text,
    textBox1.Text);
    if (optionCustomActive)
    {
        data.SetData("ClipInjectorPlus", "This format was generated byt ClipInjector+");
        data.SetData(textBox1.Text, cfs.ToString());
    }

    //Rtf data here
    if (optionRtfActive)
        data.SetData(DataFormats.Rtf, richTextBox1.Rtf);

    //Image data here
    if (optionImageActive)
        data.SetData(DataFormats.Bitmap, image);

    //Audio data here
    if (optionAudioActive)
        data.SetData(DataFormats.WaveAudio, audioData);

    //Do the deed!
    Clipboard.Clear();
    Clipboard.SetDataObject(data);
}
使用 ClipSpy+
您可能知道或不知道,我一直在自学 GDI+ 和图形,所以用户界面将展示我在此过程中学到的一些东西。我本可以做更多,但那样我就不会在下一篇文章中留下任何惊喜了。
所以,拍了拍自己的背,休息了一下,重新调整了手臂,我现在准备向您展示如何使用这个奇妙的实用工具。
图 1 和图 2 分别显示了 ClipSpy+ 的完整/扩展模式和迷你或折叠布局。

- A 切换声音开/关
- B 启用/禁用 ClipSpy+ 拦截数据
- C 筛选栏,切换类别(不活动时变暗)
- 注意:如果您单击栏左侧的绿色筛选按钮,它会将所有类别设为活动状态。
- D 当前剪辑对象 - 简要描述和指示类型的图标
- E 显示视图切换(正常/原始数据)
- F 历史树。剪辑插入到相应类别的开头。
- G 表单控件(从左到右:帮助,最小化到托盘,最小化到迷你模式,退出)
- H 视图窗格(正常或原始)
- 在原始模式下,
ComboBox包含各种格式。选择一种格式会在查看器中显示相应的数据。
- 在原始模式下,

默认情况下,应用程序启动时会注册自身并打开声音。
使用 ClipInjector+
使用注入器非常简单。可用格式位于上方窗格中,它们决定了是否设置数据以及为各种可用数据格式设置什么数据。设置好要使用的选项后,单击格式区域左下角的箭头按钮,这将把剪辑设置到 Clipboard!数据发送后,它会被 ClipSpy+ 应用程序接收,在那里可以查看数据。
好了,这次就到这里,祝您编程愉快!
参考文献
- CodeProject: ClipSpy - Michael Dunn 的一篇优秀文章
- MSDN: 剪贴板 - 包含指向其他 MSDN 文章的链接
- 剪贴板格式
- HTML 剪贴板格式
- 其他参考资料: 剪贴板的简单解释
修订历史
- 1.0 版于 12 月 29 日发布。07 星期六
已知问题 - 一段时间后,声音消失,不再提醒用户活动。这似乎并非此应用程序独有!
- 偶尔我会遇到无法识别的数据类型。当我发现它们时,我会将它们添加到此应用程序并进行更新,但应该不会有很多了。在原始视图中,如果查看器窗格下方的尺寸字段中显示“错误:0 字节”的消息,则表示我无法使用该格式处理数据!