
使用 C#.NET 消费 Amazon Web Services (SQS, S3)
逐步概述使用 C#.NET 消费 Amazon Web Services (SQS, S3)
引言
在我最近的一个项目中,我有机会使用 C#.NET 消费 Amazon Web Services (SQS, S3)。我想写一篇文章来详细说明如何消费这些服务。
背景
Amazon Web Services[AWS]
Amazon 为其云用户提供各种 Web 服务,用于基于 Web 的应用程序。在本文中,我们将了解如何使用 C#.NET 消费 “Amazon SQS” 和 “Amazon S3” 服务。
Amazon SQS
什么是 Amazon SQS?
SQS 是 “Simple Queue Service” 的缩写。这是许多其他消息队列服务的替代品,例如 Microsoft 的 MSMQ、IBM 的 MQSeries 等。SQS 可用于基于消息的面向架构的应用程序。
有关 Amazon SQS 更多详情的参考: Amazon SQS 详情。
使用 C# 消费 Amazon SQS 服务
让我们逐步介绍使用 C# 消费 SQS 的不同操作。
在您的项目中添加 “AWSSDK.dll” 的引用。[您可以从附加代码的 “Assemblies” 文件夹复制此文件。]
在您的类中添加以下命名空间的引用。
using Amazon.SQS;
using Amazon.SQS.Model;
声明 “AmazonSQSClient” 类的对象。在构造函数参数中提供您的 “Amazon Cloud AWS Access Key Id” 和 “Amazon Cloud AWS Secret Key”。
AmazonSQSClient objClient = new AmazonSQSClient
	("YourAmazonCloudAwsAccessKeyId", " YourAmazonCloudAwsSecretAccessKey");
创建新的 SQS 队列
以下两行代码即可创建我们的新 SQS 队列。
CreateQueueResponse queueResponse = new CreateQueueResponse();

queueResponse = objClient.CreateQueue(new CreateQueueRequest()
	{ QueueName = “SampleQueueName” });
获取现有 SQS 队列列表
下面的代码将返回一个 List ,其中包含使用 “Amazon Cloud AWS Access Key Id” 和 “Amazon Cloud AWS Secret Key” 指定的账户可用的所有队列。
ListQueuesResponse objqueuesResponseList = new ListQueuesResponse();

objqueuesResponseList = objClient.ListQueues(new ListQueuesRequest());

ListQueuesResult Result = objqueuesResponseList.ListQueuesResult;
向 SQS 队列发送消息
[请参考附件代码中“SQSSample.aspx.cs”的 “btnSendMessage_Click” 事件,以便更好地理解以下代码。]
//Full Url of Queue
string selectedQueue = this.QueuesList.SelectedItem.Value.ToString();

objClient.SendMessage(new SendMessageRequest()
	{ MessageBody = this.txtMessage.Text, QueueUrl = selectedQueue });
到目前为止,这不是很简单易懂吗?我们继续。
从 SQS 队列接收消息
在使用“从 SQS 队列接收消息”时,我发现有时 SQS 不会返回消息。因此,在下面的代码中,我已将 “ReceiveMessageRequest” 类的 “MaxNumberOfMessages” 属性设置为 10。
[请参考附件代码中“SQSSample.aspx.cs”的 “btnReceiveMessage_Click” 事件,以便更好地理解以下代码。]
string message = string.Empty;
//Full Url of Queue
string selectedQueue = this.QueuesList.SelectedItem.Value.ToString();

ReceiveMessageResponse queueReceiveMessageResponse = new ReceiveMessageResponse();

queueReceiveMessageResponse = objClient.ReceiveMessage(new ReceiveMessageRequest() {
QueueUrl = selectedQueue, MaxNumberOfMessages = 10 });

ReceiveMessageResult objReceiveMessageResult = new ReceiveMessageResult();

objReceiveMessageResult = queueReceiveMessageResponse.ReceiveMessageResult;

List<Message> messagesList = new List<Message>();
messagesList = objReceiveMessageResult.Message;

foreach (Message objMessage in messagesList)
{
  message += objMessage.Body;
  receiptHandle = objMessage.ReceiptHandle;
}

Session["MessageReceiptHandle"] = receiptHandle;
txtReceivedMessage.Text = message;
您可能已经注意到,我正在将 “Message” 类对象的 “ReceiptHandle“ 属性值存储在 Session["MessageReceiptHandle"] 对象中。这将在稍后删除 SQS 中的此消息时用到。
删除 SQS 消息
[请参考附件代码中“SQSSample.aspx.cs”的 “btnDeleteMessage_Click” 事件,以便更好地理解以下代码。]
//Full Url of Queue
string selectedQueue = this.QueuesList.SelectedItem.Value.ToString();

DeleteMessageResponse objDeleteMessageResponse = new DeleteMessageResponse();
objDeleteMessageResponse = objClient.DeleteMessage(new DeleteMessageRequest()
{ QueueUrl = selectedQueue, ReceiptHandle = Session["MessageReceiptHandle"].ToString() });
删除 SQS 队列
不总是需要,但您可能需要删除您的 SQS 队列。
[请参考附件代码中“SQSSample.aspx.cs”的 “btnDeleteQueue_Click” 事件,以便更好地理解以下代码。]
string selectedQueue = this.QueuesList.SelectedItem.Value.ToString();

DeleteQueueResponse queueDeleteResponse = new DeleteQueueResponse();
queueDeleteResponse = objClient.DeleteQueue(new DeleteQueueRequest()
			{ QueueUrl = selectedQueue });
Amazon S3
Amazon S3 是 Amazon 的一项基于 Web 的存储服务。用户可以使用此服务存储其应用程序的文件。这些文件可以通过 REST [HTTP] 或 SOAP 基于 Web 服务进行访问/消费。您可以创建多个 S3 “存储桶” 来存储您的文件。存储桶是文件存储位置,就像我们磁盘上的文件夹一样。
有关 Amazon S3 更多详情的参考: Amazon S3 详情。
如何在 S3 上创建新的存储桶?
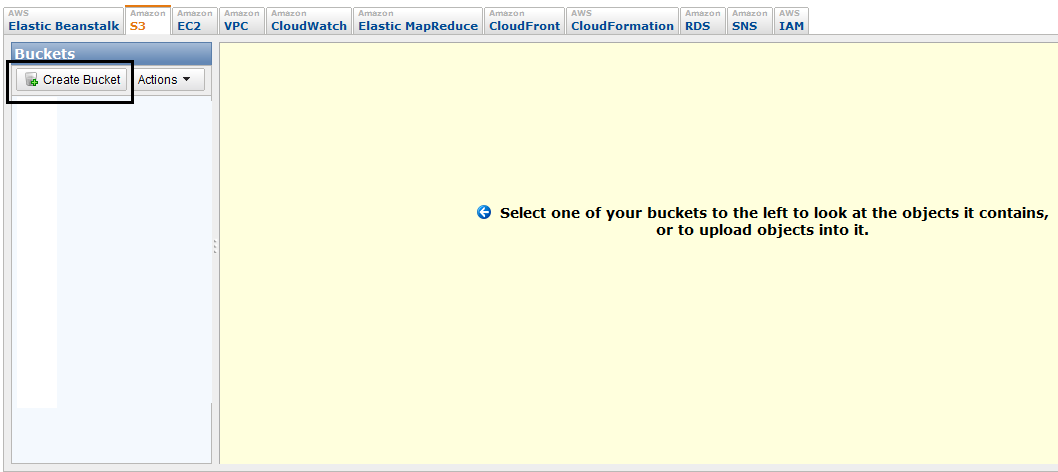
登录到您的 “AWS Management Console”。

选择 “S3” 选项卡,然后点击 “Create Bucket” 按钮。
这将打开下面的窗口。指定您的“Bucket Name”和“Region”,然后点击 “Create” 按钮。
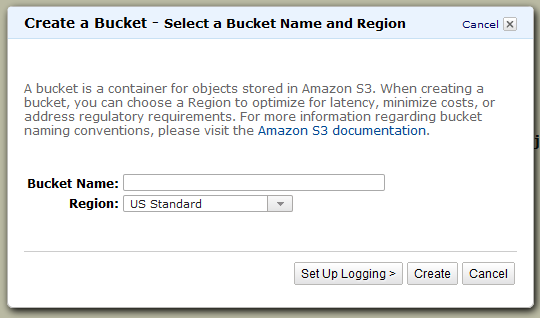
您的新 S3 存储桶现已准备就绪!!!
请根据您的应用程序服务器将托管的区域来选择 “Region”。这将使您的应用程序的 S3 操作更快。
使用 C# 消费 S3
在您的项目中添加“AWSSDK.dll”的引用。然后,在您的类中添加以下命名空间的引用。
using Amazon.S3.Model;
using Amazon.S3;
声明 “AmazonS3Client“ 类的对象,并在构造函数参数中提供您的 “Amazon Cloud AWS Access Key Id” 和 “Amazon Cloud AWS Secret Key”。
AmazonS3Client s3Client = new AmazonS3Client
	("YourAmazonCloudAwsAccessKeyId", "YourAmazonCloudAwsSecretAccessKey");
向 Amazon S3 上传新文件
[请参考附件代码中“S3Sample.aspx.cs”的 “btnUpload_Click” 事件,以便更好地理解以下代码。]
//Saving File to local disk folder.
string filePath = Server.MapPath("S3FilesUpload") + "\\" + fileUpload.FileName;
string fileExtension = fileUpload.FileName.Substring
			(fileUpload.FileName.LastIndexOf(".") + 1);

fileUpload.SaveAs(filePath);

string contentType=GetContentType(fileExtension);
//Push the given object into S3 Bucket
PutObjectRequest objReq = new PutObjectRequest
{
  Key = fileUpload.FileName,
  FilePath = filePath,
  ContentType = contentType,
  BucketName = "YourBucketName",
  CannedACL = S3CannedACL.Private,
};

PutObjectResponse response = s3Client.PutObject(objReq);
if (response.ETag != null)
{
  string etag = response.ETag;
  string versionID = response.VersionId;
}

//Deleting Locally Saved File
if (File.Exists(filePath))
{
  File.Delete(filePath);
}
下面是 “GetContentType” 方法的实现
private string GetContentType(string fileExtension)
{
  string contentType = string.Empty;
  switch (fileExtension)
  {
    case "bmp": contentType = "image/bmp"; break;
    case "jpeg": contentType = "image/jpeg"; break;
    case "jpg": contentType = "image/jpg"; break;
    case "gif": contentType = "image/gif"; break;
    case "tiff": contentType = "image/tiff"; break;
    case "png": contentType = "image/png"; break;
    case "plain": contentType = "text/plain"; break;
    case "rtf": contentType = "text/rtf"; break;
    case "msword": contentType = "application/msword"; break;
    case "zip": contentType = "application/zip"; break;
    case "mpeg": contentType = "audio/mpeg"; break;
    case "pdf": contentType = "application/pdf"; break;
    case "xgzip": contentType = "application/x-gzip"; break;
    case "xcompressed": contentType = "application/x-compressed"; break;
  }
  return contentType;
}
我们将 “PutObjectRequest” 类的 “CannedACL” 属性设置为 “S3CannedACL.Private”。这是因为我们希望将此文件设为私有,以便未经授权的用户无法访问该文件。要了解更多 “CannedACL” 的模式,您可以参考以下 URL。
一旦我们将新文件上传到 S3,它就会被分配以下详细信息
- Bucket: YourBucketName
- Name: ImageName.jpg
- Size: 352.3 KB
- Last Modified: Fri Apr 08 11:14:40 GMT+530 2011
- Owner: Me
- ETag: d645cec635h79869a8ppfc16d909d51m
- Url: https://s3.amazonaws.com/YourBucketName/ImageName.jpg
“Etag” 是您上传的 S3 文件的唯一标识符。
从 S3 下载文件
我们可以将 S3 中的文件作为 REST/HTTP URL 进行访问/下载。
例如 - https://s3.amazonaws.com/YourBucketName/ImageName.jpg。
如果我们在上传文件时通过设置 “PutObjectRequest” 类的 “CannedACL” 属性来设置限制,那么我们可以通过像下面这样消费 Amazon Web Service 来访问/下载此文件。
我们只需要文件的 “ImageKey”(图像名称)和 “ETag” 就可以从 S3 下载它。
[请参考附件代码中“S3Sample.aspx.cs”的 “btnDownload_Click” 事件,以便更好地理解以下代码。]
string imageKey = txtFileName.Text;
string eTagToMatch = txtEtag.Text;
string extension = imageKey.Substring(imageKey.LastIndexOf("."));
string imagePath = Server.MapPath("S3FilesDownload") + "\\" + imageKey;

Stream imageStream = new MemoryStream();

GetObjectRequest request = new GetObjectRequest
	{ BucketName = "YourBucketName", Key = imageKey, ETagToMatch = eTagToMatch };
using (GetObjectResponse response = s3Client.GetObject(request))
{
  response.ResponseStream.CopyTo(imageStream);
}

imageStream.Position = 0;

SaveStreamToFile(imagePath, imageStream);
下面是 “SaveStreamToFile” 方法的实现
private void SaveStreamToFile(string fileFullPath, Stream stream)
{
  using (stream)
  {
   using (FileStream fs = new FileStream(fileFullPath, FileMode.Create,
			 FileAccess.Write))
    {
      byte[] data = new byte[32768];
                    int bytesRead = 0;
                    do
                    {
                        bytesRead = stream.Read(data, 0, data.Length);
                        fs.Write(data, 0, bytesRead);
                    }
                    while (bytesRead > 0);
                    fs.Flush();
          }
       }
}
好了,在这篇文章中,我们学习了如何消费 Amazon Web Services (SQS, S3)。希望您喜欢这篇文章。