使用相同的ASP.NET MVC代码构建真正的RESTful API和网站
4.89/5 (44投票s)
如何使用相同的ASP.NET MVC代码构建真正的RESTful API和网站
- 在此处下载库。
引言
一个真正的RESTful API意味着您拥有唯一的URL来唯一地表示实体和集合,并且URL中没有动词/操作。您不能有像/Customers/Create或/Customers/John/Update、/Customers/John/Delete这样的URL,其中操作是表示实体URL的一部分。URL只能表示实体状态,例如/Customers/John表示John(一个客户)的状态,并允许在该URL上执行GET、POST、PUT、DELETE操作以执行CRUD操作。对于集合也是如此,/Customers返回客户列表,而向该URL发送POST请求则会添加新的客户。通常,我们会创建单独的控制器来处理网站的API部分,但我将向您展示如何使用同一控制器代码创建RESTful网站和API,这些代码可以处理浏览器使用的相同URL,客户端应用程序也可以对实体执行CRUD操作。
我尝试过Scott Gu关于创建RESTful路由的示例,这篇MSDN杂志文章,Phil Haack的ASP.NET MVC的REST SDK以及各种其他示例。但它们都犯了同样的经典错误——操作是URI的一部分。您必须有像https://:8082/MovieApp/Home/Edit/5?format=Xml这样的URI来编辑某个实体,并定义您需要支持的格式(例如XML)。它们并不是真正的RESTful,因为来自URI的负载并不唯一地表示实体状态。操作已成为URI的一部分。当您将操作放在URI上时,使用ASP.NET MVC很容易做到。只有当您将操作从URI中移除,并且必须支持同一URL上的CRUD,使用三种不同的格式——HTML、XML和JSON——时,这会变得棘手,并且需要一些自定义过滤器来完成工作。这并不是非常棘手,您只需要记住您的控制器操作正在服务多种格式,并以某种方式设计您的网站,使其对API友好。您使网站URL看起来像API URL。
示例代码包含一个ActionFilterAttribute和ValurProvider库,这使得通过同一URL服务和接受HTML、JSON和XML成为可能。普通浏览器获得HTML输出,期望JSON的AJAX调用获得JSON响应,而XmlHttp调用获得XML响应。
您可能会问为什么不使用WCF REST SDK?这样做的目的是重用相同的逻辑来检索模型并从同一代码发出HTML、JSON、XML,这样我们就不必在网站中复制逻辑,然后在API中也复制。如果我们使用WCF REST SDK,您必须创建一个WCF API层,该层会复制控制器中的模型处理逻辑。
此处显示的示例提供了以下RESTful URL:
- /Customers – 返回客户列表。向此URL发送
POST请求会添加新客户。 - /Customers/C0001 – 返回ID为C001的客户的详细信息。
Update和Delete操作在此URL上支持。 - /Customers/C0001/Orders – 返回指定客户的订单。向此URL发送
Post请求会向该客户添加新订单。 - /Customers/C0001/Orders/O0001 – 返回特定订单,并允许在此URL上进行
update和delete操作。
所有这些URL都支持GET、POST、PUT、DELETE。用户可以浏览到这些URL并获取渲染的HTML页面。客户端应用程序可以向这些URL发出AJAX调用来执行CRUD操作,从而构建一个真正的RESTful API和网站。

它们还支持通过POST传递动词,以防您的Web服务器或防火墙不允许PUT、DELETE。由于安全常见做法,它们通常在大多数Web服务器和防火墙中默认禁用。在这种情况下,您可以使用POST并以查询字符串的形式传递动词。例如,/Customers/C0001?verb=Delete用于删除客户。这不会破坏RESTfulness,因为URL/Customers/C0001仍然唯一地标识了实体。您正在URL上提供附加的上下文。查询字符串还用于REST URL上的过滤和排序操作。例如,/Customers?filter=John&sort=Location&limit=100告诉服务器返回经过过滤、排序和分页的客户集合。
为真正的RESTful URL注册路由
对于分层实体模型中的每个实体级别,您需要注册一个路由,该路由既服务于实体集合,也服务于单个实体。例如,第一级是Customer,然后第二级是Orders。因此,您需要按此方式注册路由
public static void RegisterRoutes(RouteCollection routes)
{
  routes.IgnoreRoute("{resource}.axd/{*pathInfo}");

  routes.MapRoute(
    "SingleCustomer",
    "Customers/{customerId}",
    new { controller = "Customers", action = "SingleCustomer" });

  routes.MapRoute(
    "CustomerOrders",
    "Customers/{customerId}/Orders/{orderId}",
    new { controller = "Customers", action = "SingleCustomerOrders",
            orderId = UrlParameter.Optional });

  routes.MapRoute(
    "Default", // Route name
    "{controller}/{action}/{id}", // URL with parameters
    new { controller = "Home", action = "Index",
        id = UrlParameter.Optional } // Parameter defaults
  );
}
默认的map处理对/Customers的访问。它调用CustomersController上的Index()操作。Index操作渲染客户集合。对单个客户的访问,如/Customers/C0001,由SingleCustomer路由处理。对客户订单的访问/Customers/C001/Orders以及对单个订单的访问,例如/Customers/C001/Orders/O0001,都由第二个路由CustomerOrders处理。
从操作渲染JSON和XML输出
为了从操作发出JSON和XML,您需要使用一些自定义的ActionFilter。ASP.NET MVC带有JsonResult,但它使用了已弃用的JavascriptSerializer。因此,我使用.NET 3.5的DataContractJsonSerializer制作了一个。
internal class JsonResult2 : ActionResult
  {
    public JsonResult2() { }
    public JsonResult2(object data) { this.Data = data; }

    public string ContentType { get; set; }
    public Encoding ContentEncoding { get; set; }
    public object Data { get; set; }

    public override void ExecuteResult(ControllerContext context)
    {
      if (context == null)
        throw new ArgumentNullException("context");

      HttpResponseBase response = context.HttpContext.Response;
      if (!string.IsNullOrEmpty(this.ContentType))
        response.ContentType = this.ContentType;
      else
        response.ContentType = "application/json";

      if (this.ContentEncoding != null)
        response.ContentEncoding = this.ContentEncoding;

      DataContractJsonSerializer serializer =
        new DataContractJsonSerializer(this.Data.GetType());
      serializer.WriteObject(response.OutputStream, this.Data);
    }
  }
同样,我创建了XmlResult,我在此处找到的,并做了一些修改以支持泛型类型。
// Source:
// http://www.hackersbasement.com/csharp/post/2009/06/07/XmlResult-for-ASPNet-MVC.aspx
  internal class XmlResult : ActionResult
  {
    public XmlResult() { }
    public XmlResult(object data) { this.Data = data; }

    public string ContentType { get; set; }
    public Encoding ContentEncoding { get; set; }
    public object Data { get; set; }

    public override void ExecuteResult(ControllerContext context)
    {
      if (context == null)
        throw new ArgumentNullException("context");

      HttpResponseBase response = context.HttpContext.Response;
      if (!string.IsNullOrEmpty(this.ContentType))
        response.ContentType = this.ContentType;
      else
        response.ContentType = "text/xml";

      if (this.ContentEncoding != null)
        response.ContentEncoding = this.ContentEncoding;

      if (this.Data != null)
      {
        if (this.Data is XmlNode)
          response.Write(((XmlNode)this.Data).OuterXml);
        else if (this.Data is XNode)
          response.Write(((XNode)this.Data).ToString());
        else
        {
          var dataType = this.Data.GetType();
          // OMAR: For generic types, use DataContractSerializer because
          // XMLSerializer cannot serialize generic interface lists or types.
          if (dataType.IsGenericType ||
            dataType.GetCustomAttributes(typeof(DataContractAttribute),
            true).FirstOrDefault() != null)
          {
            var dSer = new DataContractSerializer(dataType);
            dSer.WriteObject(response.OutputStream, this.Data);
          }
          else
          {
            var xSer = new XmlSerializer(dataType);
            xSer.Serialize(response.OutputStream, this.Data);
          }
        }
      }
    }
  }
既然我们有了JsonResult2和XmlResult,我们就需要创建ActionFilter属性,它们将拦截响应并使用正确的Result类来渲染结果。
首先,我们有EnableJsonAttribute,它发出JSON。
public class EnableJsonAttribute : ActionFilterAttribute
  {
    private readonly static string[] _jsonTypes = new string[]
        { "application/json", "text/json" };

    public override void OnActionExecuted(ActionExecutedContext filterContext)
    {
      if (typeof(RedirectToRouteResult).IsInstanceOfType(filterContext.Result))
        return;

      var acceptTypes = filterContext.HttpContext.Request.AcceptTypes ?? new[]
            { "text/html" };

      var model = filterContext.Controller.ViewData.Model;

      var contentEncoding = filterContext.HttpContext.Request.ContentEncoding ??
                Encoding.UTF8;

      if (_jsonTypes.Any(type => acceptTypes.Contains(type)))
        filterContext.Result = new JsonResult2()
        {
          Data = model,
          ContentEncoding = contentEncoding,
          ContentType = filterContext.HttpContext.Request.ContentType
        };
    }
  }
然后我们有EnableXmlAttribute,它发出XML。
public class EnableXmlAttribute : ActionFilterAttribute
  {
    private readonly static string[] _xmlTypes = new string[]
            { "application/xml", "text/xml" };

    public override void OnActionExecuted(ActionExecutedContext filterContext)
    {
      if (typeof(RedirectToRouteResult).IsInstanceOfType(filterContext.Result))
        return;

      var acceptTypes = filterContext.HttpContext.Request.AcceptTypes ?? new[]
            { "text/html" };

      var model = filterContext.Controller.ViewData.Model;

      var contentEncoding = filterContext.HttpContext.Request.ContentEncoding ??
                Encoding.UTF8;

      if (_xmlTypes.Any(type => acceptTypes.Contains(type)))
        filterContext.Result = new XmlResult()
        {
          Data = model,
          ContentEncoding = contentEncoding,
          ContentType = filterContext.HttpContext.Request.ContentType
        };
    }
  }
这两个过滤器都有相同的逻辑。它们查看请求的内容类型。如果找到正确的内容类型,它们就会执行它们的工作。
您所需要做的就是将这些属性放在操作上,它们就会完成神奇的工作。
[EnableJson, EnableXml]
public ActionResult Index(string verb)
{
    return View(GetModel().Customers);
}
这些过滤器适用于GET、POST、PUT、DELETE操作,以及单个实体和集合。
接受JSON和XML序列化对象作为请求
ASP.NET MVC 2开箱即用地不支持请求中的JSON或XML序列化对象。您需要使用ASP.NET MVC 2 Futures库来允许JSON序列化对象作为请求发送。Futures有一个JsonValueProvider,可以接受JSON的POST请求并将其转换为对象。但Futures库中没有用于XML的ValueProvider。有一个可在此处找到,我已将其使用。
为了启用请求中的JSON和XML
protected void Application_Start()
{
  AreaRegistration.RegisterAllAreas();

  RegisterRoutes(RouteTable.Routes);

  // Source: http://haacked.com/archive/2010/04/15/
  // sending-json-to-an-asp-net-mvc-action-method-argument.aspx
  // This must be added to accept JSON as request
  ValueProviderFactories.Factories.Add(new JsonValueProviderFactory());
  // This must be added to accept XML as request
  // Source: http://www.nogginbox.co.uk/blog/xml-to-asp.net-mvc-action-method
  ValueProviderFactories.Factories.Add(new XmlValueProviderFactory());
}
当同时使用这两个Value Provider时,ASP.NET MVC可以接受JSON和XML序列化对象作为请求并自动反序列化它们。最重要的是,ModelState.IsValid会起作用。如果您只使用ActionFilter来拦截请求并在此处执行反序列化(这是大多数人尝试过的方法),它不会验证模型。模型验证发生在ActionFilter被命中之前。到目前为止,使模型验证起作用的唯一方法是使用value providers。
模型
让我们快速看一下模型,以便您了解代码是如何工作的。首先,我们有一个CustomerModel,它包含一个Customers集合。
[DataContract]
public class CustomerModel
{
  [DataMember]
  public IEnumerable<Customer> Customers { get; set; }
Customer包含一个Orders集合。
[DataContract(Namespace="http://omaralzabir.com")]
public class Customer
{
  [Required]
  [DataMember]
  public string CustomerId { get; set; }

  [StringLength(50), Required]
  [DataMember]
  public string Name { get; set; }

  [StringLength(20), Required]
  [DataMember]
  public string Country { get; set; }

  //[DataMember]
  public IEnumerable<Order> Orders
  {
    get;
    set;
  }
Order看起来像这样:
[DataContract]
public class Order
{
  [Required]
  [DataMember]
  public string OrderId { get; set; }

  [StringLength(255), Required]
  [DataMember]
  public string ProductName { get; set; }

  [DataMember]
  public int ProductQuantity { get; set; }

  [DataMember]
  public double ProductPrice { get; set; }
}
就这样。
服务集合
为了服务像Customers和Orders这样的集合,我们需要一个返回对象集合的操作。例如,CustomersController上的Index操作执行此操作:
// GET /Customers
// Return all customers.
[EnableJson, EnableXml]
[HttpGet, OutputCache(NoStore=true, Location=OutputCacheLocation.None)]
public ActionResult Index(string verb)
{
    return View(GetModel().Customers);
}
EnableJson和EnableXml属性是我创建的两个ActionFilter,用于支持JSON和XML输出。然后它们查看请求,查看是否期望JSON或XML。如果期望,它们将ViewModel序列化为JSON或XML,并返回序列化后的输出而不是HTML。
这里的操作方法没有做什么花哨的事情。它只是调用视图来渲染客户集合。视图接受IEnumerable<Customer>并渲染一个表。
<%@ Page Title="" Language="C#" MasterPageFile="~/Views/Shared/Site.Master"
    Inherits="System.Web.Mvc.ViewPage<IEnumerable<MvcRestApi.Models.Customer>>" %>

<asp:Content ID="Content1" ContentPlaceHolderID="TitleContent" runat="server">
    Index
</asp:Content>

<asp:Content ID="Content2" ContentPlaceHolderID="MainContent" runat="server">

    <h2>Index</h2>

    <h3>Customers</h3>
    <table>
        <thead>
            <th>Name</th>
            <th>Country</th>
            <th>Orders</th>
        </thead>

        <tbody>
        <% foreach (MvcRestApi.Models.Customer customer in Model)
           { %>
           <tr>
            <td><a href="Customers/<%= customer.CustomerId %>">
        <%= customer.Name %></a></td>
            <td><%= customer.Country %></td>
            <td><%= Html.RouteLink("Orders", "CustomerOrders",
        new { customerID = customer.CustomerId }) %></td>
           </tr>
        <% } %>
        </tbody>
    </table>

    <p>
    <a href="?verb=New">Add New</a>
    </p>

<% Html.RenderPartial("Shared/XmlViewer"); %>

<% Html.RenderPartial("Shared/JsonViewer"); %>

</asp:Content>
输出是:
该页面使用jQuery来访问相同的URL/Customers,并使用xml内容类型来获取XML输出。然后,它使用json内容类型访问同一URL以获取json输出。
$.ajax({
      url: document.location.href,
      type: "GET",
      data: null,
      dataType: "xml",
      success: function (data) {
        renderXml(data);
      }
    });
而对于json:
$.getJSON(document.location.href, function (data) {
  renderJson(data);
});
您可以手动更改JSON或XML的内容,然后点击相应的post按钮,它将向同一URL发出POST请求,并显示正在进行的更新。
测试XML和JSON功能的最佳方法是查看下一节中涵盖的单个实体页面。
服务位于某个实体下的集合也非常相似。您可以创建一个类似的操作,该操作接受父实体的ID,然后返回该实体的子集合。例如,以下操作可以返回实体下的集合以及集合中的单个项。
// GET /Customers/CUS0001/Orders(/ORD0001)
// Return customer orders. If orderId specified, then return a single order.
[EnableJson, EnableXml]
[HttpGet, OutputCache(NoStore = true, Location = OutputCacheLocation.None)]
public ActionResult SingleCustomerOrders(string customerId, string orderId)
{
  if (!string.IsNullOrEmpty(orderId))
    return View("SingleCustomerSingleOrder", GetModel()
      .Customers.First(c => c.CustomerId == customerId)
      .Orders.First(o => o.OrderId == orderId));
  else
    return View("SingleCustomerOrders", GetModel()
      .Customers.First(c => c.CustomerId == customerId)
      .Orders);

}
上面的函数返回一个customer的orders。如果提供了订单ID,则返回特定的订单。它使用两个不同的视图来渲染orders集合和单个订单。
服务单个实体
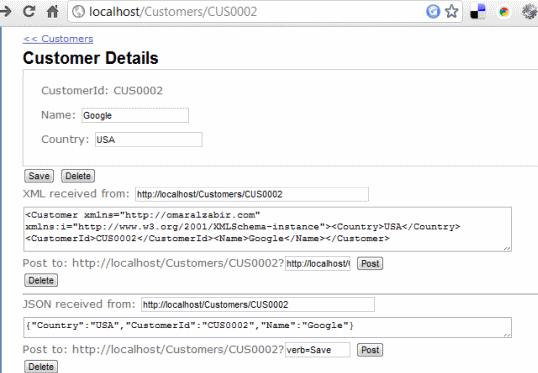
当您点击一个Customer时,您会看到这个页面:

它显示了一个代表单个Customer的URL的HTML、XML和JSON表示。您可以使用HTML、XML或JSON方法更新customer的详细信息。
负责渲染此页面以及XML和JSON表示的操作非常简单:
// GET /Customers/CUS0001
// Return a single customer data.
[EnableJson, EnableXml]
[HttpGet, OutputCache(NoStore = true, Location = OutputCacheLocation.None)]
public ActionResult SingleCustomer(string customerId)
{
  var customer = GetModel().Customers.FirstOrDefault(c => c.CustomerId == customerId);
  if (customer == null)
    return new HttpNotFoundResult("Customer with ID: " + customerId + " not found");

  return View("SingleCustomer", customer);
}
这里唯一有趣的是,当提供任何无效的客户ID时,会抛出HttpNotFoundResult。REST的原则是在命中不存在的URL时返回HTTP 404代码,而不是HTTP 500。如果我们抛出异常,它将变成HTTP 500。因此,样本中提供了一个自定义的HttpNotFoundResult类。
渲染HTML的视图代码也非常简单:
<%@ Page Title="" Language="C#" MasterPageFile="~/Views/Shared/Site.Master"
    Inherits="System.Web.Mvc.ViewPage<MvcRestApi.Models.Customer>" %>

<asp:Content ID="Content1" ContentPlaceHolderID="TitleContent" runat="server">
    SingleCustomer
</asp:Content>

<asp:Content ID="Content2" ContentPlaceHolderID="MainContent" runat="server">

    <small><%= Html.ActionLink("<< Customers", "Index", "Customers") %></small>

    <h2>Customer Details</h2>
    <%= Html.ValidationSummary() %>

<% using (Html.BeginForm())
   { %>
   <fieldset title="Customer Details">
<p><%= Html.LabelFor(customer => customer.CustomerId)%>:
    <%= Html.DisplayFor(customer => customer.CustomerId)%> </p>
<p><%= Html.LabelFor(customer => customer.Name)%>:
    <%= Html.TextBoxFor(customer => customer.Name)%>
    <%= Html.ValidationMessageFor(customer => customer.Name) %></p>
<p><%= Html.LabelFor(customer => customer.Country)%>:
    <%= Html.TextBoxFor(customer => customer.Country)%>
    <%= Html.ValidationMessageFor(customer => customer.Country) %></p>
    </fieldset>
<input type="submit" name="verb" value="Save" />
    <input type="submit" name="verb" value="Delete" />
<% } %>

<%= ViewData["Message"] ?? "" %>

<p>
<%= Html.RouteLink("Orders", "CustomerOrders", new { customerId = Model.CustomerId })%>
</p>

<% Html.RenderPartial("Shared/XmlViewer"); %>

<% Html.RenderPartial("Shared/JsonViewer"); %>
</asp:Content>
此视图渲染HTML表示。然后,在UI上,您有XML和JSON测试工具,您可以使用它们通过XML和JSON执行POST。您可以使用这些工具对实体执行更新。

您可以手动更改XML的内容并点击POST按钮。
当发生对实体URL的POST请求时,支持HTTP Post的SingleCustomer操作将被触发:
// POST /Customers/CUS0001(?verb=Delete)
// Update/Delete a single customer
[HttpPost]
[EnableJson, EnableXml]
public ActionResult SingleCustomer
    (Customer changeCustomer, string customerId, string verb)
{
  if (verb == "Delete")
  {
    return SingleCustomerDelete(customerId);
  }
  else
  {
    if (ModelState.IsValid)
    {
      var existingCustomer = GetModel().Customers.First(c =>
这段相同的代码适用于表单POST、XML和JSON POST。POST还支持?verb=DELETE的查询字符串,以防由于防火墙或Web服务器过滤而无法发送DELETE作为HTTP方法。
向集合添加新实体
当需要通过POST完成此操作时,这需要一些技巧。为了添加新实体,常见的做法是向表示容器集合的URL发送POST/PUT请求。因此,如果您想添加一个新客户,您需要向/Customers发送一个post请求;如果您想添加一个新订单,您需要向/Customers/CUS0001/Orders/发送一个post请求。
现在,通过XML和JSON POST支持这一点很容易。但在同一URL上渲染HTML UI并接受POST需要一些技巧。您需要通过URL传递一些查询字符串参数来告知操作您需要用于添加新实体的UI,而不是渲染集合的UI。这意味着您访问URL/Customers?verb=New以获取新客户的HTML UI。
这是通过调整Index操作以接受额外的verb作为查询参数来实现的。
// GET /Customers
// Return all customers.
[EnableJson, EnableXml]
[HttpGet, OutputCache(NoStore=true, Location=OutputCacheLocation.None)]
public ActionResult Index(string verb)
{
  if (verb == "New")
    return View("NewCustomer", new Customer());
  else
    return View(GetModel().Customers);
}
这将渲染一个用于创建新customer的新视图。

您可以向该URL发送POST请求,然后添加新customer。您还可以通过在xml/json负载中放入值后,发送XML和JSON POST请求,然后添加一个新customer。

现在,为了添加新实体,我们需要一个新的操作来监听与集合相同的URL,但执行添加操作。
// POST /Customers
// Add a new customer.
[EnableJson, EnableXml]
[HttpPost, OutputCache(NoStore = true, Location = OutputCacheLocation.None)]
[ActionName("Index")]
public ActionResult AddNewCustomer(Customer newCustomer)
{
  List<Customer> customers = new List<Customer>(GetModel().Customers);
  newCustomer.CustomerId = "CUS" + customers.Count.ToString("0000");
  customers.Add(newCustomer);
  GetModel().Customers = customers;

  return RedirectToAction("SingleCustomer", new { customerId = newCustomer.CustomerId });
}
这里的技巧是[ActionName]属性,它表示:“我与监听/Customers URL的Index操作相同,但我执行不同的工作。”
删除实体
为了支持表示单个实体的URL上的DELETE HTTP方法,您需要一个操作来监听实体的同一URL,但接受HTTP方法DELETE。
// DELETE /Customers/CUS0001
// Delete a single customer.
[EnableJson, EnableXml]
[HttpDelete]
[ActionName("SingleCustomer")]
public ActionResult SingleCustomerDelete(string customerId)
{
  List<Customer> customers = new List<Customer>(GetModel().Customers);
  customers.Remove(customers.Find(c => c.CustomerId == customerId));
  GetModel().Customers = customers;
  return RedirectToAction("Index", "Customers");
}
这里[ActionName]属性表示:“我与监听单个实体URL的SingleCustomer操作相同,但我执行不同的工作。”[HttpDelete]属性使其接受DELETE /Customers/CUS0001请求。
结论
相同的代码包含一个库项目,该项目具有必要的value providers和action filters,它们通过同一URL启用了JSON、XML和HTML的get和post操作。因此,您可以使用相同的ASP.NET MVC代码构建网站和Web API。