
可调整大小、可移动和可自定义的无边框窗体
4.00/5 (9投票s)
一篇关于可自定义用户窗体的文章。
 |
 |
引言
此代码允许您在 Windows 应用程序中使用完全可自定义的窗体。
这个自定义窗体的特性:
- 禁用控制框和默认边框
- 完全可调整大小(所有方向)
- 可使用鼠标完全移动
- 透明度/不透明度
- 窗体所有边和角上的自定义厚度和颜色
- 窗体的最大和最小尺寸
背景
似乎很多人,包括我自己,都需要一种方法来禁用窗体的默认边框和标题栏,但仍然能够动态地调整大小、移动和自定义它们。我找不到任何简单的方法来做到这一点,所以我编写了自己的解决方案来解决这个问题。
Using the Code
使用该代码非常简单。 它全部基于标准的 Windows 窗体,原始控制框和边框已禁用。
我们将对窗体进行的自定义也基于原始窗体的不同事件,这些事件将初始化窗体的所需行为
我们首先创建一个标准的 Windows 窗体,我们将设置它以失去其默认边框和控制框。
FormBorderStyle = FormBorderStyle.None;
当我们禁用窗体的原始边框时,默认窗体基本上已经变得无用。
我们现在必须创建我们自己的自定义边框以及悬停、单击和拖动时的相关行为。 首先,我们必须设置窗体的边界,以便我们引用所有边、角和中间区域。
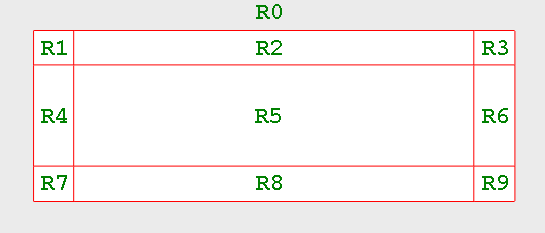
我们将首先将原始窗体划分为 9 + 1 个“虚拟矩形”,如下图所示,每个矩形代表以下内容
R0= 完整的窗体区域 (clientrectangle)R1= 左上角R2= 上边框R3= 右上角R4= 左边框R5= 窗体的中心区域R6= 右边框R7= 左下角R8= 下边框R9= 右下角
然后,我们将不同的“子事件”绑定到这些矩形中的每一个,以控制我们的自定义窗体的行为。 我们的自定义边框的厚度将由变量 VIRTUALBORDER 定义
Paint 事件
每当窗体的 paint 事件被触发时,我们的自定义窗体都会被初始化。 下面的代码将被分配给窗体的 paint 事件。 当窗体被绘制时,我们将创建 R0 - R9 矩形。
R1 = new Rectangle(new Point(ClientRectangle.X, ClientRectangle.Y),
    new Size(VIRTUALBORDER, VIRTUALBORDER));
R2 = new Rectangle(new Point(ClientRectangle.X + R1.Width, ClientRectangle.Y),
    new Size(ClientRectangle.Width - (R1.Width * 2), R1.Height));
R3 = new Rectangle(new Point(ClientRectangle.X + R1.Width + R2.Width,
    ClientRectangle.Y), new Size(VIRTUALBORDER, VIRTUALBORDER));

R4 = new Rectangle(new Point(ClientRectangle.X, ClientRectangle.Y + R1.Height),
     new Size(R1.Width, ClientRectangle.Height - (R1.Width * 2)));
R5 = new Rectangle(new Point(ClientRectangle.X + R4.Width,
     ClientRectangle.Y + R1.Height), new Size(R2.Width, R4.Height));
R6 = new Rectangle(new Point(ClientRectangle.X + R4.Width + R5.Width,
     ClientRectangle.Y + R1.Height), new Size(R3.Width, R4.Height));

R7 = new Rectangle(new Point(ClientRectangle.X,
     ClientRectangle.Y + R1.Height + R4.Height), new Size(VIRTUALBORDER, VIRTUALBORDER));
R8 = new Rectangle(new Point(ClientRectangle.X + R7.Width,
     ClientRectangle.Y + R1.Height + R4.Height),
     new Size(ClientRectangle.Width - (R7.Width * 2), R7.Height));
R9 = new Rectangle(new Point(ClientRectangle.X + R7.Width + R8.Width,
     ClientRectangle.Y + R1.Height + R4.Height), new Size(VIRTUALBORDER, VIRTUALBORDER));
如果我们想为自定义边框设置颜色,也可以在 paint 事件中完成,如下所示
if (SHOWVIRTUALBORDERS)
{
Graphics GFX = e.Graphics;


// Center Color
GFX.FillRectangle(Brushes.White, R5);

// Corner Colors
GFX.FillRectangle(Brushes.Gold, R1);
GFX.FillRectangle(Brushes.Gold, R3);
GFX.FillRectangle(Brushes.Gold, R7);
GFX.FillRectangle(Brushes.Gold, R9);


// Side Colors
GFX.FillRectangle(Brushes.Red, R2);
GFX.FillRectangle(Brushes.Red, R8);
GFX.FillRectangle(Brushes.Red, R4);
GFX.FillRectangle(Brushes.Red, R6);
}
MouseMove 事件
MouseMove 事件将为我们的窗体提供两个不同的功能,具体取决于窗体是否捕获了鼠标,即是否按下了鼠标按钮。 如果在悬停窗体时按下鼠标按钮,我们假设这表明用户想要移动或调整窗体的大小。 在这种情况下,我们将检查在窗体的哪个位置进行调整大小,并相应地重新绘制窗体...
RESIZEDESTINATION = PointToScreen(new Point(e.X, e.Y));
R0 = Bounds;

// If the form has captured the mouse...
if (Capture)
{

if (ISMOVING == true)
{
ISREZISING = false;
// ISMOVING is true if the R5 rectangle is pressed. Allow the form to be
// moved around the screen.
Location = new Point(MousePosition.X - MOUSEPOS.X, MousePosition.Y - MOUSEPOS.Y);
}

if (ISREZISING == true)
{
ISMOVING = false;

if (ISRESIZINGTOPLEFT)
{
Bounds = new Rectangle(R0.X + RESIZEDESTINATION.X - RESIZESTART.X, R0.Y +
    RESIZEDESTINATION.Y - RESIZESTART.Y, R0.Width - RESIZEDESTINATION.X +
    RESIZESTART.X, R0.Height - RESIZEDESTINATION.Y + RESIZESTART.Y);
}

if (ISRESIZINGTOP)
{
Bounds = new Rectangle(R0.X, R0.Y + RESIZEDESTINATION.Y - RESIZESTART.Y,
    R0.Width, R0.Height - RESIZEDESTINATION.Y + RESIZESTART.Y);
}

if (ISRESIZINGTOPRIGHT)
{
Bounds = new Rectangle(R0.X, R0.Y + RESIZEDESTINATION.Y - RESIZESTART.Y,
    R0.Width + RESIZEDESTINATION.X - RESIZESTART.X,
    R0.Height - RESIZEDESTINATION.Y + RESIZESTART.Y);
}

if (ISRESIZINGLEFT)
{
Bounds = new Rectangle(R0.X + RESIZEDESTINATION.X - RESIZESTART.X, R0.Y,
    R0.Width - RESIZEDESTINATION.X + RESIZESTART.X, R0.Height);
}

if (ISRESIZINGRIGHT)
{
Bounds = new Rectangle(R0.X, R0.Y, R0.Width + RESIZEDESTINATION.X - RESIZESTART.X,
    R0.Height);
}

if (ISRESIZINGBOTTOMLEFT)
{
Bounds = new Rectangle(R0.X + RESIZEDESTINATION.X - RESIZESTART.X, R0.Y,
    R0.Width - RESIZEDESTINATION.X + RESIZESTART.X, R0.Height +
    RESIZEDESTINATION.Y - RESIZESTART.Y);
}

if (ISRESIZINGBOTTOM)
{
Bounds = new Rectangle(R0.X, R0.Y, R0.Width, R0.Height +
    RESIZEDESTINATION.Y - RESIZESTART.Y);
}

if (ISRESIZINGBOTTOMRIGHT)
{
Bounds = new Rectangle(R0.X, R0.Y, R0.Width + RESIZEDESTINATION.X - RESIZESTART.X,
    R0.Height + RESIZEDESTINATION.Y - RESIZESTART.Y);
}

RESIZESTART = RESIZEDESTINATION;
Invalidate();
}
}
[MouseMove 事件继续] ...
当鼠标只是悬停在窗体上时,我们希望光标根据悬停在窗体上的位置而改变。 也就是说,如果鼠标悬停在某个角上,它应该改变它的光标,以便用户知道可以在该位置调整窗体的大小。 如果鼠标悬停在窗体上且未被捕获,则将触发以下代码
else
{
MOUSEPOS = new Point(e.X, e.Y);

// Changes Cursor depending where the mousepointer is located at the form...
if (R1.Contains(MOUSEPOS))
{
Cursor = Cursors.SizeNWSE;
}
if (R2.Contains(MOUSEPOS))
{
Cursor = Cursors.SizeNS;
}
if (R3.Contains(MOUSEPOS))
{
Cursor = Cursors.SizeNESW;
}
if (R4.Contains(MOUSEPOS))
{
Cursor = Cursors.SizeWE;
}
if (R5.Contains(MOUSEPOS))
{
Cursor = Cursors.Default;
}
if (R6.Contains(MOUSEPOS))
{
Cursor = Cursors.SizeWE;
}
if (R7.Contains(MOUSEPOS))
{
Cursor = Cursors.SizeNESW;
}
if (R8.Contains(MOUSEPOS))
{
Cursor = Cursors.SizeNS;
}
if (R9.Contains(MOUSEPOS))
{
Cursor = Cursors.SizeNWSE;
}

}
MouseDown 事件
当 MouseDown 事件被触发时,我们将检查哪个矩形包含鼠标光标并设置相应的变量和布尔值。 我们还将记录鼠标光标的位置,作为我们的调整大小或移动“事件”的参考点。
switch (e.Button)
{
case MouseButtons.Left:

if (R1.Contains(MOUSEPOS))
{
ISREZISING = true;
ISRESIZINGTOPLEFT = true;
RESIZESTART = PointToScreen(new Point(e.X, e.Y));
}

if (R2.Contains(MOUSEPOS))
{
ISREZISING = true;
ISRESIZINGTOP = true;
RESIZESTART = PointToScreen(new Point(e.X, e.Y));
}

if (R3.Contains(MOUSEPOS))
{
ISREZISING = true;
ISRESIZINGTOPRIGHT = true;
RESIZESTART = PointToScreen(new Point(e.X, e.Y));
}

if (R4.Contains(MOUSEPOS))
{
ISREZISING = true;
ISRESIZINGLEFT = true;
RESIZESTART = PointToScreen(new Point(e.X, e.Y));
}

if (R5.Contains(MOUSEPOS))
{
// If the center area of the form is pressed (R5), then we should be able
// to move the form.
ISMOVING = true;
ISREZISING = false;
MOUSEPOS = new Point(e.X, e.Y);
Cursor = Cursors.SizeAll;
}

if (R6.Contains(MOUSEPOS))
{
ISREZISING = true;
ISRESIZINGRIGHT = true;
RESIZESTART = PointToScreen(new Point(e.X, e.Y));
}

if (R7.Contains(MOUSEPOS))
{
ISREZISING = true;
ISRESIZINGBOTTOMLEFT = true;
RESIZESTART = PointToScreen(new Point(e.X, e.Y));
}

if (R8.Contains(MOUSEPOS))
{
ISREZISING = true;
ISRESIZINGBOTTOM = true;
RESIZESTART = PointToScreen(new Point(e.X, e.Y));
}

if (R9.Contains(MOUSEPOS))
{
ISREZISING = true;
ISRESIZINGBOTTOMRIGHT = true;
RESIZESTART = PointToScreen(new Point(e.X, e.Y));
}

break;
}
}
关注点
我在我的一些项目中使用过这种方法。 如果您想查看使用这种方法的示例,请查看 knas ScreenParts 应用程序。
历史
这是本文的第一个版本。