
Flex 日历
5.00/5 (1投票)
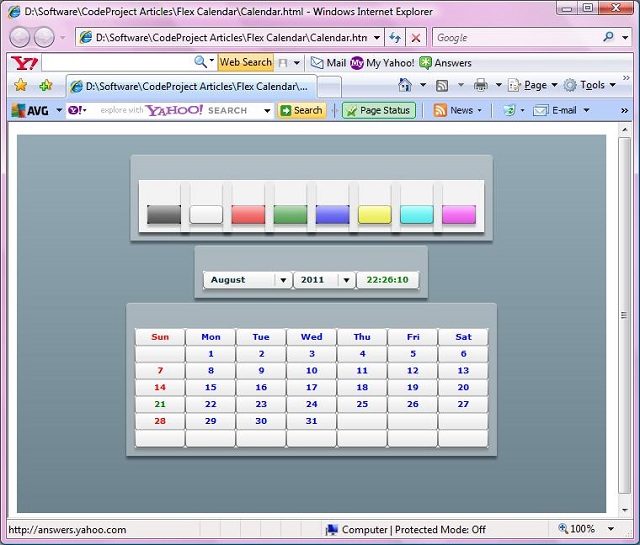
这是一个使用 Flex 开发的日历应用程序。
引言
本文演示了使用 Flex 创建日历应用程序。 Flex 技术可用于开发 Flex 应用程序,这些应用程序可以在浏览器上运行,并使用 Flash Player 运行时环境来执行客户端代码和渲染图形。
Flex 编程模型包括 Flex 类库、MXML、ActionScript、编译器和调试器,如下所示
| Flex | |
| MXML | ActionScript |
| Flex 类库 | |
| 编译器 | 调试器 |
Flex 应用程序是使用 MXML 和 ActionScript 组合编写的。 MXML 可用于创建用户界面
背景
我编写的代码用于显示交互式的月度日历。 可以从相应的组合框中选择月份和年份,并且将显示所选月份和年份的日历。 此外,当前时间以 hh:mm:ss 格式显示。
Using the Code
Flex 程序基本上是一个 XML 文件。 程序的第一行是处理指令,指定 xml 版本。
<?xml version="1.0"?>
Flex 应用程序的根元素是 <mx:Application> 标签,它表示应用程序容器。 容器包含组件。 <mx:Application> 标签具有一个名为 xmlns:mx 的属性,用于指定要包含的命名空间。creationComplete 属性指定应用程序启动后要调用的方法。
<mx:Application xmlns:mx="http://www.adobe.com/2006/mxml" creationComplete="setYears()">日历的用户界面是使用 Panel、Button 和 ComboBox 控件创建的。 第一个面板用于选择颜色。 该面板定义了用于通过将鼠标指针悬停在按钮上来更改其他面板颜色的按钮。 它使用按钮的 mouseOver 事件来调用 changecolor() 函数。<mx:Panel id="colorcontainerpanel"
layout="absolute">
<mx:Panel id="blackpanel" layout="absolute"
backgroundColor="black" x="0" y="0">
<mx:Button id="blackbutton" x="0" y="0"
mouseOver="changecolor(1)" />
</mx:Panel>
<mx:Panel id="whiletpanel" layout="absolute"
backgroundColor="white" x="50" y="0">
<mx:Button id="whitebutton" x="0" y="0"
mouseOver="changecolor(2)" />
</mx:Panel>
<mx:Panel id="redpanel" layout="absolute"
backgroundColor="red" x="100" y="0">
<mx:Button id="redbutton" x="0" y="0"
mouseOver="changecolor(3)" />
</mx:Panel>
<mx:Panel id="greenpanel" layout="absolute"
backgroundColor="green" x="150" y="0">
<mx:Button id="greenbutton" x="0" y="0"
mouseOver="changecolor(4)" />
</mx:Panel>
<mx:Panel id="bluepanel" layout="absolute"
backgroundColor="blue" x="200" y="0">
<mx:Button id="bluebutton" x="0" y="0"
mouseOver="changecolor(5)" />
</mx:Panel>
<mx:Panel id="yellowpanel" layout="absolute"
backgroundColor="yellow" x="250" y="0">
<mx:Button id="yellowbutton" x="0" y="0"
mouseOver="changecolor(6)" />
</mx:Panel>
<mx:Panel id="cyanpanel" layout="absolute"
backgroundColor="cyan" x="300" y="0">
<mx:Button id="cyanbutton" x="0" y="0"
mouseOver="changecolor(7)" />
</mx:Panel>
<mx:Panel id="magentapanel" layout="absolute"
backgroundColor="magenta" x="350" y="0">
<mx:Button id="magentabutton" x="0" y="0"
mouseOver="changecolor(8)" />
</mx:Panel>
</mx:Panel>
第二个面板包含两个 ComboBox 控件,允许用户选择月份和年份,以及一个显示当前时间的按钮控件。 从 CombBox 控件中选择月份或年份时,将调用 show() 函数。
<mx:Panel id="selectionpanel" layout="absolute">
	<mx:ComboBox id="monthlist" x="0" y="0" dataProvider="{Months}"
	change="show()" toolTip="Select month...">
	</mx:ComboBox>
	<mx:ComboBox id="yearlist" x="107" y="0" width="75"
	dataProvider="{Years}" change="show()" toolTip="Select year...">
	</mx:ComboBox>
	<mx:Button id="timerbutton" x="182" y="0" width="75" color="green" />
</mx:Panel>
第三个面板是主面板,它定义了排列成七行七列的按钮集合。 第一列表示一周的第一天,即星期日。
<mx:Panel id="datepanel" layout="absolute">
	<mx:Button x="0" y="0" label="Sun" width="60" color="red" />
	<mx:Button x="60" y="0" label="Mon" width="60" color="blue" />
	<mx:Button x="120" y="0" label="Tue" width="60" color="blue" />
	<mx:Button x="180" y="0" label="Wed" width="60" color="blue" />
	<mx:Button x="240" y="0" label="Thu" width="60" color="blue" />
	<mx:Button x="300" y="0" label="Fri" width="60" color="blue" />
	<mx:Button x="360" y="0" label="Sat" width="60" color="blue" />

	<mx:Button x="0" y="20" width="60" color="red" />
	<mx:Button x="60" y="20" width="60" color="blue" />
	<mx:Button x="120" y="20" width="60" color="blue" />
	<mx:Button x="180" y="20" width="60" color="blue" />
	<mx:Button x="240" y="20" width="60" color="blue" />
	<mx:Button x="300" y="20" width="60" color="blue" />
	<mx:Button x="360" y="20" width="60" color="blue" />

	<mx:Button x="0" y="40" width="60" color="red" />
	<mx:Button x="60" y="40" width="60" color="blue" />
	<mx:Button x="120" y="40" width="60" color="blue" />
	<mx:Button x="180" y="40" width="60" color="blue" />
	<mx:Button x="240" y="40" width="60" color="blue" />
	<mx:Button x="300" y="40" width="60" color="blue" />
	<mx:Button x="360" y="40" width="60" color="blue" />

	<mx:Button x="0" y="60" width="60" color="red" />
	<mx:Button x="60" y="60" width="60" color="blue" />
	<mx:Button x="120" y="60" width="60" color="blue" />
	<mx:Button x="180" y="60" width="60" color="blue" />
	<mx:Button x="240" y="60" width="60" color="blue" />
	<mx:Button x="300" y="60" width="60" color="blue" />
	<mx:Button x="360" y="60" width="60" color="blue" />

	<mx:Button x="0" y="80" width="60" color="red" />
	<mx:Button x="60" y="80" width="60" color="blue" />
	<mx:Button x="120" y="80" width="60" color="blue" />
	<mx:Button x="180" y="80" width="60" color="blue" />
	<mx:Button x="240" y="80" width="60" color="blue" />
	<mx:Button x="300" y="80" width="60" color="blue" />
	<mx:Button x="360" y="80" width="60" color="blue" />

	<mx:Button x="0" y="100" width="60" color="red" />
	<mx:Button x="60" y="100" width="60" color="blue" />
	<mx:Button x="120" y="100" width="60" color="blue" />
	<mx:Button x="180" y="100" width="60" color="blue" />
	<mx:Button x="240" y="100" width="60" color="blue" />
	<mx:Button x="300" y="100" width="60" color="blue" />
	<mx:Button x="360" y="100" width="60" color="blue" />

	<mx:Button x="0" y="120" width="60" color="red" />
	<mx:Button x="60" y="120" width="60" color="blue" />
	<mx:Button x="120" y="120" width="60" color="blue" />
	<mx:Button x="180" y="120" width="60" color="blue" />
	<mx:Button x="240" y="120" width="60" color="blue" />
	<mx:Button x="300" y="120" width="60" color="blue" />
	<mx:Button x="360" y="120" width="60" color="blue" />
</mx:Panel>
</mx:Application>
所有 ActionScript 代码都写在 <mx:Script> 和 </mx:Script> 标签内。 脚本标签内的内容必须包含在 CDATA 结构中。 这可以防止脚本的内容被解释为 XML。 在脚本中,我们声明了两个带有 [Bindable] 标签的数组。 [Bindable] 标签允许数组绑定到像 ComboBox 这样的控件。
<mx:Script>
	<![CDATA[
		[Bindable]
		public var Months:Array =
["January", "February",
	"March", "April", "May", "June", "July", "August",
	"September", "October", "November", "December"]; // Months Array
	[Bindable]
	public var Years:Array = new Array(8100); // Years Array
	import flash.events.Event;
	import mx.controls.Alert;
	import mx.controls.Button;
	import flash.utils.Timer;
	import flash.events.TimerEvent;
	public var month:int;
	public var year:int;
应用程序启动后立即调用 setYears() 函数。 此函数使用 1900 年到 9999 年之间的年份填充 Years 数组,并在 ComboBox 控件中显示当前年份和当前月份。 该函数还声明一个计时器来显示正在运行的时间
在 Button 上。 最后,它调用 show() 方法以显示所选月份和年份的日历。
public function setYears():void
{
	for (var ctr:int = 1900; ctr < 10000; ctr++)	// Fill Years array
	{
		Years[ctr - 1900] = ctr;
	}
	var currdate:Date = new Date();
	yearlist.selectedIndex = currdate.getFullYear() - 1900;// Display current year
	monthlist.selectedIndex = currdate.getMonth();	// Display current month
	var timer:Timer = new Timer(1000);	// Declare timer
	timer.addEventListener(TimerEvent.TIMER, displaytime);	// Add listener
	timer.start();	// Start timer
	show();	// Display calendar
}
displaytime() 函数是用于显示当前时间的事件函数。
public function displaytime(e:Event):void
{
	var currdate:Date = new Date();	// Retrieve current date
	var hours:int = currdate.getHours();	// Retrieve current hour
	var minutes:int = currdate.getMinutes();	// Retrieve current minute
	var seconds:int = currdate.getSeconds();	// Retrieve current second
	var h:String = (hours < 10)?"0" +
	hours.toString():hours.toString();	// Convert single digit year to two digit
	var m:String = (minutes < 10)?"0" +
	minutes.toString():minutes.toString();// Convert single digit minute to two digit
	var s:String = (seconds < 10)?"0" +
	seconds.toString():seconds.toString();// Convert single digit second to two digit
	timerbutton.label = h + ":" + m + ":" + s;	// Display current time
}
show() 函数检索选定的月份和年份,并显示日历。
public function show():void
{
	month = monthlist.selectedIndex;	// Retrieve selected month
	year = yearlist.selectedIndex + 1900; // Retrieve selected year
	var newdt:Date = new Date(year, month, 1);    // Initialize first day of
						// the selected month
	var dow:int = newdt.getDay();	// Find day of the week of the
					// first day of the month
	var ctr:int;
	for(ctr=7;ctr<49;ctr++)		// Clear text on all buttons
	{
		var btn:Button = Button(datepanel.getChildAt(ctr));
		btn.label = "";
	}
	for(ctr=0;ctr<dow;ctr++)		// Skip positions before
					// the first day of the month
	{
	}
	var n:int = 1;
	while(n<=maxdays(month,year))	// Display days from 1 till
					// the last day of the month
	{
		var btn1:Button = Button(datepanel.getChildAt(ctr + 7));
		btn1.label = n.toString();
		var currdate:Date = new Date();	// Retrieve current date
		if (year == currdate.getFullYear() &&
			month == currdate.getMonth() && n == currdate.getDate())
		{
			btn1.setStyle("color", "green");	// Display current
							// date in green color
		}
		else
		{
			if (btn1.x == 0)
			{
				btn1.setStyle("color", "red"); // Display Sunday
							// in red color
			}
			else
			{
				btn1.setStyle("color", "blue"); // Display other
							// days in blue color
			}
		}
		ctr++;
		n++;
	}
}
maxdays() 函数返回给定日期和年份中的最大天数。
public function maxdays(month:int,year:int):int
{
	if (month == 1)
	{
		if ((year % 4 == 0 && year % 100 != 0) ||
				year % 400 == 0) 	// Check for leap year
		{
			return 29;		// Leap year
		}
		else
		{
			return 28;		// Non-Leap year
		}
	}
	else if(month==3||month==5||month==8||month==10)
	{
		return 30;	// Months with 30 days
	}
	else
	{
		return 31;	// Months with 31 days
	}
}
changecolor() 函数检查数字并设置面板的背景颜色。
public function changecolor(n:int):void
{
   switch(n)
   {
	   case 1:
		   selectionpanel.setStyle("backgroundColor", "black");
		   datepanel.setStyle("backgroundColor", "black");
		   break;
	   case 2:
		   selectionpanel.setStyle("backgroundColor", "white");
		   datepanel.setStyle("backgroundColor", "white");
		   break;
	   case 3:
		   selectionpanel.setStyle("backgroundColor", "red");
		   datepanel.setStyle("backgroundColor", "red");
		   break;
	   case 4:
		   selectionpanel.setStyle("backgroundColor", "green");
		   datepanel.setStyle("backgroundColor", "green");
		   break;
	   case 5:
		   selectionpanel.setStyle("backgroundColor", "blue");
		   datepanel.setStyle("backgroundColor", "blue");
		   break;
	   case 6:
		   selectionpanel.setStyle("backgroundColor", "yellow");
		   datepanel.setStyle("backgroundColor", "yellow");
		   break;
	   case 7:
		   selectionpanel.setStyle("backgroundColor", "cyan");
		   datepanel.setStyle("backgroundColor", "cyan");
		   break;
	   case 8:
		   selectionpanel.setStyle("backgroundColor", "magenta");
		   datepanel.setStyle("backgroundColor", "magenta");
		   break;
   }
}
关注点
为了编译该程序,我使用了 Flex 3 SDK。 可以使用以下命令从命令行编译该程序
mxmlc Calendar.mxml
要查看生成的 *Calendar.swf* 文件,您需要在计算机上安装 Flash Player。 swf 文件可以显示在任何支持 Flash 的浏览器上。 也可以通过将其嵌入到 HTML 文件中来查看 swf 文件,如下所示
<OBJECT CLASSID="clsid:D27CDB6E-AE6D-11cf-96B8-444553540000"
WIDTH="700" HEIGHT="450"
CODEBASE="http://active.macromedia.com/flash5/cabs/swflash.cab#version=5,0,0,0">
<PARAM NAME="MOVIE" VALUE="Calendar.swf">
<PARAM NAME="PLAY" VALUE="true">
<PARAM NAME="LOOP" VALUE="true">
<PARAM NAME="QUALITY" VALUE="high">
<PARAM NAME="SCALE" value="noborder">
<EMBED SRC="Calendar.swf" WIDTH="700" HEIGHT="450" PLAY="true" LOOP="true"
QUALITY="high" scale="noborder"
PLUGINSPAGE="http://www.macromedia.com/shockwave/download/index.cgi?
P1_Prod_Version=ShockwaveFlash">
</EMBED>
</OBJECT>