
多个动态文件上传
2.84/5 (18投票s)
本文介绍如何使用 JavaScript 上传多个文件
引言
本文介绍如何使用 javascript 和服务器端代码 (C#/Vb).NET 上传多个文件。
背景
很多时候,你可能需要将多个文件上传到服务器。你可以采用通过服务器端代码动态创建文件上传控件的方法,或者采用使用 javascript 动态创建文件上传控件的方法。本文介绍如何使用 javascript 在客户端创建文件上传控件,以及从服务器端获取上传的文件。
使用代码
首先,你需要创建一个表格/单元格,用于显示你的文件上传控件。
像这样
<table width="100" >
    <tr>
            <td id="tdFileInputs" width="100" valign="top">
                </td>
        </tr>
        <tr>
            <td nowrap="nowrap">
                    <img src="images/attach.gif" />
                        <a id="lnkAttch"
                        onmouseover="this.style.textDecoration='underline'"
                        onmouseout="this.style.textDecoration='none'"
                        style="cursor: hand" onclick="AddFileInput()">Attach a file</a>
        </tr>
</table>
然后,你需要一些 javascript 代码来创建文件上传控件。为此,你必须创建一个包含如下模板的表格
<table style="display: none;">
        <tr height="1">
            <td width="1" height="1">
            </td>
            <td height="1" id="tdFileInputsTemp" width="100" valign="top"
                 style="visibility: hidden;">
                <input id="fileInputTemp" type="file" /><a
                    onmouseover="this.style.textDecoration='underline'"
                    onmouseout="this.style.textDecoration='none'" style="cursor: hand;"
                    id="remove_fileInputTemp"></a></td>
        </tr>
    </table>
Y你必须将模板表格的 “display” 属性设置为 “none”,因为你不想在 UI 上显示它。另外请注意,模板文件输入框的 name 属性未设置。因为如果你设置了 name,那么在服务器端代码中它将包含在上传文件的集合中,但你不需要它在服务器端,因为它任何时候都不会包含任何文件。
style="display: none;"
现在轮到编写 javascript 代码来创建文件输入控件和删除按钮了。
<script language="javascript" type="text/javascript">
        function Load()
        {

            document.getElementById("btnSend").style.display="none";
        }
        count  = 0;
        function AddFileInput()
        {
            var tdFileInputsTemp = document.getElementById('tdFileInputsTemp');
            var tdFileInputs = document.getElementById('tdFileInputs');
            var fileInput = tdFileInputsTemp.firstChild;
            var a = tdFileInputsTemp.lastChild;
            // Create a new file input
            var newFileInput = fileInput.cloneNode(false);
            newFileInput.value = null;
            var id = (new Date()).getTime();
            newFileInput.id = id // A unique id
            newFileInput.name = newFileInput.id;
            tdFileInputs.appendChild(newFileInput);

            // Create a new a input
            var newa = a.cloneNode(false);
            newa.id = 'remove_' + id; // A unique id
            newa.innerHTML = "Remove<br>";
            newa.onclick = RemoveFileInput;
            tdFileInputs.appendChild(newa);
            var lnkAttch = document.getElementById('lnkAttch');
            count = count + 1;
            if(count>0)
            {
                lnkAttch.innerHTML = "Attach another file";
                document.getElementById("btnSend").style.display="";
            }
            else
            {
                document.getElementById("btnSend").style.display="none";
                lnkAttch.innerHTML = "Attach a file";
            }
        }

        function RemoveFileInput(e)
        {
            var Event = e ? e : window.event;
            var obj = Event.target ? Event.target : window.event.srcElement;
            var tdFileInputs = document.getElementById('tdFileInputs');
            var a = document.getElementById(obj.id);
            tdFileInputs.removeChild(a);
            var fileInputId = obj.id.replace('remove_','');
            var fileInput = document.getElementById(fileInputId);
            tdFileInputs.removeChild(fileInput);
            var lnkAttch = document.getElementById('lnkAttch');
            count = count - 1;
            if(count>0)
            {
                lnkAttch.innerHTML = "Attach another file";
                document.getElementById("btnSend").style.display="";
            }
            else
            {
                lnkAttch.innerHTML = "Attach a file";
                document.getElementById("btnSend").style.display="none";
            }
        }

</script>
代码本身就具有描述性,我不想深入探讨每个函数。
你可以在任何 Web 开发语言中使用这段代码。
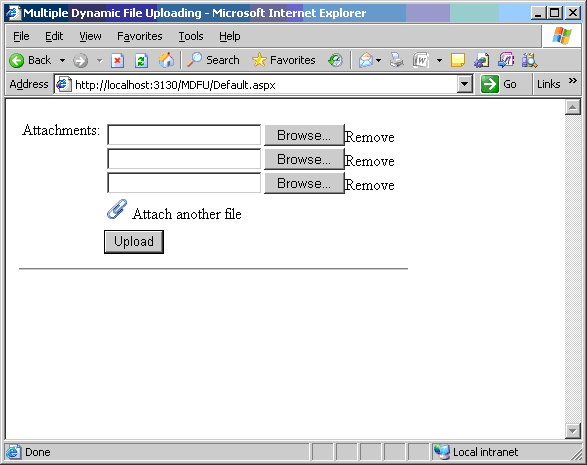
实现代码后,运行项目,你将看到如下输出

这是用于访问上传文件的服务器端代码。你可以将文件保存到服务器,或者做任何你想做的事情。
lblFiles.Text = "";
        HttpFileCollection files = Request.Files;
        for (int i = 0; i < files.Count; i++)
        {
            HttpPostedFile file = files[i];
            if (file.ContentLength > 0)
            {
                //You can perform uploading here
                lblFiles.Text += "<br>" + String.Format("File : {0} uploaded.",
                    file.FileName);
            }
        }
关注点
这只是为了创建丰富的客户端应用程序,以获得最佳性能和用户交互。
历史
未完待续...