如何在 Windows Forms 中使用透明图像和标签
4.61/5 (31投票s)
Windows Forms(.NET)中的控件不支持真正的透明度。在本文中,我们将展示如何使用透明的标签和图像。

引言 - Windows Forms 中没有透明度!
如果您尝试处理包含图像和标签的更复杂的窗体,您可能会发现 Windows Forms 不支持真正的透明度。您可能会抓耳挠腮——但别担心!
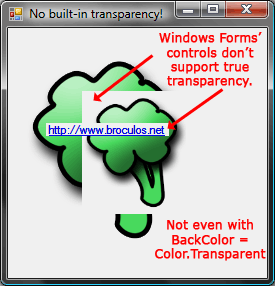
即使您将控件的 BackColor 设置为 Transparent 值,您也不会获得透明度。实际上发生的是控件会渲染其父级的背景。这种行为在下图中是可见的。

在本文中,我们将向您展示一种简单的方法来获取具有图像作为背景的标签,以及如何使用具有正确透明度的图像和文本。
如何制作透明标签
使用图像作为背景,并在前景使用具有真正透明度的标签或文本,实际上可以很容易地实现。在本章中,我们将展示如何使标签的背景透明。
有两种方法可以使标签在具有图像作为背景的情况下正确处理透明度(实际上还有更多方法可以做到这一点,但我们只讨论更直接的方法):
- 通过设置
Panel的BackgroundImage属性并将Label(s)放置在其中 - 通过将
PictureBox父化到Label(label.Parent = pictureBox;)
我们将采用第一种解决方案,它不需要任何代码,并且我们可以在设计器中立即看到结果。

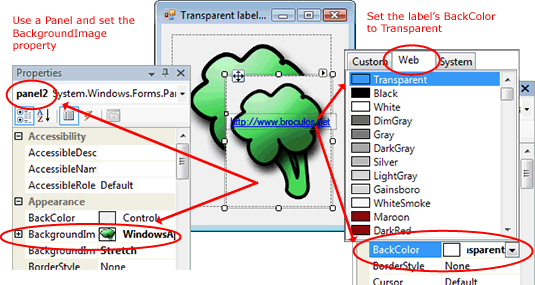
首先,将一个 Panel 拖到您的窗体上。现在,将 BackgroundImage 属性设置为您想要作为背景的图像(您可以使用 BackgroundImageLayout 来控制其行为)。
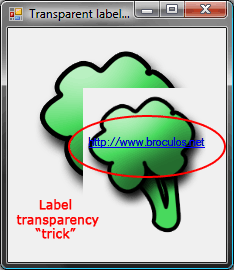
最后,添加一个 Label 并将 BackColor 属性设置为 Transparent(在 Web 选项卡中的第一个选项)。最终结果应与下图相似。

这使我们能够使用具有透明度的标签,但图像仍然是破碎的(它们之间没有透明度)!别担心,在下一章中我们将讨论一种使用具有真正透明度的图像的解决方案。
使用 GDI+ 绘制透明图像
绘制具有正确透明度的图像有点棘手,因为我们不能使用 Windows Forms 和 .NET 附带的默认控件。
对于更复杂的图像和图形处理,我们可以使用 GDI+,它代表 Graphics Device Interface(可以在 System.Drawing namespace 中找到)。
我们将创建一个通用控件,然后可以任意继承它来绘制图像和文本。可以在项目源代码中找到它,但如果您想了解它是如何工作的,请继续阅读。
用于绘制图像的通用控件
首先创建一个继承自 Panel 的新类。称它为 DrawingArea。这个类将有一个 abstract OnDraw 方法,它将被其子类重写,所以我们也需要将该类声明为 abstract。
此外,我们将添加一个 Graphics 对象,所有绘图都将在其中进行。您应该得到类似这样的内容:
using System;
using System.Drawing;
using System.Windows.Forms;
using System.Drawing.Drawing2D;

/// <summary>
/// Use this for drawing custom graphics and text with transparency.
/// Inherit from DrawingArea and override the OnDraw method.
/// </summary>
abstract public class DrawingArea : Panel
{
    /// <summary>
    /// Drawing surface where graphics should be drawn.
    /// Use this member in the OnDraw method.
    /// </summary>
    protected Graphics graphics;

    /// <summary>
    /// Override this method in subclasses for drawing purposes.
    /// </summary>
    abstract protected void OnDraw();
}
我们需要确保我们的控件的背景透明度得到正确处理。为此,我们重写 CreateParams 属性,以确保在实例化控件时包含正确的样式(感谢 Bob Powell 的这个提示)。
    protected override CreateParams CreateParams
    {
        get
        {
            CreateParams cp = base.CreateParams;
            cp.ExStyle |= 0x00000020; //WS_EX_TRANSPARENT

            return cp;
        }
    }
现在,只需要再做两件事。首先,我们必须确保背景不会被绘制。我们通过重写 OnPaintBackground 方法并使其为空来实现。
第二件事是重写 OnPaint 方法。这允许我们定义控件需要自行绘制时调用的过程。
    protected override void OnPaintBackground(PaintEventArgs pevent)
    {
        // Don't paint background
    }

    protected override void OnPaint(PaintEventArgs e)
    {
        // Update the private member so we can use it in the OnDraw method
        this.graphics = e.Graphics;

        // Set the best settings possible (quality-wise)
        this.graphics.TextRenderingHint =
            System.Drawing.Text.TextRenderingHint.AntiAlias;
        this.graphics.InterpolationMode =
            System.Drawing.Drawing2D.InterpolationMode.HighQualityBilinear;
        this.graphics.PixelOffsetMode =
            System.Drawing.Drawing2D.PixelOffsetMode.HighQuality;
        this.graphics.SmoothingMode =
            System.Drawing.Drawing2D.SmoothingMode.HighQuality;

        // Calls the OnDraw subclass method
        OnDraw();
    }
我还定义了一个 DrawText 方法和一些变体,以便于编写文本。它有点长,所以我将其从教程中省略了,但您可以在项目源代码中找到它。
使用控件绘制具有透明度的图像和文本
现在,我们如何使用这个控件?我们需要创建一个新类并继承自 DrawingArea。这非常简单易行。这里我提供一个例子:
class BroculosDrawing : DrawingArea
{
    protected override void OnDraw()
    {
        // Gets the image from the global resources
        Image broculoImage = global::WindowsApplication1.Properties.Resources.broculo;

        // Sets the images' sizes and positions
        int width = broculoImage.Size.Width;
        int height = broculoImage.Size.Height;
        Rectangle big = new Rectangle(0, 0, width, height);
        Rectangle small = new Rectangle(50, 50, (int)(0.75 * width),
                (int)(0.75 * height));

        // Draws the two images
        this.graphics.DrawImage(broculoImage, big);
        this.graphics.DrawImage(broculoImage, small);

        // Sets the text's font and style and draws it
        float fontSize = 8.25f;
        Point textPosition = new Point(50, 100);
        DrawText("http://www.broculos.net", "Microsoft Sans Serif", fontSize
            , FontStyle.Underline, Brushes.Blue, textPosition);
    }
}
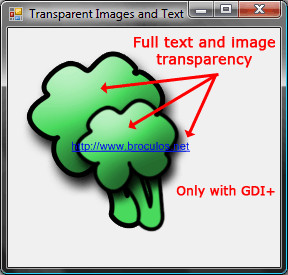
这将绘制两个图像和文本(类似于之前的),但现在具有真正的透明度!
我们可以像使用普通控件一样使用它。编译解决方案。创建一个新窗体。新控件应出现在工具箱中。将其拖到窗体上,瞧!您可以在下图看到结果:

结论
现在您知道如何绘制具有透明度的图像了。最大的缺点是它不如 .NET 内置的 Windows Forms 控件易于使用。默认控件对于更高级的图像使用和操作非常有限,因此我们使用了 GDI+ 来克服这一限制。
有了这些知识和一点额外的工作,就可以制作一个 TransparentPictureBox。希望您觉得它有用。
资源
历史
- 2008 年 4 月 8 日:初次发布
