
电子书阅读器
这是一个用于文本文件的电子书阅读器,
引言和背景
这是创建电子书阅读器的一次尝试。目前,它只能阅读txt文件。我将添加*.doc和*.rtf文件以获得更直观的效果。它使用一个File Splitter(文件分割器),可以将文件分割成指定范围(2000到500000)。File Splitter可以在此处CP找到。
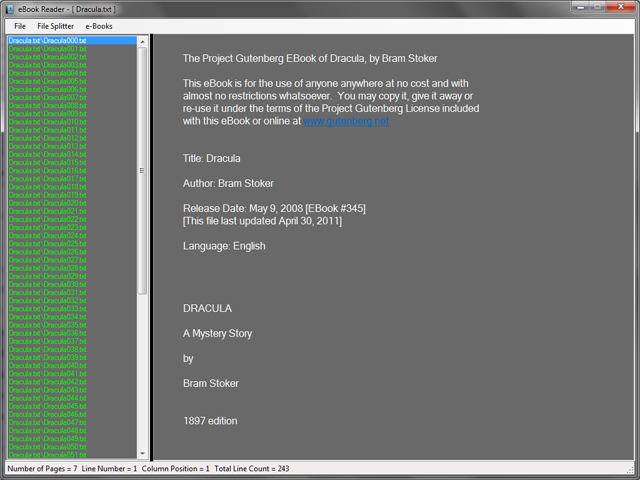
我重新编辑了DLL文件,使其仅生成TXT文件,这样在将一个大文件分割成小块后,阅读起来会容易得多,也快得多。它还会添加正确的文件名和部分编号,以便在listbox(列表框)中显示时,它们会按字母顺序排列。(见上图。)
eBookReader还会跟踪您上次阅读的位置。当您到达当前文件部分的末尾时,它会自动前进到下一个文件部分并在RichTextBox(富文本框)中显示。如果您想休息一下,可以通过点击菜单项Save Position(保存位置)来保存您的位置,当您想继续阅读时,只需打开同一本书并点击菜单项Get Position(获取位置)。它将显示您上次阅读的书中部分顶部的进度。
Using the Code
必须以管理员身份运行。这是必需的,因为我们要从Registry(注册表)创建和读取键,并创建Folders(文件夹)来存储分割后的e-books(电子书)。
当应用程序首次启动时,它会在您的Documents(文档)文件夹中创建一个名为“eBooks”的文件夹。如果该文件夹已存在,我们将正常退出sub(子程序)并继续Form loading(窗体加载)。这就是“以管理员身份运行”的原因,以及稍后我们读写Registry(注册表)中的值的原因。
如果您没有要阅读的电子书,我在本页底部的Points Of Interest(相关信息)部分发布了一些网站。这里有一个我使用的免费电子书网站,wwwgutenbergorg,在菜单项E-Books(电子书)中。选择要阅读的书时,请务必按txt格式。
您需要复制和粘贴,因此请确保打开一个文本编辑器(记事本或Notepad ++),然后将其另存为文件名.txt。这有点耗时,但是,这些书是免费的。
现在我们有了4到5本电子书要读,让我们通过点击File Splitter(文件分割器)menu item(菜单项),然后Split File(分割文件),出现此窗体...
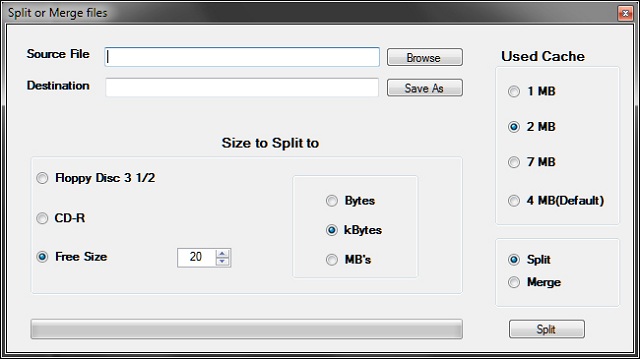
对于源文件,请输入您刚刚保存的一个文件。对于目标,选择窗体首次加载时创建的eBooks文件夹。点击分割按钮(btnGo)。
会创建一个名为我们正在分割的文件(FileName.txt)的另一个文件夹。创建的文件是(FileName000.txt、FileName001.txt、FileName002.txt)等等。当添加数字时,这是我重新编辑的DLL文件中的一个区域,它们被添加以便它们按字母顺序显示。DLL代码在此...
do
  {
    if (nCounter <= 9)
       m_fsOut = new FileStream(m_OutDir + "\\" +
		Path.GetFileNameWithoutExtension(m_FileName)
	   + "00" + nCounter.ToString() + ".txt", FileMode.Create);
    else if (nCounter <= 99)
       m_fsOut = new FileStream(m_OutDir + "\\" +
		Path.GetFileNameWithoutExtension(m_FileName)
	   + "0" + nCounter.ToString() + ".txt", FileMode.Create);
    else
       {
          m_fsOut = new FileStream(m_OutDir + "\\" +
		Path.GetFileNameWithoutExtension(m_FileName)
	      + nCounter.ToString() + ".txt", FileMode.Create);
       }
	//code continues
由于我还没有学会C#编程,这似乎效果很好。上面的主图显示了该代码在ListBox(列表框)中的结果。我还将所有“.part”
扩展名在Splitter Class(分割器类)和Merger Class(合并器类)中更改为“.txt”,这两个类位于The_FileSplitter_v2DLL中。
在btnGo_Click(点击Go按钮)事件中,我们调用fs.BeginSplit()sub(如下)。这反过来又调用后面的代码(Split() sub)。80%的分辨率在这里完成。另外20%在sub和/或我们未调用的函数中。
public void BeginSplit()
        {
#if DEBUG
            split();
#else
            m_tdSplitter = new Thread(new ThreadStart(split));
            m_tdSplitter.Priority = ThreadPriority.AboveNormal;
            m_tdSplitter.IsBackground = false;
            m_tdSplitter.Name = "Splitting";
            m_TimeStart = DateTime.Now;
            m_tdSplitter.Start();
#endif
        }
为了在.NET Framework中编程,您必须是多语种的,使用现有的任何.NET语言。虽然我还不懂C#编程,但我能读懂它。
在下面的Split sub(分割子程序)中,80%的工作在此完成...
- 我们将
m_CacheSize(缓存大小)设置为等于m_SizeLimit(大小限制),如果更大 - 我们声明一个缓冲区并将其设置为
m_CacheSize - 我们将
m_fsin设置为New FileStream(新的文件流) - 我们将
m_bReader设置为New BinaryReader(新的二进制读取器) - 如果目录不存在,我们创建一个
Directory(目录) - 我们为每个文件命名,以便它们按顺序显示。
- 我们将
cBuffer设置为New byte[m_fsIn.Length - m_fsIn.Position](新字节数组[文件输入长度-文件输入当前位置]) - 在执行完其他几个步骤后,我们获取位置并重新开始。
private void split()
        {
            if (m_CacheSize > m_SizeLimit)
                m_CacheSize = (uint)m_SizeLimit;

            byte[] cBuffer = new byte[m_CacheSize];
            int nCounter = 0;

            m_fsIn = new FileStream(m_FileName, FileMode.Open, FileAccess.Read);
            m_bReader = new BinaryReader(m_fsIn);


            if (!Directory.Exists(m_OutDir))
                Directory.CreateDirectory(m_OutDir);
            else
            {
                Directory.Delete(m_OutDir, true);
                Directory.CreateDirectory(m_OutDir);
            }

            int reads = 0;
            try
            {
                do
                {
                    if (nCounter <= 9)
                        m_fsOut = new FileStream(m_OutDir + "\\" +
			Path.GetFileNameWithoutExtension(m_FileName)
			+ "00" + nCounter.ToString() + ".txt", FileMode.Create);
                    else if (nCounter <= 99)
                        m_fsOut = new FileStream(m_OutDir + "\\" +
			Path.GetFileNameWithoutExtension(m_FileName)
			+ "0" + nCounter.ToString() + ".txt", FileMode.Create);
                    else
                    {
                        m_fsOut = new FileStream(m_OutDir + "\\" +
			Path.GetFileNameWithoutExtension(m_FileName)
			+ nCounter.ToString() + ".txt", FileMode.Create);
                    }
                    do
                    {
                        if ((m_fsIn.Length - m_fsIn.Position) < cBuffer.Length)
                            cBuffer = new byte[m_fsIn.Length - m_fsIn.Position];
                        reads = m_bReader.Read(cBuffer, 0, cBuffer.Length);
                        m_bWriter = new BinaryWriter(m_fsOut);
                        m_bWriter.Write(cBuffer, 0, reads);
                        m_Written += reads;      // = fsIn.Position;
                        m_Progress = (uint)((float)m_Written * 100 / (float)m_FileSize);
                        OnPartialSplitDone(EventArgs.Empty);
                    } while ((m_fsOut.Position < m_SizeLimit) &&
				(m_fsIn.Position < m_FileSize));
                    m_bWriter.BaseStream.Close();
                    m_Written = m_fsIn.Position;
                    nCounter++;
                    m_Progress = (uint)((float)m_Written * 100 / (float)m_FileSize);
                    OnPartialSplitDone(EventArgs.Empty);
                } while ((m_fsIn.Position < m_fsIn.Length));
                m_bReader.BaseStream.Close();
                OnSplitDone(EventArgs.Empty);
            }
            catch (Exception e)
            {
                m_SplitErrorMessage = e.Message;
                OnError(EventArgs.Empty);
                abort();
            }
            GC.Collect();
        }
现在分割部分已经完成,我们可以专注于eBookReader了。
我最初是为我的孙女开始这个项目的,但后来决定将其发布。她仍在用它。
有17个subs(子程序)和functions(函数),但我们将只介绍其中几个,因为它们大部分都很直接。我几乎注释了每一行代码,除了那些不言自明的代码(例如:Application.Exit())等等...)。我们将检查读写registry(注册表)、自动前进到下一个书本部分以及设置/查找您上次阅读的位置。
-
Private Sub OpentextFile()
这个sub(子程序)对于文件读取来说相当标准。它所做的就是打开一个文件,读取一行,将其写入RichTextBox(富文本框),然后我们**一次又一次地**重复这个过程,直到文件结束。我们设置NumberOfPages(页数),关闭文件,并将结果显示给用户。代码如下...
Private Sub OpentextFile(ByVal fname As String)

        'Clear the RichTextBox and
        'set the line count equal to zero.
        rtb1.Clear()
        lineCount = 0

        'Declare a FileStream and a StreamReader.
        Dim fs As FileStream
        Dim sr As StreamReader

        'Declare a place holder for each string we read.
        Dim strFile As String

        Try
            fs = New FileStream(fname, FileMode.Open, FileAccess.Read)
            sr = New StreamReader(fs)
            strFile = sr.ReadLine()

            'While the file is opened,
            'we read each line and put
            'it in the RichTextBox and
            'add 1 to our line count.
            'We do it repeatedly until
            'we cant do it no more.
            Do Until strFile Is Nothing
                rtb1.Text &= strFile & vbCrLf
                lineCount += 1
                strFile = sr.ReadLine()
            Loop

            'We set the NumberOfPages equal to
            'the lineCount divided by the
            'NUMBEROFLINES constant.
            NumberOfPages = lineCount / NUMBEROFLINES

            'Close the file.
            fs.Close()

            'Display the to the user, the
            'number of pages, and the line count.
            lblStatus.Text = "Number of Pages = " & NumberOfPages.ToString()
            lblTotalLineCount.Text = "Total Line Count = " & lineCount.ToString()

        Catch ex As Exception
            MessageBox.Show(ex.Message)
        End Try
    End Sub
-
Private Sub mnuFSavePosition_Click()
我们必须在书本部分中保存一个位置,以便在返回开始阅读时可以继续。我们通过在点击菜单Open(打开)按钮时设置currentFolder(当前文件夹)字符串来做到这一点。这会打开一个FolderDialog(文件夹对话框),然后我们选择一个文件夹打开并检索其中的文件。
接下来,我们必须设置一个返回的位置。我本打算设置caret(插入符)的位置,但我找不到一种方法。我发现的唯一方法是在WPF中,而我不想为了设置插入符而彻底改变应用程序。所以,我选择了简单的highlighting(高亮显示)。这很简单,只需高亮显示您想开始阅读的下一句话的文本,然后点击菜单项Save Position(保存位置)。代码如下...
Private Sub mnuFSavePosition_Click(sender As System.Object,
                                       e As System.EventArgs) _
                                   Handles mnuFSavePosition.Click

        'If the current folder is equal to an empty string
        'Exit the sub and put something in it.
        If currentFolder = "" Then Exit Sub

        'Select some text so we can start reading where we left off.
        mySelectedText = rtb1.SelectedText

        'set the current book part
        selection = lstFiles.SelectedItem

        'Set are Registry values
        My.Computer.Registry.SetValue("HKEY_LOCAL_MACHINE\SOFTWARE\eBookReader",
                                      "selection", selection)
        My.Computer.Registry.SetValue("HKEY_LOCAL_MACHINE\SOFTWARE\eBookReader",
                                      "folder", selectedFolder)
        My.Computer.Registry.SetValue("HKEY_LOCAL_MACHINE\SOFTWARE\eBookReader",
                                      "mySelectedText", mySelectedText)
        'Set the Booleans
        CanBeSaved = False
        saved = True
    End Sub
-
Private Sub mnuFGetPosition_Click()
现在我们已在Registry(注册表)中设置了我们的设置,并且保存了位置,我们可以检索它并将设置放回原始变量。如果以前没有选择文本,我们将显示一条消息说明这一点,否则我们可以继续。我们先前阅读选择的文本将被高亮显示,并设置在RichTextBox(富文本框)的顶部(高亮显示)。
Private Sub mnuFGetPosition_Click(sender As System.Object,
                                      e As System.EventArgs) Handles mnuFGetPosition.Click

        If My.Computer.Registry.GetValue("HKEY_LOCAL_MACHINE\SOFTWARE\eBookReader",
                                         "selection",
                                         selection) <> "" Then
            If currentFolder = My.Computer.Registry.GetValue _
                               ("HKEY_LOCAL_MACHINE\SOFTWARE\eBookReader",
                                "folder", selectedFolder) Then
                'Get the last read Book part
                lstFiles.SelectedItem = My.Computer.Registry.GetValue _
                               ("HKEY_LOCAL_MACHINE\SOFTWARE\eBookReader",
                                "selection", selection)
                'Get the last selected text so we can start reading
                'where we left off.
                mySelectedText = My.Computer.Registry.GetValue _
                                ("HKEY_LOCAL_MACHINE\SOFTWARE\eBookReader",
                                 "mySelectedText", mySelectedText)

                'If RichTextBox has no selected text...Then?
                If mySelectedText = "" Then
                    MessageBox.Show("Selected text was not set during the last read...", _
                                    "Highlight Info",
                                    MessageBoxButtons.OK, MessageBoxIcon.Information)
                    Exit Sub
                End If

                'Display the selected text at the top of
                'the RichTextBox
                FindMyText(mySelectedText, 0, rtb1.Text.Length)

                'Set the caret position
                rtb1.ScrollToCaret()

                'Set the Booleans
                CanBeSaved = True
                saved = False
            Else
                mySelectedText = ""
                CanBeSaved = False
                saved = True
                Exit Sub
            End If
        Else
            mySelectedText = ""
        End If
    End Sub
-
Public Function FindMyText()
在上面显示的子程序中,您会看到这一行,“FindMyText(mySelectedText, 0, rtb1.Text.Length)”。这是为了使用RichTextBox.Find(富文本框查找)方法而调用的。当调用FindMyText时,它看起来应该是这样的……FindMyText(mySelectedText, 0, rtb1.Text.Length)。它使用我们从注册表中调用的选定文本,一个起始点(文件开头),以及一个结束点(文件结尾)。此函数返回插入符位置(indexToText),但以高亮文本的形式。
 Public Function FindMyText(ByVal searchText As String,
                               ByVal searchStart As Integer,
                               ByVal searchEnd As Integer) As Integer

        ' Initialize the return value to false by default.
        Dim returnValue As Integer = -1

        ' Ensure that a search string and a valid starting point are specified.
        If searchText.Length > 0 And searchStart >= 0 Then

            ' Ensure that a valid ending value is provided.
            If searchEnd > searchStart Or searchEnd = -1 Then

                ' Obtain the location of the search string in rtb1.
                Dim indexToText As Integer = rtb1.Find(searchText, searchStart,
                                                       searchEnd,
                                                       RichTextBoxFinds.MatchCase)

                ' Determine whether the text was found in rtb1.
                If indexToText >= 0 Then

                    ' Return the index to the specified search text.
                    returnValue = indexToText
                End If
            End If
        End If

        Return returnValue
    End Function
-
Private Sub nextBookPartTimer_Tick()
当我们稳定地阅读时,我们到达了文件末尾。现在我们必须找到下一个书本部分。忘了这个。这个sub(子程序)会自动找到下一个书本部分。它清除RichTextBox(富文本框)中刚刚读取的书本部分,并通过调用此sub来打开下一个书本部分……lstFiles_SelectedIndexChanged()。这个sub(子程序)在我们改变选定索引时会被调用。代码如下...
Private Sub nextBookPartTimer_Tick(sender As Object,
                                       e As System.EventArgs) _
                                   Handles nextBookPartTimer.Tick
        If lineNumber = lineCount Then
            'Clear the RichTextBox
            rtb1.Clear()
            'Advance to the next book part automatically
            lstFiles.SelectedIndex += 1
        End If
    End Sub
-
Private Sub rtb1_KeyDown()
这个sub(子程序)只是通过在窗体底部的StatusStrip(状态栏)中的标签中显示给用户来跟踪我们当前的插入符位置。
Private Sub rtb1_KeyDown(sender As Object,
                             e As System.Windows.Forms.KeyEventArgs) Handles rtb1.KeyDown
        'Keep track of all positions when pressing the arrow keys.
        If e.KeyData = Keys.Down Then
            lineNumber = rtb1.GetLineFromCharIndex(rtb1.SelectionStart) + 1
            intPosition = rtb1.SelectionStart - rtb1.GetFirstCharIndexOfCurrentLine() + 1
            lblLineNumber.Text = "Line Number = " & lineNumber.ToString
            lblColumn.Text = "Column Position = " & intPosition.ToString()
            rtb1.Focus()
        ElseIf e.KeyData = Keys.Up Then
            lineNumber = rtb1.GetLineFromCharIndex(rtb1.SelectionStart) + 1
            intPosition = rtb1.SelectionStart - rtb1.GetFirstCharIndexOfCurrentLine() + 1
            lblLineNumber.Text = "Line Number = " & lineNumber.ToString
            lblColumn.Text = "Column Position = " & intPosition.ToString()
            rtb1.Focus()
        ElseIf e.KeyData = Keys.Left Then
            lineNumber = rtb1.GetLineFromCharIndex(rtb1.SelectionStart) + 1
            intPosition = rtb1.SelectionStart - rtb1.GetFirstCharIndexOfCurrentLine() + 1
            lblLineNumber.Text = "Line Number = " & lineNumber.ToString
            lblColumn.Text = "Column Position = " & intPosition.ToString()
            rtb1.Focus()
        ElseIf e.KeyData = Keys.Right Then
            lineNumber = rtb1.GetLineFromCharIndex(rtb1.SelectionStart) + 1
            intPosition = rtb1.SelectionStart - rtb1.GetFirstCharIndexOfCurrentLine() + 1
            lblLineNumber.Text = "Line Number = " & lineNumber.ToString
            lblColumn.Text = "Column Position = " & intPosition.ToString()
            rtb1.Focus()
        End If
    End Sub
关注点
历史
- 首次发布 2011年10月8日