
SharePoint 2010 客户端对象模型,第 2 部分
SharePoint 2010 客户端对象模型及其使用方法调查
- 下载 ConsoleDemo - 11.72 KB
- 下载 SPDemo - 511.3 KB
- 下载 SilverlightCSOM - 18.83 KB
- 下载 WPFClient - 24.91 KB
SharePoint 2010 客户端对象模型
在本文的第 1 部分中,我深入探讨了 SharePoint 客户端对象模型;它的工作原理以及如何构建查询和处理对象。现在,我将通过 .NET 托管代码、WPF、应用程序页面中使用的 JavaScript 以及 SharePoint Web 部件中的 Silverlight 的示例,实际演示如何使用客户端 OM。
安装
为了便于演示,首先创建一个 SharePoint 项目,该项目创建一个简单的联系人列表,并预先填充几个联系人。此项目包含在本文的下载文件中。对于 Silverlight 示例,我创建了一个 Silverlight 项目,并将输出添加到该网站上的文档库中。
演示应用程序可能不是设计得最好的,但它们是功能性的,并且能够以一种相对实用的方式有效地演示客户端对象模型的使用。
使用客户端 OM 和 .NET 托管代码
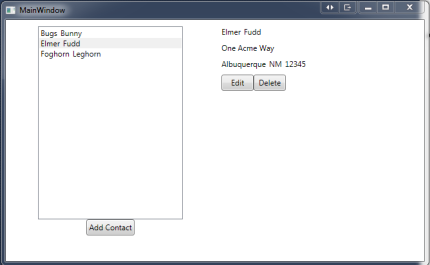
此应用程序首先获取一个包含演示列表中所有联系人的ListItemCollection。
public static ListItemCollection GetList()
{
    using(ClientContext ctx = new ClientContext(SITE))
    {
        Web web = ctx.Web;
        List list = web.Lists.GetByTitle(LIST_NAME);
        CamlQuery query = new CamlQuery();
        query.ViewXml = "<View>" +
                            "<Query>" +
                                "<OrderBy>" +
                                    "<FieldRef Name='Title'/>" +
                                    "<FieldRef Name='FirstName'/>" +
                                "</OrderBy>" +
                            "</Query>" +
                            "<ViewFields>" +
                                "<FieldRef Name='ID'/>" +
                                "<FieldRef Name='Title'/>" +
                                "<FieldRef Name='FirstName'/>" +
                                "<FieldRef Name='WorkAddress'/>" +
                                "<FieldRef Name='WorkCity'/>" +
                                "<FieldRef Name='WorkState'/>" +
                                "<FieldRef Name='WorkZip'/>" +
                            "</ViewFields>" +
                        "</View>";

        ListItemCollection listItems = list.GetItems(query);
        ctx.Load(listItems);
        ctx.ExecuteQuery();

        return listItems;
    }
}
由于本文更侧重于客户端对象模型的使用,我将不过多深入 XAML。仅用于演示,ListBox 绑定到从上述代码返回的ListItemCollection,DataTemplate 中的TextBlock 绑定到指定FieldValue 的ListItem 的索引器属性。
<ListBox x:Name="Contacts" ItemsSource="{Binding}" Width="225" Height="300" SelectionChanged="Contacts_SelectionChanged">
    <ListBox.ItemTemplate>
        <DataTemplate>
            <StackPanel Orientation="Horizontal">
                <TextBlock Text="{Binding Path=[FirstName]}" Margin="0,0,5,0"/>
                <TextBlock Text="{Binding Path=[Title]}"/>
            </StackPanel>
        </DataTemplate>
    </ListBox.ItemTemplate>
</ListBox>
本文的第 1 部分涵盖了检索ListItem、ClientContext、CamlQuery 以及其他正在使用的对象和方法的详细信息,因此我在此不再赘述。
更新 ListItems
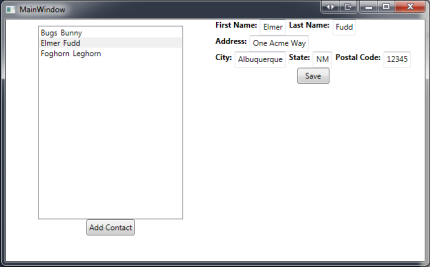
单击应用程序中的“编辑”按钮将显示编辑字段,同样,我不会过多关注 WPF,您可以自行查看下载文件以获取更多详细信息。单击“保存”按钮后,只需找到要更新的ListItem,更新FieldValues,然后提交更改。
public static void Update(int id, string firstName, string lastName, string address,
    string city, string state, string postalCode)
{
    using(ClientContext ctx = new ClientContext(SITE))
    {
        Web web = ctx.Web;
        List list = web.Lists.GetByTitle(LIST_NAME);

        // Get the item being updated
        ListItem item = list.GetItemById(id);

        // Update the FieldValues
        item["Title"] = lastName;
        item["FirstName"] = firstName;
        item["WorkAddress"] = address;
        item["WorkCity"] = city;
        item["WorkState"] = state;
        item["WorkZip"] = postalCode;

        // Must make sure to call this
        item.Update();

        // Commit the change
        ctx.ExecuteQuery();
    }
}
这里需要注意的一点是,与第 1 部分中的示例不同,这里没有调用Load 或LoadQuery。由于在这种情况下没有任何返回内容,因此无需使用这些方法。可以将其视为 ADO.NET ExecuteNonQuery 方法的等效项。另请注意,虽然看起来可能会诱人缓存ListItem 并直接更新它,但如果没有GetItemById 调用,这将不起作用。必须在ClientContext 对象上下文中检索项目,这与熟悉它的 Entity Framework 的工作方式类似。不建议缓存ClientContext,因为它会占用资源并可能导致应用程序性能下降。最好遵循数据库连接模型:晚开、使用、关闭。
添加 ListItems
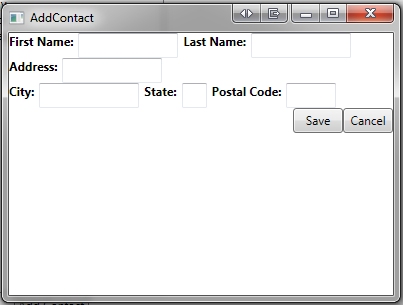
将新的ListItem 添加到List 中几乎与更新一样简单。不过,主要区别在于ListItemCreationInformation 对象。
public static void AddContact(string firstName, string lastName, string address,
    string city, string state, string postalCode)
{
    using(ClientContext ctx = new ClientContext(SITE))
    {
        Web web = ctx.Web;
        List list = web.Lists.GetByTitle(LIST_NAME);

        // Create the Listitem
        // ListItemCreationInformation can bee null for root folder
        ListItemCreationInformation createInfo = null;

        // Or for adding item to a folder
        //ListItemCreationInformation createInfo = new ListItemCreationInformation();
        //createInfo.FolderUrl = "site/lists/listname/folder";

        ListItem item = list.AddItem(createInfo);

        // Set the FieldValues
        item["Title"] = lastName;
        item["FirstName"] = firstName;
        item["WorkAddress"] = address;
        item["WorkCity"] = city;
        item["WorkState"] = state;
        item["WorkZip"] = postalCode;

        // Save changes
        item.Update();

        // Commit
        ctx.ExecuteQuery();
    }
}
与第 1 部分中演示的方法一样,调用ExecuteQuery 方法时,客户端 OM API 会创建一个 XML 字符串并将其 POST 到client.svc Web 服务。如下所示,这与“获取”方法非常相似,但您会注意到Method 元素指定了要调用的方法,而Parameter 元素传递了类型和值。
POST http://mySite/_vti_bin/client.svc/ProcessQuery HTTP/1.1
X-RequestDigest: 0xE8312251E4B[truncated for space]0000
Content-Type: text/xml
X-RequestForceAuthentication: true
Host: mySite
Content-Length: 2461
Expect: 100-continue

<Request AddExpandoFieldTypeSuffix="true" SchemaVersion="14.0.0.0" LibraryVersion="14.0.4762.1000"
        ApplicationName=".NET Library" xmlns="http://schemas.microsoft.com/sharepoint/clientquery/2009">
  <Actions>
    <ObjectPath Id="25" ObjectPathId="24" />
    <ObjectPath Id="27" ObjectPathId="26" />
    <ObjectPath Id="29" ObjectPathId="28" />
    <ObjectPath Id="31" ObjectPathId="30" />
    <ObjectIdentityQuery Id="32" ObjectPathId="30" />
    <ObjectPath Id="34" ObjectPathId="33" />
    <Method Name="SetFieldValue" Id="35" ObjectPathId="33">
      <Parameters>
        <Parameter Type="String">Title</Parameter>
        <Parameter Type="String">Betic</Parameter>
      </Parameters>
    </Method>
    <Method Name="SetFieldValue" Id="36" ObjectPathId="33">
      <Parameters>
        <Parameter Type="String">FirstName</Parameter>
        <Parameter Type="String">Alpha</Parameter>
      </Parameters>
    </Method>
    <Method Name="SetFieldValue" Id="37" ObjectPathId="33">
      <Parameters>
        <Parameter Type="String">WorkAddress</Parameter>
        <Parameter Type="String">Main street </Parameter>
      </Parameters>
    </Method>
    <Method Name="SetFieldValue" Id="38" ObjectPathId="33">
      <Parameters>
        <Parameter Type="String">WorkCity</Parameter>
        <Parameter Type="String">Anytown</Parameter>
      </Parameters>
    </Method>
    <Method Name="SetFieldValue" Id="39" ObjectPathId="33">
      <Parameters>
        <Parameter Type="String">WorkState</Parameter>
        <Parameter Type="String">PA</Parameter>
      </Parameters>
    </Method>
    <Method Name="SetFieldValue" Id="40" ObjectPathId="33">
      <Parameters>
        <Parameter Type="String">WorkZip</Parameter>
        <Parameter Type="String">12345</Parameter>
      </Parameters>
    </Method>
    <Method Name="Update" Id="41" ObjectPathId="33" />
    <Query Id="42" ObjectPathId="33">
      <Query SelectAllProperties="false">
        <Properties>
          <Property Name="Title" ScalarProperty="true" />
          <Property Name="FirstName" ScalarProperty="true" />
          <Property Name="WorkAddress" ScalarProperty="true" />
          <Property Name="WorkCity" ScalarProperty="true" />
          <Property Name="WorkState" ScalarProperty="true" />
          <Property Name="WorkZip" ScalarProperty="true" />
        </Properties>
      </Query>
    </Query>
  </Actions>
  <ObjectPaths>
    <StaticProperty Id="24" TypeId="{3747adcd-a3c3-41b9-bfab-4a64dd2f1e0a}" Name="Current" />
    <Property Id="26" ParentId="24" Name="Web" />
    <Property Id="28" ParentId="26" Name="Lists" />
    <Method Id="30" ParentId="28" Name="GetByTitle">
      <Parameters>
        <Parameter Type="String">SPUG Demo Contacts</Parameter>
      </Parameters>
    </Method>
    <Method Id="33" ParentId="30" Name="GetItemById">
      <Parameters>
        <Parameter Type="Int32">4</Parameter>
      </Parameters>
    </Method>
  </ObjectPaths>
</Request>
尽管没有像Load 或LoadQuery 那样返回任何内容,但Client.svc Web 服务调用会返回一个响应。如下所示,响应仅包含已更新的对象,但不包含随返回对象版本递增的_ObjectVersion 属性。
HTTP/1.1 200 OK
Cache-Control: private
Content-Type: application/json
Server: Microsoft-IIS/7.5
SPRequestGuid: 472b1d44-cc1e-4295-a7b0-c38cf3b68a62
Set-Cookie: WSS_KeepSessionAuthenticated={4e4cffb3-203e-4857-8f5a-90a4b18789a4}; path=/
X-SharePointHealthScore: 0
X-Content-Type-Options: nosniff
X-AspNet-Version: 2.0.50727
X-Powered-By: ASP.NET
MicrosoftSharePointTeamServices: 14.0.0.6029
Content-Length: 672

[
{
"SchemaVersion":"14.0.0.0","LibraryVersion":"14.0.6106.5001","ErrorInfo":null
},25,{
"IsNull":false
},27,{
"IsNull":false
},29,{
"IsNull":false
},31,{
"IsNull":false
},32,{
"_ObjectIdentity_":"740c6a0b-85e2-48a0-a494-e0f1759d4aa7:web:6bb[truncated for space]3964:list:9bf3[truncated for space]d045"
},34,{
"IsNull":false
},42,{
"_ObjectType_":"SP.ListItem",
"_ObjectIdentity_":"740c6a0b-85e2-48a0-a494-e0f1759d4aa7:web:6bb[truncated for space]964:list:9bf[truncated for space]d045:item:4,1",
"_ObjectVersion_":"2",
"Title":"Betic",
"FirstName":"Alpha",
"WorkAddress":"Main street ",
"WorkCity":"Anytown",
"WorkState":"PA",
"WorkZip":"12345"
}
]
删除 ListItems
删除ListItem 是最简单的操作。获取ListItem 后,调用其DeleteObject 方法,然后使用ExecuteQuery 提交更改。
public static void Delete(int id)
{
    using(ClientContext ctx = new ClientContext(SITE))
    {
        Web web = ctx.Web;
        List list = web.Lists.GetByTitle(LIST_NAME);

        // Get the item being deleted
        ListItem item = list.GetItemById(id);
        item.DeleteObject();

        // Commit
        ctx.ExecuteQuery();
    }
}
POST http://mySite/_vti_bin/client.svc/ProcessQuery HTTP/1.1
X-RequestDigest: 0x2BD0E4[truncated for space]0000
Content-Type: text/xml
X-RequestForceAuthentication: true
Host: mySite
Content-Length: 994
Expect: 100-continue

<Request AddExpandoFieldTypeSuffix="true" SchemaVersion="14.0.0.0" LibraryVersion="14.0.4762.1000"
		ApplicationName=".NET Library" xmlns="http://schemas.microsoft.com/sharepoint/clientquery/2009">
  <Actions>
    <ObjectPath Id="54" ObjectPathId="53" />
    <ObjectPath Id="56" ObjectPathId="55" />
    <ObjectPath Id="58" ObjectPathId="57" />
    <ObjectPath Id="60" ObjectPathId="59" />
    <ObjectIdentityQuery Id="61" ObjectPathId="59" />
    <ObjectPath Id="63" ObjectPathId="62" />
    <Method Name="DeleteObject" Id="64" ObjectPathId="62" />
  </Actions>
  <ObjectPaths>
    <StaticProperty Id="53" TypeId="{3747adcd-a3c3-41b9-bfab-4a64dd2f1e0a}" Name="Current" />
    <Property Id="55" ParentId="53" Name="Web" />
    <Property Id="57" ParentId="55" Name="Lists" />
    <Method Id="59" ParentId="57" Name="GetByTitle">
      <Parameters>
        <Parameter Type="String">SPUG Demo Contacts</Parameter>
      </Parameters>
    </Method>
    <Method Id="62" ParentId="59" Name="GetItemById">
      <Parameters>
        <Parameter Type="Int32">6</Parameter>
      </Parameters>
    </Method>
  </ObjectPaths>
</Request>
同样,尽管没有返回任何内容,但 Web 服务会发送一个响应。不过这次没有对象,因为它已被删除。
HTTP/1.1 200 OK
Cache-Control: private
Content-Type: application/json
Server: Microsoft-IIS/7.5
SPRequestGuid: 28594025-6d96-4798-ba72-06a6b81f0c3e
Set-Cookie: WSS_KeepSessionAuthenticated={4e4cffb3-203e-4857-8f5a-90a4b18789a4}; path=/
X-SharePointHealthScore: 0
X-Content-Type-Options: nosniff
X-AspNet-Version: 2.0.50727
X-Powered-By: ASP.NET
MicrosoftSharePointTeamServices: 14.0.0.6029
Content-Length: 343

[
{
"SchemaVersion":"14.0.0.0","LibraryVersion":"14.0.6106.5001","ErrorInfo":null
},54,{
"IsNull":false
},56,{
"IsNull":false
},58,{
"IsNull":false
},60,{
"IsNull":false
},61,{
"_ObjectIdentity_":"740c6a0b-85e2-48a0-a494-e0f1759d4aa7:web:6bb[truncated for space]964:list:9bf[truncated for space]d045"
},63,{
"IsNull":false
}
]
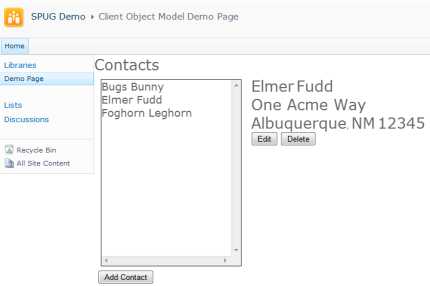
使用 JavaScript 的客户端 OM
在 JavaScript 中使用客户端 OM 与托管代码非常相似。对象基本相同,只是方法名称遵循 JavaScript 编码标准。
然而,一个主要的区别是 JavaScript 中的客户端 OM 实现使用异步方法,而托管代码实现使用同步方法。但在托管代码中,这并不妨碍您在实现代码时使用异步方法,Silverlight 示例将对此进行演示。
/// Retrieve all contacts in the list
function loadContactsList()
{
    var ctx = SP.ClientContext.get_current();
    var web = ctx.get_web();
    var list = web.get_lists().getByTitle(LIST_NAME);

    var camlQuery = new SP.CamlQuery();
    var queryXml = "<View>" +
                        "<Query>" +
                            "<OrderBy>" +
                                "<FieldRef Name='Title'/>" +
                                "<FieldRef Name='FirstName'/>" +
                            "</OrderBy>" +
                        "</Query>" +
// Can specify fields here
//                        "<ViewFields>" +
//                            "<FieldRef Name='ID'/>" +
//                            "<FieldRef Name='Title'/>" +
//                            "<FieldRef Name='FirstName'/>" +
//                        "</ViewFields>" +
                    "</View>";

    camlQuery.set_viewXml(queryXml);
    this.listItems = list.getItems(camlQuery);
    // Can use this or LoadQuery
    //ctx.load(this.listItems);
    // Fields can be included here rather than in CAML
    ctx.load(this.listItems, 'Include(ID, Title, FirstName)');

    ctx.executeQueryAsync(
            Function.createDelegate(this, onLoadContactsSuccess),
            Function.createDelegate(this, onFail));
}
如上面的代码所示,查询ListItems 与 WPF 示例中的一样;获取ClientContext,获取必要的对象,构建CamlQuery 并调用executeQueryAsync。您会注意到,使用 JavaScript 获取ClientContext 略有不同。与托管代码实现一样,您可以通过传递 URL 来构造ClientContext 对象。但是,在 JavaScript 中,这是一个相对 URL,而不是完整 URL,因为代码已经在 SharePoint 站点中执行。
var ctx = SP.ClientContext("serverRelativeUrl");
get_current 方法特定于 JavaScript 客户端 OM 实现,如您下面所见,它使用get_webServerRelativeUrl 方法构造ClientContext 对象,该方法已从其他 SharePoint JavaScript 代码中填充。
SP.ClientContext.get_current = function() {ULS5Vl:;
    if (!SP.ClientContext.$1S_1) {
        SP.ClientContext.$1S_1 = new SP.ClientContext(SP.PageContextInfo.get_webServerRelativeUrl());
    }
    return SP.ClientContext.$1S_1;
}
调用executeQueryAsync 成功后,将在第一个参数中指定的委托(在本例中为onLoadContactsSuccess)将被调用。
/// Function to be called after executeQueryAsync
/// in loadContactsList has been successful
function onLoadContactsSuccess(sender, args)
{
    $("#contactList").empty();

    if(this.listItems.get_count() == 0)
    {
        $("#contactList").append("<span>No contacts found</span>");
    }
    else
    {
        // Get Enumerator and iterate through it
        var listEnumerator = this.listItems.getEnumerator();
        while (listEnumerator.moveNext())
        {
            var item = listEnumerator.get_current();

            // Properties on FieldValues will match
            // Fields returned by query
            var title = item.get_fieldValues().Title;
            var firstName = item.get_fieldValues().FirstName;
            var id = item.get_fieldValues().ID;

            // Create the html element
            var contact = "<span  önclick='displayContactDetails(" + id + ")'>" + firstName + " " + title + "</span>";

            // Append to "list"
            $("#contactList").append(contact + "<br/>");
        }
    }
}
获取单个ListItem 几乎与之前的示例相同。但是,load 方法略有不同。由于 JavaScript 不支持 Lambda 表达式,您可以传递一个字符串数组,该数组指定要在此对象中返回的列。
function displayContactDetails(id)
{
    selectedItemId = id;
    var ctx = SP.ClientContext.get_current();
    var web = ctx.get_web();
    var list = web.get_lists().getByTitle(LIST_NAME);

    listItem = list.getItemById(id);

    // Returns all fields
    //ctx.load(this.listItem);

    // Returns only fields specified
    ctx.load(this.listItem, "Title", "FirstName", "WorkAddress", "WorkCity", "WorkState", "WorkZip");

    ctx.executeQueryAsync(
            Function.createDelegate(this, onContactDetailsSuccess),
            Function.createDelegate(this, onFail));
}
更新 ListItem
这里没什么意外的。JavaScript 的不同之处在于使用set_item 方法而不是托管代码中的索引器。
function saveContact()
{
    $(".field").each(function ()
    {
        var id = $(this).attr("ID");
        var value = $(this).next("input").val();

        listItem.set_item(id,value);
    });

    listItem.update();

    var ctx = SP.ClientContext.get_current();

    ctx.executeQueryAsync(
            Function.createDelegate(this, onSaveContactSuccess),
            Function.createDelegate(this, onFail));
}
添加 ListItems
到目前为止,您应该已经掌握了诀窍。
function onAdd()
{
    var ctx = SP.ClientContext.get_current();
    var web = ctx.get_web();
    var list = web.get_lists().getByTitle(LIST_NAME);

    // can be null when adding item to root folder
    var createInfo = null;
    //var createInfo = new SP.ListItemCreationInformation();
    var item = list.addItem(createInfo);

    $(".field").each(function ()
    {
        var id = $(this).attr("ID");
        var value = $(this).val();

        item.set_item(id, value);
    });

    item.update();

    ctx.executeQueryAsync(
            Function.createDelegate(this, onAddContactSuccess),
            Function.createDelegate(this, onFail));
}
删除 ListItem
仅为完成示例
function onDelete()
{
    var ctx = SP.ClientContext.get_current();
    var web = ctx.get_web();
    var list = web.get_lists().getByTitle(LIST_NAME);

    var listItem = list.getItemById(selectedItemId);
    listItem.deleteObject();

    ctx.executeQueryAsync(
            Function.createDelegate(this, onDeleteSuccess),
            Function.createDelegate(this, onFail));
}
使用 Silverlight 的客户端 OM
到目前为止,您可能已经厌倦了使用客户端 OM 处理ListItems。由于与之前的方法差异不大,我将使用 Silverlight 来关注客户端 OM 可以做的其他事情;在托管代码、JavaScript 或 Silverlight 中。具体来说,我将演示如何使用 Silverlight 处理页面上的 Web 部件。
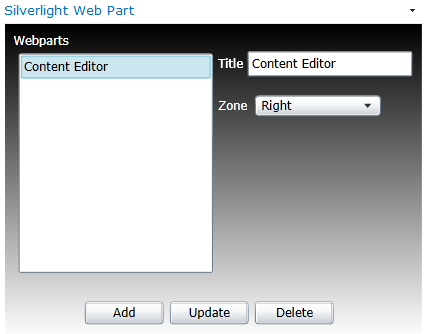
加载时,此 Silverlight Web 部件将读取指定页面(本例中为 default.aspx)上的 Web 部件,并在 ListBox 中显示标题。
private void LoadWebParts()
{
    SelectedItem = null;
    wpList.Items.Clear();
    using(ClientContext ctx = new ClientContext(SITE))
    {
        try
        {
            // Get the default page for the site
            File file = ctx.Web.GetFileByServerRelativeUrl(PAGE);

            // Get the WebPart manager to locate all the WebParts
            LimitedWebPartManager wpm = file.GetLimitedWebPartManager(PersonalizationScope.Shared);

            // Load all WebPart definitions found on the page
            WPDefinitions = ctx.LoadQuery(wpm.WebParts.Include(w => w.Id, w => w.WebPart));

            ctx.ExecuteQueryAsync(OnLoadSucceeded, OnFail);
        }
        catch(System.Exception ex)
        {
            MessageBox.Show(ex.Message);
        }
    }
}
正如您所见,与所有其他示例一样,您首先获取一个CLientContext 来进行操作,使用服务器相对 URL,因为页面已经在 SharePoint 站点内运行。接下来是使用命名良好的方法GetFileByServerRelativeUrl 来获取要操作的File。之后,通过LoadQuery 方法获取LimitedWebPartManager 来获取WebPartDefinition 的集合。与之前的示例一样,我使用 Lambda 表达式来限制结果仅包含必要的内容,本例中为ID 和WebPart 属性。此时,使用 Silverlight 的客户端 OM 将与其他环境有所不同。由于此代码是从应用程序的主线程运行的,因此您需要使用异步方法ExecuteQueryAsync 来执行查询,以防止阻塞 UI 线程。此方法接受ClientRequestSucceededEventHandler 和ClientRequestFailedEventHandler 的委托,它们将在方法成功或失败时被调用。
private void OnLoadSucceeded(object sender, ClientRequestSucceededEventArgs e)
{
    // Create delegate to update ListBox in UI thread
    Action updateList = () =>
        {
            if(WPDefinitions.Count() != 0)
            {
                foreach(WebPartDefinition def in WPDefinitions)
                {
                    wpList.Items.Add(new ListItemHelper() { ID = def.Id, Title = def.WebPart.Title });
                }
            }
        };

    this.Dispatcher.BeginInvoke(updateList);
}
在此方法中,我创建了一个匿名委托传递给BeginInvoke 方法,该方法将迭代LoadQuery 调用填充的WebPartDefinition 集合。
添加 WebPart
使用客户端 OM 将 Web 部件添加到页面相对简单。
private void OnUpdate(object sender, System.Windows.RoutedEventArgs e)
{
    // Get the title and zone that may have been updated
    SelectedItem.Title = wpTitle.Text;
    SelectedItem.Zone = ((ComboBoxItem)wpZone.SelectedItem).Content.ToString();

    // Start a worker thread to do the processing
    ThreadPool.QueueUserWorkItem(new WaitCallback(CSOMHelper.UpdateTitle), SelectedItem);

    // Update the controls
    wpList.Items[SelectedItem.ItemIndex] = wpTitle.Text;
    wpTitle.Text = "";
}
在此示例中,我将使用一种略有不同的方法来调用客户端 OM 方法。同样,由于此代码在主 UI 线程中执行,因此您不能使用任何阻塞方法。在这种情况下,我使用工作线程来处理,因为客户端 OM 代码不需要更新 UI 的任何内容。
public static void UpdateTitle(Object state)
{
    ListItemHelper item = (ListItemHelper)state;

    using(ClientContext ctx = new ClientContext(SITE))
    {
        // Get the default page for the site
        File file = ctx.Web.GetFileByServerRelativeUrl(PAGE);

        // Get the WebPart manager to locate all the WebParts
        LimitedWebPartManager wpm = file.GetLimitedWebPartManager(PersonalizationScope.Shared);

        // Load all WebPart definitions found on the page
        IEnumerable<WebPartDefinition> definitions = ctx.LoadQuery(wpm.WebParts.Include(w => w.Id, w => w.WebPart));

        // Use the synchronous method here since the
        // method is being called in separate thread
        ctx.ExecuteQuery();

        // Find the definition for the webpart to be updated
        WebPartDefinition def = definitions.FirstOrDefault(d => d.Id == item.ID);
        if(def != null)
        {
            def.WebPart.Title = item.Title;
            def.MoveWebPartTo(item.Zone.ToLower(), 0);
            // Save the changes
            def.SaveWebPartChanges();
            // Commit
            ctx.ExecuteQuery();
        }
    }
}
此方法与加载方法相同,获取ClientContext 和WebPartDefinition 的集合。在找到要更新的 Web 部件后,您会设置Title 属性并调用方便且命名良好的方法MoveWebPartTo 将 Web 部件移动到新的 WebPartZone。同样,命名良好的方法SaveWebPartChanges 保存所做的更新,并通过调用ExecuteQuery 提交更改。由于这是在工作线程中执行的,因此您可以使用同步方法。这表明 Silverlight 中的客户端 OM 实现同时支持同步和异步方法,而托管代码仅支持同步方法,JavaScript 仅支持异步方法。
删除 WebParts
删除 Web 部件同样简单。遵循与上面相同的步骤,并调用DeleteWebPart 方法。
// Find the definition for the webpart to be deleted
WebPartDefinition def = definitions.FirstOrDefault(d => d.Id == item.ID);
if(def != null)
{
    def.DeleteWebPart();
    // Save the changes
    def.SaveWebPartChanges();
    // Commit
    ctx.ExecuteQuery();
}
UserAction 菜单
在最后一个示例中,我将演示如何处理UserActions 菜单,以将项添加到列表的 EditControlBlock 菜单和“站点操作”菜单中。
public static void AddUserActions()
{
    using(ClientContext ctx = new ClientContext(URL))
    {
        Web web = ctx.Web;
        List list = web.Lists.GetByTitle(LIST_NAME);
        UserCustomActionCollection actions = list.UserCustomActions;

        UserCustomAction action = actions.Add();
        action.Location = "EditControlBlock";
        action.Sequence = 100;
        action.Title = "SPUG Custom Action";
        action.Url = URL + @"/default.aspx";
        action.Update();

        ctx.Load(list, l => l.UserCustomActions);

        ctx.ExecuteQuery();
    }
}
将菜单项添加到“站点操作”菜单与上面的示例相同,只需更改Location 和Group 属性。
UserCustomAction action = actions.Add();
action.Location = "Microsoft.SharePoint.StandardMenu";
action.Group = "SiteActions";
action.Sequence = 101;
action.Title = "SPUG Custom Action";
action.Url = URL + @"/default.aspx";
action.Update();
删除菜单项只是迭代UserCustomActions,找到正确的项并调用DeleteObject。此代码将从 EditControlBlock 和 Site Actions 菜单中删除菜单项,因为它仅比较标题。显然,您会想要检查Location 属性以使其更具体。
public static void RemoveUserActions()
{
    using(ClientContext ctx = new ClientContext(URL))
    {
        Web web = ctx.Web;
        List list = web.Lists.GetByTitle(LIST_NAME);
        UserCustomActionCollection actions = list.UserCustomActions;

        ctx.Load(list, l => l.UserCustomActions.Include(a => a.Title));

        ctx.ExecuteQuery();

        for(int x = 0; x < actions.Count; x++)
        {
            if(actions[x].Title == "SPUG Custom Action")
            {
                actions[x].DeleteObject();
                ctx.ExecuteQuery();
                break;
            }
        }
    }
}
创建列表
到目前为止,所有示例都使用了先前创建的列表。现在我将展示如何创建一个列表并向其中添加Fields。
在创建List 之前,您应该先检查它是否已存在。这方面一个有些尴尬的地方是,当找不到List 时,客户端 OM 会抛出ServerException,而不是仅仅返回一个 null 对象。
List list = web.Lists.GetByTitle("CSOM List");
try
{
    ctx.ExecuteQuery();
    if(list != null)
    {
        list.DeleteObject();
        ctx.ExecuteQuery();
    }
}
catch
{
    // ServerException is thrown if list does not exist
}
在进行检查并删除列表(如果需要)后,您可以使用ListCreationInformation 来创建List。就像之前显示的ListItemCreationInformation 一样,此对象应用了有关要创建的List 的信息。
// Set info about this list
ListCreationInformation createInfo = new ListCreationInformation();
createInfo.Title = "CSOM List";
createInfo.QuickLaunchOption = QuickLaunchOptions.On;
createInfo.TemplateType = (int)ListTemplateType.GenericList;

// Add list to the web
list = web.Lists.Add(createInfo);
list.EnableFolderCreation = true;
// Make sure to call Update to apply settings
list.Update();
在创建了List 之后,您添加Fields。提供给AddFieldAsXml 方法的 XML 与您在 Elements.xml 中用于定义 SharePoint 项目添加的Fields 的 XML 相同。
// Add fields to the list
Field field = list.Fields.AddFieldAsXml("<Field Type='Text' DisplayName='SomeField'></Field>",
    true, AddFieldOptions.DefaultValue);

field.DefaultValue = "Hello, World";
// Don't forget to Update after setting values
field.Update();

field = list.Fields.AddFieldAsXml(@"<Field Type='Choice' DisplayName='IsThisFun' Format='RadioButtons'>
                                        <Default>Yes<</Default>
                                        <CHOICES>
                                            <CHOICE>Yes</CHOICE>
                                            <CHOICE>No</CHOICE>
                                        <</CHOICES>
                                    </Field>",
    true, AddFieldOptions.DefaultValue);
现在,List 和Fields 已创建,您可以像以前的示例一样添加ListItems。
ListItemCreationInformation itemCreateInfo = new ListItemCreationInformation();
ListItem item = list.AddItem(itemCreateInfo);
item["Title"] = "One";
item.Update();
使用文件夹添加 ListItem
在之前的示例中,所有ListItems 都已添加到列表的根文件夹中。但是,有时ListItem 应该放在文件夹中。在此示例中,我省略了检查文件夹是否存在,因为列表也是在此处创建的,但您应该能够从之前的示例中理解如何执行此检查。
// Create the folder first
itemCreateInfo = new ListItemCreationInformation();
itemCreateInfo.LeafName = "New Folder";
itemCreateInfo.UnderlyingObjectType = FileSystemObjectType.Folder;

item = list.AddItem(itemCreateInfo);
item.Update();
在这里,我将UnderlyingObjectType 属性设置为FileSystemObjectType.Folder,将LeafName 属性设置为文件夹名称。之后,我使用FolderUrl 属性指向此列表中之前创建的文件夹的相对地址,然后再添加ListItem。
// Now add item to folder
itemCreateInfo = new ListItemCreationInformation();
itemCreateInfo.FolderUrl = "/Lists/CSOM List/New Folder";

item = list.AddItem(itemCreateInfo);
item["Title"] = "Three";
item.Update();
结论
SharePoint 2010 客户端对象模型与之前的 SharePoint 版本相比有了很大的改进,它为各种应用程序和可能性打开了 SharePoint 的大门。就像 SharePoint 本身一样,客户端 OM 非常庞大,拥有比我在这里能涵盖的更多的功能。希望这两篇文章都为您提供了 SharePoint 客户端对象模型是什么、它是如何工作的以及它所带来的可能性的良好背景。
历史
首次发布:2011 年 10 月 13 日