
MVVM 中的命令
为 WPF、Silverlight 和 WP7 提供命令、异步命令和事件到命令的一致性方法。
- 下载源代码 - 194 KB (注意,示例文件名为“CommandingSample”,位于 WPF、Silverlight 和 WP7 文件夹的“Samples”文件夹中。)
- 下载示例应用程序 - 200 KB
- 下载 Apex 二进制文件 - 54.9 KB
目录
- 示例 1 - 一个简单的命令
- 示例 2 - 使用 Lambda 函数的简单命令
- 示例 3 - 带参数的命令
- 示例 4 - 启用或禁用命令
- 示例 5 - 触发事件的命令
- 示例 6 - 异步命令
- 示例 7 - 更新 UI 的异步命令
- 示例 8 - 可取消的异步命令
- 示例 9 - 将事件绑定到命令
- 工作原理 - Command 类
- 工作原理 - AsynchronousCommand 类
- 工作原理 - EventBinding 类
引言
在本文中,我将描述在使用 MVVM(Model View ViewModel)的项目中命令的工作原理。我所描述的方法与您使用 WPF、Silverlight 还是 Windows Phone 7 完全相同。首先,我将展示在任何 MVVM 项目中使用命令的各种方法 - 此部分可作为命令的快速参考。然后,文章后面将详细介绍每个示例 - 我将确切地展示代码的工作原理。
使用的代码是我 Apex MVVM 库的一部分,但是由于每个部分都附有完整的代码示例,因此您可以轻松地将这些方法集成到现有项目或库中 - 或者直接添加 Apex 作为引用即可开始使用。


什么是命令?
这是 MVVM 中一个非常重要的概念。您需要了解以下内容。
命令是绑定的对象。它在用户界面和逻辑之间实现了分离。
这是核心概念。更详细地说,我们可以将命令描述为:
- 命令是实现 ICommand 接口的对象。
- 通常,它与某些代码中的函数相关联。
- 用户界面元素绑定到命令 - 当用户激活它们时,命令将被触发 - 这会调用关联的函数。
- 命令知道自己是否已启用。
- 函数可以禁用命令对象 - 自动禁用与之关联的任何用户界面元素。
命令示例
首先,我们将研究一组需要使用命令的场景。每个场景在文章后面都有一个相关的详细说明部分,介绍其工作原理。
重要提示:本示例集中的每个 ViewModel 都包含一个名为 'Messages' 的字符串可观察集合 - 每个示例应用程序都在列表中显示这些消息,以便我们能够看到发生了什么。下面的 ViewModel 基类显示如下:
public class MainViewModel : ViewModel
{
    public MainViewModel()
    {
    }

    private ObservableCollection<string> messages = new ObservableCollection<string>();

    public ObservableCollection<string> Messages
    {
      get { return messages; }
    }
}
我的 ViewModel 继承自 'ViewModel',它实现了 INotifyPropertyChanged,但是您可以使用任何您喜欢的 ViewModel 类型或基类。
示例 1:简单的命令示例
需求:当用户界面元素被按下或激活时,我需要调用 ViewModel 的一个函数。
下面的代码展示了最简单的命令示例。首先,我们在 ViewModel 中添加一个 'Command' 对象 - 并关联一个在命令被调用时要调用的函数。
public class MainViewModel : ViewModel
{
    public MainViewModel()
    {
      //  Create the simple command - calls DoSimpleCommand.
      simpleCommand = new Command(DoSimpleCommand);
    }

    /// <summary>
    /// The SimpleCommand function.
    /// </summary>
    private void DoSimpleCommand()
    {
      //  Add a message.
      Messages.Add("Calling 'DoSimpleCommand'.");
    }

    /// <summary>
    /// The simple command object.
    /// </summary>
    private Command simpleCommand;

    /// <summary>
    /// Gets the simple command.
    /// </summary>
    public Command SimpleCommand
    {
      get { return simpleCommand; }
    }
}
现在,我们将命令绑定到按钮(或其他 UI 元素)的 'Command' 属性。
<Button Content="Simple Command" Command="{Binding SimpleCommand}" />
这是最简单的命令示例 - 我们将 Command 对象绑定到界面元素的 Command 依赖属性。当元素被激活时,命令将被调用。在底层,这将导致 'DoSimpleCommand' 函数被调用。
示例 2:使用 Lambda 表达式的简单命令示例
需求:当用户界面元素被按下或激活时,我需要调用 ViewModel 的一个函数。但是,这是一个非常简单的函数,我宁愿不显式地写出来 - 我可以使用 lambda 表达式吗?
对于本文中的所有示例,您可以显式创建一个函数,就像在示例 1 中一样,或者可以在行内使用 lambda 表达式。对于小型函数,lambda 表达式可以稍微整洁一些。
public MainViewModel()
{
      //  Create the lambda command, no extra function necessary.
      lambdaCommand = new Command(
        () =>
        {
          Messages.Add("Calling the Lamba Command - no explicit function necessary.");
        });
}

/// <summary>
/// The command object.
/// </summary>
private Command lambdaCommand;

/// <summary>
/// Gets the command.
/// </summary>
public Command LambdaCommand
{
  get { return lambdaCommand; }
}
现在,我们将命令绑定到按钮(或其他 UI 元素)的 'Command' 属性。
<Button Content="Lambda Command" Command="{Binding LambdaCommand}" />
我们学到了什么?在任何定义命令的地方,我们都可以使用命名函数或 lambda 表达式。
示例 3:带参数的命令
需求:当调用命令时,我需要传递一个由绑定设置的参数。
在任何使用 Command 对象(或稍后将看到的 AsynchronousCommand 对象)的地方,我们都可以选择使用参数调用函数。
public class MainViewModel : ViewModel
{
    public MainViewModel()
    {
      //  Create the parameterized command.
      parameterizedCommand = new Command(DoParameterisedCommand);
    }

    /// <summary>
    /// The Command function.
    /// </summary>
    private void DoParameterisedCommand(object parameter)
    {
      Messages.Add("Calling a Parameterised Command - the Parameter is '" +
                   parameter.ToString() + "'.");
    }

    /// <summary>
    /// The command object.
    /// </summary>
    private Command parameterizedCommand;

    /// <summary>
    /// Gets the command.
    /// </summary>
    public Command ParameterisedCommand
    {
      get { return parameterizedCommand; }
    }
}
现在,我们将命令绑定到按钮(或其他 UI 元素)的 'Command' 属性,但同时也要绑定一个参数。
<Button Content="Parameterized Command"
    Command="{Binding ParameterizedCommand}" CommandParameter={Binding SomeObject} />
在任何使用命令的地方,我们都可以传递一个参数。在创建命令时,我们可以使用 Action(一个不带参数的命令函数)或 Action<object>(一个接受单个 'object' 类型参数的命令函数)。如果愿意,我们可以使用 lambda 表达式定义上面的命令函数。
//  Create the parameterized command.
parameterizedCommand = new Command(
  (parameter) =>
  {
    Messages.Add("Calling a Parameterised Command - the Parameter is '" +
                 parameter.ToString() + "'.");
  });
示例 4:禁用或启用命令
需求:我需要能够通过代码或 XAML 禁用或启用命令。
每个命令都有 'CanExecute' 属性。当此属性设置为 true 时,命令被启用。当此属性设置为 false 时,命令被禁用,并且 UI 会相应更新 - 例如,绑定到该命令的按钮将变为禁用状态。
public class MainViewModel : ViewModel
{
    public MainViewModel()
    {
      //  Create the enable/disable command, initially disabled.
      enableDisableCommand = new Command(
          () =>
          {
            Messages.Add("Enable/Disable command called.");
          }, false);
    }

    private void DisableCommand()
    {
      //  Disable the command.
      EnableDisableCommand.CanExecute = false;
    }

    private void EnableCommand()
    {
      //  Disable the command.
      EnableDisableCommand.CanExecute = true;
    }

    /// <summary>
    /// The command object.
    /// </summary>
    private Command enableDisableCommand;

    /// <summary>
    /// Gets the command.
    /// </summary>
    public Command EnableDisableCommand
    {
      get { return enableDisableCommand; }
    }
}
现在,我们将命令绑定到按钮(或其他 UI 元素)的 'Command' 属性。我们还可以绑定命令的 'CanExecute' 属性。
<CheckBox IsChecked="{Binding EnableDisableCommand.CanExecute, Mode=TwoWay}" Content="Enabled" />
<Button Content="Enable/Disable Command" Command="{Binding EnableDisableCommand}" />
我们可以通过设置 CanExecute 属性在代码中启用或禁用命令。我们还可以将该属性绑定到 XAML 以从中操纵它。
每当我们创建命令对象时(如构造函数所示),我们都可以传递一个布尔值作为可选的第二个参数 - 这是初始的 CanExecute 值。默认情况下,它设置为 false。在上面的示例中,我们将命令设置为初始禁用状态。
示例 5:触发事件的命令
需求:我需要知道命令何时执行或即将执行。
每个 Command 都有两个事件 - Executed,在命令执行后调用;Executing,在命令即将执行前调用。Executing 事件允许取消命令。
重要提示:在某个特定场景下,以下事件非常有用。想象一下,您想在命令即将运行时弹出一个消息框,询问用户是否要继续 - 您应该在哪里执行此操作?在命令代码中?这是一个糟糕的主意 - 它迫使您在 ViewModel 中编写 UI 代码,这会使命令混乱,并且也意味着它无法通过单元测试运行。您应该在视图中执行此操作 - 借助这些事件,您可以毫无问题地做到这一点。再举一个例子,如果您想在命令执行后将焦点设置到特定控件怎么办?您无法在 ViewModel 中完成此操作,它没有控件的访问权限,但是通过订阅视图中的 Executed 事件,我们就可以毫无问题地做到这一点。
public class MainViewModel : ViewModel
{
    public MainViewModel()
    {
      //  Create the events command.
      eventsCommand = new Command(
          () =>
                {
                    Messages.Add("Calling the Events Command.");
                });
现在,我们将命令绑定到按钮(或其他 UI 元素)的 'Command' 属性。
<Button Content="Events Command" Command="{Binding EventsCommand}" />
到目前为止,与第一个示例没有什么不同。但是,我们现在将订阅视图中的一些事件。注意:在我的视图中,我的 DataContext 被命名为 'viewModel'。
/// <summary>
/// Interaction logic for MainWindow.xaml
/// </summary>
public partial class MainWindow : Window
{
    public MainWindow()
    {
        InitializeComponent();

        viewModel.EventsCommand.Executing +=
          new Apex.MVVM.CancelCommandEventHandler(EventsCommand_Executing);
        viewModel.EventsCommand.Executed +=
          new Apex.MVVM.CommandEventHandler(EventsCommand_Executed);
    }

    void EventsCommand_Executed(object sender, Apex.MVVM.CommandEventArgs args)
    {
        viewModel.Messages.Add("The command has finished - this is the View speaking!");
    }

    void EventsCommand_Executing(object sender, Apex.MVVM.CancelCommandEventArgs args)
    {
        if (MessageBox.Show("Cancel the command?",
                 "Cancel?",
                 MessageBoxButton.YesNo) == MessageBoxResult.Yes)
            args.Cancel = true;
    }
}
我们开始感受到这个 Command 实现的强大之处。我们可以订阅视图(甚至其他 ViewModel 或其他对象)中的 Executed 和 Executing 事件,并知道它们何时触发。Executing 事件传递一个 CancelCommandEventArgs 对象 - 它有一个名为 'Cancel' 的属性。如果将其设置为 true,则命令不会执行。CommandEventArgs 和 CancelCommandEventArgs 都有一个附加属性 - Parameter。这是传递给 Command 的参数(如果存在)。
示例 6:异步命令
需求:我的命令函数将花费很长时间 - 我需要它异步运行,而不是阻塞 UI 线程。
在这种情况下,我们通常需要做一些类似的事情,例如创建一个后台工作线程并在命令函数中运行它。但我们遇到了问题:
- 如果我们想在线程函数中更新 ViewModel 怎么办?我们不能,除非在 UI 线程上调用操作。
- 我们如何确保命令不会在短时间内被按下两次,从而导致线程运行多次?
- 当有许多必须在线程中运行的命令时,如何保持 ViewModel 的整洁?
- 如何保持 WP7 和 Silverlight 的一致性,因为它们在线程方面有不同的选项?
AsynchronousCommand 对象(它继承自 Command)将处理所有这些问题 - 以及更多。以下是如何使用它:
public class MainViewModel : ViewModel
{
    public MainViewModel()
    {
      //  Create the async command.
      asyncCommand1 = new AsynchronousCommand(
          () =>
          {
            for (int i = 1; i <= 10; i++)
            {
              //  Report progress.
              asyncCommand1.ReportProgress(() => { Messages.Add(i.ToString()); });

              System.Threading.Thread.Sleep(200);
            }
          });
    }

    /// <summary>
    /// The command object.
    /// </summary>
    private AsynchronousCommand asyncCommand1;

    /// <summary>
    /// Gets the command.
    /// </summary>
    public AsynchronousCommand AsyncCommand1
    {
      get { return asyncCommand1; }
    }
}
现在,我们将异步命令绑定到按钮(或其他 UI 元素)的 'Command' 属性。
<Button Content="Asynchronous Command" Command="{Binding AsyncCommand1}" />
一旦命令被调用,我们将提供的函数(通过构造函数中的 lambda 表达式)就会被调用 - 在一个新线程上(来自线程池)。
如果我们有任何与 ViewModel 对象(可能绑定到 UI 元素)交互的需求,我们可以通过 ReportProgress 函数来完成。
asyncCommand1.ReportProgress(() => { Messages.Add(i.ToString()); });
ReportProgress 将确保传递给它的代码在正确的线程(UI 线程)上运行。这为我们的命令提供了非常简单的方式来在运行时更新 UI。
示例 7:在异步命令运行时更改 UI
需求:我的异步命令需要一段时间才能运行,我想在 UI 中显示一些进度。
AsynchronousCommand 有一个名为 'IsExecuting' 的属性。如果此属性设置为 true,则表示命令正在运行。AsynchronousCommand 实现 INotifyPropertyChanged,这意味着我们可以绑定到此属性 - 并在命令运行时使我们的 UI 保持完全最新。
public class MainViewModel : ViewModel
{
    public MainViewModel()
    {
      //  Create the async command.
      asyncCommand2 = new AsynchronousCommand(
          () =>
          {
            for (char c = 'A'; c <= 'Z'; c++)
            {
              //  Report progress.
              asyncCommand2.ReportProgress(() => { Messages.Add(c.ToString()); });

              System.Threading.Thread.Sleep(100);
            }
          });
    }

    /// <summary>
    /// The command object.
    /// </summary>
    private AsynchronousCommand asyncCommand2;

    /// <summary>
    /// Gets the command.
    /// </summary>
    public AsynchronousCommand AsyncCommand2
    {
      get { return asyncCommand2; }
    }
}
现在,我们将异步命令绑定到按钮(或其他 UI 元素)的 'Command' 属性。我们还将其他 UI 元素绑定到命令的 IsExecuting 属性。
<Button Content="Asynchronous Command" Command="{Binding AsyncCommand2}"
        Visibility="{Binding AsyncCommand2.IsExecuting,
          Converter={StaticResource BooleanToVisibilityConverter},
          ConverterParameter=Invert}" />

<StackPanel Visibility="{Binding AsyncCommand2.IsExecuting,
         Converter={StaticResource BooleanToVisibilityConverter}}">
  <TextBlock Text="The command is running!" />
  <ProgressBar Height="20" Width="120" IsIndeterminate="True" />
</StackPanel>
在此示例中,一旦命令开始运行,按钮就会消失,并且文本块和进度条会出现。请注意,我们正在绑定到命令的 IsExecuting 属性。
asyncCommand1.ReportProgress(() => { Messages.Add(i.ToString()); });
ReportProgress 将确保传递给它的代码在正确的线程(UI 线程)上运行。这为我们的命令提供了非常简单的方式来在运行时更新 UI。
注意:'Invert' 参数可以传递给 BooleanToVisilityConverter,因为它是在 Apex.Converters 中定义的标准 BooleanToVisibilityConverter 的扩展版本。它反转结果,在这种情况下非常有用。
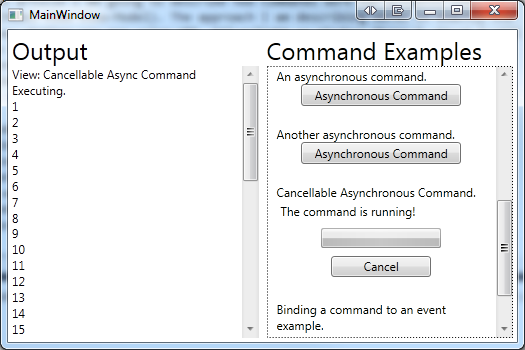
示例 8:允许用户取消 AsynchronousCommand
需求:我需要让用户取消异步命令。
我们可以使用 AsynchronousCommand 的一些功能。每个 AsynchronousCommand 对象都包含另一个 Command - 名为 CancelCommand。它可以绑定到 UI 元素(例如,名为“Cancel”的按钮)或通过代码调用。当调用此命令时,AsynchronousCommand 的 'IsCancellationRequested' 属性被设置为 true(请注意,这是一个使用 INotifyPropertyChanged 的属性,因此您也可以绑定到它)。只要您定期调用 CancelIfRequested 函数并在其返回 true 时返回,那么取消功能就已启用。
public class MainViewModel : ViewModel
{
    public MainViewModel()
    {
       //  Create the cancellable async command.
       cancellableAsyncCommand = new AsynchronousCommand(
         () =>
           {
             for(int i = 1; i <= 100; i++)
             {
               //  Do we need to cancel?
               if(cancellableAsyncCommand.CancelIfRequested())
                 return;

               //  Report progress.
               cancellableAsyncCommand.ReportProgress( () => { Messages.Add(i.ToString()); } );

               System.Threading.Thread.Sleep(100);
             }
           });
    }

    /// <summary>
    /// The command object.
    /// </summary>
    private AsynchronousCommand cancellableAsyncCommand;

    /// <summary>
    /// Gets the command.
    /// </summary>
    public AsynchronousCommand CancellableAsyncCommand
    {
      get { return cancellableAsyncCommand; }
    }
}
现在,我们将异步命令绑定到按钮(或其他 UI 元素)的 'Command' 属性。我们还将其他 UI 元素绑定到命令的 IsExecuting 属性。
<Button Content="Cancellable Async Command"
    Command="{Binding CancellableAsyncCommand}"
    Visibility="{Binding CancellableAsyncCommand.IsExecuting,
             Converter={StaticResource BooleanToVisibilityConverter},
    ConverterParameter=Invert}" />

<StackPanel Visibility="{Binding CancellableAsyncCommand.IsExecuting,
      Converter={StaticResource BooleanToVisibilityConverter}}">
  <TextBlock Margin="4" Text="The command is running!" />
  <ProgressBar Margin="4" Height="20"
     Width="120" IsIndeterminate="True" />
  <Button Margin="4" Content="Cancel"
      Command="{Binding CancellableAsyncCommand.CancelCommand}" />
</StackPanel>
在此示例中,当命令执行时,我们显示一个名为“Cancel”的按钮。此按钮绑定到 CancellableAsyncCommand.CancelCommand 属性。由于我们在异步函数中使用 CancelIfRequested 函数,因此我们可以优雅地取消异步命令。
注意:当异步命令被取消时 - Executed不会被调用。而是调用一个名为 Cancelled 的事件,该事件接受与 Executed 相同的参数。
示例 9:将事件绑定到命令
需求:我有一个必须调用的命令,但是应该调用它的 UI 元素没有 'Command' 属性 - 它只有一个事件。
在强制事件触发命令的情况下,我们可以使用一个名为 'EventBindings' 的附加属性。此属性和关联的类位于 Apex.Commands 命名空间中。EventBindings 接受一个 EventBindingCollection,它是一个简单的 EventBinding 对象集合。每个 EventBinding 对象都包含事件名称和要触发的命令。
public class MainViewModel : ViewModel
{
    public MainViewModel()
    {
      //  Create the event binding.
      EventBindingCommand = new Command(
        () =>
        {
          Messages.Add("Command called by an event.");
        });
    }

    /// <summary>
    /// The command object.
    /// </summary>
    private Command eventBindingCommand;

    /// <summary>
    /// Gets the command.
    /// </summary>
    public Command EventBindingCommand
    {
      get { return eventBindingCommand; }
    }
}
现在我们可以像下面这样通过事件绑定到此命令:
<Border Margin="20" Background="Red">

  <!-- Bind the EventBindingCommand to the MouseLeftButtonDown event. -->
  <apexCommands:EventBindings.EventBindings>
     <apexCommands:EventBindingCollection>
        <apexCommands:EventBinding EventName="MouseLeftButtonDown"
            Command="{Binding EventBindingCommand}" />
     </apexCommands:EventBindingCollection>
  </apexCommands:EventBindings.EventBindings>

  <TextBlock VerticalAlignment="Center"
     HorizontalAlignment="Center" Text="Left Click on Me"
     FontSize="16" Foreground="White" />

</Border>
通过使用 EventBindings 附加属性,我们可以将任何事件绑定到命令。
它是如何工作的?
以上每个示例都有一个关于其工作原理的关联说明。
Command 类:用于示例 1、2、3、4 和 5
这些示例使用 'Command' 类,该类将在下面逐节描述。
/// <summary>
/// The ViewModelCommand class - an ICommand that can fire a function.
/// </summary>
public class Command : ICommand
{
    /// <summary>
    /// Initializes a new instance of the <see cref="Command"/> class.
    /// </summary>
    /// <param name="action">The action.</param>
    /// <param name="canExecute">if set to <c>true</c> [can execute].</param>
    public Command(Action action, bool canExecute = true)
    {
        //  Set the action.
        this.action = action;
        this.canExecute = canExecute;
    }

    /// <summary>
    /// Initializes a new instance of the <see cref="Command"/> class.
    /// </summary>
    /// <param name="parameterizedAction">The parameterized action.</param>
    /// <param name="canExecute">if set to <c>true</c> [can execute].</param>
    public Command(Action<object> parameterizedAction, bool canExecute = true)
    {
        //  Set the action.
        this.parameterizedAction = parameterizedAction;
        this.canExecute = canExecute;
    }
首先,我们有两个创建命令的构造函数 - 传入 Action 或 Action<object>。Action<object> 用于带参数的命令。
接下来是我们的 action(或参数化 action)以及 'canExecute' 标志。请注意,当 canExecute 标志更改时,我们必须调用 canExecuteChanged。
/// <summary>
/// The action (or parameterized action) that will be called when the command is invoked.
/// </summary>
protected Action action = null;
protected Action<object> parameterizedAction = null;

/// <summary>
/// Bool indicating whether the command can execute.
/// </summary>
private bool canExecute = false;

/// <summary>
/// Gets or sets a value indicating whether this instance can execute.
/// </summary>
/// <value>
///     <c>true</c> if this instance can execute; otherwise, <c>false</c>.
/// </value>
public bool CanExecute
{
    get { return canExecute; }
    set
    {
        if (canExecute != value)
        {
            canExecute = value;
            EventHandler canExecuteChanged = CanExecuteChanged;
            if (canExecuteChanged != null)
                canExecuteChanged(this, EventArgs.Empty);
        }
    }
}
在此之后,我们实现了 ICommand 接口:
/// <summary>
/// Defines the method that determines whether the command can execute in its current state.
/// </summary>
/// <param name="parameter">Data used by the command.
///  If the command does not require data to be passed,
///  this object can be set to null.</param>
/// <returns>
/// true if this command can be executed; otherwise, false.
/// </returns>
bool ICommand.CanExecute(object parameter)
{
    return canExecute;
}

/// <summary>
/// Defines the method to be called when the command is invoked.
/// </summary>
/// <param name="parameter">Data used by the command.
///  If the command does not require data to be passed,
///  this object can be set to null.</param>
void ICommand.Execute(object parameter)
{
    this.DoExecute(parameter);

}
我们还没有看到 'DoExecute' 函数 - 我们将最后介绍它。
/// <summary>
/// Occurs when can execute is changed.
/// </summary>
public event EventHandler CanExecuteChanged;

/// <summary>
/// Occurs when the command is about to execute.
/// </summary>
public event CancelCommandEventHandler Executing;

/// <summary>
/// Occurs when the command executed.
/// </summary>
public event CommandEventHandler Executed;
还记得那些带事件的示例吗?好吧,在这里 - 以及 ICommand 所需的 CanExecuteChanged 事件。
在继续介绍 DoExecute 函数之前,我们为每个事件创建一个 Invoke 函数,以便我们可以在派生类中调用它们。
protected void InvokeAction(object param)
{
    Action theAction = action;
    Action<object> theParameterizedAction = parameterizedAction;
     if (theAction != null)
        theAction();
    else if (theParameterizedAction != null)
        theParameterizedAction(param);
}

protected void InvokeExecuted(CommandEventArgs args)
{
    CommandEventHandler executed = Executed;

    //  Call the executed event.
    if (executed != null)
        executed(this, args);
}

protected void InvokeExecuting(CancelCommandEventArgs args)
{
    CancelCommandEventHandler executing = Executing;

    //  Call the executed event.
    if (executing != null)
        executing(this, args);
}
请注意,InvokeAction 需要一点技巧 - 我们调用 action 或参数化 action,取决于哪个被设置。最后,我们有了 DoExecute:
/// <summary>
/// Executes the command.
/// </summary>
/// <param name="param">The param.</param>
public virtual void DoExecute(object param)
{
    //  Invoke the executing command, allowing the command to be cancelled.
    CancelCommandEventArgs args =
       new CancelCommandEventArgs() { Parameter = param, Cancel = false };
    InvokeExecuting(args);

    //  If the event has been cancelled, bail now.
    if (args.Cancel)
        return;

    //  Call the action or the parameterized action, whichever has been set.
    InvokeAction(param);

    //  Call the executed function.
    InvokeExecuted(new CommandEventArgs() { Parameter = param });
}
DoExecute 非常简单 - 它调用适当的事件(如果需要,还会取消!)就是这样。
此类完全实现了 ICommand,并提供了示例 1、2、3、4 和 5 中所述的功能。
AsynchronousCommand 类:用于示例 6、7 和 8
示例 6、7 和 8 使用 AsynchronousCommand 类,该类继承自 Command,并在下面逐一介绍。
首先,我们将定义类和构造函数(它们调用基类)。
/// <summary>
/// The AsynchronousCommand is a Command that runs on a thread from the thread pool.
/// </summary>
public class AsynchronousCommand : Command, INotifyPropertyChanged
{
    /// <summary>
    /// Initializes a new instance of the <see cref="AsynchronousCommand"/> class.
    /// </summary>
    /// <param name="action">The action.</param>
    /// <param name="canExecute">if set
    /// to <c>true</c> the command can execute.</param>
    public AsynchronousCommand(Action action, bool canExecute = true)
      : base(action, canExecute)
    {
      //  Initialise the command.
      Initialise();
    }

    /// <summary>
    /// Initializes a new instance of the <see cref="AsynchronousCommand"/> class.
    /// </summary>
    /// <param name="parameterizedAction">The parameterized action.</param>
    /// <param name="canExecute">if set to <c>true</c> [can execute].</param>
    public AsynchronousCommand(Action<object> parameterizedAction, bool canExecute = true)
      : base(parameterizedAction, canExecute)
    {

      //  Initialise the command.
      Initialise();
    }
我们实现 INotifyPropertyChanged,以便在 'IsExecuting' 变量更改时进行通知。两个构造函数都调用 'Initialise',让我们现在看一下:
/// <summary>
/// The cancel command.
/// </summary>
private Command cancelCommand;

/// <summary>
/// Gets the cancel command.
/// </summary>
public Command CancelCommand
{
  get { return cancelCommand; }
}

/// <summary>
/// Gets or sets a value indicating whether this instance is cancellation requested.
/// </summary>
/// <value>
///     <c>true</c> if this instance is cancellation requested; otherwise, <c>false</c>.
/// </value>
public bool IsCancellationRequested
{
  get
  {
    return isCancellationRequested;
  }
  set
  {
    if (isCancellationRequested != value)
    {
      isCancellationRequested = value;
      NotifyPropertyChanged("IsCancellationRequested");
    }
  }
}

/// <summary>
/// Initialises this instance.
/// </summary>
private void Initialise()
{
  //  Construct the cancel command.
  cancelCommand = new Command(
    () =>
    {
      //  Set the Is Cancellation Requested flag.
      IsCancellationRequested = true;
    }, true);
}
这里的内容有点多。我们有一个 Command 对象(就像示例中的一样),它所做的只是将 'IsCancellationRequested' 标志设置为 true。Initialise 创建这个对象,我们有一个属性来访问它。我们还有 'IsCancellationRequested' 属性,它会在更改时进行通知。由于我们也想知道何时正在执行,因此让我们为此添加一个属性:
/// <summary>
/// Flag indicating that the command is executing.
/// </summary>
private bool isExecuting = false;

/// <summary>
/// Gets or sets a value indicating whether this instance is executing.
/// </summary>
/// <value>
///     <c>true</c> if this instance is executing; otherwise, <c>false</c>.
/// </value>
public bool IsExecuting
{
  get
  {
    return isExecuting;
  }
  set
  {
    if (isExecuting != value)
    {
      isExecuting = value;
      NotifyPropertyChanged("IsExecuting");
    }
  }
}
不算太糟。由于我们允许取消,因此我们需要一个 Cancelled 事件以及 PropertyChanged 事件(来自 INotifyPropertyChanged)。
/// <summary>
/// The property changed event.
/// </summary>
public event PropertyChangedEventHandler PropertyChanged;

/// <summary>
/// Occurs when the command is cancelled.
/// </summary>
public event CommandEventHandler Cancelled;
除了标准的 NotifyPropertyChanged 和取消标志的连接之外,真正有趣的是 DoExecute。
/// <summary>
/// Executes the command.
/// </summary>
/// <param name="param">The param.</param>
public override void DoExecute(object param)
{
  //  If we are already executing, do not continue.
  if (IsExecuting)
    return;

  //  Invoke the executing command, allowing the command to be cancelled.
  CancelCommandEventArgs args =
     new CancelCommandEventArgs() { Parameter = param, Cancel = false };
  InvokeExecuting(args);

  //  If the event has been cancelled, bail now.
  if (args.Cancel)
    return;

  //  We are executing.
  IsExecuting = true;
如果命令已在执行,我们则不运行它。在此之后,我们允许取消命令并设置执行标志。
//  Store the calling dispatcher.
#if !SILVERLIGHT
      callingDispatcher = Dispatcher.CurrentDispatcher;
#else
      callingDispatcher = System.Windows.Application.Current.RootVisual.Dispatcher;
#endif
我们必须存储执行命令的调度程序。为什么?因为当我们报告进度时,我们可以在适当的调度程序上报告。我们必须小心如何存储调用调度程序,因为它在 Silverlight 和 WPF 之间的工作方式略有不同。
// Run the action on a new thread from the thread pool
// (this will therefore work in SL and WP7 as well).
ThreadPool.QueueUserWorkItem(
    (state) =>
    {
      //  Invoke the action.
      InvokeAction(param);

      //  Fire the executed event and set the executing state.
      ReportProgress(
        () =>
        {
          //  We are no longer executing.
          IsExecuting = false;

          //  If we were cancelled,
          //  invoke the cancelled event - otherwise invoke executed.
          if(IsCancellationRequested)
            InvokeCancelled(new CommandEventArgs() { Parameter = param });
          else
            InvokeExecuted(new CommandEventArgs() { Parameter = param });

          //  We are no longer requesting cancellation.
          IsCancellationRequested = false;
        }
      );
    }
  );
}
现在是精彩的部分。使用线程池,我们对 InvokeAction 函数进行排队 - 这将调用命令函数(在新线程上)。现在请记住 - ReportProgress 在调用调度程序上运行,因此我们必须在那里更改属性并调用 Executed 等。因此,在调用调度程序上(一旦 action 完成),我们将清除 'IsExecuting' 标志,并根据事件是否被取消来调用 Cancelled 或 Executed。就是这样。我们只剩下 ReportProgress。
/// <summary>
/// Reports progress on the thread which invoked the command.
/// </summary>
/// <param name="action">The action.</param>
public void ReportProgress(Action action)
{
  if (IsExecuting)
  {
    if (callingDispatcher.CheckAccess())
      action();
    else
      callingDispatcher.BeginInvoke(((Action)(() => { action(); })));
  }
}
使用 ReportProgress,我们可以在调用调度程序上调用提供的 action,或者如果我们就是调用调度程序,则直接调用它。
关于单元测试和 AsynchronousCommand 的说明
如果您在单元测试 AsynchronousCommand 对象时遇到任何困难,那是因为在单元测试中,没有 Dispatcher 帧。这里有一个关于如何处理此问题的说明:consistentmvvmcommands.aspx?msg=4084944#xx4084944xx。
EventBindings:用于示例 9
EventBindings 代码由于 WPF 和 Silverlight 之间的差异而包含一些额外的复杂性。在 WPF 中,EventBindingsCollection 是一个 FreezableCollection。这样,集合的子项(事件绑定)就可以继承父元素的数据上下文。在 Silverlight 中,我们没有 FreezableCollection,因此我们必须自己设置每个事件绑定的数据上下文。这是 EventBindings 属性的定义方式:
public static class EventBindings
{
  /// <summary>
  /// The Event Bindings Property.
  /// </summary>
    private static readonly DependencyProperty EventBindingsProperty =
      DependencyProperty.RegisterAttached("EventBindings",
      typeof(EventBindingCollection), typeof(EventBindings),
      new PropertyMetadata(null, new PropertyChangedCallback(OnEventBindingsChanged)));

    /// <summary>
    /// Gets the event bindings.
    /// </summary>
    /// <param name="o">The o.</param>
    /// <returns></returns>
    public static EventBindingCollection GetEventBindings(DependencyObject o)
    {
        return (EventBindingCollection)o.GetValue(EventBindingsProperty);
    }

    /// <summary>
    /// Sets the event bindings.
    /// </summary>
    /// <param name="o">The o.</param>
    /// <param name="value">The value.</param>
    public static void SetEventBindings(DependencyObject o,
                       EventBindingCollection value)
    {
        o.SetValue(EventBindingsProperty, value);
    }

    /// <summary>
    /// Called when event bindings changed.
    /// </summary>
    /// <param name="o">The o.</param>
    /// <param name="args">The <see
    /// cref="System.Windows.DependencyPropertyChangedEventArgs"/>
    /// instance containing the event data.</param>
    public static void OnEventBindingsChanged(DependencyObject o,
           DependencyPropertyChangedEventArgs args)
    {
        //  Cast the data.
        EventBindingCollection oldEventBindings =
          args.OldValue as EventBindingCollection;
        EventBindingCollection newEventBindings =
          args.NewValue as EventBindingCollection;

        //  If we have new set of event bindings, bind each one.
        if (newEventBindings != null)
        {
            foreach (EventBinding binding in newEventBindings)
            {
                binding.Bind(o);
#if SILVERLIGHT
                //  If we're in Silverlight we don't inherit the
                //  data context so we must set this helper variable.
                binding.ParentElement = o as FrameworkElement;
#endif
            }
        }
    }
}
正如我们所见,唯一真正有趣的功能是 EventBinding.Bind,它列在下面:
public void Bind(object o)
{
    try
    {
        //  Get the event info from the event name.
        EventInfo eventInfo = o.GetType().GetEvent(EventName);

        //  Get the method info for the event proxy.
        MethodInfo methodInfo = GetType().GetMethod("EventProxy",
                   BindingFlags.NonPublic | BindingFlags.Instance);

        //  Create a delegate for the event to the event proxy.
        Delegate del = Delegate.CreateDelegate(eventInfo.EventHandlerType, this, methodInfo);

        //  Add the event handler. (Removing it first if it already exists!)
        eventInfo.RemoveEventHandler(o, del);
        eventInfo.AddEventHandler(o, del);
    }
    catch (Exception e)
    {
        string s = e.ToString();
    }
}
这是满足此要求的标准方法,我在其他文章中也看到过。但是,我们必须在事件代理(这我以前没见过)中更加小心。
/// <summary>
/// Proxy to actually fire the event.
/// </summary>
/// <param name="o">The object.</param>
/// <param name="e">The <see
///    cref="System.EventArgs"/> instance
///    containing the event data.</param>
private void EventProxy(object o, EventArgs e)
{
#if SILVERLIGHT

    //  If we're in Silverlight, we have NOT inherited the data context
    //  because the EventBindingCollection is not a framework element and
    //  therefore out of the logical tree. However, we can set it here
    //  and update the bindings - and it will all work.
    DataContext = ParentElement != null ? ParentElement.DataContext : null;
    var bindingExpression = GetBindingExpression(EventBinding.CommandProperty);
    if(bindingExpression != null)
        bindingExpression.UpdateSource();
    bindingExpression = GetBindingExpression(EventBinding.CommandParameterProperty);
    if (bindingExpression != null)
        bindingExpression.UpdateSource();

#endif

    if (Command != null)
        Command.Execute(CommandParameter);
}
最终想法
在我提供的示例应用程序中,ViewModel 类在每个项目中都是相同的 - 这段代码在 WPF、Silverlight 和 WP7 中工作方式完全相同。
希望您觉得本文很有用,如果您发现任何问题,请通过评论部分告知我。
要及时了解 Apex 的最新开发动态,您可以访问我的博客:www.dwmkerr.com 或 Apex CodePlex 页面:apex.codeplex.com。