
White:Windows 应用程序的 UI 自动化工具
本文揭示了如何使用 White 对 Windows 应用程序进行 UI 自动化,以及如何使用 White 创建自动化测试脚本。
引言
在当今的技术时代,实现 Windows/Web 应用程序的自动化并非难事。在互联网上,你可以找到大量的开源/商业工具来帮助我们实现自动化目标。但其中只有少数工具能同时为 Win32、Win Forms、WPF、Silverlight 应用程序以及基础应用程序的 UI 自动化提供支持,而我们将要讨论的 White 框架就是其中之一。在本文中,我将以计算器为例,这是 Windows 应用程序自动化的最佳范例,来解释我们如何使用 White 实现 UI 自动化的目标。本文的目标读者是对 White 框架还不熟悉的自动化测试人员。
背景
本文的灵感来源于以下链接,它激发了我在 CodeProject 上撰写一篇关于 White 的文章。
White 框架
White 是一个用 C# 编写的开源框架,它支持所有富客户端应用程序,包括 Win32、WinForm、WPF 和 SWT (Java)。它基于 .NET,不需要使用任何专有的脚本语言。它提供了一致的面向对象的 API,并隐藏了微软 UI 自动化库和 Win32 Windows 消息的所有复杂性。
White 与应用程序的交互 (来源: http://white.codeplex.com/) :
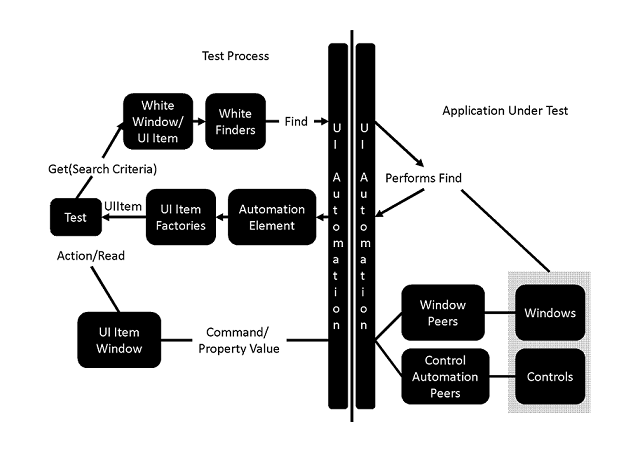
White 框架通过 UI 元素与应用程序进行交互。因此,您需要准备一些 UI 元素检查工具来找出 Automation ID 和更多其他属性。为此,您可以使用 UISpy 和 VisualUIAVerify。
UISpy 是一个独立的可执行文件,它使开发人员能够查看所有 UI 元素及其详细信息。
但我个人更喜欢 VisualUIAVerify,我发现它使用起来非常方便和顺手。
VisualUIAVerify
通过 Visual UIA Verify,您可以快速找到并选择桌面上的任何 UI 元素。UIA Verify 会根据特定的控件类型和支持的控件模式,为特定的 UI 元素提供优先的内置测试场景。开发人员可以通过向 UIA 测试库添加代码来增加额外的测试场景。该工具可以以多种形式输出测试结果或摘要。Visual UIA Verify 可以将测试详情输出为 HTML 格式。
您可以从以下链接下载 VisualUIAVerify
启动 VisualUIAVerify 后,将显示一个 UI 自动化树。根元素代表当前桌面,子元素代表应用程序窗口。每个子元素都包含菜单、按钮、单选按钮、文本框、工具栏、列表框等 UI 元素。
请参考下面的屏幕截图查看详细视图。

关于 UI 元素的详细信息会显示在“属性”面板中(如下面的屏幕截图所示)。当您想通过 White 访问一个 UI 元素时,您需要知道它的 AutomationId、ControlType 和 Name。

好了,关于 VisualUI 的解释就到此为止。是时候言归正传,不再兜圈子了。
入门
White 的 API 非常用户友好。您可以很快地利用这个框架的优势,开始使用 White 进行工作。
我使用一个控制台应用程序开发了这个演示项目。现在让我们开始编码,进行更详细的解释。
- 从此位置下载最新的 White DLL - http://white.codeplex.com/releases
- 解压缩 white 文件夹
- 打开您的项目并选择控制台应用程序,将其命名为
TestWhiteCalculator - 现在我们需要为项目添加如下引用(详见下方快照)
- 打开您的解决方案资源管理器
- 右键单击 References 文件夹
- 选择添加引用
- 转到您解压缩 white 的文件夹
- 选择以下 DLL 文件
- White.Core.dll
- Bricks.dll
- Bricks.RuntimeFramework.dll
- Castle.Core.dll
- Castle.DynamicProxy2.dll
- 在 WhiteCalculatorTest.cs 文件中,添加以下引用
using White.Core.Factory;
using White.Core.UIItems.Finders;
using White.Core.InputDevices;
- 最后,我们完成了所有准备工作。现在我们将开始我们的主要部分。
- 通过 White 启动计算器
// source exe file path. here it is calculator exe path
private const string ExeSourceFile = @"C:\Windows\system32\calc.exe";
//Global Variable to for Application launch
private static White.Core.Application _application;
//Global variable to get the Main window of calculator from application.
private static White.Core.UIItems.WindowItems.Window _mainWindow;

//start process for the above exe file location
var psi = new ProcessStartInfo(ExeSourceFile);

// launch the process through white application
_application = White.Core.Application.AttachOrLaunch(psi);
- 现在我们将获取计算器窗口的控制权,以便在计算器上执行操作。我们必须获取我们想要进行操作的窗口的控制权。在我们的案例中,它就是计算器。
//Get the window of calculator from white application _mainWindow = _application.GetWindow (SearchCriteria.ByText("Calculator"), InitializeOption.NoCache); - 当您运行上述代码片段时,它将从目标位置打开计算器。在打开的计算器中,我们将尝试执行我们的第一个操作。
通过 White 使用键盘操作计算器
为实现此目的,White 提供了一个名为 WindowsAPI 的功能,例如 White.Core.WindowsAPI.KeyboardInput。
我们将编写一段代码,将计算器转换为日期差模式。通过这种模式,我们可以计算出在计算器上提供的日期之间的差值(请参考下面的屏幕截图)。
/// <summary>
/// Find difference between dates through calculator
/// </summary>
private static void DateDifferenceCalculation()
{
Keyboard.Instance.HoldKey(White.Core.WindowsAPI.KeyboardInput.SpecialKeys.CONTROL);
Keyboard.Instance.Enter("E");
Keyboard.Instance.LeaveKey(White.Core.WindowsAPI.KeyboardInput.SpecialKeys.CONTROL);
//On Date window find the difference between dates.
//Set value into combobox
var comboBox = _mainWindow.Get<White.Core.UIItems.ListBoxItems.ComboBox>
(SearchCriteria.ByAutomationId("4003"));
comboBox.Select("Calculate the difference between two dates");
//Click on Calculate button
White.Core.UIItems.Button caclButton =
_mainWindow.Get<White.Core.UIItems.Button>(SearchCriteria.ByAutomationId("4009"));
caclButton.Click();
}
要使用快捷键将我们打开的计算器转换为日期差模式,我们只需按下 (Ctrl+E),计算器就会转换到日期差模式。
Keyboard.Instance.HoldKey(White.Core.WindowsAPI.KeyboardInput.SpecialKeys.CONTROL);
Keyboard.Instance.Enter("E");
更改后,我们必须释放按下的 Ctrl 键。否则 windowsAPI 仍将保持 Ctrl 键的按下状态。
Keyboard.Instance.LeaveKey(White.Core.WindowsAPI.KeyboardInput.SpecialKeys.CONTROL);
现在我们将访问组合框以选择适当的选项来执行我们的操作。
//Set value into combobox
var comboBox = _mainWindow.Get<White.Core.UIItems.ListBoxItems.ComboBox>
(SearchCriteria.ByAutomationId("4003"));
comboBox.Select("Calculate the difference between two dates");
选择以上选项后,我们将点击“计算”按钮。默认情况下,您会注意到它会计算“从”日期和“到”日期之间的差值,并且这两个日期都是当前日期。但您也可以选择通过 White 在计算器上更改这些日期。目前,我们将继续使用“从”和“到”中提供的默认值。
//Click on Calculate button
White.Core.UIItems.Button caclButton =
_mainWindow.Get<White.Core.UIItems.Button>(SearchCriteria.ByAutomationId("4009"));
caclButton.Click();
一旦“计算”按钮被按下,我们就可以在“差值”字段中看到结果。您可以参考下面的快照。

返回基本计算器模式
我们将尝试通过 White 的两种功能来实现这一点。
- 使用键盘热键
- 使用计算器菜单选项
使用键盘热键
/// <summary>
/// Change the calculator mode in basic using Key Board Hot Key
/// </summary>
private static void ReturnToBasicCalculatorUsingHotKey()
{
Keyboard.Instance.HoldKey(White.Core.WindowsAPI.KeyboardInput.SpecialKeys.CONTROL);
Keyboard.Instance.PressSpecialKey(White.Core.WindowsAPI.KeyboardInput.SpecialKeys.F4);
Keyboard.Instance.LeaveKey(White.Core.WindowsAPI.KeyboardInput.SpecialKeys.CONTROL);
}
使用计算器菜单选项
请参考下面的快照来理解手动操作过程。
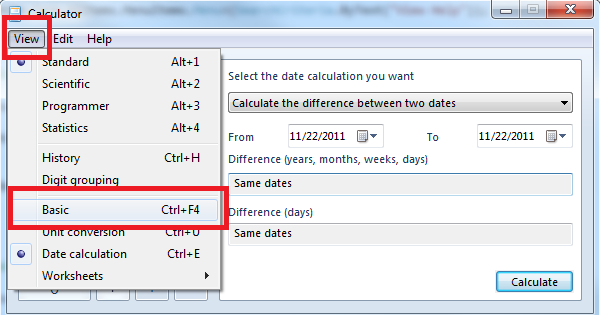
步骤 1:点击计算器顶部的菜单选项(查看)
var menuView = _mainWindow.Get<White.Core.UIItems.MenuItems.Menu>
(SearchCriteria.ByText("View"));
menuView.Click();
步骤 2:当“查看”选项下拉时。
然后点击“基本”选项,将计算器转换为基本模式。
//select Basic
var menuViewBasic = _mainWindow.Get<White.Core.UIItems.MenuItems.Menu>
(SearchCriteria.ByText("Basic"));
menuViewBasic.Click();
从计算器打开帮助文件
为了实现这一点,我们将使用下面的代码片段来完成。这段代码是自解释的。
/// <summary>
/// Open help File from calculator menu
/// </summary>
private static void OpenHelpOptionInCalculator()
{
//Click on Help at Menu item
var help = _mainWindow.Get<White.Core.UIItems.MenuItems.Menu>
(SearchCriteria.ByText("Help"));
help.Click();
//Click on View Help guide to open new window from menu bar
var viewHelp = _mainWindow.Get<White.Core.UIItems.MenuItems.Menu>
(SearchCriteria.ByText("View Help"));
viewHelp.Click();
}
通过 White 在计算器上执行求和操作。
在这个演示中,我们将两个数字(1234 和 5678)相加,并得到结果。之后,我们将比较结果,以检查我们的计算器是否工作正常。
我们将读取计算器的所有按键,以便通过 White 按下所需的键。在这里,我将使用文本而不是 Automation Id。
//Button with Numerical value 1
White.Core.UIItems.Button btn1 = _mainWindow.Get<White.Core.UIItems.Button>
(SearchCriteria.ByText("1"));
//Button with Numerical value 2
White.Core.UIItems.Button btn2 = _mainWindow.Get<White.Core.UIItems.Button>
(SearchCriteria.ByText("2"));
//Button with Numerical value 3
White.Core.UIItems.Button btn3 = _mainWindow.Get<White.Core.UIItems.Button>
(SearchCriteria.ByText("3"));
//Button with Numerical value 4
White.Core.UIItems.Button btn4 = _mainWindow.Get<White.Core.UIItems.Button>
(SearchCriteria.ByText("4"));
//Button with Numerical value 5
White.Core.UIItems.Button btn5 = _mainWindow.Get<White.Core.UIItems.Button>
(SearchCriteria.ByText("5"));
//Button with Numerical value 6
White.Core.UIItems.Button btn6 = _mainWindow.Get<White.Core.UIItems.Button>
(SearchCriteria.ByText("6"));
//Button with Numerical value 7
White.Core.UIItems.Button btn7 = _mainWindow.Get<White.Core.UIItems.Button>
(SearchCriteria.ByText("7"));
//Button with Numerical value 8
White.Core.UIItems.Button btn8 = _mainWindow.Get<White.Core.UIItems.Button>
(SearchCriteria.ByText("8"));
//Button with Numerical value 9
White.Core.UIItems.Button btn9 = _mainWindow.Get<White.Core.UIItems.Button>
(SearchCriteria.ByText("9"));
//Button with Numerical value 0
White.Core.UIItems.Button btn0 = _mainWindow.Get<White.Core.UIItems.Button>
(SearchCriteria.ByText("0"));
//Button with text as +(for sum)
White.Core.UIItems.Button btnSum = _mainWindow.Get<White.Core.UIItems.Button>
(SearchCriteria.ByText("Add"));
//Read button to get the result
White.Core.UIItems.Button btnResult = _mainWindow.Get<White.Core.UIItems.Button>
(SearchCriteria.ByText("Equals"));
按下我们的第一个数字,即 1234。
//Type First Numbers 1234
btn1.Click();
btn2.Click();
btn3.Click();
btn4.Click();
按“加号”(+)按钮以添加第二个数字
//Press Add button
btnSum.Click();
现在我们将提供我们的第二个数字,即 5678
//Type 2nd number
btn5.Click();
btn6.Click();
btn7.Click();
btn8.Click();
我们将按“等于”(=)按钮来获取结果。
//Get the result
btnResult.Click();
之后,我们将从计算器显示屏获取结果。
//read the result
White.Core.UIItems.Label resultLable= _mainWindow.Get<White.Core.UIItems.Label>
(SearchCriteria.ByAutomationId("150"));
最后我们将比较我们的结果。
string result = resultLable.Text;
Assert.AreEqual("6912", result, "Sorry Summation is wrong!!");
我们已经完成了使用 White 框架对计算器的自动化操作。
享受使用 White 框架的乐趣吧。
注意
如果您使用的是 VS2010,请在“应用程序”选项卡下将目标框架更改为“.NET Framework 4”。要找到此选项,请进入您项目树节点的属性。
在 VS2010 中,默认的目标框架是“.NET Framework 4 client profile”。在此模式下运行 White 代码时,会抛出一个构建异常,如“未能找到类型或命名空间名称'White'(是否缺少 using 指令或程序集引用?)”,即使您已经添加了 White 的命名空间。
历史
- 2011年11月25日:初次发布