
使用 UITypeEditors (VB.NET) 进行丰富的设计时编辑
4.97/5 (60投票s)
如何使用 UITypeEditors、智能标签、ControlDesigner Verbs 和 Expandable Properties 来简化设计时编辑。
引言
本文假设您对创建简单的 UserControl 有基本了解,因此在此不再详细介绍。为了演示属性编辑器,我决定创建一个控件,该控件可以绘制自身为选定的形状。这给了我很多机会来演示不同的设计时编辑器。此演示使用了 UITypeEditors、智能标签、ControlDesigner Verbs 和 Expandable Properties。
属性值与显示值
属性网格中显示的属性值是实际属性值的 string 表示形式。例如,控件的 Visible 属性类型为 Boolean。值可以是 0 或 -1,但属性网格不显示此值。它将值 0 转换为 string "False",将值 -1 转换为 string "True"。不同的属性值类型有不同的界面类型来编辑其值。
属性类型
这些是基本属性类型和常见示例
- 文本框
TabIndex-> 直接在显示文本框中编辑值。 - 列表框
BackgroundImageLayout-> 枚举string值的下拉列表。 - UI 下拉菜单
ForeColor-> 带有图形选择界面的下拉区域。 - UI 模态窗口
BackgroundImage-> 打开单独的对话框表单以选择属性值。 - 可展开
Font-> 旁边带有加号的属性,可以展开所有子属性。(注意:此外,Font还有一个模态选项。)
文本框
像 Single 这样的简单属性类型
Private _BorderWidth As Single = 2
<Description("Get or Set the Width of the border around the shape")> _
<Category("Shape")> _
<DefaultValue(GetType(Single), "2")> _
    Public Property BorderWidth() As Single
        Get
            Return _BorderWidth
        End Get
        Set(ByVal value As Single)
            _BorderWidth = value
            Invalidate()
        End Set
    End Property
列表框
具有枚举值(如 DashStyle)的属性类型。此属性将自动提供 DashStyle 文本值的列表供选择,或使用 ENUM 列表创建自己的类型。
Enum eFillType
    Solid
    GradientLinear
    GradientPath
    Hatch
End Enum

Private _FillType As eFillType = eFillType.Solid
<Description("The Fill Type to apply to the Shape")> _
<Category("Shape")> _
<DefaultValue(GetType(eFillType), "Solid")> _
Public Property FillType() As eFillType
    Get
        Return _FillType
    End Get
    Set(ByVal value As eFillType)
        _FillType = value
        Me.Invalidate()
    End Set
End Property
UITypeEditor
如果您想要一种更直观的方式来选择属性值怎么办? UITypeEditors 就是答案。有两种类型:下拉菜单 (Dropdown) 和 模态窗口 (Modal)。每种都有相同的可覆盖方法。
GetEditStyle- 获取EditValue方法使用的编辑器样式EditValue- 使用UITypeEditor编辑属性值
如果需要以下功能,则为可选。有时,您希望在文本值旁边显示一个小图形表示,就像 ForeColor 这样的颜色类型属性中的颜色名称旁边的颜色框一样。
GetPaintValueSupported- 返回True以允许覆盖PaintValue方法PaintValue- 在显示值中绘制图形
下拉菜单模式有一个额外的方法
IsDropDownResizable- 指示是否显示抓手柄以允许用户调整下拉菜单的大小。
DropDown
下拉菜单模式会创建一个在属性值下方弹出的区域。在这里,您可以放置一个 UserControl 来编辑并返回属性值。我已经演示了两种类型的下拉菜单。一种使用所有者绘制的列表框(BorderStyleEditor),另一种使用单独的 UserControl,有点像一个小表单。BorderStyleEditor 使用一个简单的 CustomControl 类(LineStyleListBox),它继承了 ListBox 并在 DrawItem 事件中绘制自己的项目。它不仅仅列出文本值,而是以该样式绘制每个 DashStyle。现在您有了一个控件可以直观地选择 DashStyle,您需要添加一个 IWindowsFormsEditorService 来使其在编辑器中工作。另外,如果您不希望自定义控件显示在工具箱中,请添加 <ToolboxItem(False)>。
<ToolboxItem(False)> _
Public Class LineStyleListBox
    Inherits ListBox

    Private _lineColor As Color = Color.Black
    Public Property LineColor() As Color
        Get
            Return _lineColor
        End Get
        Set(ByVal Value As Color)
            _lineColor = Value
        End Set
    End Property

    ' The editor service displaying this control.
    Private m_EditorService As IWindowsFormsEditorService

    Public Sub New(ByVal line_style As DashStyle, _
     ByVal editor_service As IWindowsFormsEditorService, _
    ByVal Line_Color As Color)
        MyBase.New()

        m_EditorService = editor_service

        ' Make items for each LineStyles value.
        For i As Integer = 0 To 4
            Items.Add(i)
        Next i
        LineColor = Line_Color
        ' Select the current line style.
        SelectedIndex = DirectCast(line_style, Integer)

        DrawMode = Windows.Forms.DrawMode.OwnerDrawFixed
        ItemHeight = 18
    End Sub
.
.
.
End Class
要使编辑器显示新控件,您需要一个继承 UITypeEditor 的类。
Public Class BorderStyleEditor
    Inherits UITypeEditor

    ' Indicate that we display a dropdown.
    Public Overrides Function GetEditStyle(ByVal context As ITypeDescriptorContext) _
        As UITypeEditorEditStyle

      Return UITypeEditorEditStyle.DropDown

    End Function

    ' Edit a line style
    Public Overrides Function EditValue(ByVal context As ITypeDescriptorContext, _
        ByVal provider As IServiceProvider, _
        ByVal value As Object) As Object
        ' Get an IWindowsFormsEditorService object.
        Dim editor_service As IWindowsFormsEditorService = _
            CType(provider.GetService(GetType(IWindowsFormsEditorService)), _
            IWindowsFormsEditorService)
        If editor_service Is Nothing Then
            Return MyBase.EditValue(context, provider, value)
        End If

        ' Convert the value into a BorderStyles value.
        Dim line_style As DashStyle = DirectCast(value, DashStyle)

        ' Make the editing control.
        Using editor_control As New LineStyleListBox(line_style, _
                                    editor_service, _
                                    CType(context.Instance, Shape).BorderColor)
            ' Display the editing control.
            editor_service.DropDownControl(editor_control)
            ' Save the new results.
            Return CType(editor_control.SelectedIndex, DashStyle)
        End Using
    End Function

    ' Indicate that we draw values in the Properties window.
    Public Overrides Function GetPaintValueSupported( _
        ByVal context As ITypeDescriptorContext) As Boolean

        Return True

    End Function

    ' Draw a BorderStyles value.
    Public Overrides Sub PaintValue(ByVal e As PaintValueEventArgs)
        ' Erase the area.
        e.Graphics.FillRectangle(Brushes.White, e.Bounds)

        Dim LnColor As Color
        If IsNothing(e.Context) Then
            LnColor = Color.Black
        Else
            LnColor = CType(e.Context.Instance, Shape).BorderColor
        End If
        ' Draw the sample.
        DrawSamplePen( _
                e.Graphics, _
                e.Bounds, _
                LnColor, _
                DirectCast(e.Value, DashStyle))
    End Sub
End Class
要使所有内容整合在一起,请将编辑器应用于属性声明
Private _BorderStyle As DashStyle = DashStyle.Solid
<Category("Shape")> _
<Description("The line dash style used to draw state borders.")> _
<Editor(GetType(BorderStyleEditor), GetType(UITypeEditor))> _
<DefaultValue(GetType(DashStyle), "Solid")> _
Public Property BorderStyle() As DashStyle
    Get
        Return _BorderStyle
    End Get
    Set(ByVal value As DashStyle)
        _BorderStyle = value
        Me.Invalidate()
    End Set
End Property
UITypeEditor 做什么?
它使用 GetEditStyle 获取样式
Public Overrides Function GetEditStyle( _
  ByVal context As System.ComponentModel.ITypeDescriptorContext) _
  As System.Drawing.Design.UITypeEditorEditStyle

    Return UITypeEditorEditStyle.DropDown

End Function
在 EditValue 方法中编辑值
- 创建一个
EditorService。 - 创建一个新的
LineStyleListBox控件。 - 使用
EditorService.DropDownControl(控件引用),它会打开带有该控件的下拉菜单。选择项目后,会调用CloseDropDown将值返回给EditValue以便在PropertyGrid中显示。
    Public Overrides Function EditValue(ByVal context As ITypeDescriptorContext, _
        ByVal provider As IServiceProvider, _
        ByVal value As Object) As Object
        ' Get an IWindowsFormsEditorService object.
        Dim editor_service As IWindowsFormsEditorService = _
            CType(provider.GetService(GetType(IWindowsFormsEditorService)), _
            IWindowsFormsEditorService)
        If editor_service Is Nothing Then
            Return MyBase.EditValue(context, provider, value)
        End If

        ' Convert the value into a BorderStyles value.
        Dim line_style As DashStyle = DirectCast(value, DashStyle)

        ' Make the editing control.
        Using editor_control As New LineStyleListBox(line_style, _
                                    editor_service, _
                                    CType(context.Instance, Shape).BorderColor)
            ' Display the editing control.
            editor_service.DropDownControl(editor_control)
            ' Save the new results.
            Return CType(editor_control.SelectedIndex, DashStyle)
        End Using
    End Function
在显示值中添加图形
- 使用
PaintValue方法,在DashStyle名称旁边绘制DashStyle的小图形。
    Public Overrides Sub PaintValue(ByVal e As PaintValueEventArgs)
        ' Erase the area.
        e.Graphics.FillRectangle(Brushes.White, e.Bounds)

        Dim LnColor As Color
        If IsNothing(e.Context) Then
            LnColor = Color.Black
        Else
            LnColor = CType(e.Context.Instance, Shape).BorderColor
        End If
        ' Draw the sample.
        DrawSamplePen( _
                e.Graphics, _
                e.Bounds, _
                LnColor, _
                DirectCast(e.Value, DashStyle))
    End Sub

ShapeTypeEditor 是使用下拉菜单 UITypeEditor 的另一种方式。它使用一个 UserControl(DropdownShapeEditor),允许您通过单击形状的图形表示来选择形状。在 EditValue 方法中,在创建新的 DropdownShapeEditor UserControl 后,您可以简单地突出显示鼠标悬停的形状,但我希望它能反映原始形状的外观,因此将原始 Shape 控件的属性传递给 DropdownShapeEditor 中的 Shape 控件,这样当鼠标悬停在形状上时,它就会呈现原始 Shape 控件的视觉属性。选择形状会调用 CloseDropDown。

下拉菜单的另一个示例是 RadiusInnerTypeEditor。它使用 DropdownRadiusInner UserControl,其中包含一个 TrackBar 和一个 Shape 控件。如果 Shape 是 Star,则前后滑动 TrackBar 会更改 Star 形状上的 RadiusInner 属性值。当您获得满意的值时,请勾选“应用”按钮以调用 CloseDropDown。

最后一个下拉菜单是 BlendTypeEditor。它使用 DropdownColorBlender UserControl,这是我 ColorBlender UserControl 的一个细微变体[^] UserControl 可能更复杂,但在 EditValue 方法中几乎没有区别。

有两个 HatchStyle 编辑器的示例。为了快速方便的编辑器,有一个 HatchStyleEditorEasy。
Public Class HatchStyleEditorEasy
    Inherits UITypeEditor

    Public Overrides Function GetPaintValueSupported(
        ByVal context As ITypeDescriptorContext) As Boolean
        Return True
    End Function

    Public Overrides Sub PaintValue(ByVal e As PaintValueEventArgs)
        Dim hatch As HatchStyle = CType(e.Value, HatchStyle)
        Using br As Brush = New HatchBrush(hatch, SystemColors.WindowText, SystemColors.Window)
            e.Graphics.FillRectangle(br, e.Bounds)
        End Using
    End Sub
End Class
HatchStyleEditor 是一个外观更好的属性编辑器。它与 BorderStyleEditor 非常相似,但是为了反映属性显示中的当前颜色,您需要获取控件的当前实例以检索这些属性。我发现的一个主要障碍是,出于未知原因,当此编辑器在 SmartTag 中使用时,PaintValue Sub 中的 Context 值变为 Null,这将导致致命错误并使 IDE 崩溃。为了解决这个问题,我看到 Context 值在 GetPaintValueSupported 函数中是 OK 的,所以我在那里获取了它的引用并将其存储在 SmartContext 变量中,然后在 PaintValue sub 中检查 Null 并使用 SmartContext 变量。
    Private SmartContext As ITypeDescriptorContext 'SmartTag Workaround

    Public Overrides Function GetPaintValueSupported(
         ByVal context As ITypeDescriptorContext) As Boolean
        SmartContext = context 'store reference for use in PaintValue
        Return True
    End Function

    Public Overrides Sub PaintValue(ByVal e As PaintValueEventArgs)
        Dim hatch As HatchStyle = CType(e.Value, HatchStyle)
        ' Pass the UI editor the current property value
        Dim Instance As New Shape
        'e.context only works properly in the Propertygrid.
        'When coming from the SmartTag e.context becomes null and
        'will cause a fatal crash of the IDE.
        'So to get around the null value error I captured a reference to the context
        'in the SmartContext variable in the GetPaintValueSupported function
        If e.Context IsNot Nothing Then
            Instance = CType(e.Context.Instance, Shape)
        Else
            Instance = CType(SmartContext.Instance, ShapeActionList).CurrShape
        End If

        Using br As Brush = New HatchBrush(hatch, Instance.ColorFillSolid,
            Instance.ColorFillSolidB)
            e.Graphics.FillRectangle(br, e.Bounds)
        End Using

    End Sub
在这里,您可以看到同一属性类型的两种表示形式之间的区别,而其中一种显然更好。

Modal
Modal 是 UITypeEditor 的另一种类型。不是下拉菜单,而是会打开一个单独的对话框表单,就像 Font 或 BackgroundImage 那样。FocalTypeEditor 首先创建一个新的对话框表单(dlgFocalPoints),让您可以按所需方式调整属性值。
GetEditValue 返回 UITypeEditorEditStyle.Modal。
使用 Modal 时,EditValue 的 EditorService 将使用 EditorService.ShowDialog(对话框引用)。不需要 CloseDropdown,只需关闭对话框即可完成相同操作。使用对话框在您需要更多空间时非常有用。我将其用于一个名为 FocalPoints 的属性。更改 ColorBlend 的 CenterPoint 和 FocusScales 属性,当我可以同时处理它们时,更具视觉意义。我创建了一个表单,允许以视觉方式调整这些值,但由于编辑器只返回一个属性值,我创建了一个 cFocalPoints 类,其中包含两个 PointF 值,它们将 CenterPoint 和 FocusScales 表示为一个整体。

ControlDesigner
可以在这里添加许多很酷的 DesignMode 功能,以使设计时体验更加丰富。
- 鼠标交互,超越选择和调整大小
- 额外的仅设计时绘制
- 调整大小限制
- 智能标签
- 动词
让我们再次看看如何以不同的方式处理 FocalPoints。最好是能够直接单击控件并移动点。通常,在 Designer 中会忽略鼠标事件。控件只能通过鼠标选择或调整大小,但在 ControlDesigner 中,您可以覆盖 GetHitTest 函数来告诉 Designer 处理鼠标事件。此外,还有 OnMouseEnter、OnMouseHover 和 OnMouseLeave,它们位于 ControlDesigner 中。使用 GetHitTest 函数,可以通过检查 DesignMode 属性来告诉控件处理控件的鼠标事件,然后处理设计时例程。注意,因为您覆盖了 GetHitTest,所以控件将无法正确选择,因此您需要使用 ISelectionService 手动选择它。
在控件绘制自身之后,OnPaintAdornments sub 允许您仅在设计时在控件上绘制其他内容,例如选择矩形。当控件的 FillType 为 GradientPath 时,会在 CenterPoint 位置周围绘制一个圆,在 FocusPoint 位置绘制一个正方形。然后单击该点进行拖动。或右键单击以重置点。

在 ControlDesigner 类中
    Protected Overrides Function GetHitTest( _
      ByVal point As System.Drawing.Point) As Boolean
        point = _Shape.PointToClient(point)
        _Shape.CenterPtTracker.IsActive = _
            _Shape.CenterPtTracker.TrackerRectangle.Contains(point)
        _Shape.FocusPtTracker.IsActive = _
            _Shape.FocusPtTracker.TrackerRectangle.Contains(point)

        Return _Shape.CenterPtTracker.IsActive Or _Shape.FocusPtTracker.IsActive
    End Function

    Protected Overrides Sub OnMouseEnter()
        MyBase.OnMouseEnter()
        TheBox = True
        _Shape.Invalidate()
    End Sub

    Protected Overrides Sub OnMouseLeave()
        MyBase.OnMouseLeave()
        TheBox = False
        _Shape.Invalidate()
    End Sub

    Protected Overrides Sub OnPaintAdornments _
      (ByVal pe As System.Windows.Forms.PaintEventArgs)
        MyBase.OnPaintAdornments(pe)

        If _Shape.FillType = Shape.eFillType.GradientPath And TheBox Then
            Using g As Graphics = pe.Graphics
                Using pn As Pen = New Pen(Color.Gray, 1)
                    pn.DashStyle = DashStyle.Dot
                    g.FillEllipse( _
                        New SolidBrush(Color.FromArgb(100, 255, 255, 255)), _
                        _Shape.CenterPtTracker.TrackerRectangle)
                    g.DrawEllipse(pn, _Shape.CenterPtTracker.TrackerRectangle)

                    g.FillRectangle( _
                        New SolidBrush(Color.FromArgb(100, 255, 255, 255)), _
                        _Shape.FocusPtTracker.TrackerRectangle)
                    g.DrawRectangle(pn, _Shape.FocusPtTracker.TrackerRectangle)
                End Using
            End Using
        End If
    End Sub
在控件类中
    Private Sub Shape_MouseDown(ByVal sender As Object, _
      ByVal e As System.Windows.Forms.MouseEventArgs) Handles Me.MouseDown
        If DesignMode Then
            'Because of the GetHitTest Override in the
            'Designer Manual Selection is needed
            Dim selectservice As ISelectionService = _
                 CType(GetService(GetType(ISelectionService)), ISelectionService)
            Dim selection As New ArrayList
            selection.Clear()
            selectservice.SetSelectedComponents(selection, SelectionTypes.Replace)
            selection.Add(Me)
            selectservice.SetSelectedComponents(selection, SelectionTypes.Add)

            'FocusPoints Reset
            If e.Button = Windows.Forms.MouseButtons.Right Then
                If Me.CenterPtTracker.IsActive Then
                    Me.FocalPoints = New cFocalPoints( _
                        New PointF(0.5, 0.5), _
                        Me.FocalPoints.FocusScales)
                    Me.Invalidate()
                ElseIf Me.FocusPtTracker.IsActive Then
                    Me.FocalPoints = New cFocalPoints( _
                        Me.FocalPoints.CenterPoint, _
                        New PointF(0, 0))
                    Me.Invalidate()
                End If
            End If
        End If
    End Sub

    Private Sub Shape_MouseMove(ByVal sender As Object, _
      ByVal e As System.Windows.Forms.MouseEventArgs) Handles Me.MouseMove
        If DesignMode Then
            If e.Button = Windows.Forms.MouseButtons.Left Then
                If Me.CenterPtTracker.IsActive Then
                    Me.FocalPoints = New cFocalPoints( _
                        New PointF(e.X / Me.Width, e.Y / Me.Height), _
                        Me.FocalPoints.FocusScales)
                    Me.Invalidate()
                ElseIf Me.FocusPtTracker.IsActive Then
                    Me.FocalPoints = New cFocalPoints( _
                        Me.FocalPoints.CenterPoint, _
                        New PointF(e.X / Me.Width, e.Y / Me.Height))
                    Me.Invalidate()
                End If
            End If
        End If
    End Sub
您可以应用的另一个功能(我将解释,但未在代码中提供功能性示例)是更改 SelectionRules 属性。如果您想限制大小、移动或可见性,就是它了。普通 TextBox 只能水平调整大小,除非将 Multiline 属性设置为 True,然后您也可以垂直调整大小。下面的示例将为您的控件提供仅水平效果。
    Public Overrides ReadOnly Property SelectionRules() _
      As System.Windows.Forms.Design.SelectionRules
        Get
            Return SelectionRules.LeftSizeable _
                   Or SelectionRules.RightSizeable _
                   Or Windows.Forms.Design.SelectionRules.Visible _
                   Or Windows.Forms.Design.SelectionRules.Moveable
        End Get
    End Property
智能标签
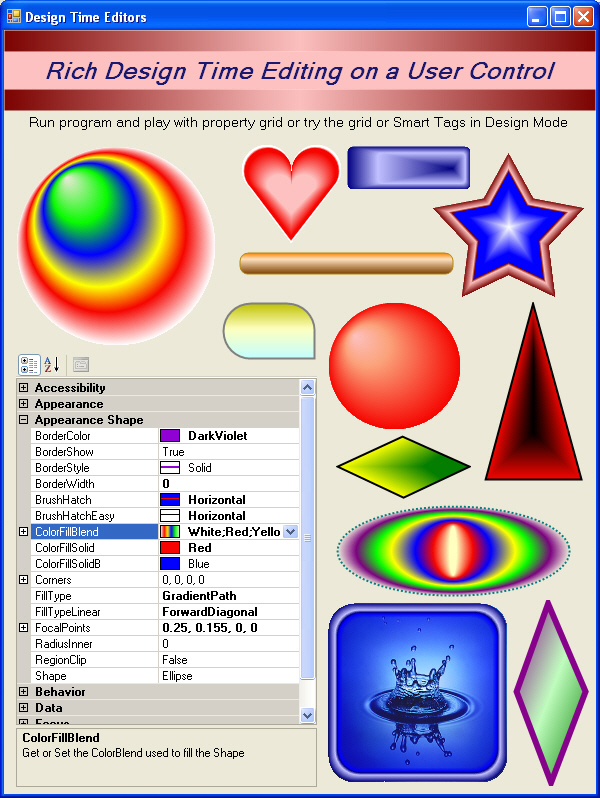
既然您已经创建了这些很酷的属性编辑器,那么以有序的方式访问它们会很有用。PropertyGrid 按类别按字母顺序排列属性,并且通过仔细的命名结构,您可以获得一些组织。智能标签将为您提供一个独立区域,以便以您想要的方式组织选定的属性,并使用与有时晦涩的属性名称不同的标签。单击某些控件右上角出现的小箭头以打开智能标签。
![]()
要创建智能标签,您需要两个类。首先,创建一个继承 ControlDesigner 的类,并覆盖 ActionLists 属性以添加第二个类的 DesignerActionListCollection。第二个类继承 DesignerActionList。在 New 事件中,添加对正在设计的组件的引用以及对 DesignerActionUIService 的引用,如果您希望智能标签自动打开,请添加 Me.AutoShow = True。
列出您希望出现在智能标签中的属性(这里的顺序无关紧要)。该属性类似于组件中的属性。但您从组件引用中获取属性值,并使用 TypeDescriptor SetValue 进行设置,以使其与 IDE 同步。
Public Class ShapeActionList
    Inherits DesignerActionList

    ' The Shape we are designing.
    Private _ShapeSelector As Shape

    Private _DesignerService As DesignerActionUIService = Nothing

    Public Sub New(ByVal component As IComponent)
        MyBase.New(component)

        ' Save a reference to the control we are designing.
        _ShapeSelector = DirectCast(component, Shape)

        ' Save a reference to the DesignerActionUIService
        _DesignerService = _
            CType(GetService(GetType(DesignerActionUIService)), _
            DesignerActionUIService)

        'Makes the Smart Tags open automatically
        Me.AutoShow = True
    End Sub

    <Editor(GetType(ShapeTypeEditor), GetType(UITypeEditor))> _
    Public Property Shape() As Shape.eShape
        Get
            Return _ShapeSelector.Shape
        End Get
        Set(ByVal value As Shape.eShape)
            SetControlProperty("Shape", value)
        End Set
    End Property

    Private Sub SetControlProperty(ByVal property_name As String, ByVal value As Object)
        TypeDescriptor.GetProperties(_ShapeSelector) _
            (property_name).SetValue(_ShapeSelector, value)
    End Sub
.
.
.

End Class
ActionList 项目类型
可以添加到智能标签中的项目类型
DesignerActionHeaderItem粗体文本,每个分组的项目区域都带有标题。
DesignerActionTextItemString文本,仅显示信息。DesignerActionPropertyItem一个控件将代表智能标签中的每个属性。
文本框、下拉菜单和模态窗口将像在
PropertyGrid中一样出现,但Boolean属性将显示为checkbox。方法将显示为超文本。然而,可展开的属性不太好用。只会显示所有子属性的string值,并且没有加号可以展开。您必须以精确的顺序和格式输入整个string才能进行任何更改(不太方便)。您可以将它们分开并单独处理,但这会占用智能标签上的大量空间。相反,更好的是一个 Action Method,它会打开一个对话框,使用IDesignerHost来编辑所有子属性(稍后详细介绍)。所有属性创建完成后,可以将它们添加到ActionList中。DesignerActionMethodItem蓝色超文本,单击时会调用分配给它的例程。
向 ActionList 添加项目
Public Overrides Function GetSortedActionItems() As _
  System.ComponentModel.Design.DesignerActionItemCollection
您可以在此处按所需顺序排列智能标签上的 ActionItem。创建一个新的 DesignerActionItemCollection 的引用,然后开始添加标题项。
Dim items As New DesignerActionItemCollection()
示例
标题
items.Add(New DesignerActionHeaderItem("Shape Appearance"))
文本
格式
Text,
Header Name to put item in
示例
Dim txt As String = "Width=" & _ShapeSelector.Width & _
 " Height=" & _ShapeSelector.Height
items.Add( _
    New DesignerActionTextItem( _
        txt, _
        "Information"))
属性
格式
Property Name,
Label Text,
Header Name to put item in,
Description
示例
items.Add( _
    New DesignerActionPropertyItem( _
        "Shape", _
        "Shape", _
        "Shape Appearance", _
        "The Shape of the Control"))
方法
格式
ActionList,
Property Name,
Label Text,
Header Name to put item in,
Description,
Show HyperText in PropertyGrid
示例
items.Add( _
    New DesignerActionMethodItem( _
         Me, _
        "AdjustCorners", _
        "Adjust Corners ", _
        "Rectangle Only", _
        "Adjust Corners", _
        True))

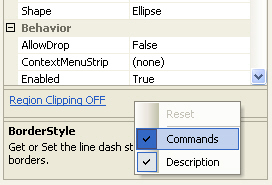
动词
在 PropertyGrid 的底部,您可以添加超文本,单击时会调用 Control Designer 中的方法。要做到这一点,请覆盖 Verbs 属性并添加一个新的 DesignerVerb。这个新的 verb 包含一个指向执行您想要的操作的事件的引用。如果您需要更改 verb 的文本,则不能直接更改它,因此您必须将其从 IMenuCommandService 中删除,然后将其添加回来并更新文本。
Public Overrides ReadOnly Property Verbs() As _
  System.ComponentModel.Design.DesignerVerbCollection
    Get
        Dim myVerbs As DesignerVerbCollection = _
            New DesignerVerbCollection
        ClipRegion = New DesignerVerb(GetVerbText, _
            New EventHandler(AddressOf ClipToRegionClicked))
        myVerbs.Add(ClipRegion)
        Return myVerbs
    End Get
End Property

Private Function GetVerbText() As String
    Return "Region Clipping " & IIf(_Shape.RegionClip, "ON", "OFF")
End Function

Public Sub ClipToRegionClicked(ByVal sender As Object, ByVal e As EventArgs)
    Me.VerbRegionClip = Not Me.VerbRegionClip
End Sub

Public Property VerbRegionClip() As Boolean
    Get
        Return _Shape.RegionClip
    End Get
    Set(ByVal value As Boolean)
        Dim prop As PropertyDescriptor = _
            TypeDescriptor.GetProperties(GetType(Shape)) _
            ("RegionClip")
        Me.RaiseComponentChanging(prop)
        _Shape.RegionClip = value
        Me.RaiseComponentChanged(prop, Not (_Shape.RegionClip), _Shape.RegionClip)
        Dim menuService As IMenuCommandService = _
          CType(Me.GetService(GetType(IMenuCommandService)), IMenuCommandService)
        If Not (menuService Is Nothing) Then
            If menuService.Verbs.IndexOf(ClipRegion) >= 0 Then
                menuService.Verbs.Remove(ClipRegion)
                ClipRegion = New DesignerVerb( _
                GetVerbText, _
                New EventHandler(AddressOf ClipToRegionClicked))
                menuService.Verbs.Add(ClipRegion)
            End If
        End If
        _Shape.Refresh()
    End Set
End Property
如果您看不到超链接,请右键单击并勾选 Commands。
可展开属性
现在,回到可展开的 Corners 属性。首先,如何创建一个,然后如何在智能标签中处理它。
对于 Corners 属性,我想要一个可展开的属性,就像 Padding 属性一样。我本可以简单地创建一个 Padding 类型的属性,但名称不正确(All、Top、Bottom、Left、Right)。我想要 All、UpperRight、UpperLeft、LowerRight、LowerLeft。
Corners 属性值在属性网格中显示为:2, 2, 2, 2,这实际上是四个属性(第五个隐藏)的字符串表示形式。需要一个过程来将实际属性转换为此字符串,或从此字符串转换回来。
首先,我需要 TypeConverter 属性类
<TypeConverter(GetType(CornerConverter))> _
Public Class CornersProperty
.
.
.
    <DescriptionAttribute("Set the Radius of the Upper Left Corner"))> _
    <RefreshProperties(RefreshProperties.Repaint))> _
    <NotifyParentProperty(True))> _
    <DefaultValue(0)> _
    Public Property UpperLeft() As Short
        Get
            Return _UpperLeft
        End Get
        Set(ByVal Value As Short)
            _UpperLeft = Value

            CheckForAll(Value)
        End Set
    End Property
.
.
.
End Class
然后是实际的转换器类,它继承 ExpandableObjectConverter。简单地说,它只是将 string 分割成几部分,并将这些部分分配给每个属性,或者将每个属性连接成 string 以显示为 Corners 属性值。
Friend Class CornerConverter : Inherits ExpandableObjectConverter

    Public Overloads Overrides Function CanConvertFrom( _
      ByVal context As System.ComponentModel.ITypeDescriptorContext, _
      ByVal sourceType As System.Type) As Boolean
        If (sourceType Is GetType(String)) Then
            Return True
        End If
        Return MyBase.CanConvertFrom(context, sourceType)
    End Function

    Public Overloads Overrides Function ConvertFrom( _
      ByVal context As System.ComponentModel.ITypeDescriptorContext, _
      ByVal culture As System.Globalization.CultureInfo, _
      ByVal value As Object) As Object
        If TypeOf value Is String Then
            Try
                Dim s As String = CType(value, String)
                Dim cornerParts(4) As String
                cornerParts = Split(s, ",")
                If Not IsNothing(cornerParts) Then
                    If IsNothing(cornerParts(0)) Then cornerParts(0) = 0
                    If IsNothing(cornerParts(1)) Then cornerParts(1) = 0
                    If IsNothing(cornerParts(2)) Then cornerParts(2) = 0
                    If IsNothing(cornerParts(3)) Then cornerParts(3) = 0
                    Return New CornersProperty( _
                      cornerParts(0), _
                      cornerParts(1), _
                      cornerParts(2), _
                      cornerParts(3))
                End If
            Catch ex As Exception
                Throw New ArgumentException("Can not convert '" & _
                  value & "' to type Corners")
            End Try
        Else
            Return New CornersProperty()
        End If

        Return MyBase.ConvertFrom(context, culture, value)
    End Function
    Public Overloads Overrides Function ConvertTo( _
      ByVal context As System.ComponentModel.ITypeDescriptorContext, _
      ByVal culture As System.Globalization.CultureInfo, _
      ByVal value As Object, ByVal destinationType As System.Type) As Object

        If (destinationType Is GetType(System.String) _
          AndAlso TypeOf value Is CornersProperty) Then
            Dim _Corners As CornersProperty = CType(value, CornersProperty)

            ' build the string as "UpperLeft,UpperRight,LowerLeft,LowerRight"
            Return String.Format("{0},{1},{2},{3}", _
                   _Corners.LowerLeft, _
                   _Corners.LowerRight, _
                   _Corners.UpperLeft, _
                   _Corners.UpperRight)
        End If
        Return MyBase.ConvertTo(context, culture, value, destinationType)

    End Function

End Class 'CornerConverter Code
如果您需要控件立即反映对子属性所做的更改,<RefreshProperties(RefreshProperties.Repaint))> 和 <NotifyParentProperty(True))> 在属性中不足以触发刷新。将 GetCreateInstanceSupported 和 CreateInstance 函数添加到 ExpandableObjectConverter 类。GetCreateInstanceSupported 应该简单地始终 Return True,然后在 CreateInstance 函数中创建一个新实例并返回它。
    Public Overrides Function GetCreateInstanceSupported( _
      ByVal context As System.ComponentModel.ITypeDescriptorContext) As Boolean

        Return True

    End Function

    Public Overrides Function CreateInstance( _
      ByVal context As System.ComponentModel.ITypeDescriptorContext, _
      ByVal propertyValues As System.Collections.IDictionary) As Object

        Dim crn As New CornersProperty
        Dim AL As Short = CType(propertyValues("All"), Short)
        Dim LL As Short = CType(propertyValues("LowerLeft"), Short)
        Dim LR As Short = CType(propertyValues("LowerRight"), Short)
        Dim UL As Short = CType(propertyValues("UpperLeft"), Short)
        Dim UR As Short = CType(propertyValues("UpperRight"), Short)


        Dim oAll As Short = CType(CType(context.Instance, Shape).Corners, _
            CornersProperty).All

        If oAll <> AL And AL > -1 Then
            crn.All = AL
        Else
            crn.LowerLeft = LL
            crn.LowerRight = LR
            crn.UpperLeft = UL
            crn.UpperRight = UR

        End If

        Return crn

    End Function
CornersProperty 有点棘手,因为每个属性都可以更改其他属性,所以我不得不回顾 context.Instance 的原始值,看看在创建新实例之前发生了什么变化。
对于一个更直接的示例,这里是 FocalPoints 的 CreateInstance
    Public Overrides Function CreateInstance( _
      ByVal context As System.ComponentModel.ITypeDescriptorContext, _
      ByVal propertyValues As System.Collections.IDictionary) As Object

        Dim fPt As New cFocalPoints

        fPt.CenterPtX = CType(propertyValues("CenterPtX"), Single)
        fPt.CenterPtY = CType(propertyValues("CenterPtY"), Single)
        fPt.FocusPtX = CType(propertyValues("FocusPtX"), Single)
        fPt.FocusPtY = CType(propertyValues("FocusPtY"), Single)

        Return fPt

    End Function
为了在智能标签中处理此属性,我创建了一个对话框(dlgCorners),允许我直观地调整角点,并通过使用 IDesignerHost 的方法打开它。
' Update new Corners values if OK button was pressed
If dlg.ShowDialog() = DialogResult.OK Then
    Dim designerHost As IDesignerHost = _
    CType(Me.Component.Site.GetService( _
         GetType(IDesignerHost)), IDesignerHost)

    If designerHost IsNot Nothing Then
        Dim t As DesignerTransaction = designerHost.CreateTransaction()
        Try
            SetControlProperty("Corners", _
                New CornersProperty( _
                dlg.TheShape.Corners.LowerLeft / ratio, _
                dlg.TheShape.Corners.LowerRight / ratio, _
                dlg.TheShape.Corners.UpperLeft / ratio, _
                dlg.TheShape.Corners.UpperRight / ratio))
            t.Commit()
        Catch
            t.Cancel()
        End Try
    End If
End If
_ShapeSelector.Refresh()

ColorFillBlend 属性是另一个可展开属性的示例,此外它还有一个模态对话框选项按钮。

如何覆盖基编辑器
某些属性类型需要额外的一步才能正常工作。Color 属性有一个内置的编辑器系统。如果您创建自己的颜色选择器控件,您可以将其替换为 Microsoft 颜色选择器。如果您有一个更复杂的颜色选择器并且需要它在模态对话框中打开,您会遇到一个问题。将出现一个简单的下拉列表而不是自定义对话框。为了使其正常工作,必须通过创建新的 ColorConverter 并覆盖该函数来关闭 TypeConverter 中的 GetStandardValuesSupported。
首先创建一个 Converter 类
Imports System.ComponentModel

Public Class AltColorConverter
    Inherits ColorConverter

    Public Overrides Function GetStandardValuesSupported( _
        ByVal context As ITypeDescriptorContext) As Boolean
        Return False
    End Function

End Class
然后添加 TypeConverter 属性
    Private _colorC As Color = Color.White
    <Category("Appearance")> _
    <DefaultValue(GetType(Color), "White")> _
    <Editor(GetType(AltColorPickerModalUI), GetType(UITypeEditor))> _
    <TypeConverter(GetType(AltColorConverter))> _
    Public Property ColorC() As Color
        Get
            Return _colorC
        End Get
        Set(ByVal Value As Color)
            _colorC = Value
            Panel4.BackColor = ColorC
            Invalidate()
        End Set
    End Property
查看 Form2 以了解将自定义颜色编辑器实现到 Color 属性的不同方法的示例。
ColorExampleControl.vb
ColorExampleControl 是一个简单的 UserControl,具有利用不同 UIEditor 的不同 Color 属性。
ColorA- 使用AltColorPicker下拉菜单和AltColorPickerDropDownUI编辑器。IWindowsFormsEditorService未传递给AltColorPicker下拉菜单,因此属性在下拉菜单失去焦点并自行关闭之前不会更新。ColorB- 使用AltColorPicker_ES下拉菜单和AltColorPickerDropDownUI_ES编辑器。在此,IWindowsFormsEditorService已传递,因此可以在需要的地方调用CloseDropDown。ColorC- 使用AltColorModalDialog对话框和AltColorPickerModalUI编辑器。
全局自定义 TypeEditor
TypeDescriptor.addAttributes 允许您更改所有颜色属性,无论是基础的还是自定义的,使其在整个项目中使用相同的编辑器。从属性中删除编辑器属性并使用下面的代码。
*** 注意:如果您改变主意并将其删除,您必须关闭项目并重新打开才能正确重置。
TypeDescriptor.AddAttributes(GetType(Color), _
        New EditorAttribute(GetType(AltColorPickerDropDownUI_ES), _
        GetType(UITypeEditor)), _
        New TypeConverterAttribute(GetType(Color)))
历史
- 版本 1.0 - 2008 年 9 月
- 版本 1.1 - 2008 年 9 月
- 使用此
.TheShape.FocalPoints = Instance.FocalPoints并不总是能提交。例如,如果您仅单独更改FocalPoints,它在设计师中看起来似乎有效,但在生成后会恢复原状。为了解决这个问题,我将其更改为.TheShape.FocalPoints = New cFocalPoints(Instance.FocalPoints.CenterPoint, Instance.FocalPoints.FocusScales),一切就绪。
- 使用此
- 版本 1.2 - 2008 年 12 月
- 添加了新的
ControlDesigner功能GetHitTest、OnPaintAdornments和SelectionRules。在设计图面上与控件直接进行鼠标交互。
- 添加了新的
- 版本 1.3 - 2008 年 12 月
- 修复了
ExpandableObjectConverter类中的CornerConverter和FocalPointsConverter,以便在更改子属性后立即更新控件。 - 添加了两个
HatchStyle编辑器,以展示处理它们的两种不同方式。
- 修复了
- 版本 1.4 - 2011 年 1 月
- 为
ColorFillBlend添加了 Type Converter - 各种调整和修复
- 为
- 版本 1.5 - 2011 年 1 月
- 添加了
Form2演示如何将自定义编辑器用于Color属性。
- 添加了