
探索通过蓝牙连接的 OBEX 设备
4.77/5 (41投票s)
一个演示如何浏览OBEX设备并向其传输文件的示例应用程序。
目录
引言
在本文中,我将介绍一个程序,该程序允许您浏览连接到计算机的任何通过蓝牙连接的设备,并允许您将文件上传/下载到/从设备。该设备应支持OBEX。为了通过蓝牙连接设备并执行OBEX操作,我使用了以下库:32feet.Net和Brecham OBEX。我想感谢这些库的作者,因为没有提到的库,我将无法编写此程序。
要求
为了使此应用程序正常工作,您需要在计算机上安装使用Microsoft蓝牙堆栈的蓝牙,以及另一个具有蓝牙的设备,您将连接到该设备以使用此程序。如果您的蓝牙设备使用非Microsoft堆栈,则可以将其禁用并安装Microsoft堆栈。请参阅本指南以获取更多说明。
此程序使用与设备通信的OBEX库,因此最好对OBEX是什么以及它是如何工作的有一个大致的了解,但并非强制要求。
应用程序的工作原理
连接
运行应用程序时,您首先要做的是连接到设备。您可以使用显示可用蓝牙设备的对话框选择要连接的设备。选择设备后,我们连接到它并启动一个新会话。代码片段显示了如何做到这一点
private void Connect()
{
  using (SelectBluetoothDeviceDialog bldialog =
                new SelectBluetoothDeviceDialog())
  {
    bldialog.ShowAuthenticated = true;
    bldialog.ShowRemembered = true;
    bldialog.ShowUnknown = true;

    if (bldialog.ShowDialog() == DialogResult.OK)
    {
      if (bldialog.SelectedDevice == null)
      {
        MessageBox.Show("No device selected", "Error",
                        MessageBoxButtons.OK, MessageBoxIcon.Error);
        return;
      }

      //Create new end point for the selected device.
      //BluetoothService.ObexFileTransfer means
      //that we want to connect to Obex service.
      BluetoothDeviceInfo selecteddevice = bldialog.SelectedDevice;
      BluetoothEndPoint remoteEndPoint =  new
       BluetoothEndPoint(selecteddevice.DeviceAddress,
       BluetoothService.ObexFileTransfer);

      //Create new Bluetooth client..
      client = new BluetoothClient();
      try
      {
        //... and connect to the end point we created.
        client.Connect(remoteEndPoint);

        //Create a new instance of ObexClientSession
        session = new ObexClientSession(client.GetStream(), UInt16.MaxValue);
        session.Connect(ObexConstant.Target.FolderBrowsing);
      }
      catch (SocketException ex)
      {
        ExceptionHandler(ex, false);
        return;
      }
      catch (ObjectDisposedException ex)
      {
        ExceptionHandler(ex, false);
        return;
      }
      catch (IOException ex)
      {
        ExceptionHandler(ex, false);
        return;
      }

      bgwWorker.RunWorkerAsync();
    }
  }
}
首先,我们显示一个显示可用蓝牙设备的对话框。除了当前存在的设备外,它还将显示过去连接到计算机但现在可能不可用的设备。可以通过将SelectBluetoothDeviceDialog的ShowRemembered属性设置为false来禁用此功能。但是,在这种情况下,如果您想连接到已记住的设备,它将不会显示在对话框中。
选择设备后,我们将基于设备地址创建一个远程终结点。第二个参数指定我们要连接的服务。在我们的例子中,它是BluetoothService.ObexFileTransfer,这意味着我们将能够使用OBEX协议传输文件。接下来,我们需要创建一个BluetoothClient类实例,并连接到我们之前创建的终结点。建立连接后,我们将创建一个ObexClientSession类实例。根据文档,“[ObexClientSession 是]一个客户端OBEX服务器连接,支持Put、Get以及大多数其他操作类型。”我们将使用我们创建的实例来执行所有OBEX操作。接下来,我们连接到文件夹浏览服务,以便我们可以使用OBEX浏览设备。
现在,当我们连接到设备的文件夹浏览服务后,我们可以开始探索它。我们将能够显示文件和文件夹,创建新文件夹,删除现有文件夹以及刷新文件夹内容。
探索设备
显示文件夹内容
为了获取文件夹内容,我们需要向设备发送这样的请求。然后,我们需要解析从设备收到的响应并检索所需信息。Brecham.Obex 库的优点在于它隐藏了所有低级别的OBEX协议特定内容。它还提供了一个完整的OBEX文件夹列表对象的解析器。我们所要做的就是调用ObexClientSession类的Get方法,传递必要的命令并将结果传递给解析器。然后,我们可以使用解析器返回的项目来填充显示文件夹内容的listview。所有这些都使用BackGroundWorker类完成,这样UI就不会被阻塞。
private void bgwWorker_DoWork(object sender, DoWorkEventArgs e)
{
  DateTime old = DateTime.Now;
  TimeSpan dr = TimeSpan.FromMilliseconds(200);

  //Request current folder's content
  using (ObexGetStream str = session.Get(null, ObexConstant.Type.FolderListing))
  {
    //Pass the response stream to folder listing parser
    ObexFolderListingParser parser = new ObexFolderListingParser(str);
    parser.IgnoreUnknownAttributeNames = true;

    ObexFolderListingItem item = null;
    List<ListViewItem> items = new List<ListViewItem>();

    //Iterate through the items and construct listview items.
    while ((item = parser.GetNextItem()) != null)
    {
      if (item is ObexParentFolderItem)
    continue;

      ObexFileOrFolderItem filefolderitem = item as ObexFileOrFolderItem;

      bool isfolder = filefolderitem is ObexFolderItem;
      ListViewItem temp = new ListViewItem(new string[] {filefolderitem.Name,
                             FormatSize(filefolderitem.Size,isfolder),
                             FormatDate(filefolderitem.Modified),
                             FormatDate(filefolderitem.Accessed),
                             FormatDate(filefolderitem.Created)},
                         GetIconIndex(Path.GetExtension(filefolderitem.Name), isfolder));

      temp.Tag = isfolder;
      temp.Name = filefolderitem.Name;
      items.Add(temp);

      //Report progress
      if (old.Add(dr) < DateTime.Now)
      {
        old = DateTime.Now;
        bgwWorker.ReportProgress(0, temp.Text);
      }
    }
    e.Result = items.ToArray();
  }
}
从上面的代码可以看出,我们将null和ObexConstant.Type.FolderListing传递给Get方法,然后将响应流传递给文件夹对象解析器。然后,我们遍历解析器返回的项目并构建listview项目。
按扩展名提取图标
列表视图中的所有项目都有一个关联的图像。图像是与当前项目的扩展名关联的图标,或者如果它是文件夹,那么它只是一个文件夹图标。为了检索图标,我使用了本篇文章中的代码:IconHandler。检索到的图标存储在与列表视图关联的图像列表中。如果图像列表已包含某个扩展名的图标,则不会再次检索。
private int GetIconIndex(string extension, bool isFolder)
{
  //If it is a folder just return index for the folder icon
  if (isFolder)
  {
    return 1;
  }

  //If the icon for the extension has already
  //been retrieved then return its index
  if (imlSmall.Images.ContainsKey(extension))
  {
    return imlSmall.Images.IndexOfKey(extension);
  }

  //Retrieve small icon
  Icon small = IconHandler.IconHandler.IconFromExtension(extension,
                                       IconSize.Small);
  if (small != null)
  {
    imlSmall.Images.Add(extension, small);
  }

  //Retrieve large icon
  Icon large = IconHandler.IconHandler.IconFromExtension(extension,
                                       IconSize.Large);
  if (large != null)
  {
    imlLarge.Images.Add(extension, large);
  }

  //If we managed to retrieve only one icon, use it for both sizes.
  if (small != null & large == null)
  {
    imlLarge.Images.Add(extension, small);
  }
  if (small == null & large != null)
  {
    imlSmall.Images.Add(extension, large);
  }

  int result = small == null & large == null ? 0 :
               imlSmall.Images.IndexOfKey(extension);

  small.Dispose();
  large.Dispose();

  return result;
}
在文件夹之间导航
当用户双击列表视图中的项目时,会根据项目的类型进行处理。如果它是文件夹,程序将进入选定的子文件夹并显示其内容。如果是文件,则会下载。但是,在处理项目之前,首先有必要确定被点击的项目。
确定被点击的项目
为了确定哪个项目被双击,我们可以使用ListView类的HitTest方法。此方法接受一个Point参数,并返回一个ListViewHitTestInfo类的实例。该类有一个Item属性,正如您可能已经猜到的,它指向被双击的项目。
private void lsvExplorer_MouseDoubleClick(object sender, MouseEventArgs e)
{
  ListViewItem clicked = lsvExplorer.HitTest(e.Location).Item;

  if (clicked != null)
  {
    if ((bool)clicked.Tag)
    ProcessFolder(clicked.Text);
    else
    DownloadFiles();
  }
}
移动到子文件夹
如果点击的项目代表一个文件夹,我们需要将连接设备上的路径设置为子文件夹位置。之后,我们可以通过启动一个BackGroundWorker来显示其内容,就像我们为显示初始视图所做的一样。但是,在显示新内容之前,当前在列表视图中显示的项目会被推入堆栈。以后当用户向上移动一个文件夹时将使用它们。
private void ProcessFolder(string folderName)
{
  try
  {
    //Set path on the device
    session.SetPath(folderName);
  }
  catch (IOException ex)
  {
    ExceptionHandler(ex);
    return;
  }

  //Push current items into stack
  ListViewItem[] previousItems =
          new ListViewItem[lsvExplorer.Items.Count];
  lsvExplorer.Items.CopyTo(previousItems, 0);
  lsvExplorer.Items.Clear();
  previousItemsStack.Push(previousItems);

  SetControlState(false);
  tsStatusLabel.Text = "Operation started";

  //Display current folder's content.
  bgwWorker.RunWorkerAsync();
}
下载和上传文件将在本文后面讨论。
向上移动一个文件夹
用户可以通过单击菜单上的“向上”按钮来向上移动一个文件夹。单击此按钮时,我们需要将当前路径更改为父文件夹的路径并显示其内容。由于我们将父文件夹的内容推入了堆栈,因此我们无需第二次请求项目。
private void MoveUp()
{
  //Check if we are at the topmost folder.
  if (previousItemsStack.Count > 0)
  {
    SetControlState(false);

    try
    {
    //Set path to parent folder.
    session.SetPathUp();
    }
    catch (IOException ex)
    {
    ExceptionHandler(ex);
    return;
    }

    //Clear current items and display saved ones.
    lsvExplorer.Items.Clear();
    lsvExplorer.Items.AddRange(previousItemsStack.Pop());
    SetControlState(true);
  }
}
由于列表视图显示的项目是早期获取的,因此文件夹的内容可能无法反映当前内容。为了查看当前项目,您可以单击“刷新”按钮。
刷新当前文件夹
刷新当前文件夹的内容非常简单,因为路径已设置。我们只需要再次运行我们的BackGroundWorker。
private void RefreshFolder()
{
  SetControlState(false);
  tsStatusLabel.Text = "Operation started";
  lsvExplorer.Items.Clear();

  bgwWorker.RunWorkerAsync();
}
创建新文件夹
创建新文件夹比任何其他操作都棘手一些。在创建新文件夹之前,我们应该确保该文件夹尚不存在。如果文件夹不存在,我们可以创建它。当用户单击“新建文件夹”按钮时,新项目将被添加到列表视图中,并为其调用BeginEdit()方法。
private void CreateNewFolder()
{
  ListViewItem newitem = new ListViewItem("", 1);

  lsvExplorer.Items.Add(newitem);
  lsvExplorer.LabelEdit = true;

  newitem.BeginEdit();
}
当用户完成输入新文件夹名称后,将触发ListView类的AfterLabelEdit事件。在事件处理程序中,我们检查文件夹是否存在,如果不存在则创建它。
private void lsvExplorer_AfterLabelEdit(object sender, LabelEditEventArgs e)
{
  if (string.IsNullOrEmpty(e.Label))
  {
    e.CancelEdit = true;
    lsvExplorer.Items.RemoveAt(e.Item);
    return;
  }

  //If folder already exists show a messagebox.
  if (lsvExplorer.Items.ContainsKey(e.Label))
  {
    if (MessageBox.Show(string.Format("There is already a folder called {0}",
        e.Label), "Error", MessageBoxButtons.OKCancel,
        MessageBoxIcon.Error) == DialogResult.OK)
    {
      //If OK is clicked continue editing the item.
      e.CancelEdit = true;
      lsvExplorer.Items[e.Item].BeginEdit();
    }
    else
     {
       //If Cancel is clicked, we need to remove item from the listview.
       lsvExplorer.LabelEdit = false;
       lsvExplorer.BeginInvoke((MethodInvoker)(() =>
       {
         lsvExplorer.Items.RemoveAt(e.Item);
       }));
    }
  }
  //Folder does not exist.
  else
  {
    e.CancelEdit = false;
    lsvExplorer.LabelEdit = false;
    lsvExplorer.Items[e.Item].Name = e.Label;

    SetControlState(false);
    try
    {
      //Create new folder and move up one folder
      //so that path is not set to newly created folder.
      session.SetPath(BackupFirst.DoNot, e.Label, IfFolderDoesNotExist.Create);
      session.SetPathUp();
    }
    catch (IOException ex)
    {
      ExceptionHandler(ex);
      return;
    }
    catch (ObexResponseException ex)
    {
      ExceptionHandler(ex);
    }
    SetControlState(true);
  }
}
从上面的代码可以看出,我们首先检查是否存在具有该名称的文件夹。如果是,我们会显示一个消息框告知用户。如果用户单击“确定”,则继续编辑,并可以为文件夹指定一个新名称。如果单击“取消”,我们需要删除我们添加的项目。如您所见,这是在另一个线程上完成的。之所以出现这种情况,是因为如果您尝试在事件处理程序中删除它,您将收到一个无法捕获的异常。有关更多详细信息,请参阅此博客文章:AftetLabelEdit和删除ListView中的最后一个项目。
如果文件夹不存在,我们通过调用SetPath方法并传入新文件夹的名称来创建它。由于我们要创建一个文件夹,因此我们还指定IfFolderDoesNotExist.Create,表示如果不存在则应创建一个文件夹。之后,当前路径被设置为新创建的文件夹,所以我们需要向上移动一个文件夹。
删除文件夹和文件
为了从设备删除文件或文件夹,我们可以使用ObexClientSession类的Delete方法,并传入要删除的项目的名称。删除文件夹时,其内容也会被删除,所以请小心。
private void DeleteSelectedItems()
{
  if (MessageBox.Show("Do you really want to delete selected items?",
      "Confirm", MessageBoxButtons.OKCancel,
      MessageBoxIcon.Question) == DialogResult.OK)
  {
    lsvExplorer.BeginUpdate();

    SetControlState(false);
    foreach (ListViewItem item in lsvExplorer.SelectedItems)
    {
      try
      {
        session.Delete(item.Text);
      }
      catch (IOException ex)
      {
        ExceptionHandler(ex);
        return;
      }
      item.Remove();
    }

    lsvExplorer.EndUpdate();
    SetControlState(true);
  }
}
下载和上传文件
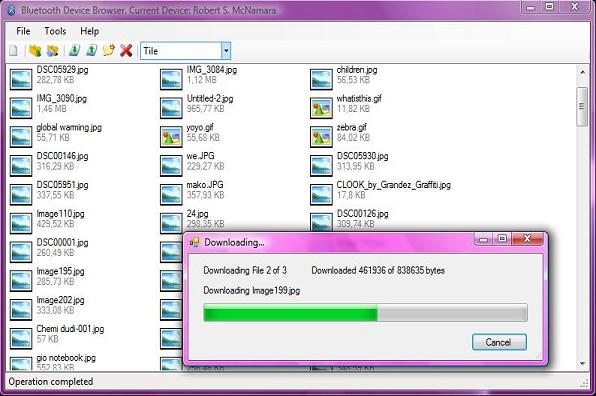
为了下载或上传文件,您可以使用GetTo或PutFrom方法。但是,要报告进度,您需要创建一个新的流类型并将其与装饰器模式结合使用。您可以在此处阅读更多相关信息:OBEX库 — 程序员指南。一种更简单的报告进度的方法是使用Get和Put方法。它们都返回一个Stream对象。在下载的情况下,我们应该从返回的流中读取并写入FileStream对象,在上传的情况下,我们应该从FileStream中读取并写入Put方法返回的流。在这两种情况下,我们都可以计算已读取的字节数并根据此报告进度。这同样使用BackgroundWorker完成。
private void bgwWorker_DoWork(object sender, DoWorkEventArgs e)
{
  long progress = 0;
  DateTime start = DateTime.Now;

  for (int i = 0; i < filesToProcess.Count; i++)
  {
    string currentfile = filesToProcess[i];

    //Report that we started downloading new file
    bgwWorker.ReportProgress((int)(((progress * 100) / totalsize)), i + 1);

    string filename = download ? Path.Combine(dir, currentfile) : currentfile;

    //Stream on our file system. We will need to either read from it or write to it.
    FileStream hoststream = download ?
    new FileStream(filename, FileMode.Create, FileAccess.Write, FileShare.None)
       : new FileStream(filename, FileMode.Open, FileAccess.Read, FileShare.None);

    AbortableStream remotestream = null;
    try
    {
      //Stream on our device. We will need to either read from it or write to it.
      remotestream = download ? (AbortableStream)currentSession.Get(currentfile, null)
              : (AbortableStream)currentSession.Put(Path.GetFileName(currentfile), null);
    }
    catch (IOException ex)
    {
      exceptionoccured = true;
      ExceptionMethod(ex);
      return;
    }
    catch (ObexResponseException ex)
    {
      exceptionoccured = true;
      ExceptionMethod(ex);
      return;
    }
    using (hoststream)
    {
      using (remotestream)
      {
        //This is the function that does actual reading/writing.
        long result = download ?
               ProcessStreams(remotestream, hoststream, progress, currentfile)
                        :ProcessStreams(hoststream, remotestream, progress, currentfile);

        if (result == 0)
        {
          e.Cancel = true;
          //Even if we are cancelled we need to report how many files we have already
          //uploaded so that they are added to the listview. Or if it is download we
          //need to delete the partially downloaded last file.
          filesProcessed = i;
          return;
        }
    else
      progress = result;
      }
    }
  }
  DateTime end = DateTime.Now;
  e.Result = end - start;
}
由于两种情况下的过程相似,因此有一个函数执行实际工作。该函数从源流读取并写入目标流。这是它的工作方式
private long ProcessStreams(Stream source, Stream destination, long progress,
                            string filename)
{
  //Allocate buffer
  byte[] buffer = new byte[1024 * 4];
  while (true)
  {
    //Report downloaded file size
    bgwWorker.ReportProgress((int)(((progress * 100) / totalsize)), progress);

    if (bgwWorker.CancellationPending)
    {
      currentSession.Abort();
      return 0;
    }

    try
    {
      //Read from source and write to destination.
      //Break if finished reading. Count read bytes.
      int length = source.Read(buffer, 0, buffer.Length);
      if (length == 0) break;
      destination.Write(buffer, 0, length);
      progress += length;
    }
    //Return 0 as if operation was cancelled so that processedFiles is set.
    catch (IOException ex)
    {
      exceptionoccured = true;
      ExceptionMethod(ex);
      return 0;
    }
    catch (ObexResponseException ex)
    {
      exceptionoccured = true;
      ExceptionMethod(ex);
      return 0;
    }
  }
  return progress;
}
上传拖放的文件
当文件从Windows Explorer拖放到主表单时,它们会自动上传到设备。为了检测拖放的文件,我使用了本书中的库:Windows Forms 2.0 Programming。我们只需要订阅FileDropped事件。
private void DragDrop_FileDropped(object sender, FileDroppedEventArgs e)
{
  UploadFiles(e.Filenames);
}
下载和上传就到此为止。下载/上传对话框会报告所花费的时间和平均速度。
最终注释
我用我的Sony Ericsson手机测试了此应用程序,它运行良好。我没有做任何特别针对我的手机进行优化的工作,所以它应该也能与其他手机一起工作,尽管我没有测试过。该应用程序在64位Vista Ultimate SP1上运行,但也应该可以在32位系统以及其他Windows版本上运行。
关注点
在AfterLabelEdit中删除ListView中的最后一个项目会导致异常,这非常令人恼火。
参考文献
历史
- 2008年10月1日 - 初始发布
- 2008年10月13日 - 版本1.1
- 更新至Brecham.Obex 1.7
- 修复了小 bug
- 2008年10月24日 - 版本1.2
- 添加了文件的拖放支持;拖放的文件会自动上传
- 添加了一些快捷方式:按F5刷新当前文件夹,按Delete将删除选定的项目