
WCF (Windows Communication Foundation) 简介和实现
4.58/5 (29投票s)
本文包含 WCF 简介、WCF 服务库示例、在 Windows 服务中托管 WCF 服务以及在 Web 应用程序中消费 WCF 服务。
引言
本文包含 WCF 简介、WCF 服务库示例、在 Windows 服务中托管 WCF 服务以及在 Web 应用程序中消费 WCF 服务。
背景
需要 C# 和 HTML 的基础知识。
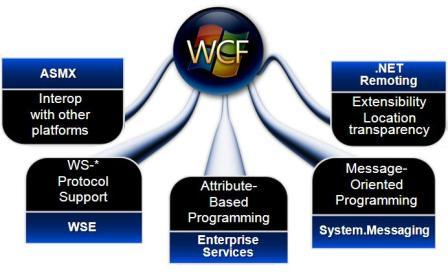
WCF 简介
WCF(Windows Communication Foundation),最初代号为“Indigo”,是一个用于构建相互通信的应用程序的编程框架。它是微软用于构建面向服务应用程序的统一编程模型。它使开发人员能够构建安全、可靠、事务性的解决方案,这些解决方案可以跨平台集成并与现有投资进行互操作。WCF 是 .NET Framework 中专门用于通信的部分。
此定义来自 Wikipedia 和 Microsoft。更多详情,请参阅: http://en.wikipedia.org/wiki/Windows_Communication_Foundation。
使用 Visual Studio 2008 创建 WCF 服务应用程序
CodeProject 上有一篇很好的文章。您可以参考 这篇文章。
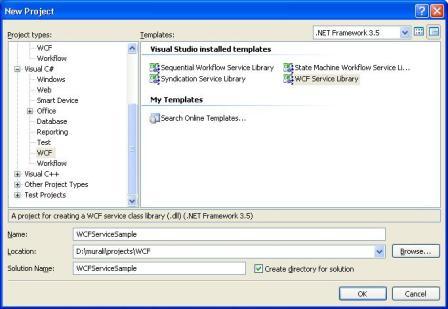
使用 Visual Studio 2008 创建 WCF 服务库
以下是使用 Visual Studio 2008 创建 WCF 服务库需要遵循的步骤。
- 打开 Visual Studio 2008。
- 在“文件”菜单中,点击“新建项目”。
- 在“项目类型”树中,展开“Visual C#”节点,然后选择“WCF”节点。
- 选择“WCF 服务库”。
- 选择要保存应用程序的名称和位置,然后点击“确定”按钮。
- 项目将使用默认文件创建,即 IService1.cs、Service1.cs 和 App.config。
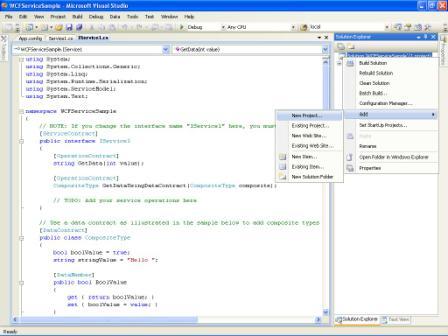
我们可以看到带有 ServiceContract 特性的 IService1,并且暴露的方法是用 OperationContract 特性定义的。Service1 是实现 IService1 的具体类。端点和其他行为属性在 App.Config 文件的 system.serviceModel 部分定义。
如果我们重命名服务,则需要对 App.Config 的以上部分进行必要的更改;否则,外部系统将无法识别服务。
WCF 服务代码
IService1.cs
//<createdby> Murali Manohar Pareek </createdby>
//<date> Oct 23, 2008 </date>
//<description> WCF Service</description>
//<version> 1.0.0.0 </version>

using System;
using System.Collections.Generic;
using System.Linq;
using System.Runtime.Serialization;
using System.ServiceModel;
using System.Text;

namespace WCFServiceSample
{
    // NOTE: If you change the interface name "IService1" here,
    // you must also update the reference to "IService1" in App.config.
    [ServiceContract]
    public interface IService1
    {
        [OperationContract]
        string GetData(int value);

        [OperationContract]
        CompositeType GetDataUsingDataContract(CompositeType composite);

        // TODO: Add your service operations here
    }

    // Use a data contract as illustrated in the sample below to
    //add composite types to service operations
    [DataContract]
    public class CompositeType
    {
        bool boolValue = true;
        string stringValue = "Hello ";

        [DataMember]
        public bool BoolValue
        {
            get { return boolValue; }
            set { boolValue = value; }
        }

        [DataMember]
        public string StringValue
        {
            get { return stringValue; }
            set { stringValue = value; }
        }
    }
}
Service1.cs
//<createdby> Murali Manohar Pareek </createdby>
//<date> Oct 23, 2008 </date>
//<description> WCF Service</description>
//<version> 1.0.0.0 </version>

using System;
using System.Collections.Generic;
using System.Linq;
using System.Runtime.Serialization;
using System.ServiceModel;
using System.Text;

namespace WCFServiceSample
{
    // NOTE: If you change the class name "Service1" here,
you must also update the reference to "Service1" in App.config.
    public class Service1 : IService1
    {
        public string GetData(int value)
        {
            return string.Format("You entered: {0}", value);
        }

        public CompositeType GetDataUsingDataContract(CompositeType composite)
        {
            if (composite.BoolValue)
            {
                composite.StringValue += "Suffix";
            }
            return composite;
        }
    }
}
App.Config
 <?xml version="1.0" encoding="utf-8" ?>
<configuration>
  <system.web>
    <compilation debug="true" />
  </system.web>
  <!-- When deploying the service library project, the content of the config file
must be added to the host's
  app.config file. System.Configuration does not support config files for libraries. -->
  <system.serviceModel>
    <services>
      <service name="WCFServiceSample.Service1" behaviorConfiguration=
"WCFServiceSample.Service1Behavior">
        <host>
          <baseAddresses>
            <add baseAddress = "https://:8731/Design_Time_Addresses
/WCFServiceSample/Service1/" />
          </baseAddresses>
        </host>
        <!-- Service Endpoints -->
        <!-- Unless fully qualified, address is relative to base address supplied
 above -->
        <endpoint address ="" binding="wsHttpBinding" contract=
"WCFServiceSample.IService1">
          <!--
              Upon deployment, the following identity element should be removed
or replaced to reflect the identity under which the deployed service runs.
 If removed, WCF will infer an appropriate identity
              automatically.
          -->
          <identity>
            <dns value="localhost"/>
          </identity>
        </endpoint>
        <!-- Metadata Endpoints -->
        <!-- The Metadata Exchange endpoint is used by the service to describe
 itself to clients. -->
        <!-- This endpoint does not use a secure binding and should be secured
or removed before deployment -->
        <endpoint address="mex" binding="mexHttpBinding" contract="IMetadataExchange"/>
      </service>
    </services>
    <behaviors>
      <serviceBehaviors>
        <behavior name="WCFServiceSample.Service1Behavior">
          <!-- To avoid disclosing metadata information,
          set the value below to false and remove the metadata endpoint above
before deployment -->
          <serviceMetadata httpGetEnabled="True"/>
          <!-- To receive exception details in faults for debugging purposes,
          set the value below to true.  Set to false before deployment
          to avoid disclosing exception information -->
          <serviceDebug includeExceptionDetailInFaults="False" />
        </behavior>
      </serviceBehaviors>
    </behaviors>
  </system.serviceModel>
</configuration>
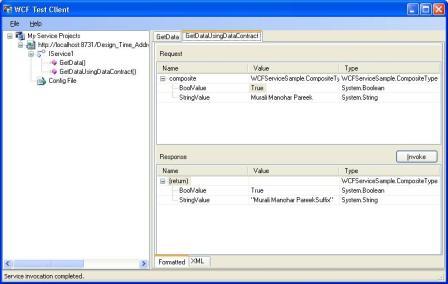
运行 WCF 服务库
当我们作为简单的 Windows 或 Web 应用程序运行此应用程序时,它将自动托管应用程序并运行测试客户端。我们可以按如下方式使用测试客户端:
托管 WCF 服务
- IIS 6 (ASPNET_WP.EXE / W3wp.exe)
- 按需激活,响应客户端请求
- 仅支持 HTTP/S 传输
- 自托管
- 可以是任何托管的应用程序,例如控制台应用程序或 WinForms 应用程序
- 低级别但灵活
- Windows Activation Service (WAS)
- 支持所有传输
- 将在 Vista 和 Longhorn Server 上的 IIS 7 中发布
- 托管 Windows 服务 (NT 服务)
在这里,我们将 WCF 服务托管在托管 Windows 服务中。我们将按如下方式添加新项目:
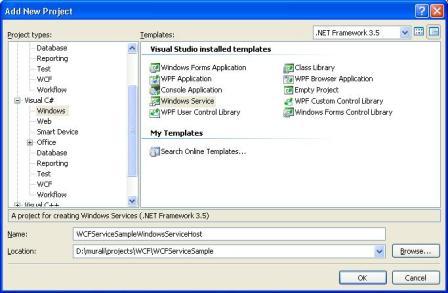
步骤 1:添加新项目
步骤 2:选择 Windows 服务项目
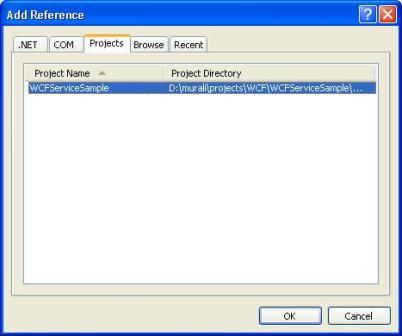
步骤 3:添加引用

步骤 4:选择“项目”选项卡,然后将“WCFServiceSample”库添加为 Windows 服务中的引用
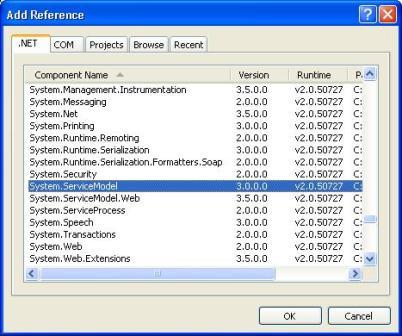
步骤 5:现在我们将打开 WCF 服务宿主。要打开服务宿主,我们需要将 System.ServiceModel 库添加为 Windows 服务中的引用。
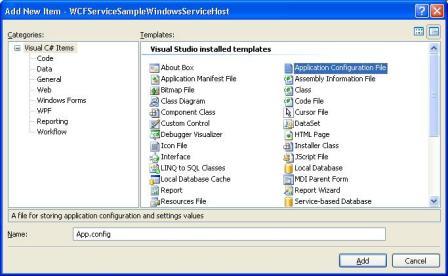
步骤 6:Windows 服务本身没有与 WCF 服务配置相关的配置文件,例如端点、行为等,所以我们必须将 App.Config 文件包含在 Windows 服务中。我们只需添加一个应用程序配置文件,并将其复制为 WCFServiceSample 应用程序中的 App.Config 文件。
步骤 7:现在我们将代码添加到 Windows 服务中以打开宿主。
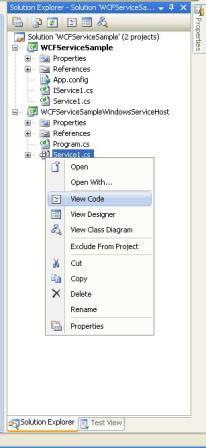
步骤 8:添加 Windows 服务代码
using System;
using System.Collections.Generic;
using System.ComponentModel;
using System.Data;
using System.Diagnostics;
using System.Linq;
using System.ServiceProcess;
using System.Text;
using System.ServiceModel;
using System.IO;

namespace WCFServiceSampleWindowsServiceHost
{
    public partial class Service1 : ServiceBase
    {
        ServiceHost host;
        FileStream fs;
        StreamWriter m_streamWriter;

        public Service1()
        {
            InitializeComponent();
        }

        protected override void OnStart(string[] args)
        {
            fs = new FileStream(@"c:\temp\WCFLog.txt", FileMode.OpenOrCreate,
            FileAccess.Write);
            m_streamWriter = new StreamWriter(fs);

            try
            {
                if (host != null)
                {
                    host.Close();
                }

                host = new ServiceHost(typeof(WCFServiceSample.Service1));
                host.Open();


                m_streamWriter.BaseStream.Seek(0, SeekOrigin.End);
                m_streamWriter.WriteLine(DateTime.Now + " WCF: Host
                open successfully \n");

                m_streamWriter.WriteLine(DateTime.Now + " WCF: Service
                Started successfully \n");
            }
            catch (Exception ex)
            {
                m_streamWriter.BaseStream.Seek(0, SeekOrigin.End);
                m_streamWriter.WriteLine(DateTime.Now + " WCF: Error in
                opening Host : " + ex.Message + "\n");

                if (host != null)
                {
                    host = null;
                }
            }
            finally
            {
                m_streamWriter.Flush();
                m_streamWriter.Close();
                m_streamWriter = null;
                fs.Close();
                fs = null;
            }
        }

        protected override void OnStop()
        {
            fs = new FileStream(@"c:\temp\WCFLog.txt", FileMode.OpenOrCreate,
                                FileAccess.Write);
            m_streamWriter = new StreamWriter(fs);

            try
            {
                if (host != null)
                {
                    host.Close();
                    host = null;

                    m_streamWriter.BaseStream.Seek(0, SeekOrigin.End);
                    m_streamWriter.WriteLine(DateTime.Now + " WCF: Host close
                    successfully \n");
                    m_streamWriter.WriteLine(DateTime.Now + " WCF: Stopped
                    successfully \n");

                }
            }
            catch (Exception ex)
            {
                m_streamWriter.BaseStream.Seek(0, SeekOrigin.End);
                m_streamWriter.WriteLine(DateTime.Now + " WCF: Error in
                closing Host : " + ex.Message + "\n");
            }
            finally
            {
                m_streamWriter.Flush();
                m_streamWriter.Close();
                m_streamWriter = null;
                fs.Close();
                fs = null;
            }
        }
    }
}
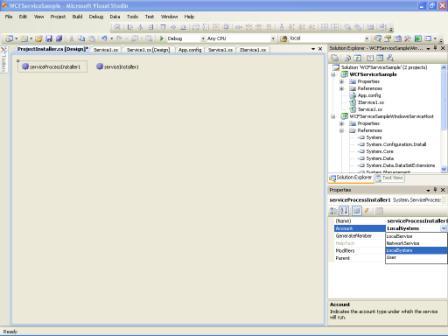
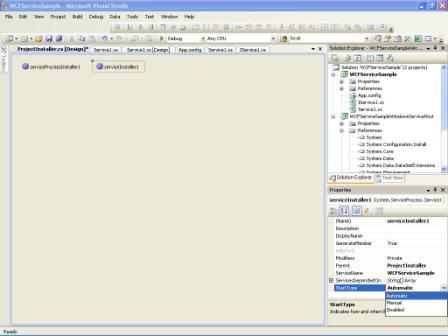
步骤 9:添加安装程序。它将添加服务进程安装程序和服务安装程序。服务进程安装程序负责服务帐户相关信息,服务安装程序负责服务相关信息,如 ServiceName、DisplayName、StartupType 等。
步骤 10:根据需要设置 ServiceProcessInstaller 属性。
步骤 11:根据需要设置 ServiceInstaller 属性,然后构建应用程序。
运行 Windows 服务
要运行 Windows 服务,我们必须安装 Windows 服务。安装 Windows 服务有两种选择。
- 使用 .NET Framework 的 InstallUtil 命令。
打开命令提示符并运行以下命令:
C:\WINDOWS\Microsoft.NET\Framework\v2.0.50727\InstallUtil.exe
D:\murali\projects\WCF Demo\SampleWCFService\WCFServiceHost\bin\Debug\
WCFServiceSampleWindowsServiceHost.exe
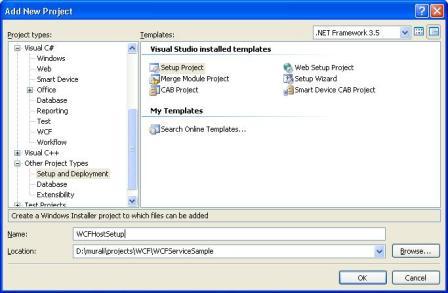
使用安装项目
使用安装项目安装 Windows 服务
步骤 1:添加安装项目
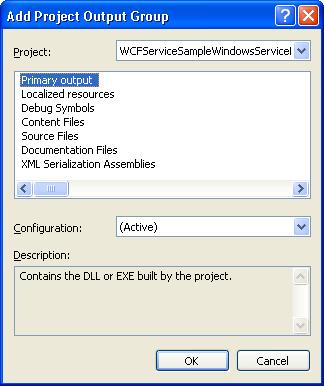
步骤 2:添加项目输出

步骤 3:选择“WCFServiceSampleWindowsServiceHost”作为主要输出。
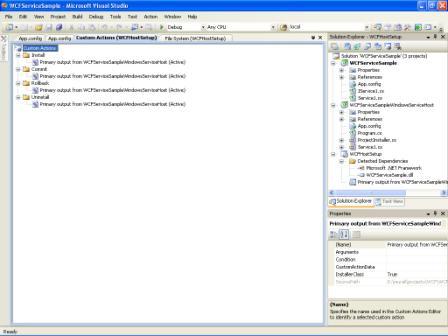
步骤 4:查看自定义操作
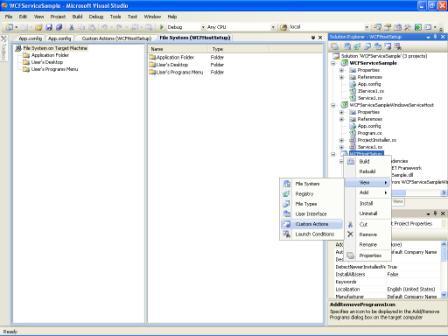
步骤 5:添加自定义操作
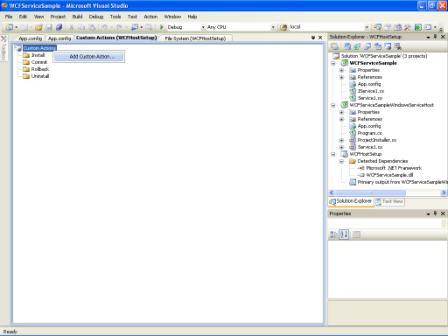
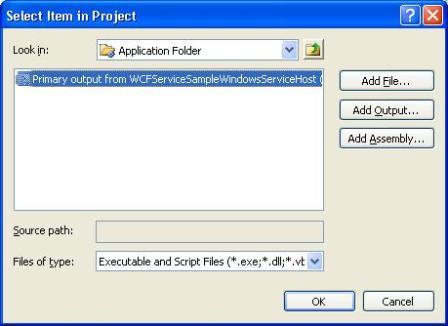
步骤 6:从安装项目的应用程序文件夹中选择主要输出
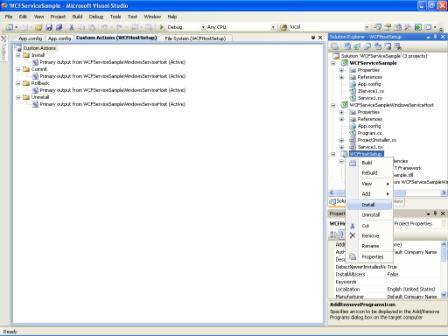
步骤 7:主要输出将自动添加到所有自定义操作的子文件夹中。现在构建安装应用程序。
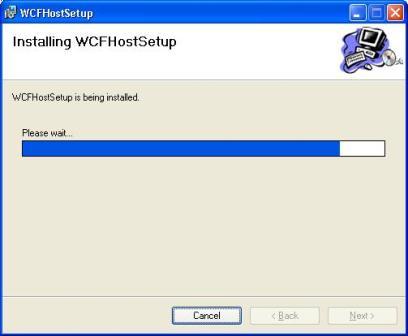
步骤 8:安装安装应用程序
步骤 9:它将显示安装向导,使用此向导我们将安装 Windows 服务。
步骤 10:现在通过“控制面板”->“管理工具”->“服务”打开“服务”。它将显示可用服务的列表。选择我们的“WCFServiceSample”服务并启动它。
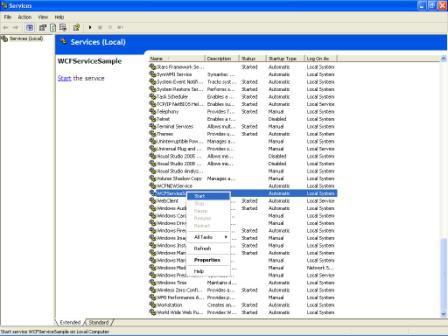
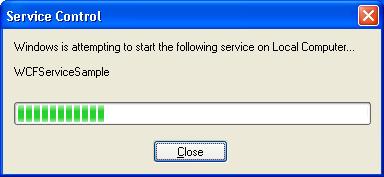
步骤 11:启动服务。
消费 WCF 服务
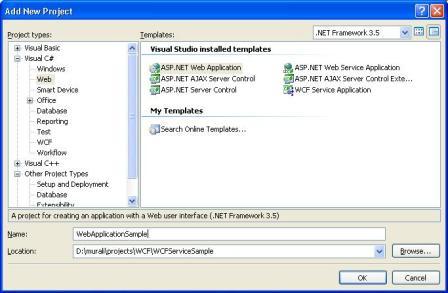
我们添加 ASP.NET Web 应用程序项目作为客户端。
步骤 1:添加 ASP.NET Web 应用程序项目
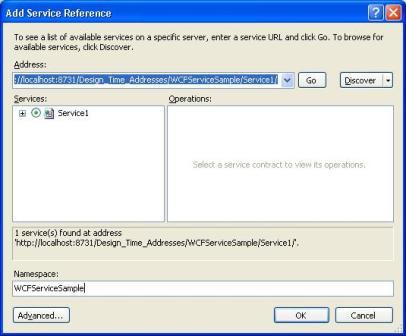
步骤 2:使用右键单击 Web 应用程序的“引用”,然后选择“添加服务引用”。添加服务地址,此地址与 App.Config 文件中定义的相同。键入所需的服务命名空间,然后按“确定”按钮。
步骤 3:已创建代理并将其添加到服务引用中,可以通过 WCFServiceSample 引用在应用程序中消费该服务。

使用 WCF 服务客户端
创建 WCF 客户端实例以按如下方式与 WCF 服务通信:
protected void btnGetData_Click(object sender, EventArgs e)
        {
            WCFServiceSample.Service1Client proxy =
             new WebApplicationSample.WCFServiceSample.Service1Client();
            lblOutput.Text =proxy.GetData(Convert.ToInt32(txtInput.Text));
        }

protected void btnGetCompData_Click(object sender, EventArgs e)
        {
            WCFServiceSample.Service1Client proxy =
              new WebApplicationSample.WCFServiceSample.Service1Client();
            WCFServiceSample.CompositeType compType =
              new WebApplicationSample.WCFServiceSample.CompositeType();
            compType.BoolValue = true;
            compType.StringValue = txtInput.Text;
            compType = proxy.GetDataUsingDataContract(compType);
            lblOutput.Text = compType.StringValue;
        }
运行 Web 应用程序
在给定的文本框中输入输入,然后按按钮获取输出。

结论
本文包含 WCF 简介、WCF 服务库示例、在 Windows 服务中托管 WCF 服务以及在 Web 应用程序中消费 WCF 服务。我将在下一篇文章中很快包含有关为不同类型的通信配置服务和客户端的详细信息。
历史
版本 1.0.0.0 包含初始代码,该代码包括 WCF 简介、WCF 服务库示例、在 Windows 服务中托管 WCF 服务以及在 Web 应用程序中消费 WCF 服务。