
Windows XP Tablet Ed.Windows VistaVisual Studio .NET 2003Windows 2003Visual Studio 2008.NET 1.1.NET 3.0Visual Studio 2005Windows 2000设计 / 图形架构师Windows XP.NET 2.0.NET 3.5C# 2.0初学者C# 3.0中级开发Visual StudioWindows.NETC#
设置和应用程序配置编辑器
4.42/5 (8投票s)
在应用设置和之后编辑配置文件。描述了递归节点解析和填充树视图控件。
引言
应用程序部署可能以多种方式发生,其中一种是安装过程。可以向安装过程中添加任何类型的脚本来修改应用程序设置。另一种方法是使用 UI 应用程序来更改配置设置。在本文中,我想展示如何操作 .config 文件或任何 XML 文档以更新其节点/属性值。
背景
此应用程序使用 TreeView、XML XPath、递归调用和控件调整大小。
使用代码
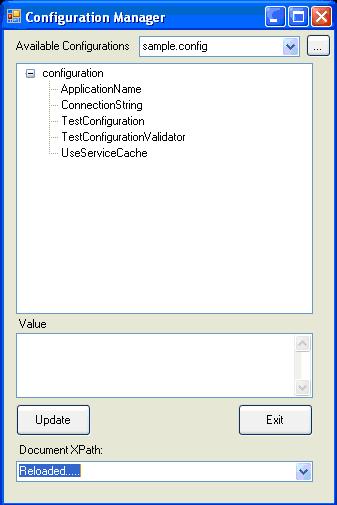
首先,让我们看看配置编辑器的 UI 是如何工作的。UI 应用程序在已安装的目录中查找扩展名为 .config 的任何文件
private void BindList() {
    try {
    string dir = string.IsNullOrEmpty(appDir) ? pplication.StartupPath : appDir;
    string[] confFiles = Directory.GetFiles(dir, "*.config");
    foreach (string fn in confFiles) {
       cbConfFiels.Items.Add(fn.Substring(fn.LastIndexOf('\\') + 1));
    }
    cbConfFiels.SelectedIndex = 0;
    } catch {
    cbConfFiels.SelectedIndex = -1;
    }
}
找到配置文件后,它将被解析并加载到树视图控件中
private void LoadConfigFileData() {
    tvNodes.Nodes.Clear();
    useXPath = false;
    cbNodes.Items.Clear();
    XPathDocument doc = null;
    try {
    appConfigFileName = localPath + "\\" + configFileName;
    XmlDocument xdoc = new XmlDocument();
    doc = new XPathDocument(appConfigFileName);
    } catch (IOException ioe) {
    string msg = configFileName + " is not found in this directory:" +
                 localPath + "\nSelect App.config file";
    MessageBox.Show(msg);
    doc = LoadCopyFile();
    }
    LoadDocument(doc);
    ReadNodes(appConfigFileName);
}
与此同时,当前配置文件的所有可用 XPath 将被加载到 XPath 下拉列表中
/// <summary>
/// Walk through document and pick up XPath to each node
/// </summary>
/// <param name="node"></param>
void GetNode(XmlNode node) {
    int index = xPath.Length;
    xPath.Append(node.Name + "/");
    //Console.Out.WriteLine("Parent: {0}\n", xPath.ToString());

    foreach (XmlNode n in node.ChildNodes) {
    //Console.Out.WriteLine("Node name:'{0}{1}'", n.Name,
    //    n.HasChildNodes == true ? "/" : "");
    if (n.NodeType == XmlNodeType.Element) {
        foreach (XmlAttribute at in n.Attributes) {
           //Console.Out.WriteLine("\tattribute:'{0}'
           //   value:'{1}'", at.Name, at.Value);
        }
        if (n.HasChildNodes) {
          GetNode(n);
        }
    }
    }
    //Remove last character '/'
    xPath.Remove(index, node.Name.Length + 1);
    try{
    if(!nodeNames.Keys.Equals(xPath.ToString())){
        string xpath = xPath.ToString();//.Substring(0, xPath.Length - 1);
        if (!xPath.ToString().Equals("//")) {
        nodeNames.Add(xPath.ToString(), xpath);
        }
    }
    }catch{}
}
通过从下拉列表中选择 XPath,它会将相应的节点加载到树视图中进行编辑。
private void cbNodes_SelectedIndexChanged(object sender, EventArgs e) {
    useXPath = true;
    string xpath = ((System.Windows.Forms.ComboBox)(sender)).Text + "*";
    XPathDocument xpDoc = new XPathDocument(appConfigFileName);
    XPathNavigator nav = xpDoc.CreateNavigator();
    XPathNodeIterator iter = nav.Select(xpath);
    iter.MoveNext();
    tvNodes.Nodes.Clear();

    string rootName = xpath.Remove(xpath.Length - 2);
    int lastIndexOf = rootName.LastIndexOf("/");
    rootName = rootName.Substring(lastIndexOf + 1, rootName.Length - lastIndexOf-1);
    XmlDocument doc = new XmlDocument();

    //Exit function no root found
    if (string.IsNullOrEmpty(rootName))
    return;

    //Add root element
    doc.LoadXml("<" + rootName + ">" +
                iter.Current.InnerXml + "</" +
                rootName + ">");

    XPathNavigator rootElement = doc.CreateNavigator().SelectSingleNode("/*");
    TreeNode root = new TreeNode(rootElement.LocalName);
    tvNodes.Nodes.Add(root);

    XmlNodeList addNodeList = appDoc.SelectNodes(xpath);

    //Recursive call to fill all nested nodes
    foreach (XmlNode node in addNodeList) {
    TreeNode eltNode = new TreeNode(node.Name);
    root.Nodes.Add(eltNode);
    if (node.HasChildNodes) {
        AddTreeNode(eltNode, node);
    }
    }
    tvNodes.ExpandAll();
}

通过单击树视图中的节点,所选节点的值将加载到值字段中,该字段可以被更新和保存。

 /// <summary>
/// Update @key attribute value in appSettings node
/// or route to generic fuction for attributes
/// </summary>
/// <param name="sender"></param>
/// <param name="e"></param>
private void btnUpdate_Click(object sender, EventArgs e) {
    if (!useXPath) {
    UnicodeEncoding uniEncoding = new UnicodeEncoding();
    XmlNode addNode = appDoc.SelectSingleNode("configuration/" +
                      "appSettings/add[@key='" + nodeToEdit + "']");
    XmlNode valueNode = addNode.SelectSingleNode("@value");
    valueNode.InnerText = txtValue.Text;
    StringBuilder sb = new StringBuilder(appDoc.InnerXml.Length);
    sb.Append(appDoc.InnerXml);
    File.WriteAllLines(appConfigFileName,
         new string[] { appDoc.InnerXml }, Encoding.UTF8);
    lblValue.Text += " - UPDATED";
    lblValue.ForeColor = Color.Blue;
    } else {
    UpdateXPath();
    }
}
/// <summary>
/// Update attribute value and save XML/Config document.
/// </summary>
private void UpdateXPath() {
    UnicodeEncoding uniEncoding = new UnicodeEncoding();
    XmlNode addNode = appDoc.SelectSingleNode(cbNodes.SelectedItem +
                      "/@" + nodeToEdit);
    XmlNode valueNode = addNode.SelectSingleNode(".");

    valueNode.Value = txtValue.Text;
    StringBuilder sb = new StringBuilder(appDoc.InnerXml.Length);
    sb.Append(appDoc.InnerXml);
    File.WriteAllLines(appConfigFileName,
       new string[] { appDoc.InnerXml }, Encoding.UTF8);
    lblValue.Text = nodeToEdit + " - UPDATED";
    lblValue.ForeColor = Color.Blue;
}
安装过程
创建安装项目后,将项目的主输出添加到安装过程的自定义操作中

将 CustomActionData 设置为 /dir="[TARGETDIR]\" – 此值或安装目录将作为参数传递给安装程序类

public override void Install(System.Collections.IDictionary stateSaver) {
    base.Install(stateSaver);
    Process();
}

private void Process() {
    string dir = "";
    try {
    //this is the value from setup project CustomActionData
    dir = this.Context.Parameters["dir"];
    MainForm mf = new MainForm(dir);
    mf.ShowDialog();
    mf.Close();
    } catch (Exception ex){
    StreamWriter sw = File.CreateText(dir + "SetupLog.txt");
    sw.WriteLine("Error log: " + DateTime.Now.ToLocalTime());
    if (this.Context.Parameters.Count > 0) {
        foreach (string s in this.Context.Parameters.Keys) {
        sw.WriteLine("parameter: " + s + " value: " +
                     this.Context.Parameters[s]);
        }
    }
    sw.WriteLine(ex.Message);
    sw.Flush();
    sw.Close();
    }
}
重写 Install 方法以获取对您的应用程序的引用非常重要。如果未指定安装目录,则 Application.StartupPath 将指向您的 windows\system32 目录。如果需要一个简单的编辑器/解析器,此 UI 将适用于任何 XML 文档。附加了完整的代码。App.config 文件在构建时被转换为 ExecutbleName.exe.config 文件。