
Craft Your Own Archiver 3 / 3
2.47/5 (5投票s)
本文解释如何使用 cake3 的线程支持。
本教程包含 3 个部分,
- 存档操作
- 文件列表、目录树和拖放
- 线程支持(本文)
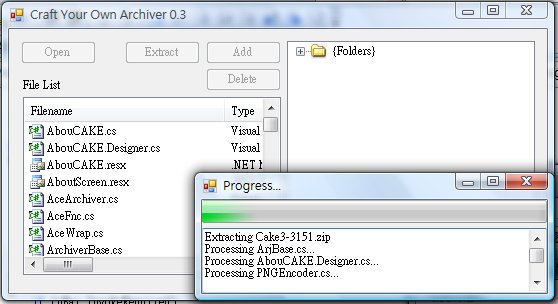
Craft Your Own Archiver 3
Windows 应用程序在启动时生成一个名为主线程的线程,在之前的 cyoa1 和 cyoa2 演示中,UI 和存档操作都在主线程中运行。由于一个线程一次只能运行一个执行序列,如果主线程被存档操作(通常需要很长时间)占用,它将无法处理 UI 工作,这将导致屏幕不更新(并且在标题栏中出现 [未响应])为了避免这个问题,cakdir3 有许多事件,因此当一个事件被调用时,它将逐个调用每个事件处理程序,它们会更新 UI 元素,然后当所有事件处理程序都被调用后,它会继续做其他工作。这提高了应用程序的响应速度,但是当存档操作正在进行时,应用程序仍然会滞后。
另一个解决方案是为存档操作生成一个新线程,由于 UI 和存档操作在不同的线程上运行,因此 UI 不受影响。
在一个线程中做某事
1) private void DoWork(object data)
2) { //Do Something ... }
.....
3) public void ThreadWork(object data)
4) {
5)   Thread newThread = new Thread(new ParameterizedThreadStart(DoWork));
6)   newThread.Start(data);
7) }
- 第 6 行,当被调用时,将在一个新线程中启动
DoWork()方法,除非您调用newThread.Join();,否则这不会阻塞当前线程。
由于主线程和新创建的线程是两个不同的线程,因此不应直接从新线程调用 UI 元素,而应该使用事件。
0.9) public EventHandler OnFinished;
1)   private void DoWork(object data)
2.1) {
2.2)    //Do Something ...
2.3)    if (OnFinished != null)
2.4)      OnFinished(this, new EventArgs());
2.5) }
...
3)   public void ThreadWork(object data)
4)   {
4.1)   OnFinished += new EventHandler(OnThreadFinished);
5)     Thread newThread = new Thread(new ParameterizedThreadStart(DoWork));
6)     newThread.Start(data);
7)   }
...
8)   public void OnThreadFinished(object sender, EventArgs e)
9)   {
0)     if (tbMessage.InvokeRequired)
a)       tbMessage.Invoke(new EventHandler(OnThreadFinished), new object[] { sender, e });
b)     else tbMessage.Text += "Finished" + Environment.NewLine;
c)   }
- 第 0-b 行,
InvokeRequired返回当前线程(运行代码的线程)是否不等于控件的线程(UI 线程)。
如果为真,它将使用控件的线程再次调用相同的事件,并且将再次调用InvokeRequired,它将返回 false。
如果为假,它将执行 UI 工作。
这就是如何对工作进行线程处理,但是 Cake3 有很多事件、操作,编写线程支持将非常耗时,因此我为此编写了一个组件。
Cake3 线程支持类 (命名空间 Cake3.Queue)
CakdirWorkItem:表示一个提取、添加或删除操作,本身支持线程处理。CakdirThreadQueue-CakdirWorkItem的一个先入先出队列。ThreadQueueMonitor- 用于查看CakdirThreadQueue的 WinForms 控件。
使用 CakdirWorkItem
1) private CakdirWorkitem workItem;
...
2) ExtractOptions extrOptions = new ExtractOptions(archiveName, extractTo, new string[] { "*" }, allowOverwrite, useFolder);
3) workItem = new CakdirWorkItem(extrOptions);
4) workItem.OnStopWorking += new EventHandler(WorkItem_StopWorking);
5) workItem.Start();
- 第 2 行,
ExtractOptions实际上与cakdir.ExtractOptions相同,您可以传递cakdir.ExtractOptions。 - 第 3 行,
CakdirWorkItem可以使用ExtractOptions、AddOptions或DeleteOptions作为参数创建。 - 第 4 行,
workItem具有所有cakdir事件(例如 startworking、stopworking、progress)记住在处理事件时必须使用上面提到的InvokeRequired。 - 第 5 行,
workItem.Start()将在新线程中运行该操作,如果要运行在同一线程中,请使用workItem.Run()。
使用 CakdirThreadQueue: (CakdirThreadQueue 未在演示中使用)
1) public CakdirThreadQueue CTQ;
...
2) CTQ = new CakdirThreadQueue();
3) CTQ.OnQueueChanged = new EventHandler(CTQ_QueueChanged);
...
4) CTQ.Enqueue(workItem);
...
5) public void CTQ_QueueChanged(object sender, EventArgs e)
6) {
7)   if (this.InvokeRequired)
8)     this.Invoke(new EventHandler(CTQ_QueueChanged), new object[] {sender, e});
9)   else
0)   if (CTQ.Count == 0)
a)     tbMessage.Text += "Finished";
b)   else tbMessage.Text += CTQ.Queue[0].LastMessage;
c) }
- 第 3 行,每次添加、启动、停止、删除 workItem 时都会调用
QueueChanged。 - 第 4 行,将把工作项添加到队列中,记住您不必调用
Start()方法,队列将在可用时自动启动它。
使用 ThreadQueueMonitor
将其拖放到您的表单 (queueMonitor),然后调用以下内容来链接 CakdirThreadQueue。
1) queueMonitor.RegisterThreadQueue(CTQ);
You may want to
write your own ThreadQueueMonitor based on Cakdir's one as well, source
code can be found under "Cake3 \ Queue \ ThreadQueueMonitor.cs".
操作方法
获取路径信息
string Current = Directory.GetCurrentDirectory();
string Desktop = Environment.GetFolderPath(Environment.SpecialFolder.DesktopDirectory);
string MyDocument = Environment.GetFolderPath(Environment.SpecialFolder.Personal);
string MyApplicationData = Environment.GetFolderPath(Environment.SpecialFolder.ApplicationData);
string System = Environment.GetFolderPath(Environment.SpecialFolder.System);
string Framework = System.Runtime.InteropServices.RuntimeEnvironment.GetRuntimeDirectory();
string Temp = System.IO.Path.GetTempPath();
string CurrentUserPath {  get { RegistryKey rKey = Registry.LocalMachine.OpenSubKey(@"SOFTWARE\Microsoft\Windows NT\CurrentVersion\ProfileList", false);
				string dir = Utils.AppendSlash((string)rKey.GetValue("ProfilesDirectory"));
				string userdir = dir + System.Environment.UserName + "\\";
				if (Directory.Exists(userdir)) return userdir;
				if (Directory.Exists(dir)) return dir;
                                return (new DirectoryInfo(Environment.GetFolderPath(Environment.SpecialFolder.Personal)).Parent.FullName); } }
string SharedPath  {  get {  RegistryKey rKey = Registry.LocalMachine.OpenSubKey(@"SOFTWARE\Microsoft\Windows NT\CurrentVersion\ProfileList", false);
                             string dir = (string)rKey.GetValue("Public");
                             if (Utils.DirectoryExists(dir)) return dir;
                             return Path.Combine(new DirectoryInfo(Environment.GetFolderPath(Environment.SpecialFolder.Personal)).Parent.Parent.FullName, "Public");  } }
string ProgramPath { get { System.Reflection.Assembly assembly;
			   assembly = System.Reflection.Assembly.GetExecutingAssembly();
			   if (assembly != null)
				return Path.GetPathRoot(assembly.Location);
			   else
			        return Path.GetPathRoot(System.Diagnostics.Process.GetCurrentProcess().MainModule.FileName)); } }
在 cakdir 中重命名文件或文件夹
private static void RenameFile(Cakdir3 cakdir, string fullPath, string newPath)
{
     string tempPath = Utils.NewTempPath("qzTemp");
     string basePath = Utils.AppendSlash(tempPath);

     cakdir.Extract(fullPath, tempPath, true, true);
     fullPath = Utils.RemoveFrontSlash(fullPath);
     newPath = Utils.RemoveFrontSlash(newPath);
     File.Copy(tempPath + fullPath, tempPath + newPath);

     cakdir.AddOptions.baseFolder = basePath;
     cakdir.AddOptions.addFile = new string[] { basePath + newPath };
     cakdir.AddOptions.addFolder = AddOptions.folderMode.relative;
     cakdir.Add();

     cakdir.Delete(fullPath);

     cakdir.List("*");
}

private static void RenameFolder(Cakdir3 cakdir, string fullPath, string newPath)
{
     string path = Utils.AppendSlash(fullPath);
     string lastPath = Utils.ExtractFileName(Utils.RemoveSlash(path));
     if (lastPath == newPath)
       return;

     string tempPath = Utils.NewTempPath("qzTemp");
     string basePath = Utils.AppendSlash(tempPath + Utils.RemoveFrontSlash(path));


     cakdir.Extract(path + "*", tempPath, true, true);
     cakdir.Delete(path + "*");
     cakdir.AddOptions.baseFolder = basePath;
     cakdir.AddOptions.addFile = new string[] { basePath + "*" };
     cakdir.AddOptions.addFolder = AddOptions.folderMode.relative;
     cakdir.AddToFolder(path.Replace("\\" + lastPath, "") + newPath);
     cakdir.List("*");
}
HotEdit (允许用户修改存档中的文件/路径,然后更新,实际上只是提取、显示一个对话框,然后添加。)
internal static void HotEdit(string archive, string path, string hotEditPath)
{
    string tempPath;
    if (hotEditPath != "")
    {
	Utils.RemoveFile(hotEditPath + path);
	tempPath = hotEditPath;
    }
    else tempPath = Utils.NewTempPath("qzTemp");

    Cakdir3 c3 = new Cakdir3(archive);
    c3.Extract(path, tempPath, true, true);
    path = Utils.RemoveFrontSlash(path);

    Utils.OpenDirectory(Utils.ExtractFilePath(tempPath + path));
    string msg = String.Format(
    	"HotEdit started, any changes to the following file will be updated to the archive when you pressed [OK]. \r\n" +
	"\r\n"+
        "Archive : {0}\r\n" +
	"File    : {1}\r\n\r\n" +
	"Press [OK] to stop monitoring.", archive, tempPath + path);
	MessageBox.Show(msg,  archive, MessageBoxButtons.OK, MessageBoxIcon.Warning, MessageBoxDefaultButton.Button1);

     c3.Add(tempPath + path, AddOptions.folderMode.relative, tempPath);
}
读取和写入 INI 文件:(下载 qzIniFiles__Cs_.zip - 2.45 KB )
IniFile = new QzIniFiles(iniFile);
IniFile["Section"]["Key"].Value = "aString";
IniFile["Section"]["Key1"].ValueAsInt = 1;
IniFile["Section"]["Key2"].ValueAsBool = true;
Debug.WriteLine(IniFile["Section"]["Key"].Value);
Debug.WriteLine(IniFile["Section"]["Key1"].ValueAsInt);
Debug.WriteLine(IniFile["Section"]["Key2"].ValueAsBool);

ArrayList strings = new ArrayList();
strings.Add("1");
strings.Add("2");
strings.Add("3");
IniFile.WriteStringList("Section", "List", strings);
ArrayList strings2 = IniFile.ReadStringList("Section","List"));
IniFile.UpdateFile();
创建快捷方式
在这里查看 here
获取任何文件的上下文菜单命令
internal static Hashtable PollShCmdList(string filename)
{
	Hashtable retVal = new Hashtable();
	if (filename != "")
	{
		string ext = Utils.ExtractFileExt(filename);
		if (ext == "") return retVal;

        	RegistryKey rk0 = Registry.ClassesRoot.OpenSubKey(ext, false);
		if (rk0 != null)
		{
			string ftype = (string)rk0.GetValue("");
			rk0.Close();

			if (ftype != null)
			{
				RegistryKey rk = Registry.ClassesRoot.OpenSubKey(ftype + "\\shell\\", false);
				if (rk != null)
				{
				string[] keys = rk.GetSubKeyNames();;
				rk.Close();

				foreach (string key in keys)
					if ((key.ToLower() != "printto") &&
					    (key.ToLower() != "runas") &&
					    (key.ToLower() != "file"))
						{
				RegistryKey rk1 = Registry.ClassesRoot.OpenSubKey(ftype + "\\shell\\" + key + "\\command", false);
				string cmdline = (string)rk1.GetValue("");
				rk1.Close();
				if (cmdline != "")
					retVal.Add(key, cmdline);
				}
			}

		}
		}
		if (retVal.Count == 0)
			retVal.Add("Open with...", "");
	}
	return retVal;
}
获取不存在文件的图标
[StructLayout(LayoutKind.Sequential)]
 internal struct SHFILEINFO
 {
            public IntPtr hIcon;
            public IntPtr iIcon;
            public uint dwAttributes;
            [MarshalAs(UnmanagedType.ByValTStr, SizeConst = 260)]
            public string szDisplayName;
            [MarshalAs(UnmanagedType.ByValTStr, SizeConst = 80)]
            public string szTypeName;
};
internal const uint SHGFI_ICON = 0x100;
internal const uint SHGFI_TYPENAME =0x400;
internal const uint SHGFI_LARGEICON = 0x0; // 'Large icon
internal const uint SHGFI_SMALLICON = 0x1; // 'Small icon
internal const uint SHGFI_SYSICONINDEX = 16384;
internal const uint SHGFI_USEFILEATTRIBUTES = 16;
[DllImport("shell32.dll")]
internal static extern IntPtr SHGetFileInfo(string pszPath, uint dwFileAttributes,
   ref SHFILEINFO psfi, uint cbSizeFileInfo, uint uFlags);

public static Icon GetSmallFileIcon(string fileName)
{
	SHFILEINFO shinfo = new SHFILEINFO();

	SHGetFileInfo(fileName, 0, ref shinfo,
              (uint)Marshal.SizeOf(shinfo),SHGFI_ICON |SHGFI_SMALLICON |
              SHGFI_SYSICONINDEX | SHGFI_USEFILEATTRIBUTES);
	return System.Drawing.Icon.FromHandle(shinfo.hIcon);
}

public static Icon GetLargeFileIcon(string fileName)
{
	SHFILEINFO shinfo = new SHFILEINFO();

	SHGetFileInfo(fileName, 0, ref shinfo,
	              (uint)Marshal.SizeOf(shinfo),SHGFI_ICON |
	              SHGFI_SYSICONINDEX | SHGFI_USEFILEATTRIBUTES);
	return System.Drawing.Icon.FromHandle(shinfo.hIcon);
}
延伸阅读
- .NET 中的线程处理初学者指南 (Sacha Barber)
- 托管预览处理程序框架
- Cake3 相关
历史
- 2008 年 12 月 5 日 - 首次提交到 CodeProject。
- 2008 年 12 月 14 日 - 添加 QzIniFiles,操作方法