
读取和渲染 PGM 和 PBM 图像
4.73/5 (9投票s)
一篇关于处理和渲染 P1 和 P2 位图图像的文章。
引言
你是否曾对市面上纷繁复杂的图像格式感到震惊(甚至有点害怕)?嗯,在我看来,只有一件事比令人困惑的图像格式更烦人,那就是……古老又令人困惑的图像格式。本文希望能理清其中两种格式——“P1”和“P2”类型的灰度和黑白图像,即稀有而又优美的 PBM 和 PGM 位图格式。
背景
PBM 格式
这种格式有许多使用相同扩展名的变体。现在,我们将要处理的是“P1”类型的图像。这种格式为图像中的每个像素存储一个简单的“1”或“0”,“1”表示白色,“0”表示黑色。例如:
#Comments Can Appear Here
P1
#Comments Can Appear Here
24 7
0 0 0 0 0 0 0 0 0 0 0 0 0 0 0 0 0 0 0 0 0 0 0 0
0 1 1 1 1 0 0 1 1 1 1 0 0 1 1 1 1 0 0 1 1 1 1 0
0 1 0 0 0 0 0 1 0 0 0 0 0 1 0 0 0 0 0 1 0 0 1 0
0 1 1 1 0 0 0 1 1 1 0 0 0 1 1 1 0 0 0 1 1 1 1 0
0 1 0 0 0 0 0 1 0 0 0 0 0 1 0 0 0 0 0 1 0 0 0 0
0 1 0 0 0 0 0 1 1 1 1 0 0 1 1 1 1 0 0 1 0 0 0 0
0 0 0 0 0 0 0 0 0 0 0 0 0 0 0 0 0 0 0 0 0 0 0 0
这是一个简单的 PBM 文件,内容是“FEEP”这个词。当它被渲染时,会生成一个 24x7 的图像,在黑色背景上显示白色字母。仔细看,你会看到用“1”拼出的字母。让我们来分解这个二进制数据块,看看各部分的作用。
以“#”开头的行
这些是注释行,它们只能(但不必)出现在标有“#Comments Can Appear Here”(#注释可在此处出现)的位置。不过,它们可以出现任意次数。例如:
#Comments Can Appear Here
#Comments Can Appear Here
P1
#Comments Can Appear Here
#Comments Can Appear Here
#Comments Can Appear Here
24 7
0 0 0 0 0 0 0 0 0 0 0 0 0 0 0 0 0 0 0 0 0 0 0 0
0 1 1 1 1 0 0 1 1 1 1 0 0 1 1 1 1 0 0 1 1 1 1 0
0 1 0 0 0 0 0 1 0 0 0 0 0 1 0 0 0 0 0 1 0 0 1 0
0 1 1 1 0 0 0 1 1 1 0 0 0 1 1 1 0 0 0 1 1 1 1 0
0 1 0 0 0 0 0 1 0 0 0 0 0 1 0 0 0 0 0 1 0 0 0 0
0 1 0 0 0 0 0 1 1 1 1 0 0 1 1 1 1 0 0 1 0 0 0 0
0 0 0 0 0 0 0 0 0 0 0 0 0 0 0 0 0 0 0 0 0 0 0 0
这完全是有效的。
第 2 行:图像的“幻数”
这行将该文件标识为单比特便携位图文件,除了表明文件类型外,没有其他作用。
第 4 行:图像尺寸
非常重要。这两个数字表示图像的简单宽度-高度尺寸(以像素为单位)。
第 5 行及以后:图像像素数据
这是描述图片本身的实际图像主体。
没那么复杂,对吧?
所以,看吧,这就是最简单的图像格式。它小巧、紧凑且易于渲染。但现在,我们将进入一个稍微复杂一点的领域……PGM 格式!
PGM 格式
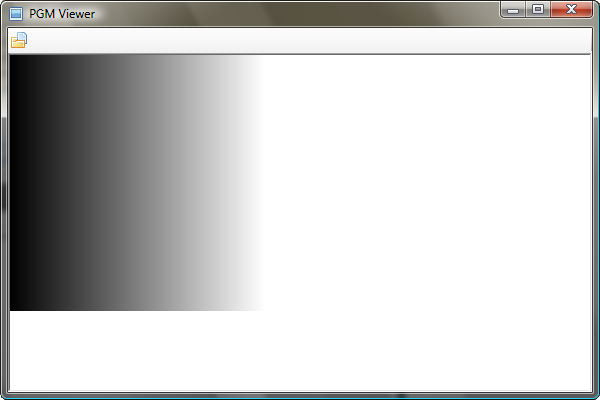
和之前一样,这种图像文件也有许多不同的类型,它们都使用相同或相似的扩展名。我们现在要处理的是“P2”类型。它和之前的格式非常相似,只是这一次,每个像素的值可以从 0 到所谓的“MBV”(或“最大亮度值”)。让我们来看一个文件:
#Comments Can Appear Here
P2
#Comments Can Appear Here
11 10
#Comments Can Appear Here
100
0 10 20 30 40 50 60 70 80 90 100
0 10 20 30 40 50 60 70 80 90 100
0 10 20 30 40 50 60 70 80 90 100
0 10 20 30 40 50 60 70 80 90 100
0 10 20 30 40 50 60 70 80 90 100
0 10 20 30 40 50 60 70 80 90 100
0 10 20 30 40 50 60 70 80 90 100
0 10 20 30 40 50 60 70 80 90 100
0 10 20 30 40 50 60 70 80 90 100
0 10 20 30 40 50 60 70 80 90 100
这个文件是一个简单的水平渐变,从左到右逐渐变亮。但是,让我们把它分解一下,以便更清楚地理解它。
以“#”开头的行
如前所述,这些是注释行。
第 2 行:图像的“幻数”
如前所述,“幻数”用于标识图像像素数据所使用的文件格式。
第 4 行:图像尺寸
一个简单的宽度-高度图像尺寸,描述了图像主体的大小。
第 6 行:MBV(最大亮度值)
这个数字描述了图像主体中每个像素的最大亮度值(0 - 255)。然而,在“P1”类型的 PBM 格式中,文件头没有这一部分,原因很简单,因为每个像素的颜色要么是白色,要么是黑色。
第 7 行及以后:图像像素数据
如前所述,这是将被渲染的实际图像位图数据。
那么,我们该如何渲染这些格式呢?
渲染这些格式并非易事。任何类型的图像渲染都不简单。但是,这可以说是最简单的一种,因为它以原始、未压缩的纯文本数据形式存储在磁盘上,使得解析更加容易。
Using the Code
使用 UserControl 比编写类更容易
微软迄今为止最好的想法之一,就是为 Visual Studio 添加了 UserControl 功能。这让我们能够创建一个外观精美的控件,而无需编写大量繁琐的代码。现在,我们可以在我们都已熟知并喜爱的窗体设计器中设计功能齐全的控件。
首先,在 Visual Studio 中创建一个新的类库项目。然后,删除默认的“Class1”,点击“添加新项”,然后选择“UserControl”。
将一个 PictureBox 拖到控件上,将其命名为 DisplayPanel,然后我们就可以开始了!
在附加的 VB UserControl 中,有三个主要函数。它们是:
OpenFile(ByVal FilePath As String)- 打开一个文件,解析图像头,并将图像数据存储在内存中。DrawToCanvas()- 将图像数据绘制到PictureBox上。实际的渲染过程在这里发生。PurgeGlobalData()- 完全清除全局变量,使控件准备好打开另一个文件。
作为整个控件核心的全局变量用于在函数之间传递数据:
Private CurrentBitmap As New Bitmap(25, 25)- 保存要在PictureBox中显示的Bitmap。Private CurrentFile As String = ""- 保存当前图片的图像主体。Private CurrentFilePath As String = ""- 保存当前图像的文件路径。Public ImageType As String = ""- 保存图像的“P1”或“P2”类型。Private CurrentX As Integer = 0- 保存用于渲染的当前列的索引号。Private CurrentY As Integer = 0- 保存用于渲染的当前行的索引号。Private ImageHeight As Integer = 0- 保存当前图像的高度。Private ImageWidth As Integer = 0- 保存当前图像的宽度。Public ImageMaxGreyValue As Integer = 255- 保存图像的 MBV。
首先,PurgeGlobalData() 函数只是将所有这些值重置为其默认值:
Private Function PurgeGlobalData() As Boolean

    CurrentBitmap = New Bitmap(25, 25)
    DisplayPanel.Image = Nothing
    CurrentX = 0
    CurrentY = 0
    ImageHeight = 0
    ImageWidth = 0
    ImageMaxGreyValue = 255
    CurrentFile = ""
    CurrentFilePath = ""
    ImageType = ""

End Function
这很简单,所以让我们来看看 OpenFile() 函数。它逐行从提供的文件路径中读取数据,并单独解析图像头中的每一行,然后将像素数据读入 CurrentFile 变量,以便 DrawToCanvas() 可以渲染它。
Public Function OpenFile(ByVal FilePath As String) As Boolean
    Try
    'Check For Invalid File Paths [

        If FilePath = "" Then
            Return False
            Exit Function
        End If

        If Not My.Computer.FileSystem.FileExists(FilePath) Then
            Return False
            Exit Function
        Else
            CurrentFilePath = FilePath
        End If

    ']

    'Set Up A StreamReader, Buffer, And Array For Our Data [

        Dim ImageStreamReader As New StreamReader(FilePath)
        Dim LineBuffer As String
        Dim ExtractDimensions As Array

    ']

    PurgeGlobalData() ‘Empty The Global Variables

    'Skip Over Comment Lines [

        LineBuffer = "#"
        Do While LineBuffer.StartsWith("#")
            LineBuffer = ImageStreamReader.ReadLine()
        Loop

    ']

    'Get The Image Type [

    If LineBuffer.StartsWith("P2") Then
        ImageType = "P2"
    ElseIf LineBuffer.StartsWith("P1") Then
        ImageType = "P1"
    Else
        ImageStreamReader.Close()
        Return False
        Exit Function
    End If

    ']

    'Skip Over Comment Lines [

        LineBuffer = "#"
        Do While LineBuffer.StartsWith("#")
            LineBuffer = ImageStreamReader.ReadLine()
        Loop

    ']

    'Read In The Height And Width And Split Them Up [

        ExtractDimensions = LineBuffer.Split(" ")
        ImageHeight = Val(ExtractDimensions(1))
        ImageWidth = Val(ExtractDimensions(0))

    ']

    'Assign This Height And With To the Picture Box [

        DisplayPanel.Width = ImageWidth
        DisplayPanel.Height = ImageHeight

    ']

    'Resize The Bitmap [
    CurrentBitmap = New Bitmap(ImageWidth, ImageHeight)
    ']

    'If It's A P2 Image, Skip Comments and Read MBV
    If ImageType = "P2" Then

        LineBuffer = "#"
        Do While LineBuffer.StartsWith("#")
            LineBuffer = ImageStreamReader.ReadLine()
        Loop

        ImageMaxGreyValue = Val(LineBuffer)

    End If

    ']

    'Read In The Image Data And Close The File [
        CurrentFile = ImageStreamReader.ReadToEnd
        CurrentFile = CurrentFile.Replace(vbNewLine, " ")
        ImageStreamReader.Close()
    ']

    'Begin Rendering Image [
        DrawToCanvas()
    ']

    Catch MyException As Exception
        PurgeGlobalData() ‘Reset Globals
        Return False
    End Try

    Return True

End Function
我们遇到的第一个问题是注释。它们确实会妨碍任何内容的解析,包括图像。我们可以通过一个简单的循环来绕过这个问题,该循环从 StreamReader 读取输入,直到遇到不以“#”开头的行为止。
Dim LineBuffer As String = "#"

Do While LineBuffer.StartsWith("#")
    LineBuffer = ImageStreamReader.ReadLine()
Loop
其余部分相当直观,注释应该能清楚地说明发生了什么。然而,DrawToCanvas() 函数要稍微复杂一些:
Private Function DrawToCanvas() As Boolean
    Try
       Dim NewString As String = CurrentFile.Replace(Chr(13), " ")
       'Remove NewLine Characters

       Dim ColorArray As Array = NewString.Split(" ")
       'Split Image Data into Pixel Values

       Dim ColorArrayFiltered As New ArrayList
       'An Array List To Hold Our Inamage Data With All Spaces Removed

       Dim Counter As Integer = 0 ‘A Counter To Count Repetitions
       'Remove Duplicate Spaces [

       Dim NewCounter As Integer = 0

       Do Until NewCounter = ColorArray.Length

         If Not ColorArray(NewCounter).ToString.Length = 0 Then
             ColorArrayFiltered.Add(ColorArray(NewCounter))
         End If

         NewCounter += 1

       Loop

       ']

        'Sort Out The Image Types
        If ImageType = "P2" Then

            'Loop Through File [
            Do Until Counter = ColorArray.Length

                'Move To Next Line [
                If CurrentX = DisplayPanel.Width Then
                    CurrentX = 0
                    CurrentY += 1
                End If
                ']

                'Get Ready To Exit [
                If CurrentY = DisplayPanel.Height Then
                    Exit Do
                End If
                ']

                'Set A Pixel [
                CurrentBitmap.SetPixel(CurrentX, CurrentY, _
                   Color.FromArgb(255, Val( ColorArrayFiltered(Counter).ToString), _
                   Val(ColorArrayFiltered(Counter).ToString), _
                   Val(ColorArrayFiltered(Counter).ToString)))
                ']

                'Update Tracking Variables [
                CurrentX += 1
                Counter += 1
                ']

            Loop
            ']

            'Assign Picture To PictureBox [
            DisplayPanel.Image = CurrentBitmap
            ']

        ElseIf ImageType = "P1" Then

            'Loop Though Array [
            Do Until Counter = ColorArray.Length

                'Move To Next Line [
                If CurrentX = DisplayPanel.Width Then
                    CurrentX = 0
                    CurrentY += 1
                End If
                ']

                'Get Ready To Exit [
                If CurrentY = DisplayPanel.Height Then
                    Exit Do
                End If
                ']

                'Set A Pixel [


                'Set A Black Pixel [
               If ColorArrayFiltered(Counter).ToString = "0" Then
                    CurrentBitmap.SetPixel(CurrentX, _
                          CurrentY, Color.FromArgb(255, 0, 0, 0))
               End If
                ']

                'Set A White Pixel [
               If ColorArrayFiltered(Counter).ToString = "1" Then
                    CurrentBitmap.SetPixel(CurrentX, _
                            CurrentY, Color.FromArgb(255, 255, 255, 255))
               End If
                ']

                ']

                'Update Positioning Variables [
                CurrentX += 1
                Counter += 1
                ']

            Loop
            ']

            'Assign Picture To PictureBox [
            DisplayPanel.Image = CurrentBitmap
            ']

        Else

            'Exit [
            Return False
            Exit Function
            ']

        End If

    Catch MyException As Exception

        'Return A Failure [
        PurgeGlobalData() 'Clear Globals
        Return False
        ']

    End Try

    'Return A Success [
    Return True
    ']

End Function
尽管注释很清楚地解释了这个函数,但同样显而易见的是,这并非渲染图像文件的最有效方法,但我已尽力使其保持清晰,以便更清楚地展示将每个像素的值绘制到位图的过程。
这个函数的过程非常简单:
- 从保存每个像素值的数组中删除所有双重、三重、四重等空格。
- 将数据分割成一个数组以便单独处理。
- 循环遍历数组,并将每个像素绘制到位图上。
- 将位图分配给
PictureBox。
大功告成!
现在,我们已经创建了一个能够渲染这些格式的用户控件,希望这个控件在未来某个时候对您有所帮助。它非常轻量级,并且能够检测图像的“幻数”并相应地调整渲染方法。通过本文以及代码中的注释和清晰的方法,您将看到图像渲染可以如此简单!祝您好运!
致谢
- 非常感谢 Mark James 的 Silk Icon Pack(在演示应用程序中使用)。请访问他的网站 这里。
历史
- 08年12月13日 - 文章于 18:09 提交