从对话框获取用户输入 - 第二部分
4.69/5 (9投票s)
关于通过使用对话框获取用户输入的文章。
引言
本系列两篇文章的前一篇 《从对话框获取用户输入 - 第一部分》 演示了从用户那里获取单个数据的方法。本文将尝试为多个数据项执行相同的操作。
示例解决方案包含四个项目
这四个项目都处理“复杂”的用户输入,即获取一个以上的信息。
Account 类
本文中的所有示例都使用一个相当简单的类,名为 Account,代码如下:
[Serializable]
public class Account
{
	private string accountNumber;
	private string accountHolder;
	private decimal balance;

	protected Account()
	{
		// deliberately empty
	}

	public Account(string number, string holder, decimal balance)
	{
		this.accountNumber = number;
		this.accountHolder = holder;
		this.balance = balance;
	}

	public Account Clone()
	{
		System.Runtime.Serialization.Formatters.Binary.BinaryFormatter
			binFormatter = new System.Runtime.Serialization.Formatters.
			Binary.BinaryFormatter(null,
			new StreamingContext(StreamingContextStates.Clone));
		using (System.IO.MemoryStream accountStream =
					new System.IO.MemoryStream())
		{
			binFormatter.Serialize(accountStream, this);
			accountStream.Seek(0, System.IO.SeekOrigin.Begin);
			Account result =
				(Account)binFormatter.Deserialize(accountStream);
			return result;
		}
	}

	public Account ShallowClone()
	{
		return (Account)this.MemberwiseClone();
	}

	public static Account Clone(Account account)
	{
		return account.Clone();
	}

	public override string ToString()
	{
		return this.accountNumber + ", " + this.AccountHolder;
	}

	#region Account PROPERTIES ...............................
	public static Account Empty
	{
		get
		{
			return new Account(string.Empty, string.Empty, 0.00M);
		}
	}

	public string AccountNumber
	{
		get
		{
			return this.accountNumber;
		}

		set
		{
			if (this.accountNumber != value)
			{
				this.accountNumber = value;
			}
		}
	}

	public string AccountHolder
	{
		get
		{
			return this.accountHolder;
		}

		set
		{
			if (this.accountHolder != value)
			{
				this.accountHolder = value;
			}
		}
	}

	public decimal Balance
	{
		get
		{
			return this.balance;
		}

		set
		{
			if (this.balance != value)
			{
				this.balance = value;
			}
		}
	}

	#endregion Account PROPERTIES
}
Account 有三个 private 成员,其中两个是 string 类型...
accountNumberaccountHolder
... 和一个 decimal 类型
balance
这些都有一个与之关联的 public 属性。所有属性碰巧都既是访问器又是设置器,但这与本示例无关。
Account 唯一有趣的地方在于 Clone() 方法。它使用一种将数据复制到内存然后通过再次读取数据来返回新实例的技术。通过使用这种技术,您可以获得所谓的对象的深拷贝。对于使用这种方法克隆大型或复杂对象,已经提出了一些担忧,但对于像 Account 这样的小类,它是可以的,并且具有额外的优点,即它使用内存,因此速度非常快。
您可能还会注意到有一个 static Clone() 方法。如果您仔细考虑,很难设想该方法可能被使用的场景。为了使用它,您必须有一个 Account 实例作为参数传递,如果您有一个实例,您可以调用实例上的 Clone() 方法...
newAccount = exampleAccount.Clone();
... 而不是
newAccount = Account.Clone(exampleAccount);
我保留它是因为它起到了警告的作用。当我“设计”Account 类时大约是凌晨 3 点,我可能,仅仅是可能,喝了一两杯琥珀色的液体。所以,永远、永远、永远不要在疲惫和/或情绪激动时进行任何编码!
VerySimpleComplexDialog 示例
主窗体
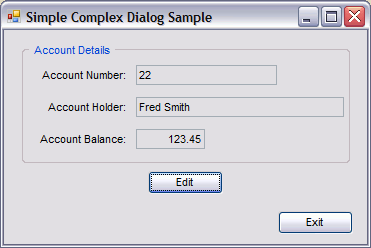
如下所示
这是代码
public partial class VerySimpleComplexDialogMainForm : Form
{
	// Declare an Account to use for the example
	private Account exampleAccount = null;

	// Constructor
	public VerySimpleComplexDialogMainForm()
	{
		InitializeComponent();

		// set up an example Account instance
		exampleAccount = new Account("22", "Fred Smith", 123.452M);
		// Update the display
		this.RefreshExampleAccount();
	}

	private void btnEdit_Click(object sender, EventArgs e)
	{
			// Create an instance of the dialog with the Account
			// created in the constructor.
			using (AccountDialog dlg = new AccountDialog(exampleAccount))
			{
				// and display it modally.
				dlg.ShowDialog();

				// No need to check for OK or Cancel because the
                                     // dialog takes care of returning the appropriate
                                     // account.
				this.exampleAccount = dlg.ResultAccount;
			}

			// Refresh account details
			this.RefreshExampleAccount();
	}

	private void RefreshExampleAccount()
	{
		// Simply copy exampleAccount data into the TextBoxes.
		this.txtAccountNumber.Text = this.exampleAccount.AccountNumber;
		this.txtAccountHolder.Text = this.exampleAccount.AccountHolder;
		this.txtAccountBalance.Text =
			this.exampleAccount.Balance.ToString("F2");
	}

	private void btnExit_Click(object sender, EventArgs e)
	{
		// Er.........., go on, take a guess.
		this.Close();
	}
}
窗体上的 TextBoxes 被设置为只读,这仅仅是为了本示例的目的。由于它们未连接到 exampleAccount,因此允许输入没有意义。在类定义开头声明了一个 Account 实例,在本示例中,它在构造函数中初始化。如果这是一个真实世界的情况,它可能已从数据库、XML 文件、Excel 或其他任何地方获得。当用户单击“编辑”按钮时,Click event handler 使用与系列 第一部分 中的第二个示例相同的技术来显示对话框,但以不同的方式实现。
注意
// Create an instance of the dialog with the Account
// created in the constructor.
using (AccountDialog dlg = new AccountDialog(exampleAccount))
{
	// and display it modally.
	dlg.ShowDialog();

	// No need to check for OK or Cancel because the dialog
	// takes care of returning the appropriate account.
	this.exampleAccount = dlg.ResultAccount;
}
这使用了“using”语句。该语句正常工作所需的一切就是被实例化的对象实现了 IDisposable 接口,而 Form 确实实现了。严格来说,Form 的两个远房祖先 ScrollableControl 实现了该接口,Form 继承了该实现。如果您使用的对象没有实现 IDisposable,您将收到一个编译时错误,告知您这一点。
为什么使用“using”?很简单,我无法比引用 MSDN 帮助中的定义更好地解释它。
通常,当您使用 IDisposable 对象时,您应该在 using 语句中声明并实例化它。using 语句会以正确的方式调用对象上的 Dispose 方法,并且(当您像上面那样使用它时)它还会导致对象在 Dispose 被调用后立即超出范围。在 using 块内,对象是只读的,不能被修改或重新分配。
这消除了检查对话框是否仍在那里并随后对其进行处理的需要。还有什么比这更好的?绝对是确保对象被处理的最安全的方法。
我之所以特别关注这一点,有两个原因:
这是正确的方法。当我最初在 VS2003 时代编写第一部分的代码时,我还没有发现“using”语句,如果我发现了,它将为我节省许多其他项目中的麻烦。然而,这一切都是学习过程的一部分。
在 第一部分 在 CodeProject 上发布后,一位目光敏锐的 CP 用户 Michal Blazejczyk 注意到了糟糕的代码,并善意地给我发了消息。多谢 Michal!
主窗体真的就只有这些了。
对话框窗体
如下所示
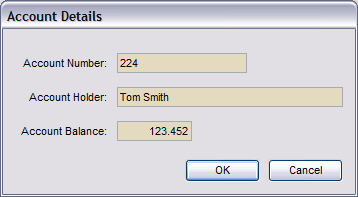
这是一个相当典型的对话框,其设计与系列 第一部分 中的对话框完全相同。
最明显的区别在于,它为 Account 中的每个字段都有一个输入控件,而不是 第一部分 中的对话框使用的单个 TextBox。
这是代码
/// <summary>
/// Summary description for AccountDialog.
/// </summary>
public partial class AccountDialog : System.Windows.Forms.Form
{
	private Account resultAccount;

	protected AccountDialog()
	{

		//
		// Required for Windows Form Designer support
		//
		InitializeComponent();

		//
		// TODO: Add any constructor code after InitializeComponent call
		//
	}

	public AccountDialog(Account account)
		: this()
	{
		Initialize(account);
	}

	private void Initialize(Account account)
	{
		// Save a reference to the account in case of Cancel
		this.resultAccount = account;
		// Update display
		this.DisplayAccount(account);
	}

	private void DisplayAccount(Account account)
	{
		this.txtAccountNumber.Text = account.AccountNumber;
		this.txtAccountHolder.Text = account.AccountHolder;
		this.txtBalance.Text = account.Balance.ToString();
	}

	#region AccountDialog PROPERTIES ...........................
	/// <summary>
	/// Public getter for access from calling Form
	/// </summary>
	public Account ResultAccount
	{
		get
		{
			return resultAccount;
		}
	}
	#endregion

	private void btnOK_Click(object sender, EventArgs e)
	{
		// User is satisfied with edits, so change resultAccount
		// to reflect changes.
		decimal newBalance = 0.00M;
		decimal.TryParse(this.txtBalance.Text, out newBalance);
		this.resultAccount = new Account(this.txtAccountNumber.Text,
			this.txtAccountHolder.Text,
			newBalance);
	}
}
默认构造函数的访问修饰符已更改为 protected,因此必须使用另一个构造函数。此构造函数需要一个 Account 实例作为参数。对于本示例,使用了已初始化的实例,但如果需要启动一个新的 Account,可以这样使用...
dlg = new AccountDialog(Account.Empty);
... 甚至...
dlg = new AccountDialog(null);
... 并像这样修改 AccountDialog 构造函数:
public AccountDialog(Account account)
	: this()
{
	if (account == null)
	{
		Initialize(Account.Empty);
	}
	else
	{
		Initialize(account);
	}
}
请记住,此示例仅用于演示获取用户输入的整体技术,而不是如何设计类、编码风格或其他任何内容。发挥您的想象力,使用 Google,使用 MSDN,玩得开心。
构造函数将工作转交给 Initialize() 方法。此方法将传入实例的引用存储在 resultAccount 中,因此 resultAccount 和传入的 Account 实例指向相同的数据。然后,它使用传入实例中的数据更新显示控件。从这里开始,一切都取决于用户。他/她可以在单击“确定”或“取消”之前根据需要修改数据。由于本文仅用于演示技术,因此代码中的数据验证非常少。例如,通过在 Balance TextBox 中输入非数字数据,很容易导致此应用程序出现异常。因为输入控件既未链接到传递给对话框的 Account 实例,也未链接到 resultAccount,所以原始数据仍然存在。因此,如果用户“取消”,则无需执行任何操作。如果他们单击“确定”或按 Enter 键,则会创建一个使用输入控件值的新的 Account 实例,并将其引用存储在 resultAccount 中。当控件返回到主窗体时,通过 public ResultAccount 属性访问 resultAccount 的值,从而实现“秘密”(参见 第一部分),并显示新值。如果用户未更改任何数据,则返回的值与传入的值相同,无论他/她按了“确定”还是“取消”。如果用户修改了数据并按了“取消”,则返回原始数据,但如果他/她按了“确定”,则返回新数据。
自己研究的主题
- 深拷贝
- 浅拷贝
Object.Clone()方法
SimpleComplexDialog 示例
此示例中的两个窗体在视觉上与上一个示例相同。然而,代码不同,因为此示例使用不同的数据访问方法,即 数据绑定。
主窗体
代码
public partial class SimpleComplexDialogMainForm : Form
{
	// Account instance for use in example.
	private Account exampleAccount = null;

	public SimpleComplexDialogMainForm()
	{
		InitializeComponent();

		// set up the example Account instance
		exampleAccount = new Account("22", "Fred Smith", 123.452M);

		// Update the display
		this.RefreshExampleAccount();
	}

	private void RefreshExampleAccount()
	{
		if (this.exampleAccount != null)
		{
			// Simply copy exampleAccount data into the TextBoxes.
			this.txtAccountNumber.Text =
				this.exampleAccount.AccountNumber;
			this.txtAccountHolder.Text =
				this.exampleAccount.AccountHolder;
			this.txtAccountBalance.Text =
				this.exampleAccount.Balance.ToString("F2");
		}
	}

	private void btnEdit_Click(object sender, EventArgs e)
	{
			// If exampleAccount is null, for some reason,
			// make it an empty account.
			if (this.exampleAccount == null)
			{
				this.exampleAccount = Account.Empty;
			}

			// Create a clone of the account, in case of cancel.
			Account oldAccount = exampleAccount.Clone();

			// Create an instance of the dialog with the Account
			// created in the constructor.
			using (AccountDialog dlg = new AccountDialog(exampleAccount))
			{
				// No need to check for OK, just Cancel because the
                                     // dialog updates exampleAccount automatically.
				// Display it modally.
				if (dlg.ShowDialog() != DialogResult.OK)
				{
					this.exampleAccount = oldAccount;
				}
			}
			// Refresh account details, on return
			// from dialog.
			this.RefreshExampleAccount();
	}

	private void btnExit_Click(object sender, EventArgs e)
	{
		this.Close();
	}
}
与上一个示例相比,主要区别出现在“编辑”按钮的事件处理程序中。首先,进行检查以确保 exampleAccount 不为 null(参见 对话框窗体 描述以了解原因),对示例数据进行 Clone() 并将其存储在 Account 实例 oldAccount 中。其次,使用 exampleAccount 作为 参数 创建一个 AccountDialog 实例。第三,模态 显示新的对话框实例,同时检查非 OK 结果。如果 DialogResult 为 OK,则无需执行任何操作,因为对话框中使用的 Account是exampleAccount,因此在对话框中进行的任何更改都会神奇地出现在主窗体中。另一方面,如果用户取消,恰恰因为任何更改都会自动在主窗体中注册,我们必须将 exampleAccount 替换为方法开始时获取的原始数据副本...
this.exampleAccount = oldAccount;
... 并使用以下内容刷新显示:
this.RefreshExampleAccount();
主窗体的内容就是这些了。
对话框窗体
代码
public partial class AccountDialog : Form
{
	// Declare a BindingSource instance.
	private System.Windows.Forms.BindingSource accountBindingSource = null;

	/// <summary>
	/// Default Constructor
	/// access modifier changed to protected.
	/// </summary>
	protected AccountDialog()
	{
		InitializeComponent();

		this.accountBindingSource =
			new System.Windows.Forms.BindingSource();
	}

	/// <summary>
	/// Only accessible constructor.
	/// </summary>
	/// <param name="account"></param>
	public AccountDialog(Account account)
		: this()
	{
		if (account == null)
		{
			throw new ArgumentNullException("account");
		}
		Initialize(account);
	}

	private void Initialize(Account account)
	{
		// Set the bindingSource up
		this.accountBindingSource.DataSource = account;
	}

	private void AccountDialog_Load(object sender, EventArgs e)
	{
		this.txtBalance.DataBindings.Add(new System.Windows.Forms.Binding
			("Text", this.accountBindingSource, "Balance", true));
		this.txtAccountHolder.DataBindings.Add
		    (new System.Windows.Forms.Binding
		    ("Text", this.accountBindingSource, "AccountHolder", true));
		this.txtAccountNumber.DataBindings.Add
		    (new System.Windows.Forms.Binding
		    ("Text", this.accountBindingSource, "AccountNumber", true));
		this.txtAccountNumber.Select();
	}
}
代码中首先要注意的一点是,它比上一个示例要短一些。这主要是因为使用数据绑定免去了对 Account 的 public 访问器的需要。
代码中最先注意到的是一个 BindingSource 实例 accountBindingSource 的声明。
默认构造函数被修改为具有 protected访问修饰符,并且除了标准的 InitializeComponent() 之外,还实例化了 accountBindingSource。
一个带有 Account 参数的新 public 构造函数是对话框唯一可访问的构造函数。重要的是要注意,您不能将 null 作为参数传递,因为 accountBindingSource 将在运行时引发 ArgumentException,所以我添加了一个条件测试,以在找到 null 时引发 exception。最好是由您来控制在您知道可能发生的情况下引发 Exceptions,而不是将其留给系统。
与之前一样,构造函数将账户传递给 Initialize(Account account) 方法。在此示例中,此方法仅将 accountBindingSource 的 DataSource 属性 设置为传入的账户。
然后,当对话框加载时,在 AccountDialog_Load() 事件处理程序 中,三个输入控件被连接到 accountBindingSource。这意味着用户在对话框中所做的任何更改都会自动注册到传递给对话框的 Account 中。如前所述,这个 Account 实例与主窗体中的实例(exampleAccount)相同,因此 exampleAccount 也包含更改。所有这些都由 数据绑定 自动完成。
自己研究的主题
- 数据绑定
BindingSource组件- 异常
ComplexDialog 示例
此示例本质上与上一个示例相同,因为它使用了 数据绑定。不同之处在于它使用了系列 第一部分 中第三个示例的方法,将显示对话框的责任委托给对话框本身。
主窗体
这是代码
public partial class ComplexDialogMainForm : Form
{
	private Account exampleAccount = null;

	public ComplexDialogMainForm()
	{
		InitializeComponent();

		this.exampleAccount = new Account("22", "Fred Smith", 123.425M);

		this.DisplayAccount();
	}

	private void DisplayAccount()
	{
		this.txtAccountNumber.Text = this.exampleAccount.AccountNumber;
		this.txtAccountHolder.Text = this.exampleAccount.AccountHolder;
		this.txtAccountBalance.Text =
			this.exampleAccount.Balance.ToString();
	}

	private void btnEdit_Click(object sender, EventArgs e)
	{
		Account accountStore = this.exampleAccount.Clone();
		if (AccountDialog.Show(this.exampleAccount) != DialogResult.OK)
		{
			this.exampleAccount = accountStore;
		}

		this.DisplayAccount();
	}

	private void btnExit_Click(object sender, EventArgs e)
	{
		this.Close();
	}
}
它比上次更短。唯一值得注意的代码是显示对话框的代码:
if (AccountDialog.Show(this.exampleAccount) != DialogResult.OK)
{
	this.exampleAccount = accountStore;
}
与 第一部分 中的示例 3 一样,这使用了 AccountDialog 中的 static Show() 方法。
与本文中的上一个示例一样,它会检查是否不 OK,如果为真,则将 exampleAccount 替换为 accountStore。
对话框窗体
这是代码
public partial class AccountDialog : Form
{
	private System.Windows.Forms.BindingSource accountBindingSource;

	protected AccountDialog()
	{
		InitializeComponent();

		this.accountBindingSource =
			new System.Windows.Forms.BindingSource();
	}

	protected AccountDialog(Account account)
		: this()
	{
		if (account == null)
		{
			this.Initialize(Account.Empty);
		}
		else
		{
			this.Initialize(account);
		}
	}

	public static DialogResult Show(Account account)
	{
			DialogResult result = DialogResult.None;

			using (AccountDialog dlg = new AccountDialog(account))
			{
				result = dlg.ShowDialog();
			}

			return result;
	}

	private void Initialize(Account account)
	{
		this.accountBindingSource.DataSource = account;
	}

	private void AccountDialog_Load(object sender, EventArgs e)
	{
		this.txtBalance.DataBindings.Add(new System.Windows.Forms.Binding
			("Text", this.accountBindingSource, "Balance", true));
		this.txtAccountHolder.DataBindings.Add
		    (new System.Windows.Forms.Binding
		    ("Text", this.accountBindingSource, "AccountHolder", true));
		this.txtAccountNumber.DataBindings.Add
		    (new System.Windows.Forms.Binding
		    ("Text", this.accountBindingSource, "AccountNumber", true));
	}
}
这比上一个示例也短。
因此,数据绑定的一个好处是它可以减少您必须输入的代码量。
以编程方式执行数据绑定,如本示例所示,对于像 Account 这样简单的类来说可能有些过度,特别是对于该类的单个实例。但是,如果该类复杂得多,即它有更多 public 成员,数据绑定作为一种技术将很有用,但设置数据绑定所需的输入量,如在Load event handler 中,将是可怕且容易出错的。幸运的是,在设计器中有办法进行数据绑定,下一个示例将尝试演示这一点。它仍然使用 Account,因为它的简单性有助于演示,但这次它将维护一个 Account 集合。
自己研究的主题
静态方法
ComplexCollectionDialog 示例
此示例以非常类似于上一个示例的方式使用数据绑定,唯一区别在于要编辑的 Account 是从 DataGridView 控件中显示的集合中选择的。此外,我还包含了一个对话框,允许一次滚动浏览集合。在第二个对话框中,用户所做的任何更改都是永久性的,因为我没有实现任何恢复/回滚。该对话框只是为了展示如何在设计器中对对象进行数据绑定。
主窗体

代码
public partial class ComplexCollectionDialogMainForm : Form
{
	private Accounts exampleAccounts = null;
	private BindingSource accountBindingSource = null;
	private int activeRow = -1;

	public ComplexCollectionDialogMainForm()
	{
		InitializeComponent();

		this.accountBindingSource = new BindingSource();
		this.exampleAccounts = new Accounts();

		this.MakeList();

		if (this.exampleAccounts.Count > 0)
		{
			this.activeRow = 0;
		}
	}

	private void MakeList()
	{
		this.exampleAccounts.Clear();

		this.exampleAccounts.Add(new Account("1", "Theresa Green", 1.11M));
		this.exampleAccounts.Add(new Account("2", "Orson Cart", 22.2M));
		this.exampleAccounts.Add(new Account
				("3", "Mahatma Coht", 333.00M));
		this.exampleAccounts.Add(new Account("4", "Hugh Jarse", 4.44M));
		this.exampleAccounts.Add(new Account("5", "Willy Sanker", 55.5M));
		this.exampleAccounts.Add(new Account("6", "Gloria Smud", 666.00M));
		this.exampleAccounts.Add(new Account("7", "Anita Bush", 7.77M));
		this.exampleAccounts.Add(new Account("8", "Drew Peacock", 88.8M));
		this.exampleAccounts.Add(new Account("9", "Sean Neatly", 999.00M));
		this.exampleAccounts.Add(new Account("10", "Alek Kazam", 10.10M));
		this.exampleAccounts.Add(new Account
				("11", "Justin Case", 111.10M));
		this.exampleAccounts.Add(new Account
				("12", "Helen Highwater", 1212.00M));
		this.exampleAccounts.Add(new Account("13", "Clara Smud", 13.13M));
		this.exampleAccounts.Add(new Account
				("14", "Marion Haste", 141.4M));
		this.exampleAccounts.Add(new Account
				("15", "Ophelia Smallcock", 1515.00M));
		this.exampleAccounts.Add(new Account
				("16", "Gloria Stitz", 16.16M));
		this.exampleAccounts.Add(new Account
				("17", "Mustapha P Baddely", 171.7M));
		this.exampleAccounts.Add(new Account
				("18", "Ahmed Totheteeth", 1818.00M));
		this.exampleAccounts.Add(new Account("19", "Lord Elpus", 19.19M));
		this.exampleAccounts.Add(new Account
				("20", "Jiminy Trembler", 202.00M));
		this.exampleAccounts.Add(new Account
				("21", "Brendan ButtaPudding", 2121.00M));
		this.exampleAccounts.Add(new Account
				("22", "Martha Tidfyll", 22.22M));
	}

	#region ComplexCollectionDialogMainForm PROPERTIES ...........................
	private int ActiveRow
	{
		set
		{
			if (this.activeRow != value)
			{
				this.activeRow = value;
				this.btnEditActive.Enabled = value >= 0;
			}
		}
	}

	#endregion ComplexCollectionDialogMainForm PROPERTIES

	private void btnExit_Click(object sender, EventArgs e)
	{
		this.Close();
	}

	private void dgvAccount_CellEnter(object sender, DataGridViewCellEventArgs e)
	{
		if (e.RowIndex >= 0)
		{
			this.ActiveRow = e.RowIndex;
		}
		else
		{
			this.ActiveRow = -1;
		}
	}

	private void ComplexCollectionDialogMainForm_Load(object sender, EventArgs e)
	{
		this.accountBindingSource.DataSource = this.exampleAccounts;
		this.dgvAccount.DataSource = this.accountBindingSource;
	}

	private void btnEditActive_Click(object sender, EventArgs e)
	{
		if (this.exampleAccounts.Count > 0)
		{
			Account oldAccount = this.exampleAccounts
						[this.activeRow].Clone();
			if (AccountDialog.Show(((Account)((BindingSource)
				this.dgvAccount.DataSource)[this.activeRow]))
							!= DialogResult.OK)
			{
				((BindingSource)this.dgvAccount.DataSource)
						[this.activeRow] = oldAccount;
				((BindingSource)this.dgvAccount.DataSource).
							ResetCurrentItem();
			}
		}
	}

	private void btnEditCollection_Click(object sender, EventArgs e)
	{
		if (this.exampleAccounts.Count > 0)
		{
			AccountCollectionDialog acd = null;
			using (acd = new AccountCollectionDialog
						(this.exampleAccounts))
			{
				acd.ShowDialog();
			}
		}
	}
}
此示例以略有不同的方式执行数据绑定。它使用 BindingSource 实例作为 DataGridView 的 datasource。不是因为 DataGridView 需要它,而是因为 BindingSource 在这种情况下有更多有用的方法和属性。我建议您查找更多使用 BindingSource 的示例并进行研究。搜索 MSDN 帮助文档以获取更多详细信息。
BindingSource 实例(accountBindingSource)在类开头声明,还有一个 Accounts 实例(exampleAccounts),即 Account 实例的集合,以及一个整数成员(activeRow)来跟踪 DataGridView 中当前选定的行。所有这些都在构造函数中初始化。
这是 Accounts 类:
public class Accounts : System.ComponentModel.BindingList<accountlibrary.account>
{
}
那不是错误,就只有这些了。
当然,exampleAccounts 的声明...
private Accounts exampleAccounts = null;
... 本可以写成...
private BindingList<account> exampleAccounts = null;
... 并且从构造函数实例化...
this.exampleAccounts = new Accounts();
... 本可以
this.exampleAccounts = new BindingList<account>();
在此示例中,那将正常工作。但是,在我这样做过的许多项目中,后来我发现我需要对集合的工作方式进行一些“改进”,这需要创建 BindingList<account> 的派生类,以便实现改进。所以,当我记住,或者,当我设计而不是即兴编码时,我会像在这个示例中所展示的那样做。
构造函数中还有对一个方法的调用,该方法将一些测试数据放入 exampleAccounts 集合中。当然,在现实世界中,这些数据可能来自任何地方。
还有一个 private 属性用于设置 activeRow 成员,以便“编辑活动”按钮可以根据是否选择了账户启用/禁用。
数据绑定部分在窗体的 Load event handler 中完成。我在这里这样做是因为,至少理论上,我可以确定所需的元素已经初始化。首先,accountBindingSource 的 DataSource 属性 设置为 exampleAccounts 集合,然后 DataGridView 的 DataSource 属性 设置为 accountBindingSource。
DataGridView 的 CellEnter event 被处理,以便通过私有属性使用 DataGridViewCellEventArgs 参数方便地传入的 RowIndex 来设置 activeRow 成员。
这只剩下两个编辑按钮了。
“编辑活动”按钮的 Click event handler 首先检查是否存在账户(如果不存在,则不应启用该按钮),然后,与前面的示例一样,它会复制现有数据。其次,它将对话框的显示委托给对话框本身,并检查非 OK 结果。如果返回非 OK 结果,则将原始数据复制回 DataGridView 的 DataSource,并调用 BindingSource 的一个非常有用的方法(ResetCurrentItem())。此方法会导致所有绑定的控件将其数据与 DataSource 中的数据同步。
“编辑集合”按钮的事件处理程序只是显示 AccountCollectionDialog 的一个实例。仅此而已,无需检查结果,无需取消时恢复。它在本示例中的目的是展示设计时数据绑定可以与对象以及数据存储一起完成。创建对话框将在相关部分中介绍。
编辑活动对话框窗体
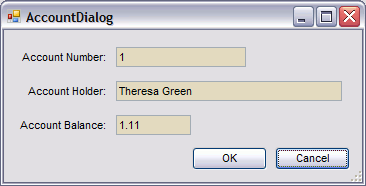
如下所示
代码
public partial class AccountDialog : Form
{
	private System.Windows.Forms.BindingSource accountBindingSource;

	protected AccountDialog()
	{
		InitializeComponent();

		this.accountBindingSource =
			new System.Windows.Forms.BindingSource();
	}

	protected AccountDialog(Account account)
		: this()
	{
		if (account == null)
		{
			this.Initialize(Account.Empty);
		}
		else
		{
			this.Initialize(account);
		}
	}

	public static DialogResult Show(Account account)
	{
			DialogResult result = DialogResult.None;

			// Using the 'using' construct takes care of
			// disposing of the dialog automatically.
			using (AccountDialog dlg = new AccountDialog(account))
			{
				result = dlg.ShowDialog();
			}

			return result;
	}

	private void Initialize(Account account)
	{
		this.accountBindingSource.DataSource = account;
	}

	private void AccountDialog_Load(object sender, EventArgs e)
	{
		this.txtBalance.DataBindings.Add(new System.Windows.Forms.Binding
			("Text", this.accountBindingSource, "Balance", true));
		this.txtAccountHolder.DataBindings.Add
		    (new System.Windows.Forms.Binding
		    ("Text", this.accountBindingSource, "AccountHolder", true));
		this.txtAccountNumber.DataBindings.Add
		    (new System.Windows.Forms.Binding
		    ("Text", this.accountBindingSource, "AccountNumber", true));
	}
}
这应该与上一个示例熟悉,并响应主窗体上“编辑活动”按钮的单击而显示。
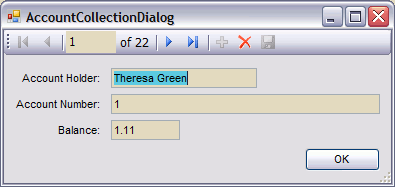
编辑集合对话框窗体
如下所示
代码
public partial class AccountCollectionDialog : Form
{
	protected AccountCollectionDialog()
	{
		InitializeComponent();
	}

	public AccountCollectionDialog(Accounts accounts)
		: this()
	{
		this.accountBindingSource.DataSource = accounts;
	}
}
唯一值得注意的是,默认构造函数的访问修饰符已更改为 protected,强制使用第二个构造函数,该构造函数需要一个 Accounts 集合作为参数。此参数用于设置 accountBindingSource 成员的 DataSource 属性。
以下是使用 Visual Studio 创建此窗体的分步详细信息:
- 创建一个新的空窗体,用作对话框,并确保您的项目能够生成,特别是用于您要绑定的对象的类。在本例中是
AccountLibrary。 - 打开“数据源”窗口,找到“数据”|“显示数据源”。
- 在“数据源”窗口中,单击“添加新数据源”链接。
- 在显示的对话框中,选择“对象”然后单击“下一步”按钮。
- 展开向导左侧的树,直到可以选择要使用的对象(
Account)。在我的项目中,它是:AccountLibrary–AccountLibrary–Account。然后单击“下一步”。 - 然后单击“完成”。
- 确保要使用的窗体在设计器中可见并被选中。
- 在“数据源”窗口中,展开“Account”节点。请注意有三个子节点,分别对应
Account的三个public属性。每个节点都有一个图标,表示如果将该节点拖到窗体上时将使用的控件类型。另外,只要您在设计器中选中了窗体,Account节点就有一个用于DataGridView的图标,如果您现在将Account节点拖到窗体上,您将获得一个具有每个public属性的列的DataGridView。但是,要获得我使用的设计,请单击下拉列表并选择“详细信息”,然后将Account节点拖到窗体上。随意排列控件,添加按钮等,就这样。顺便说一句,子节点使用的控件也可以通过选择节点并单击下拉列表然后从列表中选择来更改。选择“自定义”允许您使用非标准控件,例如您自己设计或购买的控件。
我还推荐CodeProject 上的 Marc Clifton 的文章,其中深入介绍了在设计器中对属性进行数据绑定。
自己研究的主题
- 集合
- 泛型集合
BindingListDataGridView
Using the Code
本文随附的源代码只是用用户的输入更新了一些文本框,这不是一项最富挑战性或最困难的操作。您可以对数据做任何您想做的事情。更新数据库、将其通过电子邮件发送给某人或任何其他操作。这是您的数据,发挥您的想象力!
样本中的代码应该可以在所有版本的 C# 和 .NET 中运行。(对于 VS2008 之前的版本,您需要复制代码。)其中很多直接来自我使用 VS2003 和 .NET 1.1 编写的项目,尽管包含的解决方案和项目文件是用 VS2008 和 .NET 3.5 生成的。
关注点
这里没什么有趣的。快走开!
历史
- 2008 年 12 月 11 日:初始版本 这是本系列文章的第二部分。
