
垂直可折叠分组框 分步指南
4.81/5 (8投票s)
垂直可折叠分组框
引言
这是我的第一篇文章,而且我不是专业的写作者,请原谅我拙劣的英语和文章写作技巧。
很多时候,我们希望在有限的空间内展示大量信息,因为用户希望在一个表单上看到更多信息,而无需滚动。因此,可折叠控件应运而生。这里提供一点努力,制作一个可以垂直折叠的控件。
阅读前
这是一个逐步指南,用于实现此目标。您会看到重复的函数和属性声明,对这些函数或属性的新更改将用粗体标出,而新的内容则以普通字体显示。
步骤 1
在第一步中,我们将绘制分组框和位于分组框左上角的图像。
像这样声明变量。这意味着我们的控件最初将展开。同时声明图像矩形边界。
private bool _iscollapsed = false;
private Rectangle _buttonrect=new Rectangle(0,14,11,11);
public bool IsCollapsed
{
   get { return _iscollapsed; }
}
private Rectangle ButtonRect
{
   get { return _buttonrect; }
}
创建一个新的函数,该函数负责绘制分组框。首先,重新定位新的矩形,以便我们的图像位于左侧线条的中间。然后使用 GroupBoxRenderer.DrawGroupBox 函数绘制分组框。
void DrawGroupBox(Graphics g)
{
   Rectangle bounds = new Rectangle(ClientRectangle.X+4, ClientRectangle.Y + 6, ClientRectangle.Width-4, ClientRectangle.Height-6);
   GroupBoxRenderer.DrawGroupBox(g, bounds, Enabled ? GroupBoxState.Normal : GroupBoxState.Disabled);
}
另一个负责绘制图像的函数。
private void DrawButton(Graphics g)
{
   if (IsCollapsed)
      g.DrawImage(Properties.Resources.plus, ButtonRect);
   else
      g.DrawImage(Properties.Resources.minusver, ButtonRect);
}
并在 Paint 函数中像这样调用这些函数
protected override void OnPaint(PaintEventArgs pe)
{
   DrawGroupBox(pe.Graphics);
   DrawButton(pe.Graphics);
}
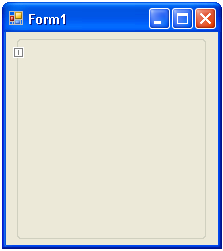
现在查看完成此步骤后的结果。
第二步
在这一步中,我们将向分组框添加垂直文本
添加一个 StringFormat 变量,并将文本方向设置为垂直。同时定义一个 SolidBrush,首次调用时创建,并在最后重复使用并释放。
private StringFormat format = new StringFormat(StringFormatFlags.DirectionVertical);
private SolidBrush _drawBrush = null;
private SolidBrush DrawBrush
{
   get
   {
      if (_drawBrush == null)
         return _drawBrush = new SolidBrush(Color.FromArgb(0, 70, 213));
      else
         return _drawBrush;
   }
}
在 DrawGroupBox 函数中计算字符串宽度,并调用 DrawString 函数将字符串绘制在框的左侧线条上。
void DrawGroupBox(Graphics g)
{
   Rectangle bounds = new Rectangle(ClientRectangle.X+4, ClientRectangle.Y + 6, ClientRectangle.Width-4, ClientRectangle.Height-6);
   GroupBoxRenderer.DrawGroupBox(g, bounds, Enabled ? GroupBoxState.Normal : GroupBoxState.Disabled);

   StringFormat sf = new StringFormat();
   int i_textPos = (bounds.X + 8) + ButtonRect.Width + 2;
   int i_textSize = (int)g.MeasureString(Text, this.Font).Width;
   i_textSize = i_textSize < 1 ? 1 : i_textSize;
   int i_endPos = i_textPos + i_textSize + 1;

   g.DrawString(Text, this.Font, DrawBrush, ButtonRect.X-4,ButtonRect.Y+15,format);
}
现在查看完成此步骤后的结果。

步骤 3
在这一步中,我们将完成两项任务:(1)使图像具有交互性,即它将像一个按钮一样工作;(2)使分组框成为一个可折叠的框。
private int _actualwidth = 0;
private int _currentwidth = 0;
private int _collapsewidth = 20;
private int CollapseWidth
{
   get { return _collapsewidth; }
}
private int ActualWidth
{
   get { return _actualwidth; }
   set { _actualwidth = value; }
}
private int CurrentWidth
{
   get { return _currentwidth; }
   set { _currentwidth = value; }
}
public bool IsCollapsed
{
   get { return _iscollapsed; }
   set
   {
      _iscollapsed = value;
      if (!value)
      {
         Width = ActualWidth;
      }
      else
         Width = CollapseWidth;
      Invalidate();
   }
}
protected override void OnPaint(PaintEventArgs pe)
{
   if (ActualWidth == 0)
      ActualWidth = Width;
   DrawGroupBox(pe.Graphics);
   DrawButton(pe.Graphics);
}
重写 OnMouseUp 以捕获是否在图像内部执行了单击操作,如果是,则调用 Collapsed 更改函数并切换其当前状态。private void CollapsedChanged()
{
IsCollapsed = !IsCollapsed;
}
protected override void OnMouseUp(MouseEventArgs e)
{
if (ButtonRect.Contains(e.Location))
{
CollapsedChanged();
}
base.OnMouseUp(e);
}
现在查看完成此步骤后的结果。
步骤 4
在这一步中,我们将美化我们的控件。如果看到文本下方有一条线,看起来很丑陋,让我们将其删除。同时重写 OnResize 函数并调整其实际宽度,这在我们的控件大小更改时很有帮助。void DrawGroupBox(Graphics g)
{
Rectangle bounds = new Rectangle(ClientRectangle.X+4, ClientRectangle.Y + 6, ClientRectangle.Width-4, ClientRectangle.Height-6);
GroupBoxRenderer.DrawGroupBox(g, bounds, Enabled ? GroupBoxState.Normal : GroupBoxState.Disabled);
StringFormat sf = new StringFormat();
int i_textPos = (bounds.X + 8) + ButtonRect.Width + 2;
int i_textSize = (int)g.MeasureString(Text, this.Font).Width;
i_textSize = i_textSize < 1 ? 1 : i_textSize;
int i_endPos = i_textPos + i_textSize + 1;
g.DrawLine(SystemPens.Control, ButtonRect.X+4, ButtonRect.Y + 15, ButtonRect.X+4, i_endPos);
g.DrawString(Text, this.Font, DrawBrush, ButtonRect.X-4,ButtonRect.Y+15,format);
}
protected override void OnResize(EventArgs e)
{
if (ActualWidth == 0)
ActualWidth = Width;
base.OnResize(e);
}
步骤 5
在这一步中,我们将添加事件支持,当折叠更改事件触发时,我们可以使用它在父表单中执行操作。public delegate void CollapseChangeEventHandler(object sender);
public event CollapseChangeEventHandler OnCollapsedChanged;
private void CollapsedChanged()
{
IsCollapsed = !IsCollapsed;
if (OnCollapsedChanged != null)
OnCollapsedChanged(this);
}
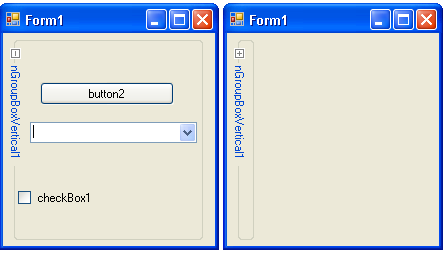
步骤 6
现在我们的控件几乎准备好了,但有一个问题,当我们折叠框时,左对齐的控件仍然可见,就像这样。
可以通过设置此控件内所有控件的可见属性来解决此问题,但对于最初隐藏的控件呢?它们也会通过这种方法显示出来,因此解决此问题的方案是维护控件的可见状态,就像这样。
private List<control> _visiblectrls = new List<control>();
public bool IsCollapsed
{
   get { return _iscollapsed; }
   set
   {
      _iscollapsed = value;
      if (!value)
      {
         Width = ActualWidth;
      }
      else
         Width = CollapseWidth;
      foreach (Control c in _visiblectrls)
      {
         c.Visible = !value;
      }
      Invalidate();
   }
}
protected override void OnLayout(LayoutEventArgs levent)
{
   if (_visiblectrls.Count == 0)
   {
      foreach (Control c in Controls)
      {
         if (c.Visible)
            _visiblectrls.Add(c);
      }
   }
   base.OnLayout(levent);
}
</control>
现在查看最终结果
隐藏的按钮最初是隐藏的。


这就是我们工作的结束。非常感谢阅读这篇文章。