
使用 .NET 创建可扩展的用户界面,第一部分
4.68/5 (32投票s)
2002年11月18日
4分钟阅读
208597
728
一种通过插件组件扩展程序用户界面的架构。
引言
很多时候,在程序部署后对其用户界面(UI)进行扩展或增强是很有价值的。通常这意味着需要重新部署整个应用程序。本文档描述了一种“插件”架构,允许随时扩展 UI。具有可扩展 UI 的程序的一个例子是 Microsoft 管理控制台(MMC)及其相关的管理单元。
概述
在考虑此架构之前,您的程序必须满足一个主要要求。
- UI 插件之间应完全没有交互。这并不意味着它们不能共享公共数据结构或业务对象,但每个 UI 插件都不应尝试直接调用其他插件。
在此架构中,所有 UI 元素都包含在一组基于 System.Windows.Forms.UserControl 类的插件中。所有插件都在配置文件中描述,并在运行时加载。通过创建新插件并将相应的条目添加到配置文件中,即可实现 UI 的扩展。
此架构的一些优点是:
- 独立开发不同的 UI 元素。例如,如果您正在开发一个个人信息管理器(PIM),一个人可以负责“约会/日历” UI,而另一个人可以负责“联系人” UI。
- 应用程序控制。您可以根据用户的姓名、用户的角色或购买的选项来限制应用程序的功能。
- 您可以随时添加新的 UI 元素。在上面的 PIM 示例中,您可以在应用程序分发后添加一个“日记” UI。
该架构包含 3 个部分:
- 一个“shell”应用程序,负责加载和导航插件。
- 一个基类,提供“shell”和插件之间的所有通信。
- Individual UI 插件本身。
Shell
启动时,shell 应用程序会读取配置文件以获取每个 UI 插件的名称和位置。然后使用反射加载每个插件。在下面的屏幕截图中,Shell 应用程序包含一个 ListBox 用于在插件之间导航,以及一个 Panel 用于加载插件。
下面是一个加载了 2 个插件的“shell”示例。左侧的 ListBox 用于在每个插件之间进行选择,而右侧的 panel 将在插件可见时显示它。
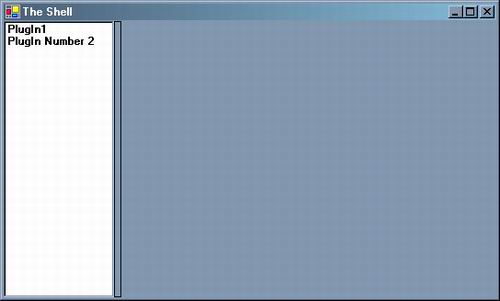
点击“PlugIn1”使插件可见。

然后点击“PlugIn Number 2”使其在 panel 中可见。

Tabbed Shell 应用程序展示了另一种导航方式。
这是加载后的 Tabbed Shell。

这是选择“PlugIn Number 2”后的样子。

Shell 如何找到插件。
将在运行时加载的插件列在一个名为 config.xml 的 XML 文件中。
<?xml version="1.0" encoding="utf-8" ?>
<PlugIns>
  <PlugIn Location="E:\ExtensibleUI\OurControls\bin\Debug\OurControls.dll"
        Name="OurControls.PlugIn1"></PlugIn>
  <PlugIn Location="E:\ExtensibleUI\OurControls\bin\Debug\OurControls.dll"
        Name="OurControls.PlugIn2"></PlugIn>
</PlugIns>
在窗体加载事件中,config.xml 文件通过 ReadXml 加载到 DataSet 中。然后遍历每个 DataRow,调用 AddPlugin 并传入插件的“location”和“name”。
private void Form1_Load(object sender, System.EventArgs e)
{
    DataSet ds = new DataSet();
    ds.ReadXml("Config.xml");
    foreach(DataRow dr in ds.Tables["Plug-In"].Rows)
    {
        AddPlugIn(dr["Location"].ToString(),
            dr["Name"].ToString());
    }
}
AddPlugIn 代码的两个示例。
AddPlugIn 会加载包含插件的程序集并创建其实例。它还会将插件添加到 ListBox 中。当选中列表框中的新项时,我们需要隐藏当前插件,并显示新选择的插件。
// Load and add a plug-in to the panel1 control

// Also set the list box to navigate between plugins.

private void AddPlugIn(string Location, string ControlName)
{
    Assembly ControlLib;
    PlugIn NewPlugIn;
    // Load the assembly.

    ControlLib = Assembly.LoadFrom(Location);

    // Now create the plugin.

    NewPlugIn = (PlugIn)ControlLib.CreateInstance(ControlName);
    NewPlugIn.Location = new System.Drawing.Point(0, 0);
    NewPlugIn.Dock = DockStyle.Fill;
    NewPlugIn.Visible = false;
    // Add it to the panel, note that its Visible property is false.

    panel1.Controls.Add(NewPlugIn);
    // Set up the ClickHandler

    NewPlugIn.Clicked += new PlugInLib.ClickHandler(Control_Clicked);
    // Add the plugin to the listBox, listBox will use ToString to

    // get the text to display.

    listBox1.Items.Add(NewPlugIn);

}

private PlugIn CurrentPlugIn;

// When a new item in the listBox is selected,

// hide the current plugin and show the new.

private void listBox1_SelectedIndexChanged(object sender,
                                           System.EventArgs e)
{
    if(CurrentPlugIn!=null)
    {
        CurrentPlugIn.Visible = false;
    }
    CurrentPlugIn = (PlugIn)listBox1.SelectedItem;
    CurrentPlugIn.Visible = true;
}
Tabbed Shell 应用程序的 AddPlugIn 略有不同。Tabbed Shell 应用程序不需要导航代码,因为导航由 TabControl 处理。
// Load and add a plug-in to the TabControl1 control

private void AddPlugIn(string Location, string ControlName)
{
    Assembly ControlLib;
    PlugIn NewPlugIn;
    // Load the assembly.

    ControlLib = Assembly.LoadFrom(Location);

    // Now create the plugin.

    NewPlugIn = (PlugIn)ControlLib.CreateInstance(ControlName);
    NewPlugIn.Location = new System.Drawing.Point(0, 0);
    NewPlugIn.Dock = DockStyle.Fill;
    NewPlugIn.Visible = true;
    // Create a new TabPage.

    TabPage newPage = new TabPage();
    // Set the text on the tabPage with the PlugIn Caption.

    newPage.Text = NewPlugIn.Caption;
    // Add the PlugIn to the TabPage.

    newPage.Controls.Add(NewPlugIn);
    // Add the page to the tabControl.

    tabControl1.TabPages.Add(newPage);
    // Set up the ClickHandler

    NewPlugIn.Clicked += new PlugInLib.ClickHandler(Control_Clicked);
}
PlugIn 基类
The PlugIn 基类基于 System.Windows.Forms.UserControl 类,并对其进行扩展,提供预定义的事件、方法和属性,每个插件都可以使用它们与 shell 应用程序进行通信。在此示例中,预定义了 Clicked 事件、Caption 属性和 TestFunction 方法。此外,还重写了 ToString 以返回 Caption 而不是对象名称。
using System;
using System.Windows.Forms;

namespace PlugInLib
{
    /// <summary>

    /// A delegate type for hooking up notifications.

    /// </summary>

     public delegate void ClickHandler(object sender, EventArgs e);
    /// <summary>

    /// Summary description for PlugIn.

    /// </summary>

    public class PlugIn : System.Windows.Forms.UserControl
    {
        // The following provides "Clicked" event back to the container.

        public event ClickHandler Clicked;
        protected void DoClick(EventArgs e)
        {
            if (Clicked != null)
                Clicked(this, e);
        }
        // Provide a "Caption" that the container can display.

        protected string m_Caption = "PlugIn";
        public string Caption
        {
            get
            {
                return m_Caption;
            }
            set
            {
                m_Caption = value;
            }
        }
        public override string ToString()
        {
            return m_Caption;
        }

        // Provide a method "TestFunction" that the container can call.

        public virtual void TestFunction()
        {
        }
    }
}
创建 UI 插件。
- 使用 Visual Studio 创建一个新的“Windows 控件库”。
- 添加对包含插件基类的
PlugInLib的引用。 - 将用户控件的名称从
UserControl1更改为更具描述性的名称。 - 添加
using指令以导入PlugInLib。 - 将用户控件的基类从
System.Windows.Forms.UserControl更改为PlugIn。 - 连接任何您希望发送到 shell 应用程序的事件。
- 为从 shell 到插件的调用添加必要的重写。
- 像构建任何其他
UserControl一样构建您的 UI。
using System;
using System.Collections;
using System.ComponentModel;
using System.Drawing;
using System.Data;
using System.Windows.Forms;
using PlugInLib;            // <---Add using for the plug-In base class


namespace OurControls
{
    /// <summary>

    /// Summary description for PlugIn3.

    /// </summary>

    public class PlugIn3 : PlugIn    // <---Change base class to PlugIn

    {
        /// <summary>

        /// Required designer variable.

        /// </summary>

        private System.ComponentModel.Container components = null;

        public PlugIn3()
        {
            // This call is required by the Windows.Forms Form Designer.

            InitializeComponent();

            // TODO: Add any initialization after the InitForm call


        }

        /// <summary>

        /// Clean up any resources being used.

        /// </summary>

        protected override void Dispose( bool disposing )
        {
            if( disposing )
            {
                if(components != null)
                {
                    components.Dispose();
                }
            }
            base.Dispose( disposing );
        }

        #region Component Designer generated code
        /// <summary>

        /// Required method for Designer support - do not modify

        /// the contents of this method with the code editor.

        /// </summary>

        private void InitializeComponent()
        {
            //

            // PlugIn3

            //

            this.Caption = "PlugIn 3";
            this.Name = "PlugIn3";
            this.Click += new System.EventHandler(this.PlugIn3_Click);

        }
        #endregion

        // Override Base class to receive call from the shell.

        public override void TestFunction()
        {
            Console.WriteLine("TestFunction called by the shell.");
        }

        // Send clicks to the shell, just because we can.

        private void PlugIn3_Click(object sender, System.EventArgs e)
        {
            DoClick(e);
        }
    }
}
结论
通过此架构,插件与 shell 之间的交互应该是明确且有限的。在上面显示的 PlugIn 基类示例中,shell 和插件之间唯一的实际交互是 Caption 属性。另一种可能的交互方式是 shell 加载一个公共数据结构,该结构在加载每个插件时传递给它。
您可以随时添加新插件,只需创建一个新插件并将相应的条目添加到 config.xml 文件中即可。
注释
在下载部分提供的演示 zip 文件中,config.xml 文件位于两个“Shell”应用程序的 Release 和 Debug 目录中。这些文件包含 OurControls.dll 的绝对路径,包括驱动器字母。您需要为本地系统修改这些路径。