
LINQtoXML
3.33/5 (9投票s)
使用 .NET 中的 LINQ 进行 XML 编程入门
本文档包含什么?
本文档概述了如何使用 LINQ 创建和查询 XML。本文档提供了我们在使用 LINQ to XML 时遇到的实际场景,并附有代码片段和易于理解的输出屏幕截图。
谁可以阅读?
所有有兴趣探索如何在 .NET 中使用 LINQ 来处理 XML 的人。
这对我有何用?
本文档不深入讨论所有主题,但肯定会为您提供一个快速入门指南,帮助您开始使用 LINQ to XML。
LINQ:Language Integrated Query 是一个 Microsoft .NET Framework 组件,它为 .NET 语言添加了原生的查询功能。
什么是 LINQ to XML:一个内存 XML 编程接口,使我们能够直接在 .NET Framework 编程语言中使用 XML。
LINQ to XML 的优势:与 LINQ 集成,使我们能够对内存中的 XML 文档编写查询,以检索元素和属性的集合。这些 LINQ 查询在语法上与 XPath 不同,但功能相似。
轻松地将查询结果用作 XElement 和 XAttribute 对象构造函数的参数,从而以简单的方式创建 XML 树,这进一步使得 XML 树能够轻松地从一种形状转换为另一种形状。
为了使用 LINQ to XML,需要在代码中包含的命名空间:System.Xml.Linq。
从 .NET 3.5 开始,使用 LINQ (Language Integrated Query) 可以轻松地在 .NET 中创建 XML。以下是创建 XML 文档时的一些重要语法更改。
| .NET 旧版本的 XML | .NET 3.5 及更高版本的 XML |
XMLDocument |
XDocument |
XMLElement |
XElement |
XMLAttribute |
XAttribute |
XMLNamespace |
XNamespace |
XMLNode |
XNode |
创建简单的 XML
我们正在创建一个 XDocument (本质上就是一个 XML),其中包含 Employee 详细信息,如 Name、Id 和 Designation。
XDocument document = new XDocument(
                new XElement("Employees",
                    new XElement("Name", "Krishna"),
                    new XElement("ID", "12345"),
                    new XElement("Designation", "Engineer")));
如上面的代码片段所示,这就像引用 KEY、VALUE 对一样简单,就像 `new XElement("Name", "Krishna")` 一样。
输出是:

创建带有元素属性的 XML
在大多数实际场景中,我们需要创建带有 Element 属性的 XML。以下是创建带有其职位作为 Element 属性的 Employees XML 的代码。
XDocument xDocument = new XDocument(
                new XElement("Employees",
                    new XElement("Employee", "Pavan",
                        new XAttribute("Designation", "Developer")),
                        new XElement("Employee", "sudhir",
                            new XAttribute("Designation", "Tester"))));
输出

创建带有命名空间的 XML
使用命名空间创建 XDocument 时,必须显式地将命名空间添加到子元素中 `(new XElement(myNamespace + "Employee", "sudhir")`,以便它包含在父元素的命名空间中,如下所示。
XNamespace myNamespace = "https://www.microsoft.com";
XDocument xDocument = new XDocument(
                new XElement(myNamespace + "Employees",
                    new XElement(myNamespace + "Employee", "Pavan",
                        new XAttribute("Designation", "Developer")),
                        new XElement(myNamespace + "Employee", "sudhir",
                            new XAttribute("Designation", "Tester"))));
输出将如下所示

如果您在添加子元素时未指定命名空间关键字(此处为“myNamespace”),则输出将如下所示
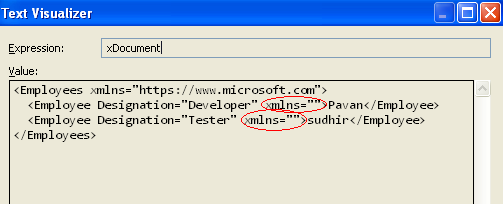
正如用红色圆圈标出的那样,所有子元素中都会出现一个空的属性。因此,在创建 XDocument 时,需要为每个子元素附加命名空间。
处理多个命名空间
某些场景要求我们在创建的 XDocument 中有多个命名空间。一个命名空间用于父节点,另一个用于所有子节点。在这种情况下,我们需要使用两个不同的 XNamespace 变量,如下所示。
XNamespace firstNamespace = "https://www.microsoft.com";
XNamespace secondNamespace = "https://www.microsoft.com/myBlogs";

XDocument myDocument = new XDocument(
                new XElement(firstNamespace + "Employees",
                    new XElement(firstNamespace + "Employee", "Senthil"),
                    new XElement(firstNamespace + "Employee", "Prabhu"),
                    new XElement(secondNamespace + "Employee", "Sampath"),
                    new XElement(secondNamespace + "Employee", "Kumar")));
输出

命名空间前缀
如果我们看上面的例子,输出中每个 Child 元素都带有命名空间 URL,看起来很乱。为了解决这个问题,我们可以将第二个命名空间也包含在父元素中,并为其分配一个关键字,然后在使用关键字创建 XElements。
XDocument myDocument = new XDocument(
                new XElement(firstNamespace + "Employees",
                    new XAttribute(XNamespace.Xmlns +"secondNamespace",secondNamespace),
                    new XElement(firstNamespace + "Employee", "Senthil"),
                    new XElement(firstNamespace + "Employee", "Prabhu"),
                    new XElement(secondNamespace + "Employee", "Sampath"),
                    new XElement(secondNamespace + "Employee", "Kumar")));
输出

保存 XML
我们可以将创建的 XDocument 保存到任何位置,作为 XML 文档。
XDocument xDoc = new XDocument(
                new XElement("Friends",
                    new XElement("Friend", "Senthil"),
                    new XElement("Friend", "Prabhu")));

            xDoc.Save(@"c:\myTest.xml");
当我们在浏览器中打开保存的 XML 时,可以看到如下所示的内容

加载已保存的 XML
我们可以使用以下代码片段加载已保存的 XML 文档并创建 XDocument 。这里我加载 XML 文档,然后将生成的 XDocument 绑定到一个 string 变量。
XDocument myDoc = XDocument.Load(@"c:\myTest.xml");
string check = myDoc.ToString();
在文本可视化工具中检查 string 变量时,它看起来如下

XElement 类的方法
Attribute, Attributes, Element, Elements, Descendants, Ancestors.
有很多方法,这里无法一一列举。我们将介绍如何使用一些最常用的方法,例如上面提到的那些。
- Element:提供直接的子节点。
- Elements:根据文档顺序提供此元素或文档的子元素集合。
- Descendants:提供所有子节点。
- Attributes:返回此元素的属性集合。
- Attribute:返回具有指定
XName的XElement的XAttribute。
获取具有特定名称的元素
XDocument myDocument = new XDocument(
                new XElement("Employees",
                    new XAttribute(XNamespace.Xmlns +"secondNamespace",secondNamespace),
                    new XElement(firstNamespace + "Employee", "Senthil"),
                    new XElement(firstNamespace + "Employee", "Prabhu"),
                    new XElement(secondNamespace + "Employee", "Sampath"),
                    new XElement(secondNamespace + "Employee", "Kumar")));

            foreach (XElement myElement in myDocument.Descendants
            (firstNamespace + "Employee"))
            {
               String sOne += (string)myElement;
            }
foreach 语句用于循环遍历为 Element “Employee” 返回的所有值,然后将这些值分配给一个 string 变量。在将 Element 值分配给 string 变量时需要进行显式转换。输出如下:

同样,我们可以使用以下查询获取 Element 属性值。
foreach (XElement myElement in xdoc.Descendants("Employee"))
{
    foreach (XAttribute xAtt in myElement.Attributes())
    {
        String sTwo = (string)xAtt;
    }
}
解析字符串到 XDocument
考虑一个包含 XML 的 string ,如下所示。

string myString =
                @"<?xml version=""1.0"" encoding=""utf-8""?>
                <BankDetails>
                    <AccountHolder>Sai Krishna</AccountHolder>
                    <AccountNumber>12345678912</AccountNumber>
                    <AccountType>Savings</AccountType>
                </BankDetails>";
现在,调用 Parse 方法以从上述 string 生成 XDocument。
XDocument myXDoc = XDocument.Parse(myString);
输出
在 XDocument 上使用查询运算符
假设我们需要从以下 XDocument 中获取所有指导“Action”类型电影的 Director 姓名。
XDocument xdoc = new XDocument(
               new XElement("Directors",
                   new XElement("Director", "James cameron",
                       new XAttribute("Type", "Sci-Fi")),
                       new XElement("Director", "Guy Ritchie",
                           new XAttribute("Type", "Action")),
                               new XElement("Director", "clientEastwood",
                                   new XAttribute("Type", "Action")),
                                   new XElement("Director", "ManiRatnam",
                                       new XAttribute("Type", "Sci-Fi"))));
我们需要编写的查询
var myDirectors = from xE in xdoc.Descendants("Director")
                              where xE.Attribute("Type").Value == "Action"
                              orderby xE.Value
                              select xE.Value;
            foreach (var Director in myDirectors)
            {
                Console.WriteLine(Director);
            }
输出
我们得到“Client Eastwood”和“Guy Ritchie”,因为他们的类型属性是“Action”。

将元素追加到已存在的 XDocument
假设已经创建了一个 XDocument 。我们需要向现有的 XDocument 添加几个额外的元素。例如,我们需要将另外两个员工的详细信息添加到已有的 Employee XML 树中。这里的代码向您展示了如何做到这一点。
XDocument myDoc = new XDocument(
               new XElement("SASTeam",
                   new XElement("Employee",
                   new XElement("Designer", "Naveen"),
                   new XElement("DBA", "Shankar")
                   )));
如果我们检查这个 XDocument,我们会得到下面的 XML 树。

现在,添加另外两个 employee 详细信息,如下所示。
myDoc.Root.Element("Employee").Add(
                new XElement("Developer", "Kaipa"),
                new XElement("Tester", "Kartheek"));
输出是:

您会在输出中看到,已将两个员工的详细信息“Kaipa”和“kartheek”添加到了现有的 Employee 树中。
XDocument 和 String
考虑上一节中提到的 XDocument 。我们可以通过调用 Tostring() 方法将其转换为 XML 字符串。
string myString = myDoc.ToString();
结果 string 值为
myString =
"<SASTeam>\r\n  <Employee>\r\n    <Designer>Naveen</Designer>\r\n
<DBA>Shankar</DBA>\r\n    <Developer>Kaipa</Developer>\r\n
<Tester>Kartheek</Tester>\r\n  </Employee>\r\n</SASTeam>"
我注意到这与我们期望的不符。为了删除特殊字符,如“\r\n”,在将 XDocument 分配给 string 时,我们需要这样做。
string myString = myDoc.ToString(SaveOptions.DisableFormatting);
结果 string 如下所示。
myString =
"<SASTeam><Employee><Designer>Naveen</Designer><DBA>Shankar</DBA>
<Developer>Kaipa</Developer><Tester>Kartheek</Tester></Employee></SASTeam>"
默认的 SaveOption 是 None (SaveOptions.None)。我们需要根据需要切换选项。
XDeclaration 问题
如果在上一节中观察到,XDocument 中没有 XDeclaration 。这次我们将创建相同的 XDocument,但包含 XDeclaration。
XDocument myDoc = new XDocument(
                new XDeclaration("1.0","utf-8","yes"),
                   new XElement("SASTeam",
                       new XElement("Employee",
                       new XElement("Designer", "Naveen"),
                       new XElement("DBA", "Shankar")
                   )));
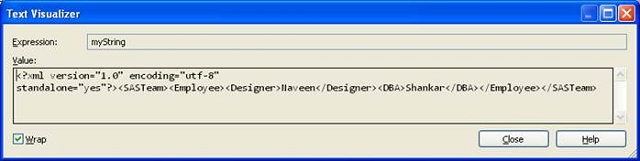
现在,如果我们检查 myString,我们会得到
在结果 string 中,我们可以看到 XML 声明丢失了。为了解决这个问题,我们需要显式地附加声明 string ,如下所示。

string myString = myDoc.Declaration.ToString() +
myDoc.ToString(SaveOptions.DisableFormatting);
现在 string 值是
摘要
LINQ to XML 是使用最新的 .NET 框架语言功能构造、编写、读取和查询 XML 数据的新方法。这个新的 API 简化了 XML 的使用,并提供了卓越的开发体验。