
不停机可升级的服务框架
一个旨在支持在服务中升级组件而无需停止运行的框架
引言
作为后端服务,我们可能需要多次升级以满足不同的需求,也许需求发生变化,也许发现并解决了问题,也许业务逻辑发生了变化。所有这些情况都需要升级服务。那么,如果我们可以在不停止运行的情况下升级服务,那应该是一个更好的主意。这个框架旨在实现不停止运行的服务升级,支持即时升级。
优点
- 支持不停止服务的情况下升级。通常,升级过程可能包含:备份程序数据、停止/卸载旧版本、安装/启动或升级新版本。与不停止服务直接升级组件相比,这是一个漫长而庞大的过程。
- 灵活扩展组件。在此框架中,支持从0到多个组件,并且很容易定义组件之间的关系。
- 最小化升级过程,易于维护,也可以避免许多手动操作造成的错误。
- 如果服务以24*7模式运行,则减少中断时间。在某些领域,服务根本不能停止,即使您可能有备份服务,停止某些服务也可能导致其他服务承受高压。
背景
实际上,这个想法来自于我的真实项目,我们实现了运行后端的服务,旨在收集新闻并分发新闻给下游。我们多次面临需求变化、业务逻辑变化或依赖关系变化的问题。每次升级服务,我们都必须遵循一个漫长而艰难的过程来完成,例如,在某个位置激活某些服务,在另一个位置停用某些服务……升级某些服务……等等,最后,我们需要将所有服务状态恢复到升级之前。这是一项枯燥的工作,您必须仔细遵循流程以避免错误。
演示
演示步骤
- 从以上链接下载并解压缩到某个位置,例如,X:\CodeProject.com,以下步骤假设位置为X:\CodeProject.com\Non-Stopping-Upgadable_Service_Framework_Demo
- 打开CMD窗口并定位到X:\CodeProject.com\Non-Stopping-Upgadable_Service_Framework_Demo\bin,其中包含演示程序:DemoServiceProgram.exe和组件:ClassLibrary1.dll
- 启动DemoServiceProgram.exe,您将看到如上图左侧窗口所示的内容。在演示程序中,我们有三个组件:
reader1、processor1、dispatcher1。reader1将创建一个对象Created MyObject in ClassLibrary1. No.XX,此对象模拟从某个地方“读取”的对象,processor1模拟一些业务,最后对象进入dispatcher1,它可能将对象分发到下游或将其保存到本地文件或数据库。
- 打开另一个CMD窗口并定位到
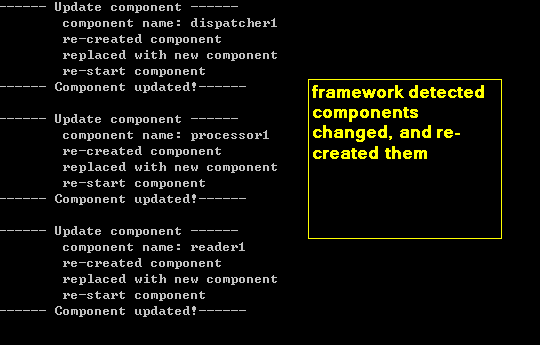
<span style="FONT-FAMILY: 'Courier New', Courier, mono; COLOR: rgb(153,0,0); FONT-SIZE: 15px">X:\CodeProject.com\Non-Stopping-Upgadable_Service_Framework_Demo\bin</span>,您将看到两个批处理文件,_UpdateToClassLibrary1.bat和_UpdateToClassLibrary2.bat。请运行_UpdateToClassLibrary2.bat,您将看到DemoServiceProgram检测到组件已更改,并重新创建了组件。然后,DemoServiceProgram开始通过ClassLibrary2.dll执行业务。

- 这两个(2个批处理文件)是模拟升级行为的快捷方式,运行_UpdateToClassLibrary2.bat将使用ClassLibrary2.dll文件作为新文件替换当前正在使用的文件;运行_UpdateToClassLibrary1.bat将使用ClassLibrary1.dll文件作为新文件替换当前正在使用的文件;默认的类库是ClassLibrary1.dll,我们在v1文件夹中有一个副本,它的另一个版本是ClassLibrary2.dll,也在v2文件夹中有一个副本。
如果您想使用ClassLibrary1替换回来,请运行_UpdateToClassLibrary1.bat,您会发现程序将恢复使用ClassLibrary1.dll中的组件,并开始执行业务。
使用框架
- 实现需要从
IComponent继承的类。在演示程序中,我们将所有组件(Reader、Processor、Dispatcher)组合在一个程序集中,但在实际项目中,我们建议一个组件一个程序集。 - 在app.config文件中配置组件,在演示项目中,我们有以下配置
<?xml version="1.0" encoding="utf-8" ?>
<configuration>
  <configSections>
    <section name="componentSection" type="ClassContract.ComponentSectionHandler,ClassContract"/>
  </configSections>
  <componentSection>
    <components>
      <component name="reader1" assemblyName="ClassLibrary1.dll"
       className="ClassLibrary1.Reader" isUpgradable="true" downstreams="processor1" />
      <component name="processor1" assemblyName="ClassLibrary1.dll"
       className="ClassLibrary1.Processor" isUpgradable="true" downstreams="dispatcher1" />
      <component name="dispatcher1" assemblyName="ClassLibrary1.dll"
       className="ClassLibrary1.Dispatcher" isUpgradable="true" downstreams="" />
    </components>
  </componentSection>
</configuration>
首先,我们添加了自定义部分,将其类型设置为ClassContract.ComponentSectionHandler,ClassContract,然后添加了<components>节点,并在<components>节点下添加了所有组件,<component>具有以下字段
名称 | 必需,组件的名称,也用作组件的键,必须是唯一的。 |
程序集名称 | 必需,组件的程序集名称,可以是相对路径,也可以是绝对路径,例如,ClassLibrary1.dll,它将在程序所在位置或X:\codeproject.com\ClassLibrary1.dll中搜索。 |
类名 | 必需,组件的完整类名,需要实现IComponent接口。 |
是否可升级 | 可选,指示框架运行时是否支持升级。 |
下游组件 | 可选,指示哪些组件是下游组件,支持0个或多个组件,请通过组件名称填充此字段,多个组件用逗号分隔。例如, 注意:组件本身不能是它的下游(或者您可以更改 |
完成以上步骤后,您现在可以启动框架了。
框架设计
框架的类图如下所示

Mediator 类中的 Init() 方法
此图显示了从上到下的类,但我将从下到上描述类,Mediator类主要是业务类,在main()方法中,我们像这样使用Mediator
static void Main(string[] args)
{
  Mediator e = Mediator.GetInstance();
  e.Init();

  // keep the console alive...
  Console.ReadKey();
}
首先,我们以单例模式编写Mediator类,在一个程序中,只需要一个mediator就足够了,并且为了保护Mediator只有一个实例。我们对Mediator类应用了单例模式。Mediator负责管理组件。
- 从app.config读取组件配置
ComponentSectionHandler config = ComponentSectionHandler.GetConfigurationSection();
- 创建每个组件,我们在
Mediator和ComponentManager之间实现了观察者模式,ComponentManager负责创建组件实例,并检测组件的程序集更改。当ComponentManager检测到程序集文件更改时,它将通知Mediator类来确定是否重新创建组件实例(我们可以在IComponent接口中添加一个属性,以指示组件是否繁忙,如果不忙,我们可以替换它,否则我们可以等到它不忙,这不包括在演示中,只是一个想法)。ComponentManager类计算程序集文件的MD5值以确定文件是否更改,文件更改事件由FileSystemWatcher类引发。//------------------------------ // Create components //------------------------------ Console.WriteLine("------ Create components ------"); foreach (ComponentConfigurationElement componentConfig in config.Components) { ComponentManager componentMgr = new ComponentManager(); componentMgr.ComponentConfiguration = componentConfig; componentMgr.Updated += new EventHandler<ComponentUpdatedEventArgs>(ComponentManager_Updated); IComponent component = componentMgr.CreateInstance(); if (component != null) { component.Name = componentConfig.Name; component.Downstreams = componentConfig.Downstreams; componentMgr.EnableMonitor = componentConfig.IsUpgradable; this.ComponentList.Add(component); Console.WriteLine("\tCreated component: {0}", component.Name); } else { Console.WriteLine("\tError to create component: {0}", componentConfig.Name); } } - 计算下游组件并为每个组件注册事件,我们有两个辅助方法来获取下游和上游组件,它们是
GetUpstreamComponents,GetDownsteamComponents。//------------------------------ // Register components events //------------------------------ Console.WriteLine("------ Register components events ------"); foreach (IComponent component in this.ComponentList) { List<IComponent> downstreamComps = GetDownsteamComponents(component); if (downstreamComps != null && downstreamComps.Count > 0) { component.DownstreamComponents = downstreamComps; component.AfterBusiness += Component_AfterBusiness; Console.WriteLine("\tRegistered component: {0} downstreams:{1}", component.Name, component.Downstreams); } }为每个组件注册了
AfterBusiness事件,我们使用事件机制在组件之间传递数据。在Component_AfterBusiness方法中,它将通过调用DoBusinesss方法通知所有下游组件执行其业务,数据包含在ComponentDataEventArgs.Data属性中,其类型是object,如果我们需要在不同的组件中过滤数据,我们可以在该组件的DoBusinesss方法中过滤数据。 启动/停止组件//------------------------------ // Start components //------------------------------ Console.WriteLine("------ Start components ------"); this.ComponentList.ForEach(p => { p.Start(); Console.WriteLine("\tStarted: {0}", p.Name); });
组件程序集更改方法
当ComponentManager引发Updated事件时,我们将知道其中一个组件程序集已更改,从ComponentUpdatedEventArgs.ComponentConfiguration.Name获取特定组件,名称是唯一的,因此我们可以通过枚举组件列表轻松获取组件。
- 从新版本的程序集重新创建组件实例
// create new component, and check its status IComponent newComponent = componentMgr.CreateInstance(); if (newComponent == null) { Console.WriteLine("\tError when re-create component {0}", e.ComponentConfiguration.Name); return; } newComponent.Name = e.ComponentConfiguration.Name; newComponent.Downstreams = e.ComponentConfiguration.Downstreams; newComponent.DownstreamComponents = GetDownsteamComponents(newComponent); sb.AppendLine("\tre-created component"); - 用新实例替换组件的旧实例
// get component which need updated.
IComponent oldComponent = GetComponentByName(e.ComponentConfiguration.Name);
if (oldComponent == null) return;
// stop component
oldComponent.Stop();
// un-register event from component
oldComponent.AfterBusiness -= Component_AfterBusiness;
// remove component from upstream components
List<IComponent> upstreamComponents = GetUpstreamComponents(oldComponent);
upstreamComponents.ForEach(p => p.DownstreamComponents.Remove(oldComponent));
// remove component from component list
this.ComponentList.Remove(oldComponent);
- 应用组件的新实例
this.ComponentList.Add(newComponent);
upstreamComponents.ForEach(p => p.DownstreamComponents.Add(newComponent));
newComponent.AfterBusiness += Component_AfterBusiness;
sb.AppendLine("\treplaced with new component");
newComponent.Start();
sb.AppendLine("\tre-start component");
注释
- 为了同步组件与
Mediator更新过程之间的业务,我们使用lock语句来保护多线程中的内容。 - 在演示程序中,我们将三个组件组合在一个程序集中,当程序集更改时,这意味着三个组件都已更新,这将引发三次
Updated事件。为了同步Updated方法中的输出,我们使用StringBuilder在方法中收集输出并一次性输出。
进一步思考
在演示框架中,我们只实现了服务运行期间升级组件的机制,为了进一步开发,我有两个建议来改进这个框架
- 支持一个程序集文件中包含多个组件,但只引发一次
Updated事件。 - 对于组件配置,它可能比这个框架有更复杂的属性,我们还可以通过更改配置而不是程序集文件更改来支持升级组件。