
WPF 验证。
3.26/5 (9投票s)
本文介绍了 WPF 中的验证过程


引言
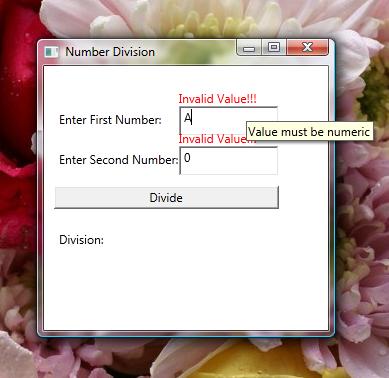
在本文中,我讨论了 WPF 中的验证过程。 为了理解验证过程,我创建了一个简单的应用程序,该应用程序将文本框中输入的数字相除,并在标签中显示结果。 如果用户输入无效数据,它将显示相应的错误消息。
背景
在对两个数字进行除法时,最可能出现的问题可能与处理非数字数据和除以零有关。 在本文中,我描述了如何对此类错误进行数据验证。 在此应用程序中,我验证了用户没有在文本框中输入非数字数据和零。 我使用 Microsoft Visual C# 2010 Express Edition (Microsoft .NET Framework Version 4.0.21006) 开发了该应用程序。
Using the Code
要使用验证器函数,我们必须首先声明将在其中找到它的namespace。 这是通过为根Window元素添加一个属性来完成的,如下所示
xmlns:local="clr-namespace:ValidationExample"
window元素的完整 XAML 代码如下
<Window x:Class="ValidationExample.Window1"
    xmlns="http://schemas.microsoft.com/winfx/2006/xaml/presentation"
    xmlns:x="http://schemas.microsoft.com/winfx/2006/xaml"
    xmlns:local="clr-namespace:ValidationExample"
    Title="Number Division" Height="300" Width="300"
    Loaded="Window_Loaded">
在上面的代码中,Window Loaded 事件调用了Window_Loaded,用于使用初始值初始化我们的data对象。 Window_Loaded事件的后台代码如下
private void Window_Loaded(object sender, RoutedEventArgs e)
{
    MyData data = new MyData("", "");
    t1.DataContext = data;
    t2.DataContext = data;
}
MyData类代表我们的数据。 它由三个属性组成:FirstNumber、SecondNumber和Division。 它的代码如下
public class MyData
{
    public object FirstNumber    // FirstNumber Property
    {
        get;
        set;
    }
    public object SecondNumber    // SecondNumber Property
    {
        get;
        set;
    }
    public object Division        // Division Property
    {
        get
        {
            try
            {
                double n1 = Convert.ToDouble(FirstNumber.ToString());
                double n2 = Convert.ToDouble(SecondNumber.ToString());
                double n3 = n1 / n2;
                return n3;
            }
            catch (Exception)
            {
                return null;
            }
        }
    }
    public MyData(object FirstNumber, object SecondNumber)    // Constructor
    {
        this.FirstNumber = FirstNumber;
        this.SecondNumber = SecondNumber;
    }
}
为了显示除法的结果,我创建了一个名为myTemplate的模板,如下所示
<Window.Resources>
    <DataTemplate x:Key="myTemplate" DataType="ValidationExample.MyData">
        <StackPanel Orientation="Horizontal">
            <TextBlock Text="Division: "/>
            <TextBlock Text="{Binding Path=Division}"/>
        </StackPanel>
    </DataTemplate>
上面的代码通过将Division属性绑定到TextBlock来显示除法的结果。 为了显示任何验证错误,我创建了一个名为errorTemplate的带有键的控件模板,如下所示
<ControlTemplate x:Key="errorTemplate">
        <StackPanel>
            <TextBlock Foreground="Red">Invalid Value!!!</TextBlock>
            <AdornedElementPlaceholder/>
        </StackPanel>
    </ControlTemplate>
</Window.Resources>
在上面的代码中,AdornedElementPlaceholder元素用于显示错误消息。 用于接受用户输入的两个数字并显示除法结果的用户界面如下所示
    <Canvas>
        <Label Canvas.Left="10" Canvas.Top="40" Content="Enter First Number: "/>
        <TextBox x:Name="t1" Canvas.Left="135" Canvas.Top="40" Width="100"
        Height="30" Validation.ErrorTemplate="{StaticResource errorTemplate}"
        Validation.Error="NumberError">
            <Binding Path="FirstNumber" NotifyOnValidationError="True">
                <Binding.ValidationRules>
                    <local:NumberValidator/>
                </Binding.ValidationRules>
            </Binding>
        </TextBox>
        <Label Canvas.Left="10" Canvas.Top="80" Content="Enter Second Number: "/>
        <TextBox x:Name="t2" Canvas.Left="135" Canvas.Top="80" Width="100"
        Height="30" Validation.ErrorTemplate="{StaticResource errorTemplate}"
        Validation.Error="NumberError">
            <Binding Path="SecondNumber" NotifyOnValidationError="True">
                <Binding.ValidationRules>
                    <local:NumberValidator/>
                </Binding.ValidationRules>
            </Binding>
        </TextBox>
        <Button Name="b1" Canvas.Left="10" Canvas.Top="120" Width="225"
        Content="Divide" Click="b1_Click"/>
        <Label x:Name="lblResult" Canvas.Left="10"
        Canvas.Top="160" ContentTemplate="{StaticResource myTemplate}"/>
    </Canvas>
</Window>
在上面的代码中,Canvas元素用作容器。 两个TextBoxest1和t2分别绑定到属性FirstNumber和SecondNumber。 这两个textboxes 的错误模板是使用Validation.ErrorTemplate属性指定的。
textbox的<Binding>子元素用于将textbox绑定到其对应的数据属性(FirstNumber和SecondNumber)。 自定义验证类由<local:NumberValidator/>元素指定。 Button b1用于对数字进行除法运算,结果显示在名为lblResult的label中。 label的模板是使用ContentTemplate属性指定的。
错误模板的问题在于它总是显示一个通用的错误消息。 为了以工具提示的形式显示特定错误,使用了Validation.Error属性。 Validation.Error属性用于将textboxes 链接到名为NumberError的error函数。 NumberError函数的后台代码如下
private void NumberError(object sender, ValidationErrorEventArgs e)
{
    if (e.Action == ValidationErrorEventAction.Added)    // Validation Error Occurred
    {
        ((Control)sender).ToolTip = e.Error.ErrorContent.ToString();
    }
    else                        // No Error
    {
        ((Control)sender).ToolTip = "";
    }
}
上面的代码检查是否在textboxes 中输入了无效数据,并以工具提示的形式显示错误消息,并在错误被删除时重置工具提示。
Validation函数的代码如下
    public class NumberValidator : ValidationRule
    {
        public override ValidationResult Validate
        (object value, System.Globalization.CultureInfo cultureInfo)
        {
            double number = 0;
            try
            {
                number = Convert.ToDouble(value.ToString());  // Check for numeric value
            }
            catch (Exception)
            {
                return new ValidationResult(false, "Value must be numeric");
            }
            if (number == 0)                    // Check for non-zero value
            {
                return new ValidationResult(false, "Value must be non-zero");
            }
            return new ValidationResult(true, null);
        }
    }
}
自定义验证类必须继承自ValidationRule类,并且必须重写Validate方法。 Validate方法接受两个参数。 第一个参数是要验证的对象。 第二个参数的类型为System.Globalization.CultureInfo。 在这种情况下,Validate函数检查该值是否为数字且不为零,并返回一个ValidationResult对象。 ValidationResult构造函数的第一个参数是布尔值,如果数据为true,则表示数据有效,否则表示无效。 第二个参数是error消息string,以防数据无效,否则为null。
关注点
我希望本文将有助于以一种简单的方式理解 WPF 验证的基础知识。
历史
- 2012 年 1 月 30 日:初始版本