
构建带 RDS 支持的 FM 收音机
4.89/5 (16投票s)
本文介绍了如何使用 WPF 和 USBFM 库构建一个带 RDS 支持的简单 FM 收音机播放器。
引言
本文解释了如何使用开源的 USB FM 库 (由 我 编写) 和 Windows Presentation Foundation 来构建一个简单但功能齐全的具有 RDS 和 TMC 支持的收音机播放器。
背景
USB FM 库提供托管接口,使用 C# 开发,用于 USB FM 接收器,支持 RDS。WPF (Windows Presentation Foundation) 提供了一个易于使用的框架,可以零投入时间地构建丰富的用户界面。将这两者“融合”在一起,将使我们能够构建功能齐全的应用程序,而无需大量的时间投入。
第一步:构建线框图
为了构建一个 WPF 应用程序,我们应该首先构建线框图。WPF 为我们提供了丰富的布局控件选择。在我们的例子中,我们将使用 Grid 来标记主窗口 (也是唯一窗口) 中的区域。
 <Grid>
    <Grid.RowDefinitions>
        <RowDefinition Height="*"/>
        <RowDefinition Height="35px"/>
        <RowDefinition Height="Auto"/>
    </Grid.RowDefinitions>
    <Grid.ColumnDefinitions>
        <ColumnDefinition Width="Auto"/>
        <ColumnDefinition Width="*"/>
        <ColumnDefinition Width="Auto"/>
    </Grid.ColumnDefinitions>
 <Grid>
正如您所看到的,我们有三行三列。现在我们可以开始将控件放入其中了。
在任何收音机接收器中,我们都有旋钮来控制音量并调谐到电台。有一个现成的旋钮控件,由 Microsoft Expression Blend 团队准备。那为什么不“按原样”使用它呢?
为了做到这一点,我们必须引用控件库并在应用程序主体的 XAML 文件中定义控件的命名空间。
    xmlns:c="clr-namespace:RotaryControl;assembly=RotaryControl"
...
        <c:RotaryControl Name="Volume" RotationIsConstrained="True"
		ClockwiseMostAngle="340" Angle="340"/>
        <c:RotaryControl Name="Tune" Grid.Column="2"/>
我们还将添加两个标签和一个预设电台列表框,稍后将与 FM 设备库进行绑定。
         <TextBlock Text="Volume" Grid.Row="1"/>
        <TextBlock Text="Tune" Grid.Row="1" Grid.Column="2"/>

        <ListBox Name="Presets" ItemTemplate="{StaticResource PresetTemplate}"
		Grid.ColumnSpan="3" Grid.Row="2" Background="Transparent"
		HorizontalAlignment="Center" >
            <ListBox.ItemsPanel>
                <ItemsPanelTemplate>
                    <DockPanel Margin="0" IsItemsHost="True"/>
                </ItemsPanelTemplate>
            </ListBox.ItemsPanel>
        </ListBox>
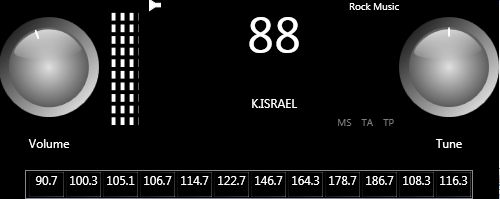
在 XAML 标记中唯一剩下的是设置频率和程序文本指示器、单声道/立体声图标和信号强度计的显示。为了设置所有这些,我们将创建另一个网格并将所有内容放入其中。
 <Grid Grid.Column="1">
    <Grid.RowDefinitions>
        <RowDefinition Height="12px"/>
        <RowDefinition Height="*"/>
        <RowDefinition Height="20px"/>
        <RowDefinition Height="20px"/>
    </Grid.RowDefinitions>
    <Grid.ColumnDefinitions>
        <ColumnDefinition Width=".2*"/>
        <ColumnDefinition Width="*"/>
    </Grid.ColumnDefinitions>
    <TextBlock Name="Freq" Grid.Column="1" Grid.Row="0" Grid.RowSpan="2"
		Style="{StaticResource LargeTextStyle}"/>
    <TextBlock Name="PS" Grid.Column="1" Grid.Row="2"/>
    <TextBlock Name="PTY" Grid.Column="1" Grid.Row="0"
	Style="{StaticResource PTYTextStyle}"/>
    <Path Name="MonoStereo" Stroke="White" Fill="White"
	Stretch="Fill" Grid.Column="1" Grid.Row="0" Width="12"
	Height="12" HorizontalAlignment="Left"/>
    <Rectangle Grid.RowSpan="4" Fill="{StaticResource SignalBrush}" Margin="10"/>
    <Rectangle Grid.RowSpan="4" Fill="Black" Margin="9" RenderTransformOrigin="0.5,0">
        <Rectangle.RenderTransform>
            <ScaleTransform x:Name="SignalTransform" ScaleX="1"/>
        </Rectangle.RenderTransform>
    </Rectangle>
    <StackPanel Grid.Column="1" Grid.Row="4" HorizontalAlignment="Right"
	Orientation="Horizontal">
        <TextBlock Style="{StaticResource IndiStyle}" Text="MS" Name="MS"/>
        <TextBlock Style="{StaticResource IndiStyle}" Text="TA" Name="TA"/>
        <TextBlock Style="{StaticResource IndiStyle}" Text="TP" Name="TP"/>
    </StackPanel>
</Grid>
我们的应用程序的线框图已完成,现在是时候让它看起来更好了。
第二步:样式化 WPF 应用程序
WPF 不仅易于使用标记构建 UI。它还提供了广泛的样式化可能性。资源具有分层结构,但在我们的应用程序中,我们将所有样式和模板放在 Window.Resource 级别。首先,让我们为所有 TextBlock 设置一个应用程序范围的样式。
<Style TargetType="TextBlock">
    <Setter Property="TextAlignment" Value="Center"/>
    <Setter Property="FontFamily" Value="{x:Static SystemFonts.SmallCaptionFontFamily}"/>
    <Setter Property="FontStyle" Value="{x:Static SystemFonts.SmallCaptionFontStyle}"/>
</Style>
正如您所看到的,当我们不设置 x:Key 属性时,它会应用于层次结构中较低的所有资源。此外,我们可以继承样式并设置特殊的键来在 XAML 标记和代码中标识资源。
<Style x:Key="LargeTextStyle" TargetType="TextBlock">
    <Setter Property="TextAlignment" Value="Center"/>
    <Setter Property="FontSize" Value="50"/>
</Style>
<Style x:Key="PTYTextStyle" TargetType="TextBlock">
    <Setter Property="TextAlignment" Value="Right"/>
    <Setter Property="FontSize" Value="10"/>
</Style>
我们还可以使用触发器,它们是直接在样式中的基本事件处理程序
 <Style BasedOn="{StaticResource PTYTextStyle}" x:Key="IndiStyle" TargetType="TextBlock">
    <Setter Property="Margin" Value="5,0,5,0"/>
    <Setter Property="Foreground" Value="White"/>
    <Style.Triggers>
        <Trigger Property="IsEnabled" Value="False">
            <Setter Property="Foreground" Value="Gray"/>
        </Trigger>
    </Style.Triggers>
</Style>
除了所有这些,我们还可以通过覆盖 Template 属性来完全重新定义控件的外观和感觉,如下所示
<Style TargetType="Button">
    <Setter Property="Foreground" Value="White"/>
    <Setter Property="Template">
        <Setter.Value>
            <ControlTemplate TargetType="Button">
                <Border Height="25" Width="35" BorderThickness=".5"
			Background="Black" Name="PART_Border" >
                    <Border.BorderBrush>
                        <LinearGradientBrush EndPoint="0.854,0.854"
			StartPoint="0.146,0.146">
                            <GradientStop Color="#FF262626" Offset="0"/>
                            <GradientStop Color="#FFD7D7D7" Offset="1"/>
                        </LinearGradientBrush>
                    </Border.BorderBrush>
                    <ContentPresenter HorizontalAlignment="Center"
			SnapsToDevicePixels="True" Margin="0"
			MouseLeftButtonDown="Button_MouseLeftButtonDown"/>
                </Border>
                <ControlTemplate.Triggers>
                    <Trigger Property="IsPressed" Value="True">
                        <Setter Property="BorderBrush" TargetName="PART_Border">
                            <Setter.Value>
                                <LinearGradientBrush EndPoint="0.854,0.854"
				StartPoint="0.146,0.146">
                                    <GradientStop Color="#FF262626" Offset="1"/>
                                    <GradientStop Color="#FFD7D7D7" Offset="0"/>
                                </LinearGradientBrush>
                            </Setter.Value>
                        </Setter>
                    </Trigger>
                </ControlTemplate.Triggers>
            </ControlTemplate>
        </Setter.Value>
    </Setter>
</Style>
但不仅仅是样式可以存储在 Resources 中。我们还可以共享其他对象,例如几何图形 (用于单声道/立体声指示器) 或画笔。
<Geometry x:Key="MonoGeometry">M0,0L1,2 2,2 2,4 1,4 0,6z</Geometry>
<Geometry x:Key="StereoGeometry">M0,0L1,2 2,2 3,0 3,6 2,4 1,4 0,6z</Geometry>
<DrawingBrush x:Key="SignalBrush" TileMode="Tile" Viewport="0,0,.3,.1" Stretch="Uniform">
    <DrawingBrush.Drawing>
        <DrawingGroup>
            <GeometryDrawing Brush="Black">
                <GeometryDrawing.Geometry>
                    <RectangleGeometry Rect="0,0,20,20"/>
                </GeometryDrawing.Geometry>
            </GeometryDrawing>
            <GeometryDrawing Brush="White">
                <GeometryDrawing.Geometry>
                    <RectangleGeometry Rect="0,20,20,40"/>
                </GeometryDrawing.Geometry>
            </GeometryDrawing>
        </DrawingGroup>
    </DrawingBrush.Drawing>
</DrawingBrush>
我们还可以为应用程序中使用的数据类定义模板。例如,我希望电台预设的 double 值显示为按钮。下面是如何做到这一点
<DataTemplate x:Key="PresetTemplate">
    <Button Content="{Binding}" />
</DataTemplate>
现在 UI 已完全完成。是时候转向“代码隐藏”了。
第三步:连接基本业务逻辑
首先,我们必须初始化我们的 USB FM 设备。这是一个非常简单的任务。只需找到它
 _device = USBRadioDevice.FindDevice(RadioPlayer.Properties.Settings.Default.PID,
	RadioPlayer.Properties.Settings.Default.VID);
现在我们需要订阅它的事件并为某些成员设置数据绑定
_device.PropertyChanged += (s, ed) => {
   if (ed.PropertyName == "RDS" && _device.RDS != null) {
      //set bindings
      this.Dispatch(() => {
         Presets.SetBinding(ListBox.ItemsSourceProperty, _device, "Presets");
         Freq.SetBinding(TextBlock.TextProperty, _device,
		"CurrentFrequency", new ValueConverter<double,
		double>(d => { return d == 0 ? _device.CurrentStation : d; }));
         PS.SetBinding(TextBlock.TextProperty, _device.RDS, "PS");
         PTY.SetBinding(TextBlock.TextProperty, _device.RDS, "PTYString");
         MonoStereo.SetBinding(Path.DataProperty, _device.RDS, "IsStereo",
		new ValueConverter<bool, Geometry>(b =>
		{ return (Geometry)(b ? this.Resources["StereoGeometry"] :
		this.Resources["MonoGeometry"]); }));
         SignalTransform.SetBinding(ScaleTransform.ScaleYProperty,
		_device.RDS,"SignalStrength",
		new ValueConverter<byte, double>(b => { return 1-(b / 36d); }));
         MS.SetBinding(TextBlock.IsEnabledProperty, _device.RDS, "HasMS");
         TA.SetBinding(TextBlock.IsEnabledProperty, _device.RDS, "HasTA");
         TP.SetBinding(TextBlock.IsEnabledProperty, _device.RDS, "HasTP");
      });
   }
};
在此代码中,我使用了一些我自己开发的“省时”工具来简化某些 WPF 方面的内容。:) 如果您想了解更多关于这些省时工具的信息,请 访问 并通过 RSS 订阅 我的博客。
现在是时候初始化音频和 RDS 报告了
_device.InitAudio();
_device.InitRDSReports();
此外,一个小技巧是无需显式设置绑定即可收到音量和调谐旋钮“角度”依赖项属性更改的通知。
Volume.AddValueChanged(RotaryControl.RotaryControl.AngleProperty, (s, ex) => {
   DirectSoundMethods.Volume = (int)Volume.Angle.ToRange
	(Volume.CounterClockwiseMostAngle, Volume.ClockwiseMostAngle, -4000, 0);
});
 Tune.AddValueChanged(RotaryControl.RotaryControl.AngleProperty, (s, ex) => {
   _device.Tune(Tune.Angle > _prevTune);
   _prevTune = Tune.Angle;
});
实际上我们已经完成了。现在我们的应用程序几乎准备就绪。剩下的就很清楚和简单了。
第四步:最终化应用程序
首先,我们在 USB FM 库中使用平台调用,因此它实现了 IDisposable 接口。如果您不想在内存中留下句柄,停止音频、RDS 报告线程并处理 USB 句柄是一个非常好的主意。
  private void Window_Closing(object sender, System.ComponentModel.CancelEventArgs e) {
     _device.StopRDSReports();
     _device.StopAudio();
  }
   private void Window_Unloaded(object sender, RoutedEventArgs e) {
     _device.Close();
     _device.Dispose();
     _device = null;
  }
此外,我们的应用程序运行在无边框窗口中,所以我们必须以某种方式拖动它。为什么不使用 Windows 的 DragMove() 方法来实现呢?请注意,旋钮控件会捕获移动,所以如果我们想让它继续工作,了解鼠标移动事件的来源是有意义的。
private void Window_PreviewMouseLeftButtonDown(object sender, MouseButtonEventArgs e) {
    if (e.Source.GetType().IsSubclassOf(typeof(Window)) ||
		e.Source.GetType().Equals(typeof(TextBlock))) DragMove();
}
最后一件事是获取预设按钮点击并调谐到选定的电台
  private void Button_MouseLeftButtonDown(object sender, MouseButtonEventArgs e) {
     var button = sender as ContentPresenter;
     if (button != null) {
        var frq = double.Parse(button.Content.ToString());
        _device.Tune(frq);
     }
  }
我们完成了。现在我们可以编译并运行我们的应用程序了。是不是很有趣?:)
参考文献
- CodePlex 上的 FM USB 库
- Microsoft Expression Blend 团队的 旋转自定义控件
- 我的博客,特别是
修订历史
- 2009 年 1 月 8 日 - 发布文章