
Audio-Gallery-Suite(一款完整的 HTML5/CSS3/jQuery-JS/PHP/C# 音频库解决方案)
4.99/5 (82投票s)
Audio-Gallery-Suite 是一个完整的音频库解决方案,它包含一个 Web 音频库和用于管理该 Web 音频库的软件。该解决方案采用 HTML5/CSS3/Jquery-JS/PHP-Ajax/C# 构建。
在深入了解之前,请观看此视频演示:让我们一起观看!!!
从 GitHub 下载最新版本的 Audio Gallery Suite:GITHUB。(请在 GitHub 上点亮此仓库)
更新(2013 年 4 月 30 日) - Audio-Gallery-Suite 已更新,现已拥有一个名为 GALLARDMIN 的基于 Web 的管理界面,用于管理音频库。 Gallardmin 提供了一个精致易用、功能齐全的管理界面。它利用了最新的 xhr2、html5 和 javascript 技术。
更新(2012 年 7 月 2 日) - Audio-Gallery-Suite 已更新,现在与 IE9 兼容。
目录
描述
Audio-Gallery-Suite 是一个完整的音频库套件/解决方案,它包含一个 Web 音频库以及一个用于管理播放列表、上传音频和管理 Web 音频库的软件。Audio-Gallery-Suite 使用最新技术构建,并利用其强大功能提供了一个精致的解决方案。Audio-Gallery-Suite 的设计易于任何人安装和部署。我希望这个项目能对需要使用它的人有所帮助。
技术栈
- HTML5
- CSS3
- JavaScript/jQuery
- AJAX
- PHP
- MySQL
- .NET/C#
演示
请访问下面的链接查看 Web 音频库。我推荐使用 Chrome/Firefox 浏览器查看 Web 音频库。http://projects.robinrizvi.info/audio-gallery-suite/
请访问下面的链接下载用于上传音频和管理此演示中使用的 Web 音频库的软件。请使用用户名 [superuser] 和密码 [superuser](不包括方括号)登录软件。
http://projects.robinrizvi.info/audio-gallery-suite/software/audiogallery_setup.zip
下载/贡献
下载完整的 Audio-Gallery-Suite 以及完整的源代码和 Audio-Gallery-Suite 中使用的所有资源。如果您想在您的任何项目中使用 Audio-Gallery-Suite,您需要下载完整的套件并遵循我稍后将讨论的安装说明。您可以为本项目做出贡献,使其变得更好,请随时通过 GitHub 分叉项目(使用与下面相同的链接)。
https://github.com/robinrizvi/Audio-Gallery-Suite
特性
Web 库
- 动态加载播放列表。
- 动态加载属于播放列表的音频。
- 动态音频搜索。
- 易于使用的音频播放器。
- 提供播放、暂停、下一首、上一首、音量控制和跳转等选项。
- 可以使用键盘按键操作音频播放器。
- 旋转光盘以指示音频的播放状态。
- 音频分享到流行的社交网络。
- 当前选定的音频可下载。
- 音频文件的直接链接可查看和复制。
- 响应式布局,Web 库会随着浏览器大小调整而调整。
库软件
- 播放列表可添加、编辑和删除。
- 音频可添加到任何已添加的播放列表中。
- 音频可编辑和删除。
- 可配置设置,如更改用户名和密码。
- 可添加、编辑和删除其他用户(仅通过超级用户帐户)。
- 响应式/非阻塞用户界面。
- 显示音频上传进度。
- 要上传的每个音频在上传前都会标记一个海报(也称为专辑封面)。
安装(使用 Gallardmin - 基于 Web 的库管理软件)
- 下载此 zip 文件:https://github.com/robinrizvi/Audio-Gallery-Suite/archive/master.zip
- 在您的 MySQL 服务器上执行这些 SQL 脚本(位于 Resources/SQL Script):1)audiogallery_db.sql 2)create_user_[optional].sql
- 配置 config.php(位于 Gallery/php),如果数据库或数据库用户有任何更改,但未更改上述 SQL 脚本所假定的默认值。
- 将 zip 中 Gallery 文件夹的内容复制/上传到您的服务器。
- 访问http://root_url_to_gallery_folder/management/audiogallery/login.html
- 将用户名和密码分别键入 superuser 和 superuser。
- 添加播放列表,并在该播放列表下添加音频。
- 访问 http://root_url_to_gallery_folder/index.html 查看您的库
安装(在远程服务器上,使用基于 Windows 的管理软件)
注意
- 方括号 [] 仅用于表示重要性,否则应忽略。
- [root_url_of_web_gallery] 指的是 Web 库文件将驻留在您的 Web 服务器上的文件夹或 URL。例如:在我(请参阅上面的演示部分)的演示中,它是http://projects.robinrizvi.info/audio-gallery-suite/ (http://www.yourdomain.com/foldername/)。
初始步骤
- 从 GitHub 下载完整的 Audio-Gallery-Suite(请参阅上面的下载/贡献部分)。解压缩下载的 zip 文件。
- 现在您的磁盘上应该有一个名为 [Audio-Gallery-Suite] 的文件夹,其中包含 audio-gallery-suite。
- 打开磁盘上的 [Audio-Gallery-Suite\Gallery] 文件夹,并在其中创建一个名为 [audiogallery] 的文件夹。
- 现在打开 [Audio-Gallery-Suite\Gallery\audiogallery] 文件夹,并在其中创建一个名为 [user_0] 的文件夹。它在您的磁盘上应该如下所示:[Audio-Gallery-Suite\Gallery\audiogallery\user_0]。
上传 Web 库:
- 将磁盘上 [Audio-Gallery-Suite\Gallery] 文件夹中的所有文件上传到您的服务器/主机上的 [root_url_of_web_gallery] 目录(请参阅上面的“注释”)。
配置 FTP:
- 在您的服务器/主机上创建一个 FTP 帐户,该帐户指向服务器上的 [root_url_of_web_gallery/audiogallery] 目录。请记住我们将使用(FTP 服务器名、FTP 用户名、FTP 密码),请记下它们。
创建数据库:
- 打开磁盘上 [Audio-Gallery-Suite\Resources\SQL Script] 文件夹中的 [audiogallery_db.sql] 文件。(您可以使用记事本等任何文本编辑器打开 sql 文件)。
- 如果您想将数据库名称从默认名称 [audiogallery] 更改为其他名称,可以通过将行 [CREATE DATABASE IF NOT EXISTS audiogallery;USE audiogallery;] 更改为 [CREATE DATABASE IF NOT EXISTS some_other_database_name;USE some_other_database_name;] 来实现。
- 如果您已经创建了一个其他名称的数据库,请从 sql 脚本中删除行 [CREATE DATABASE IF NOT EXISTS audiogallery;] 并像这样编辑行 [USE audiogallery]:[USE your_other_db_name;]。
- 如果您想更改 SUPERUSER 的用户名和密码,可以通过 [audiogallery_db.sql] 进行更改,如下所示:[INSERT INTO `user` (`id`,`username`,`password`,`name`,`description`) VALUES
(0,'your_superuser_username','your_superuser_password','Super User','Superuser that creates and manages other users and can also create also create and manage his own playlists and audios');。 - 在 [audiogallery_db.sql] 文件中更改 ftp 设置,如下所示:[INSERT INTO `settings` (`ftpurl`,`ftpusername`,`ftppassword`) VALUES ('ftp://your_ftp_server/','ftp_username','ftp_password');]。请记住,这三个值是我们创建服务器上的 FTP 帐户时获得的值(请参阅上面的“配置 FTP”部分)。
- 在保存和执行 [audiogallery_db.sql] 文件之前,请确保超级用户配置和 ftp 配置已正确设置。
- 保存 [audiogallery_db.sql] 文件。
- 在进行上述更改后执行 [audiogallery_db.sql](它默认创建一个名为 audiogallery 的数据库)。您可以通过服务器的 PHPMYADMIN 进行“导入”来执行 sql 脚本(屏幕截图),或者您可以下载 MySQL Workbench(下载链接),连接到您的远程数据库服务器,然后导入 sql 脚本并执行它。
- 请记住,我们需要记下数据库名称、分配给数据库的用户的用户名和密码(即有权对我们创建的数据库执行操作(运行查询)的用户)。
配置 PHP:
- 在磁盘上的 [Audio-Gallery-Suite\Gallery\php] 文件夹中打开 [config.php] 文件。您可以使用任何文本编辑器打开此文件。
- 在 [config.php] 中配置数据库设置,如下所示:[$mysqli = new mysqli("localhost", "DB_USERNAME", "DB_PASSWORD", "DB_NAME"); ]。请记住,[localhost] 不需要更改,其余三个值是我们在服务器上创建数据库时获得的值(请参阅上面的“创建数据库”部分)。
- 在 [config.php] 文件中配置 [$root] 变量,如下所示:[$root= “http://root_url_of_web_gallery/”;]。什么是 [root_url_of_web_gallery]?(请参阅上面的“注释”部分)。例如:在我(请参阅上面的演示部分)的演示中使用了 [$host=”http://projects.robinrizvi.info/audio-gallery-suite/”]。请记住,不要忘记在末尾添加斜杠。
- 完成上述更改后,保存 [config.php] 文件。
- 将磁盘上 [Audio-Gallery-Suite/Gallery/php] 文件夹中的 [config.php] 文件上传到您的服务器/主机上的 [root_url_of_web_gallery/php] 文件夹(替换旧的 [config.php] 文件)。
配置 Web 库软件
- 在磁盘上的 [Audio-Gallery-Suite\Software] 文件夹中,使用 Visual Studio 打开 [AUDIO GALLERY.sln] 文件。
- 从 audiogallery 项目的 Resources(在 Solution-Explorer->Properties->Resources 中)打开 Resources。
- 编辑 Resources 中的 [mysqlconnectionstring] 设置,以便正确配置 MySQL 数据库连接设置,如下所示:[server=DB_SERVER_HOST;User Id=DB_USERNAME;Persist Security Info=True;database=DB_NAME;password=DB_PASSWORD]。请记住,DB_SERVER 将指代您的服务器(即数据库服务器运行的位置),例如 server=your_host_domain.com,其余三个(DB_USERNAME、DB_NAME、DB_PASSWORD)是我们创建数据库时记录的值(请参阅上面的“创建数据库”部分)。
- 重新生成整个解决方案。.
添加一些播放列表和音频。
- 现在运行软件(从构建的 exe、visual studio 或 audiogallery_setup.exe)。
- 使用超级用户的用户名和密码登录(默认为 [superuser] 和 [superuser])。
- 在这里,您可以创建一些播放列表并将音频添加到其中,以便 Web 库显示一些音频。
- 擦干汗水,为看到一切正常工作而高兴!
安装(在本地服务器/本地主机上,使用基于 Windows 的管理软件)
注意:
- 方括号 [] 仅用于表示重要性,否则应忽略。
- [root_url_of_web_gallery] 指的是您的本地测试服务器上的 URL,Web 库文件将驻留在该 URL 上。例如:https:///gallery/,在我本地的设置中,[gallery] 是我在 [apache webserver] 的 [www] 文件夹中创建的文件夹([https://] 是我的机器的回环地址,指向 [www] 文件夹)。
- [root_folder_of_web_gallery] 指的是您的本地测试服务器上的文件夹,Web 库文件将驻留在该文件夹中。例如:在我本地的设置中,https:// 指向 [C:\Program Files (x86)\EasyPHP-5.3.6.1\www] 文件夹,然后我在 www 文件夹中创建了一个名为 gallery 的文件夹,因此我的 [root_folder_of_web_gallery] 是 [C:\Program Files (x86)\EasyPHP-5.3.6.1\www\gallery\],我的 [root_url_of_web_gallery] 是 [https:///gallery/ ]
初始步骤:
- 从 GitHub 下载完整的 Audio-Gallery-Suite(请参阅上面的下载/贡献部分)。解压缩下载的 zip 文件。
- 现在您的磁盘上应该有一个名为 [Audio-Gallery-Suite] 的文件夹,其中包含 audio-gallery-suite。
- 打开磁盘上的 [Audio-Gallery-Suite\Gallery] 文件夹,并在其中创建一个名为 [audiogallery] 的文件夹。
- 现在打开 [Audio-Gallery-Suite\Gallery\audiogallery] 文件夹,并在其中创建一个名为 [user_0] 的文件夹。它在您的磁盘上应该如下所示:[Audio-Gallery-Suite\Gallery\audiogallery\user_0]。
- 您的本地计算机上必须设置 WAMP(Windows+Apache+MySQL+PHP)堆栈。如果您还没有,可以从EasyPHP 下载链接下载。请记住,您也可以选择 LAMP 堆栈,但为了运行 .NET 软件,建议您安装 WAMP。
- 您的计算机上必须有一个本地 FTP 服务器。您可以使用 IIS 或Xlight FTP 服务器(请参阅Xlight 使用说明)。
上传 Web 库:
- 将磁盘上 [Audio-Gallery-Suite\Gallery] 文件夹中的所有文件复制到您的本地 Web 服务器的 [root_folder_of_web_gallery] 文件夹中(请参阅上面的“注释”)。例如 - 我将所有文件复制到了这个文件夹 [C:\Program Files (x86)\EasyPHP-5.3.6.1\www\gallery\]
配置 FTP:
- 在本地计算机上添加一个 FTP 站点(使用 Xlight - 请参阅Xlight 使用说明或 IIS),该站点指向服务器上的 [root_folder_of_web_gallery\audiogallery] 目录。请记住我们将使用(FTP 服务器名、FTP 用户名、FTP 密码),请记下它们。例如 - 我的 FTP 服务器名是 localhost,FTP 用户名是 robin,FTP 密码是 robinr,我的 FTP 站点指向 [C:\Program Files (x86)\EasyPHP-5.3.6.1\www\gallery\audiogallery] 文件夹。
创建数据库:
- 打开磁盘上 [Audio-Gallery-Suite\Resources\SQL Script] 文件夹中的 [audiogallery_db.sql] 文件。(您可以使用记事本等任何文本编辑器打开 sql 文件)。
- 如果您想将数据库名称从默认名称 [audiogallery] 更改为其他名称,可以通过将行 [CREATE DATABASE IF NOT EXISTS audiogallery;USE audiogallery;] 更改为 [CREATE DATABASE IF NOT EXISTS some_other_database_name;USE some_other_database_name;] 来实现。
- 如果您已经创建了一个其他名称的数据库,请从 sql 脚本中删除行 [CREATE DATABASE IF NOT EXISTS audiogallery;] 并像这样编辑行 [USE audiogallery]:[USE your_other_db_name;]。
- 如果您想更改 SUPERUSER 的用户名和密码,可以通过 [audiogallery_db.sql] 进行更改,如下所示:[INSERT INTO `user` (`id`,`username`,`password`,`name`,`description`) VALUES
(0,'your_superuser_username','your_superuser_password','Super User','Superuser that creates and manages other users and can also create also create and manage his own playlists and audios');。 - 在 [audiogallery_db.sql] 文件中更改 ftp 设置,如下所示:[INSERT INTO `settings` (`ftpurl`,`ftpusername`,`ftppassword`) VALUES ('ftp://your_local_ftp_server_url/','ftp_username','ftp_password');]。请记住,这三个值是我们创建服务器上的 FTP 帐户时获得的值(请参阅上面的“配置 FTP”部分)。例如 - 'ftp:///', 'robin', 'robinr' 是我的三个值。
- 在保存和执行 [audiogallery_db.sql] 文件之前,请确保超级用户配置和 ftp 配置已正确设置。
- 保存 [audiogallery_db.sql] 文件。
- 在进行上述更改后执行 [audiogallery_db.sql](它默认创建一个名为 audiogallery 的数据库)。您可以通过本地服务器的 PHPMYADMIN 进行“导入”来执行 sql 脚本(屏幕截图),或者您可以下载 MySQL Workbench(下载链接),连接到您的本地数据库服务器,然后导入 sql 脚本并执行它。
- 请记住,我们需要记下数据库名称、分配给数据库的用户的用户名和密码(即有权对我们创建的数据库执行操作(运行查询)的用户)。如果您在确定刚创建的数据库用户的用户名-密码时遇到任何问题,可以更改/配置并执行 [Audio-Gallery-Suite\Resources\SQL Script] 文件夹中的 [create_user_[optional].sql] sql 脚本。
配置 PHP:
- 在 [root_folder_of_web_gallery\php] 文件夹中打开 [config.php] 文件。您可以使用任何文本编辑器打开此文件。例如 - 在我的本地设置中,config.php 文件位于 [C:\Program Files (x86)\EasyPHP-5.3.6.1\www\gallery\php\config.php]
- 在 [config.php] 中配置数据库设置,如下所示:[$mysqli = new mysqli("localhost", "DB_USERNAME", "DB_PASSWORD", "DB_NAME"); ]。请记住,[localhost] 不需要更改,其余三个值是我们在服务器上创建数据库时获得的值(请参阅上面的“创建数据库”部分)。例如 - 在我的本地设置中使用了 [$mysqli = new mysqli("localhost", "audgaldbusr", "audgaldbpwd", "audiogallery");]。
- 在 [config.php] 文件中配置 [$root] 变量,如下所示:[$root= “http://root_url_of_web_gallery/”;]。什么是 [root_url_of_web_gallery]?(请参阅上面的“注释”部分)。例如:在我本地的设置中使用了 [$host= "https:///gallery/";]。请记住,不要忘记在末尾添加斜杠。
- 完成上述更改后,保存 [config.php] 文件。
配置 Web 库软件
- 在磁盘上的 [Audio-Gallery-Suite\Software] 文件夹中,使用 Visual Studio 打开 [AUDIO GALLERY.sln] 文件。
- 从 audiogallery 项目的 Resources(在 Solution-Explorer->Properties->Resources 中)打开 Resources。
- 编辑 Resources 中的 [mysqlconnectionstring] 设置,以便正确配置 MySQL 数据库连接设置,如下所示:[server=DB_SERVER_HOST;User Id=DB_USERNAME;Persist Security Info=True;database=DB_NAME;password=DB_PASSWORD]。例如 - [server=localhost;User Id=audgaldbusr;Persist Security Info=True;database=audiogallery;password=audgaldbpwd],这是我在本地设置中使用的设置。请记住,DB_SERVER 将指代您的本地主机/服务器(即数据库服务器运行的位置),其余三个(DB_USERNAME、DB_NAME、DB_PASSWORD)是我们创建数据库时记录的值(请参阅上面的“创建数据库”部分)。
- 重新生成整个解决方案。.
添加一些播放列表和音频:
- 现在运行软件(从构建的 exe、visual studio 或 audiogallery_setup.exe)。
- 使用超级用户的用户名和密码登录(默认为 [superuser] 和 [superuser])。
- 在这里,您可以创建一些播放列表并将音频添加到其中,以便 Web 库显示一些音频。
- 是时候再次感到高兴了!
代码深入解析
我将简要介绍 audio-gallery-suite 的内部工作原理。建议您在深入了解代码和内部工作原理之前,先查看演示部分(见上文)。我将讨论 audio-gallery-suite(Web 库和库软件)一些关键功能的实现,并尝试简要介绍用于实现这些功能的代码。
注意:代码的重要部分用粗斜体标出。
工作原理
在开始讨论代码之前,让我们先看看整个系统是如何工作的。让我们对套件的主要部分及其如何协同工作有一个大致的了解。套件的主要部分是
- 服务器/主机上的 [audiogallery] 目录,音频将上传到这里。
- 数据库,其中包含音频、播放列表、用户和套件使用的常规设置的详细信息。
- Web 音频库,它为 Web 用户提供在网站上收听音频的界面。
- 音频库软件,授权用户用于创建播放列表和上传音频。

让我们考虑一个场景来理解 audio-gallery-suite 的工作原理以及上述四个部分如何(神奇地,我希望!)协同工作。
- 使用超级用户用户名/密码登录音频库软件。超级用户帐户是最初存在的默认帐户。
- 点击“[Manage Users]”按钮。
- 创建一个用户帐户 [user_test](注意:只有超级用户才能创建用户)。
- 创建用户 [user_test] 后,会将一个记录插入 [user] 表,并为此用户创建一个自动 [id](例如,user_test 的 id 为 2)。
- 服务器/主机上的 [audiogallery] 目录现在看起来像这样:{Root}/audiogallery/user_2
- 现在使用 [user_test] 帐户登录库软件。
- 然后通过点击播放列表窗格中的 [Add] 按钮创建播放列表 [playlist_test]。
- 添加播放列表后,会在数据库(默认命名为 audiogallery)的 [playlist] 表中添加一个播放列表条目,并为其生成一个自动 [id](例如,playlist_test 的 id 为 1)。请注意,[playlist] 表中 [playlist_test] 的记录指定用户 [user_test] 为其用户,即 [playlist_test] 的 [user_id=2]。
- 服务器/主机上的 [audiogallery] 目录看起来像这样:{Root}/audiogallery/user_2/playlist_1/audios
- 现在点击软件中的 [playlist_test] 将其设为当前播放列表。
- 接下来使用音频窗格中的 [Add] 按钮将一些音频添加到 [playlist_test]。
- 添加音频时,记录会被添加到数据库的 [audio] 表中。 [audio] 表的每条记录都通过在记录中指定正确的 [playlist_id] 来指定音频所属的播放列表,在本例中,新添加的音频的 [playlist_id] 将是 [playlist_id=1]。
- 添加的音频将上传到此目录:{Root}/audiogallery/user_2/playlist_1/audios/audio_test.mp3
- 现在,当您打开 Web 库时,在页面/DOM 加载完成后,播放列表会通过查询数据库中的 [playlist] 表加载到下拉列表中。
- 现在,当您从 Web 库的 [Select Playlist] 下拉列表中选择您的播放列表 [playlist_test] 时,属于 [playlist_test] 的音频会通过查询数据库中的 [audio] 表加载。
- 选择 [playlist_test] 播放列表后,您将在 Web 库的音频列表中看到 [audio_test] 音频/mp3 文件(以及您可能在此播放列表下上传的任何其他文件)。
- 现在,只需点击 Web 库中的 [audio_test] mp3 文件,享受美妙的音乐!
查看下面的视频以更清楚地了解上述场景。
到目前为止,让我们再走几步。如上所述,Audio-Gallery-Suite 的四个主要部分是:[audiogallery] 目录、数据库、Web 音频库和音频库软件。这四个主要部分将在下面的部分中进行更详细的讨论(按列出的顺序)。
1. 目录结构
让我们看一下将上传音频的目录结构。该目录名为 [audiogallery]。由于此目录包含上传的播放列表和音频,并且 Web 音频库和库软件都会使用它。它具有特定的目录结构格式,如下所示:{Root}/audiogallery/user_id/playlist_id/audios/

2. 数据库结构

上面图示中显示的数据库模式显示了数据库中使用的四个表。
- audio:audio 表包含上传的音频。它指定音频的 id、name、title 和 description。它有一个属性 [playlist_id],用于指定特定音频所属的播放列表。
- playlist:playlist 表包含创建的播放列表。它指定播放列表的 id、name、thumb(代表播放列表的缩略图)和 description。它有一个属性 [user_id],用于指定创建特定播放列表并有权管理该播放列表的用户。
- user:user 表包含所有授权使用音频库软件的用户。它指定特定用户的 id、username、password、name 和 description。授权用户可以创建播放列表和上传音频。用户上传的音频将属于他创建的某个播放列表。
- settings:settings 表仅包含关于 FTP 信息的一条记录。音频库软件使用此 FTP 信息将音频上传到服务器/主机。
3. Web 库
HTML 骨架

Web 库的主文件是 [index.html] 文件。其结构如图所示。从视觉上看,它分为左右两部分。(更多说明请参阅下面的屏幕截图部分)
左侧部分包含播放列表选择元素、音频列表和音频搜索元素。
右侧部分包含封面艺术(DVD 盒)、音频播放器以及当前播放的音频名称和播放列表名称。
这是显示主 [index.html] 的屏幕截图。

可以在下面看到主 [index.html] 的原始 HTML 代码和结构。
HTML 代码
<body>
  <!--Contains the album selector, audios from the playlist and search-->
  <div id="left">
    <div id="playlistselecttoolbar">
      <label>Select Playlist :</label> <select name="playlistselect" id="playlistselect">
        <!--Content will be loaded via ajax php from the database-->
      </select>
    </div>
    <div id="audiolist">
      <!--Content will be loaded via ajax php from the database.-->
    </div>
    <div id="searchaudiotoolbar">
      <label>Search Audio :</label> <input id="searchinput" name="audiosearchtxt" type=
      "text" />
      <div id="searchbtnimg"></div>
    </div>
  </div>
  <!--Contains the audio player, cover art and hopefully a visualizer if I can pull it off-->
  <div id="right">
    <div id="coverart">
        <img src="image/audiogallery_images/coverart.png" oriwidth="693"
          oriheight="680" width="693" height="680" alt="coverart" />
        <img id="rotatingdisc" src="image/audiogallery_images/rotating_disc.png"
          width="350" height="350" alt="rotatingdisc" name="rotatingdisc" />
    </div>
    <div class="sharebar">
        <input name="audiourl" type="text" readonly="true" />
        <!--<a id="copyurltool" class="button gray medium">COPY</a>-->
    </div>
    <div id="toolbar">
        <a id="shareaudiotool"
          class="sharebar-trigger button gray medium" name="shareaudiotool">LINK</a>
        <a id="addthissharetool"
          class="sharebar-trigger button gray medium" name="addthissharetool">SHARE</a>
        <a id="downloadaudiotool" target="_blank"
           class="button gray medium" name="downloadaudiotool">DOWNLOAD</a>
        <a id="helptool" class="button gray medium"
          rel="prettyPhoto[inline]" href="#inline_content"
          name="helptool">HELP</a>
    </div>
    <div id="player">
      <div id="jquery_jplayer_2" class="jp-jplayer"></div>
      <div class="jp-audio">
        <div class="jp-type-playlist">
          <div id="jp_interface_2" class="jp-interface">
            <ul class="jp-controls">
              <li><a href="#" class="jp-play"
                 tabindex="1">play</a></li>
              <li><a href="#" class="jp-pause"
                 tabindex="1">pause</a></li>
              <li><a href="#" class="jp-stop"
                 tabindex="1">stop</a></li>
              <li><a href="#" class="jp-mute"
                 tabindex="1">mute</a></li>
              <li><a href="#" class="jp-unmute"
                 tabindex="1">unmute</a></li>
              <li><a href="#" class="jp-previous"
                 tabindex="1">previous</a></li>
              <li><a href="#" class="jp-next"
                 tabindex="1">next</a></li>
            </ul>
            <div class="jp-progress">
              <div class="jp-seek-bar">
                <div class="jp-play-bar"></div>
              </div>
            </div>
            <div class="jp-volume-bar">
              <div class="jp-volume-bar-value"></div>
            </div>
            <div class="jp-current-time"></div>
            <div class="jp-duration"></div>
          </div>
        </div>
      </div>
    </div>
    <div id="playerstatbar">
      <span id="nowplaying">Now Playing:</span> <span id="currentplaylist">Current
      Playlist: </span>
    </div>
  </div><!--This is an isolated div to show help to the users-->
  <div style='display:none'>
    <div id='inline_content'>
      <div style= "background-color:#000;padding:5px;width:98%;
        margin-bottom:5px;text-align:center;color:#FFF;height:1em;font-size:1em;">
      HELP/INSTRUCTIONS
      </div>
      <div style='padding:10px; vertical-align:middle; font-size:0.9em;'>
        <div style="margin-bottom:15px">
          <img style='vertical-align:middle;' src="image/help_images/mouse.png" width=
          "50" height="70" /><span style='margin-left:10px;'>Use your mouse
                   to interact with the player.</span>
        </div>
        <div style="margin-bottom:15px">
          <img style='vertical-align:middle;' src="image/help_images/space.png" width=
          "150" height="50" /><span style='margin-left:10px;'>Press the space-bar to
          toggle Play and Pause.</span>
        </div>
        <div style="margin-bottom:15px">
          <img style='vertical-align:middle;' src="image/help_images/right.png" width=
          "50" height="50" /><span style='margin-left:10px;'>Press the right arrow key to
          jump to next audio.</span>
        </div>
        <div style="margin-bottom:15px">
          <img style='vertical-align:middle;' src="image/help_images/left.png" width="50"
          height="50" /><span style='margin-left:10px;'>Press the left arrow key to jump
          to previous audio.</span>
        </div>
        <div style="margin-bottom:15px">
          <img style='vertical-align:middle;' src="image/help_images/m.png" width="50"
          height="50" /><span style='margin-left:10px;'>Press the M key to toggle mute
          and unmute.</span>
        </div>
        <div style="margin-bottom:15px">
          <img style='vertical-align:middle;' src="image/help_images/shift.png" width=
          "50" height="50" /> + <img style='vertical-align:middle;' src=
          "image/help_images/right.png" width="50" height="50" /><span style=
          'margin-left:10px;'>Use Shift + Right arrow key to seek forward.</span>
        </div>
        <div style="margin-bottom:15px">
          <img style='vertical-align:middle;' src="image/help_images/shift.png" width=
          "50" height="50" /> + <img style='vertical-align:middle;' src=
          "image/help_images/left.png" width="50" height="50" /><span style=
          'margin-left:10px;'>Use Shift + Left arrow key to seek backward.</span>
        </div>
      </div>
      <div style="background-color:#000;padding:5px;width:98%;
         margin-bottom:5px;text-align:center;color:#FFF;height:1em;font-size:1em;">
      <input name="popupstartup" id="popupstartupcheck"
         onchange="showpopupchange();" type="checkbox" value="" /> Do not show at start up!
      </div>
    </div>
  </div>
</body>
[index.html]
查看完基本骨架和 HTML 后,让我们继续了解 Web 音频库的基本功能/特性以及它们的实现方式。
加载播放列表
DOM 就绪后,即在 $(document).ready(function(){---}); 中,会向 audiogalleryengine.php 发送一个 AJAX 请求,数据为 (playlistselct:1)。收到数据后,[audiogalleryengine.php] 会查询数据库以获取所有播放列表(select * from playlist),对于每个播放列表记录,它会生成 <option> 元素。
让我们看一下加载完播放列表后的屏幕截图。

现在让我们看看不同文件中实现这一点的代码。
<select name="playlistselect" id="playlistselect">
    <!--Content will be loaded via ajax php from the database-->
</select>
[index.html]
//Filling the playlist select box with values via XHR/ajax

$("#playlistselect").load("php/audiogalleryengine.php",{playlistselect:1},
   function(){$("#playlistselect").change();$('select').selectmenu({style:'dropdown'});});
[script_audio.js]
//for getting all the playlist and returning them
if (isset($_POST['playlistselect']))
{
    $query="SELECT * FROM playlist";
    $result=$mysqli->query($query);
    $responsehtml='<option value="0">All</option>';
    while($tuple=$result->fetch_array())
    {
        $responsehtml.="<option value={$tuple['id']}>{$tuple['name']}</option>";
    }
    $result->close();
    echo $responsehtml;
    exit();
}
[audiogalleryengine.php]
加载音频
音频在播放列表更改或用户进行音频搜索时加载。根据播放列表选择框(下拉菜单)的值和搜索文本,会向 [audiogalleryengine.php] 发送一个 AJAX 调用,数据为 (playlistid 和 searchtext)。基于收到的数据,[audiogalleryengine.php] 会查询数据库(audio 表)以获取属于特定播放列表以及与搜索文本匹配的所有音频。在从数据库接收到音频记录后,[audiogalleryengine.php] 会为所有音频生成 <li> 元素。
让我们看一下加载完音频后的屏幕截图。

现在让我们看看不同文件中实现这一点的代码。
 <div id="audiolist">
    <!--Content will be loaded via ajax php from the database.-->
</div>
[index.html]
//Event handler for playlistselect change
$("#playlistselect").change(function(){
    searchaudio();
    $("#currentplaylist span").text($("#playlistselect :selected").text());
});

//Initializing the audio search button
$("#searchbtnimg").click(function(){
    searchaudio();
});

//Calling search audio function each time when user presses a key
$("#searchinput").keyup(function(){
    searchaudio();
});

function searchaudio()
{
    searchxhrabort();
    $("#audiolist").showLoading();
    window.searchxhr = $.ajax({
        type: "POST",
        url: "php/audiogalleryengine.php",
        data: "playlistid="+$('#playlistselect').val()+
           "&searchtext="+$('#searchinput').val(),
        success: function(html){
            //Adding the ajax returned audiotracks to the audiolist and reinitializing jscrollpane
           window.scrollableaudiolist.html(html);
           window.jscrollapi.reinitialise();
           $("#audiolist").hideLoading();

           //Storing previous currentplaytime beforing creating a new playlist from
           //the new search items because after creating the new playlist the
           //currentplaytime would automatically get to zero so that I can
           //seek properly if the old element is found in the new search

           $("#player").data("previouscurrenttime",
             $("#player").data("currenttime"));
           //Reinitializing the playlist for jplayer
           createplaylist();
           //Checking if the current playing track in the old playlist is also
           //present in the new search list and taking actions accordingly
           var trackidifany=currenttrackinnewsearch();

           if (trackidifany===false)
           {
               window.audioPlaylist.playlistChange(0);
               $("#jquery_jplayer_2").jPlayer("stop");
           }
           else
           {
                window.audioPlaylist.playlistChange(trackidifany);
                $("#jquery_jplayer_2").jPlayer(
                   "pause",$("#player").data("previouscurrenttime"));
           }

           //Adding event hander for the newly loaded audiotracks
           $(".audiotrack").click(function(){
                var audiotrackindex=$(this).index();
                window.audioPlaylist.playlistChange(audiotrackindex);
            });
        }
    });
}
[script_audio.js]
if (isset($_POST['playlistid']) && isset($_POST['searchtext']))
{
      $playlistid=$_POST['playlistid'];
      $searchtext=$_POST['searchtext'];

      if ($searchtext=="") $searchtext="%";
        else $searchtext="%".$searchtext."%";

      if ($playlistid==0)
          $query="SELECT audio.name AS name,audio.title AS title,audio.playlist_id
                  AS playlistid,playlist.user_id AS userid FROM (audio JOIN playlist
                  ON audio.playlist_id=playlist.id) WHERE audio.title LIKE '{$searchtext}'";

      else $query="SELECT audio.name AS name,audio.title AS title,
                   audio.playlist_id AS playlistid,playlist.user_id AS userid FROM
                   (audio JOIN playlist ON audio.playlist_id=playlist.id) WHERE
                   audio.playlist_id={$playlistid} AND audio.title LIKE '{$searchtext}'";

      $result=$mysqli->query($query);
      $html="<ul>";

      while($tuple=$result->fetch_array())
      {
        $userid=$tuple['userid'];
        $playlistid=$tuple['playlistid'];
        $name=$tuple['name'];
        $title=$tuple['title'];
        $audiourl="{$root}audiogallery/user_{$userid}/playlist_{$playlistid}/audios/{$name}";
        $html.="<li class=\"audiotrack\"
                 url=\"{$audiourl}\">{$title}</li>";
      }

      $html.="</ul>";
      echo $html;
}
[audiogalleryengine.php]
>初始化播放列表
Audio-Gallery-Suite 中的音频播放器使用 Jplayer 进行播放和维护播放列表信息。但有一个小细节是,它有很好的文档记录(或者说只为)静态播放列表而设计,所以我必须使用一些技巧来将播放列表数据提供给 Jplayer 的播放列表功能,以确保一切正常工作。我创建了一个对象字符串,如下所示:var myaudioplaylist=[{name:"title",mp3:"url"},{..},..],然后执行了这个字符串上的 eval() javascript 函数,创建了一个名为 myaudioplaylist 的对象,并将其传递给 Jplayer Playlist 构造函数。请参阅代码以获得清晰的理解。所有这些功能都封装在一个 createplaylist() 函数中,当用户从播放列表选择下拉菜单中选择新播放列表时会调用该函数。
现在让我们看看不同文件中实现这一点的代码。
function createplaylist()
{
    var objectarraystring="var myaudioplaylist=[";
    $(".audiotrack").each(function(){
        objectarraystring=objectarraystring+"{name:\""+$(this).text()+
          "\",mp3:\""+$(this).attr('url')+"\"},";
    });

    objectarraystring+="]";
    eval(objectarraystring);

    audioPlaylist = new window.Playlist("2",
                myaudioplaylist, {

    ready: function() {
        audioPlaylist.playlistInit(false); // Parameter is a boolean for autoplay.
    },
    ended: function() {
        audioPlaylist.playlistNext();
    },

    play: function() {
        $(this).jPlayer("pauseOthers");
    },

    swfPath: "flash",
    supplied: "mp3",
    solution: "html, flash",
    wmode: "window",
    preload: "auto"
});

}
[script_audio.js]
>播放音频/初始化 Jplayer
音频由 Jplayer(一个 Jquery 插件)播放和控制,因此它是使用 Jplayer 的标准/技术实现的。请访问http://jplayer.org/了解详情。
让我们看看 Web 库上(自定义)Jplayer 界面的屏幕截图。

现在让我们看看不同文件中实现这一点的代码。
<div id="player">
    <div id="jquery_jplayer_2" class="jp-jplayer"></div>
        <div class="jp-audio">
        <div class="jp-type-playlist">
            <div id="jp_interface_2" class="jp-interface">
                <ul class="jp-controls">
                    <li><a href="#" class="jp-play"
                       tabindex="1">play</a></li>
                    <li><a href="#" class="jp-pause"
                       tabindex="1">pause</a></li>
                    <li><a href="#" class="jp-stop"
                       tabindex="1">stop</a></li>
                    <li><a href="#" class="jp-mute"
                       tabindex="1">mute</a></li>
                    <li><a href="#" class="jp-unmute"
                       tabindex="1">unmute</a></li>
                    <li><a href="#" class="jp-previous"
                       tabindex="1">previous</a></li>
                    <li><a href="#" class="jp-next"
                       tabindex="1">next</a></li>
                </ul>
                <div class="jp-progress">
                    <div class="jp-seek-bar">
                        <div class="jp-play-bar"></div>
                    </div>
                </div>
                <div class="jp-volume-bar">
                    <div class="jp-volume-bar-value"></div>
                </div>
                <div class="jp-current-time"></div>
                <div class="jp-duration"></div>
            </div>
        </div>
    </div>
</div>
[index.html]
$(document).ready(function(){
//Other code here see source files, removed it for a clearer view
//Global variables for playlist management

var Playlist;
var audioPlaylist;

/*Defines Jplayer Playlist Class*/
initjplayerplaylistfunctions();

});

function initjplayerplaylistfunctions()
{
    Playlist = function(instance, playlist, options) {
    var self = this;

    this.instance = instance; // String: To associate specific HTML with this playlist
    this.playlist = playlist; // Array of Objects: The playlist
    this.options = options; // Object: The jPlayer constructor options for this playlist

    this.current = 0;
    this.cssId = {
        jPlayer: "jquery_jplayer_",
        interface: "jp_interface_",
        playlist: "jp_playlist_"
    };

    this.cssSelector = {};

    $.each(this.cssId, function(entity, id) {
        self.cssSelector[entity] = "#" + id + self.instance;
    });

    if(!this.options.cssSelectorAncestor) {
        this.options.cssSelectorAncestor = this.cssSelector.interface;
    }

    $(this.cssSelector.jPlayer).jPlayer(this.options);
        $(this.cssSelector.interface + " .jp-previous").click(function() {
            self.playlistPrev();
            $(this).blur();
            return false;
        });

        $(this.cssSelector.interface + " .jp-next").click(function() {
            self.playlistNext();
            $(this).blur();
            return false;
        });
    };

    Playlist.prototype = {
        playlistInit: function(autoplay) {
            if(autoplay) {
                this.playlistChange(this.current);
            } else {
                this.playlistConfig(this.current);
            }
        },

    playlistConfig: function(index) {
        $(this.cssSelector.playlist + "_item_" + this.current).removeClass(
          "jp-playlist-current").parent().removeClass("jp-playlist-current");
        $(this.cssSelector.playlist + "_item_" + index).addClass(
          "jp-playlist-current").parent().addClass("jp-playlist-current");
        this.current = index;
        $(this.cssSelector.jPlayer).jPlayer("setMedia", this.playlist[this.current]);
        $("#nowplaying span").text(this.playlist[this.current].name);
        $("#player").data("currenttrackurl",this.playlist[this.current].mp3);
        playlistuiupdate(1,$('#player').data("currenttrackindex"),index);
        $('#player').data("currenttrackindex",index);
        shareupdate($("#player").data("currenttrackurl"),this.playlist[this.current].name);
    },

    playlistChange: function(index) {
        this.playlistConfig(index);
        $(this.cssSelector.jPlayer).jPlayer("play");
    },

    playlistNext: function() {
        var index = (this.current + 1 < this.playlist.length) ? this.current + 1 : 0;
        this.playlistChange(index);
    },

    playlistPrev: function() {
        var index = (this.current - 1 >= 0) ? this.current - 1 : this.playlist.length - 1;
        this.playlistChange(index);
    }
};

}

//The createplaylist() function is called from the searchaudio()
// function which in turn is called when the playlist is changed or audio search is done.
// So when new audiolist is formed, new playlist is initialized for it
// and new instance of Jplayer is created for it.

function createplaylist()
{
    var objectarraystring="var myaudioplaylist=[";
    $(".audiotrack").each(function(){
        objectarraystring=objectarraystring+"{name:\""+$(this).text()+
           "\",mp3:\""+$(this).attr('url')+"\"},";
    });
    objectarraystring+="]";
    eval(objectarraystring);

    audioPlaylist = new window.Playlist("2",myaudioplaylist, {
    ready: function() {
        audioPlaylist.playlistInit(false); // Parameter is a boolean for autoplay.
    },

    ended: function() {
        audioPlaylist.playlistNext();
    },

    play: function() {
        $(this).jPlayer("pauseOthers");
    },

    swfPath: "flash",
    supplied: "mp3",
    solution: "html, flash",
    wmode: "window",
    preload: "auto"

});
}
[script_audio.js]
>旋转光盘
旋转光盘是一个透明的 PNG 图像 [rotating_disc.png]。此图像被适当地放置(通过对宽高比等进行一些计算)在封面艺术图像 [coverart.png] 上。放置旋转光盘后,当播放音频时,使用 CSS3 的 transform 属性 transform:rotate(angle); 旋转光盘。由于不同浏览器在实现 CSS transform 属性(-ms-transform,-moz-transform,-webkit-transform,-o-transform)方面存在不一致,我们必须使用适合浏览器的属性名称,因此为了简单起见,我使用了 jquery-animate-css-rotate-scale 这个 jquery 库来实现我们的目标。
让我们看看 Web 库中看到的旋转光盘的屏幕截图。

现在让我们看看不同文件中实现这一点的代码。
 <div id="coverart">
<img src="image/audiogallery_images/coverart.png  "
   oriwidth="693" oriheight="680" width="693" height="680" alt="coverart" />

<img id="rotatingdisc" src="image/audiogallery_images/rotating_disc.png"
   width="350" height="350" alt="rotatingdisc" />
</div>
[index.html]
$(document).ready(function(){
    //Other code is present here, see source files. Removed for clarity
    //adding audioplaying status data to my player and starting the disc
    $("#jquery_jplayer_2").bind($.jPlayer.event.play, function() {
          $("#player").data("audioplaying",true);
        startdisk();
    });

    //adding audioplaying status data to my player and stopping the disc
    $("#jquery_jplayer_2").bind($.jPlayer.event.pause, function() {
          $("#player").data("audioplaying",false);
        stopdisk();
    });
});

function setdimensions()
{

//Other code is present here, see source files. Removed for clarity
// Making the coverart rotatingdisc to the correct size and positioning it
$("#rotatingdisc").width($("#coverart img").width()/1.98);
$("#rotatingdisc").height($("#rotatingdisc").width());
var rotatingdiscleftposition=
  $("#coverart img").position().left+$("#coverart img").width()/2.240896;
var rotatingdisctopposition=
  $("#coverart img").position().top+$("#coverart img").height()/4.65753;
$("#rotatingdisc").css('left',rotatingdiscleftposition);
$("#rotatingdisc").css('top',rotatingdisctopposition);
//rotatingdisc code end
}

//Rotate disk at regular intervals by specified angle
function rotatedisk(element,angle)
{
    stopdisk();
    element.stop().animate({rotate: '+=150deg'}, 800, 'easeInCubic', function() {
        var intervalid = setInterval(
           function () {
              element.animate({rotate: '+=' + angle + 'deg'}, 0);
          },
          25
        );
        element.data('intervalid', intervalid);
    });
}

function stopdisk()
{
    var intervalid = $('#rotatingdisc').data('intervalid');
    clearInterval(intervalid);
    $('#rotatingdisc').stop().animate({rotate: '+=150deg'}, 800, 'easeOutCubic');
}

function startdisk()
{
    var randnum=Math.floor(Math.random() * (60 - 10 + 1) + 10);
    //remove this if it doesn't suite you

    rotatedisk($('#rotatingdisc'),randnum);
}
[script_audio.js]
>键盘支持
Web 库的音频播放器还可以通过键盘按键进行控制。这为 Web 库用户提供了便捷的访问和控制播放器的能力。我使用了 keydown 事件处理程序来检测按下哪个键,并根据按下的键执行相应操作。keydown 事件及其事件处理程序的绑定被封装在一个名为 [initplayerkeyboardsupport] 的函数中,该函数在 DOM 就绪时被调用,即(在 $(document).ready(function(){---}); 中)。
让我们看看显示可用于控制播放器的按键的屏幕截图。
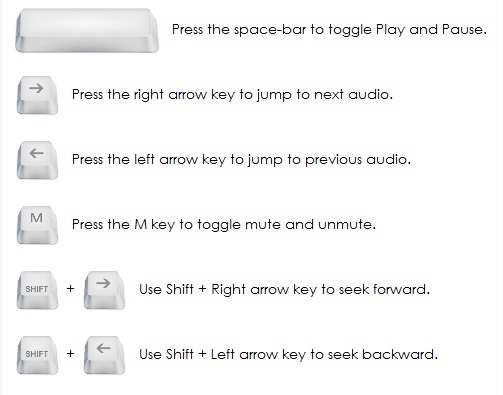
现在让我们看看实现这一点的代码。
function initplayerkeyboardsupport()
{
    $(document).keydown(function(event)
    {
        //for seeking
        if (event.shiftKey)
        {
            switch (event.keyCode)
            {
                case 37: // SHIFT + left arrow
                    $("#player").data("currenttime")-1>=0?$("#jquery_jplayer_2").jPlayer(
                         "playHead", $("#player").data("currenttime")-1):null;
                    if (($("#player").data("currenttime")-1)>=0)
                    {
                        if ($("#player").data("audioplaying"))
                        {
                            $("#jquery_jplayer_2").jPlayer("play",
                               $("#player").data("currenttime")-1);
                            $("#jquery_jplayer_2").jPlayer("play");
                        }
                        else
                        {
                            $("#jquery_jplayer_2").jPlayer("pause",
                               $("#player").data("currenttime")-1);
                        }
                    }
                    return;
                    break;
                case 39: // SHIFT + right arrow
                    if (($("#player").data("currenttime")+1)<=$(
                       "#player").data("currenttrackduration"))
                    {
                        if($("#player").data("audioplaying"))
                        {
                            $("#jquery_jplayer_2").jPlayer("play",
                                $("#player").data("currenttime")+1);
                            $("#jquery_jplayer_2").jPlayer("play");
                        }
                        else
                        {
                            $("#jquery_jplayer_2").jPlayer("pause",
                               $("#player").data("currenttime")+1);
                        }
                    }
                    return;
                    break;
            }
        }
        switch (event.keyCode)
        {
            case 37: // left arrow
                  window.audioPlaylist!=undefined?window.audioPlaylist.playlistPrev():null;
                  break;
            case 39: // right arrow
                window.audioPlaylist!=undefined?window.audioPlaylist.playlistNext():null;
                break;
            case 32: // space
                if ($("#player").data("audioplaying")===false ||
                         $("#player").data("audioplaying")===undefined)
                {
                    $("#jquery_jplayer_2").jPlayer("play");
                    $("#player").data("audioplaying",true);
                }
                else
                {
                    $("#jquery_jplayer_2").jPlayer("pause");
                    $("#player").data("audioplaying",false);
                }
                break;
            case 77: // m
                if ($("#player").data("muted")===false ||
                        $("#player").data("muted")===undefined)
                {
                    $("#jquery_jplayer_2").jPlayer("mute");
                    $("#player").data("muted",true);
                }
                else
                {
                    $("#jquery_jplayer_2").jPlayer("unmute");
                    $("#player").data("muted",false);
                }
                break;
            case 109: // M

                if ($("#player").data("muted")===false ||
                           $("#player").data("muted")===undefined)
                {
                    $("#jquery_jplayer_2").jPlayer("mute");
                    $("#player").data("muted",true);
                }
                else
                {
                    $("#jquery_jplayer_2").jPlayer("unmute");
                    $("#player").data("muted",false);
                }
                break;
          }
    });
}
[script_audio.js]
>下载音频
每当更改音频时,它都会通过 Jplayer 的 "setmedia" 方法进行更改,并且该方法在 Playlist 类的 playlistConfig 函数中被调用(请参阅下面的代码),因此每当使用 Jplayer 的 setmedia 方法 (http://jplayer.org/latest/developer-guide/#jPlayer-setMedia) 更改音频/媒体时,在调用 setmedia 的行下方不久,我就会使用 Jquery 的 data 方法 (https://api.jqueryjs.cn/jQuery.data/) 将当前音轨 URL 信息添加到我们的播放器 div (#player) 中的一个变量 [currenttrackurl] 中。通过这样做,我总是确保 [currenttrackurl] 变量始终指向当前播放的音轨,因为每当更改音频时,[currenttrackurl] 变量都会被分配一个新/当前值。因此,在 下载按钮的点击事件处理程序中,我只需获取 [currenttrackurl] 变量的值并将其发送到 [downloadengine.php],后者将启动下载该特定文件。
让我们看看 Web 库中看到的下载按钮的屏幕截图。

现在让我们看看不同文件中实现这一点的代码。
<a id="downloadaudiotool" target="_blank"
             class="button gray medium">DOWNLOAD</a>
[index.html]
$(document).ready(function(){
//Other code is present here, see source files. Removed for clarity
$("#downloadaudiotool").click(function(){
        var filedownloadpath=encodeURIComponent($("#player").data("currenttrackurl"));
        $("#downloadaudiotool").attr('href','php/downloadengine.php?file='+filedownloadpath);
});
});

function initjplayerplaylistfunctions()
{
    Playlist = function(instance, playlist, options) {
        //Other code is present here, see source files. Removed for clarity
    playlistConfig: function(index) {
        $(this.cssSelector.playlist + "_item_" + this.current).removeClass(
            "jp-playlist-current").parent().removeClass("jp-playlist-current");
        $(this.cssSelector.playlist + "_item_" + index).addClass(
           "jp-playlist-current").parent().addClass("jp-playlist-current");
        this.current = index;
        $(this.cssSelector.jPlayer).jPlayer("setMedia",
                       this.playlist[this.current]);
        $("#nowplaying span").text(this.playlist[this.current].name);
        $("#player").data("currenttrackurl",this.playlist[this.current].mp3);
        playlistuiupdate(1,$('#player').data("currenttrackindex"),index);
        $('#player').data("currenttrackindex",index);
        shareupdate($("#player").data("currenttrackurl"),this.playlist[this.current].name);
}
[script_audio.js]
>音频分享
音频分享使用 AddThis 工具 (http://www.addthis.com/)。由于每次设置播放新音频时,我都会创建一个新的 AddThis 实例,并从 DOM 中移除旧实例,因为 AddThis 易于实现和初始化静态内容,而且主要是单个元素,在这里我想要一个用于多个可能动态出现的音频的共享按钮,所以我使用了这个简单的解决方法来简化我的工作。
让我们看看 Web 库中看到的共享按钮的屏幕截图。

现在让我们看看实现这一点的代码。
function initjplayerplaylistfunctions()
{
    Playlist = function(instance, playlist, options)
    {
        //Other code is present here, see source files. Removed for clarity
        playlistConfig: function(index)
        {
            $(this.cssSelector.playlist + "_item_" + this.current).removeClass(
                  "jp-playlist-current").parent().removeClass("jp-playlist-current");
            $(this.cssSelector.playlist + "_item_" + index).addClass(
                    "jp-playlist-current").parent().addClass("jp-playlist-current");
            this.current = index;
            $(this.cssSelector.jPlayer).jPlayer(
                   "setMedia", this.playlist[this.current]);
            $("#nowplaying span").text(this.playlist[this.current].name);
            $("#player").data("currenttrackurl",this.playlist[this.current].mp3);
            playlistuiupdate(1,$('#player').data("currenttrackindex"),index);
            $('#player').data("currenttrackindex",index);
            shareupdate($("#player").data(
                        "currenttrackurl"),this.playlist[this.current].name);
        }
    }
}

function shareupdate(url,title)
{
    $('#addthissharetool').remove();
    $('#toolbar').append('<a id="addthissharetool" ' +
           'class="sharebar-trigger button gray medium">SHARE</a>');
    url=encodeURI(url);
    addthis.button(
        '#addthissharetool',
        {
            ui_click: true,
            ui_open_windows:true,
        },
        {
            url:url,
            title:title,
            description:'Visit robinrizvi.info'
        }
    );

    //Create gray to blue hover effect for toolbar buttons
    $("#addthissharetool").hover(function(){
            $(this).removeClass('button gray medium').addClass('button blue medium');
        },
        function(){
            $(this).removeClass('button blue medium').addClass('button gray medium');
        }
    );
}
[script_audio.js]
4. 库软件
让我们看看库管理软件的一些基本和内在功能及特性是如何在代码中实现的。库管理软件中的大部分代码都以支持多线程架构的方式实现,并为用户提供快速响应和非阻塞的 UI 体验。代码带有轻微的三层架构风格,因此,所有用于数据库交互的代码都驻留在名为 user 的静态类 [user.cs] 中。我将不讨论 [user] 类,因为它包含名称能够自解释其功能的函数,您始终可以查看源文件并阅读其中的注释,或者查看代码以获得完整理解。
让我们看一个给出库软件概述的屏幕截图。

现在让我们开始讨论库软件的基本功能及其实现。
登录
用户输入凭据后,这些凭据将传递给用户类 [user.cs] 的 login() 方法。user.login() 方法在数据库中搜索 [user] 表,如果找到具有给定用户名和密码的记录,则将用户类的(静态)属性/变量 [isvalid] 设置为 true,否则设置为 false。通过检查 user.isvalid 的值来确定输入的用户名和密码是否正确,并据此采取相应措施(如果用户名和密码正确,则显示主窗体)。
让我们看一个登录窗体的屏幕截图。

现在让我们看看实现这一点的代码。
private void loginbtn_Click(object sender, EventArgs e)
{
    if (unametxt.Text != string.Empty && pwdtxt.Text != string.Empty)
    {
        userstatuspic.Visible = false;
        loginloadingindicator.Visible = true;
        loginloadingindicator.Active = true;
        unametxt.Enabled = false;
        pwdtxt.Enabled = false;
        loginbtn.Enabled = false;
        Thread loginthread = new Thread(user.login);
        string[] unamepwd = { unametxt.Text, pwdtxt.Text };
        loginthread.Start(unamepwd);
        while (loginthread.IsAlive) Application.DoEvents();
        if (user.isvalid)
        {
            userstatuspic.Image = Properties.Resources.user_accept;
            userstatuspic.Visible = true;
            loginloadingindicator.Visible = false;
            loginloadingindicator.Active = false;
            Application.DoEvents();
            Thread.Sleep(2000);
            main mainfrm = new main();
            this.Hide();
            mainfrm.ShowDialog();
            this.Close();
        }
        else
        {
            userstatuspic.Image = Properties.Resources.user_remove;
            unametxt.Enabled = true;
            pwdtxt.Enabled = true;
            loginbtn.Enabled = true;
            userstatuspic.Visible = true;
            loginloadingindicator.Visible = false;
            loginloadingindicator.Active = false;
        }
    }
    else MessageBox.Show("Please fill in all the fields.");
}
[login.cs]
显示播放列表
加载主窗体后,会调用 showplaylists() 函数,该函数又会调用 user 类 [user.cs] 的 getplaylists() 方法。user.getplaylists() 方法查询数据库中的播放列表表以获取当前使用库软件的用户的播放列表。user.getplaylists() 方法将数据库查询返回的播放列表存储在 user.playlists 集合中(请参阅下面的代码)。
public struct playlist
{
    public UInt64 id;
    public string name;
    public string description;
    public string thumb;
}

public static List<playlist> playlists = new List<playlist>();
public static void getplaylists()
//reads the records from playlist table and for each entry calls
//downloadplaylist() to download the thumb and save it into local temp foler
{
    playlists.Clear();
    try
    {
        if (conn.State == ConnectionState.Closed) conn.Open();
        string query = "SELECT * FROM playlist WHERE user_id=@userid";
        MySqlCommand cmd = new MySqlCommand(query, conn);
        cmd.Parameters.AddWithValue("@userid", userid);
        MySqlDataReader rdr = cmd.ExecuteReader();
        while (rdr.Read())
        {
            playlist a1;
            a1.id = UInt64.Parse(rdr["id"].ToString());
            a1.name = rdr["name"].ToString();
            a1.description = rdr["description"].ToString();
            a1.thumb = rdr["thumb"].ToString();
            if (downloadplaylistthumb(a1)) playlists.Add(a1);
        }
        conn.Close();
    }
    catch (Exception)
    {
        System.Windows.Forms.MessageBox.Show("The connection to the database could " +
          "not be made. Please check your internet connection." +
          Environment.NewLine+"The application will now exit.");
        System.Windows.Forms.Application.Exit();
    }
}
[user.cs]
在播放列表存储在 user.playlists 集合(List)中之后,控制权返回到 showplaylists() 函数,user.playlists 集合中的每个播放列表都会被添加到主窗体的一个 Listview 中。
private void showplaylists()
{
    Thread getplaylistthread = new Thread(user.getplaylists);
    getplaylistthread.Start();
    while (getplaylistthread.IsAlive) Application.DoEvents();
    playlistimagelist.Images.Clear();
    playlistview.Items.Clear();
    foreach (user.playlist playlist in user.playlists)
    {
        string filename = Application.StartupPath +
          "\\temp\\playlist_" + playlist.id + "\\" + playlist.thumb;
        Bitmap img = new Bitmap(filename);
        playlistimagelist.Images.Add(playlist.id.ToString(), img);
        playlistview.Items.Add(playlist.name, playlist.id.ToString());
    }
}
[main.cs]
让我们看一下显示主窗体中播放列表视图(Listview)的屏幕截图。

显示音频
当选择一个播放列表(通过点击它)时,会调用 showaudios() 函数,该函数又会调用 user 类 [user.cs] 的 getaudios() 方法。user.getaudios() 函数需要 playlist_id 作为参数,根据此参数(playlist_id),它会查询数据库中的 audio 表以获取属于特定播放列表(给定了 playlist_id)的音频。user.getaudios() 方法将数据库查询返回的音频存储在 user.audios 集合中(请参阅下面的代码)。
public struct audio
{
    public UInt64 id;
    public string name;
    public string title;
    public string description;
}

public static List<audio> audios = new List<audio>();
public static void getaudios(object data)
//reads records from the audio table for a particular albumid and then saves the entries in the pictures list
{
    Int32 currentplaylistid = (Int32)data;
    audios.Clear();
    try
    {
        if (conn.State == ConnectionState.Closed) conn.Open();
        string query = "SELECT * FROM audio WHERE playlist_id=@playlistid";
        MySqlCommand cmd = new MySqlCommand(query, conn);
        cmd.Parameters.AddWithValue("@playlistid", currentplaylistid);
        MySqlDataReader rdr = cmd.ExecuteReader();

        while (rdr.Read())
        {
            audio p1;
            p1.id = UInt64.Parse(rdr["id"].ToString());
            p1.name = rdr["name"].ToString();
            p1.title = rdr["title"].ToString();
            p1.description = rdr["description"].ToString();
            if (downloadaudio(p1, currentplaylistid)) audios.Add(p1);
            //add the audios to the list
        }
        conn.Close();
    }
    catch (Exception)
    {
        System.Windows.Forms.MessageBox.Show("The connection to the database could not be made. " +
           "Please check your internet connection." +
           Environment.NewLine+"The application will now exit.");
        System.Windows.Forms.Application.Exit();
    }
}
[user.cs]
在音频存储在 user.audios 集合(List)中之后,控制权返回到 showaudios() 函数,user.audios 集合中的每个音频都会被添加到主窗体的一个 Listview 中。
private void showaudios(Int32 currentplaylistid)
{
    Thread getaudiothread = new Thread(user.getaudios);
    getaudiothread.Start(currentplaylistid);
    while (getaudiothread.IsAlive) Application.DoEvents();
    audioimagelist.Images.Clear();
    audiolistview.Items.Clear();
    foreach (user.audio audio in user.audios)
    {
        audioimagelist.Images.Add(audio.id.ToString(), Properties.Resources.audio);
        audiolistview.Items.Add(audio.title, audio.id.ToString());
    }
}
[main.cs]
让我们看一下显示音频列表视图(Listview)的主窗体屏幕截图。

添加播放列表
当用户在播放列表窗格的主窗体上点击 [ADD] 按钮时,addplaylist [addplaylist.cs] 窗体将打开。
让我们看一下 addplaylist 窗体的屏幕截图。

[addplaylist] 窗体要求用户填写要创建的播放列表的名称和描述,用户还必须提供代表播放列表的缩略图。填写这些信息后,用户必须点击 [ADD PLAYLIST] 按钮,该按钮将执行 playlistadd() 函数,该函数执行创建播放列表的实际任务。创建播放列表涉及三个基本步骤:
- 在数据库的 [playlist] 表中为新播放列表添加记录。
- 在远程服务器上为播放列表创建文件夹(请参阅上面的目录结构部分)。
- 将播放列表的缩略图上传到远程服务器。
让我们看一下如何实现这 3 个基本步骤的代码。
private void playlistadd()
{
    int thumbnailwidth = 150;
    int thumbnailheight = 150;
    try
    {
        #region add records in the playlist table for the new playlist
        UInt32 newaddedplaylistid = user.addplaylist(
           nametxt.Text, new FileInfo(thumbnametxt.Text).Name, descriptiontxt.Text);
        if (newaddedplaylistid == 0) throw new Exception();
        #endregion
        try
        {
            #region creating folders for the playlist on the remote server
            //creating playlist folder
            string createpath = user.ftpurl + "user_" +
                     user.userid + "/playlist_" + newaddedplaylistid;
            FtpWebRequest request = (FtpWebRequest)FtpWebRequest.Create(createpath);
            request.Credentials = new NetworkCredential(user.ftpusername, user.ftppassword);
            request.KeepAlive = true;
            request.Method = WebRequestMethods.Ftp.MakeDirectory;
            request.GetResponse();

            //creating audios folder in the playlist folder
            createpath = user.ftpurl + "user_" + user.userid +
                        "/playlist_" + newaddedplaylistid + "/audios";
            request = (FtpWebRequest)FtpWebRequest.Create(createpath);
            request.Credentials = new NetworkCredential(user.ftpusername, user.ftppassword);
            request.KeepAlive = true;
            request.Method = WebRequestMethods.Ftp.MakeDirectory;
            request.GetResponse();
            #endregion

            #region uploading thumbnail of the playlist to the remote server
            try
            {
                int ChunkSize = 4096, NumRetries = 0, MaxRetries = 20;
                byte[] Buffer = new byte[ChunkSize];
                string onlythumbname = new FileInfo(thumbnametxt.Text).Name;
                Image thumbimg = Image.FromFile(thumbnametxt.Text).GetThumbnailImage(
                  thumbnailwidth, thumbnailheight, thumbnailcreationfailedcallback, IntPtr.Zero);
                MemoryStream thumbimgstream = new MemoryStream();
                thumbimg.Save(thumbimgstream, System.Drawing.Imaging.ImageFormat.Jpeg);
                thumbimgstream.Position = 0;
                string UploadPath = user.ftpurl + "user_" +
                  user.userid + "/playlist_" + newaddedplaylistid + "/" + onlythumbname;
                request = (FtpWebRequest)WebRequest.Create(UploadPath);
                request.Method = WebRequestMethods.Ftp.UploadFile;
                request.KeepAlive = true;
                request.Credentials = new NetworkCredential(user.ftpusername, user.ftppassword);
                using (Stream requestStream = request.GetRequestStream())
                {
                    using (thumbimgstream)
                    {
                        int BytesRead = thumbimgstream.Read(Buffer, 0, ChunkSize);
                        // read the first chunk in the buffer

                        // send the chunks to the web service one by one, until
                        // FileStream.Read() returns 0, meaning the entire file has been read.
                        while (BytesRead > 0)
                        {
                            try
                            {
                                requestStream.Write(Buffer, 0, BytesRead);
                            }
                            catch
                            {
                                if (NumRetries++ < MaxRetries)
                                {
                                    // rewind the imagememeorystream and keep trying
                                    thumbimgstream.Position -= BytesRead;
                                }
                                else
                                {
                                    throw new Exception();
                                }
                            }
                            BytesRead = thumbimgstream.Read(Buffer, 0, ChunkSize);
                            // read the next chunk (if it exists) into the buffer.
                            // the while loop will terminate if there is nothing left to read
                        }
                    }
                }
            }
            catch (Exception)
            {
                //thumbnail could not be uploaded so remote folders have to be deleted
                #region deleting folder that were created for the playlist
                string deletepath = user.ftpurl + "user_" + user.userid +
                             "/playlist_" + newaddedplaylistid;
                new DeleteFTPDirectory().DeleteDirectoryHierarcy(deletepath);
                #endregion
                throw new Exception();
            }
            #endregion
        }
        catch (Exception)
        {
            #region deleting playlist record from the database
            //If folder could not be created or thumbnail could not be created
            //remove the playlist record from the playlist table in the database
            user.deleteplaylist(newaddedplaylistid);
            throw new Exception();
            #endregion
        }
    }
    catch (Exception)
    {
        MessageBox.Show("The playlist could not be added");
        return;
    }
    MessageBox.Show("The playlist has been added");
    //this.Close();
}
[addplaylist.cs]
编辑播放列表
当用户在播放列表窗格的主窗体上点击 [EDIT] 按钮时,editplaylist [editplaylist.cs] 窗体将打开。
让我们看一个 editplaylist 窗体的屏幕截图。

[editplaylist] 窗体显示用户可以编辑的播放列表信息。编辑信息后,用户必须点击 [UPDATE PLAYLIST] 按钮,该按钮将执行 playlistedit() 函数,该函数执行更新播放列表的实际任务。编辑播放列表涉及两个基本步骤:
- 在数据库的 [playlist] 表中更新播放列表的记录。
- 如果缩略图已更改,则将播放列表的缩略图上传到远程服务器。
让我们看一下如何实现这些基本步骤的代码。
private void playlistedit()
{
    bool thumbuploaded = true;
    if (new FileInfo(thumbnametxt.Text).Name != playlisttoedit.thumb)
    {
        #region uploading thumbnail of the playlist to the remote server
        try
        {
            int thumbnailwidth = 150;
            int thumbnailheight = 150;
            int ChunkSize = 4096, NumRetries = 0, MaxRetries = 20;
            byte[] Buffer = new byte[ChunkSize];
            string onlythumbname = new FileInfo(thumbnametxt.Text).Name;
            Image thumbimg = Image.FromFile(thumbnametxt.Text).GetThumbnailImage(thumbnailwidth,
               thumbnailheight, thumbnailcreationfailedcallback, IntPtr.Zero);
            MemoryStream thumbimgstream = new MemoryStream();
            thumbimg.Save(thumbimgstream, System.Drawing.Imaging.ImageFormat.Jpeg);
            thumbimgstream.Position = 0;
            string UploadPath = user.ftpurl + "user_" + user.userid +
              "/playlist_" + playlisttoedit.id + "/" + onlythumbname;
            FtpWebRequest request = (FtpWebRequest)WebRequest.Create(UploadPath);
            request.Method = WebRequestMethods.Ftp.UploadFile;
            request.KeepAlive = true;
            request.Credentials = new NetworkCredential(user.ftpusername, user.ftppassword);
            using (Stream requestStream = request.GetRequestStream())
            {
                using (thumbimgstream)
                {
                    // read the first chunk in the buffer
                    int BytesRead = thumbimgstream.Read(Buffer, 0, ChunkSize);
                    // send the chunks to the web service one by one, until FileStream.Read()
                    // returns 0, meaning the entire file has been read.
                    while (BytesRead > 0)
                    {
                        try
                        {
                            requestStream.Write(Buffer, 0, BytesRead);
                        }
                        catch
                        {
                            if (NumRetries++ < MaxRetries)
                            {
                                // rewind the imagememeorystream and keep trying
                                thumbimgstream.Position -= BytesRead;
                            }
                            else
                            {
                                throw new Exception();
                            }
                        }
                        BytesRead = thumbimgstream.Read(Buffer, 0, ChunkSize);
                        // read the next chunk (if it exists) into the buffer.
                        // the while loop will terminate if there is nothing left to read
                    }
                }
            }
        }
        catch (Exception)
        {
            //thumbnail could not be uploaded
            thumbuploaded = false;
        }
        #endregion
    }

    if (thumbuploaded)
    {
        if (!(user.updateplaylist((UInt32)playlisttoedit.id, nametxt.Text,
                      new FileInfo(thumbnametxt.Text).Name, descriptiontxt.Text)))
        {
            #region deleting the new thumbnail that was uploaded
                   because the entry in the database could not be made
            if (new FileInfo(thumbnametxt.Text).Name != playlisttoedit.thumb)
            {
                try
                {
                    string deletepath = user.ftpurl + "user_" + user.userid + "/playlist_" +
                       playlisttoedit.id + "/" + new FileInfo(thumbnametxt.Text).Name;
                    FtpWebRequest request = (FtpWebRequest)FtpWebRequest.Create(deletepath);
                    request.Credentials = new NetworkCredential(user.ftpusername, user.ftppassword);
                    request.Method = WebRequestMethods.Ftp.DeleteFile;
                    request.KeepAlive = true;
                    request.GetResponse();
                }
                catch (Exception)
                {
                    //do nothing if thumb could not be deleted,
                    //later on it'll be done via garbage collector
                }
            }

            #endregion
            MessageBox.Show("The playlist could not be updated");
        }
        else
        {
            #region deleting the old playlist thumb from the remote server and the local temp folder
            if (new FileInfo(thumbnametxt.Text).Name != playlisttoedit.thumb)
            {
                try
                {
                    string deletepath = user.ftpurl + "user_" + user.userid +
                       "/playlist_" + playlisttoedit.id + "/" + playlisttoedit.thumb;
                    FtpWebRequest request = (FtpWebRequest)FtpWebRequest.Create(deletepath);
                    request.Credentials = new NetworkCredential(user.ftpusername, user.ftppassword);
                    request.Method = WebRequestMethods.Ftp.DeleteFile;
                    request.KeepAlive = true;
                    request.GetResponse();
                    //deleting the old thumb from the local temp folder
                    deletepath = Application.StartupPath + "\\temp\\playlist_" +
                      playlisttoedit.id + "\\" + playlisttoedit.thumb;
                    if (File.Exists(deletepath)) File.Delete(deletepath);
                }
                catch (Exception)
                {
                    //do nothing if old thumb could not be deleted,
                    //later on it'll be done via garbage collector
                }
            }
            #endregion
            MessageBox.Show("The playlist has been updated");
        }
    }
    else
    {
        MessageBox.Show("The playlist could not be updated");
    }
}
[editplaylist.cs]
删除播放列表
当用户在播放列表窗格的主窗体上点击 [DELETE] 按钮时,将选择当前活动的播放列表进行删除。删除播放列表涉及两个基本步骤:
- 在数据库的 [playlist] 表和 [audio] 表中删除选定播放列表的记录。
- 删除在远程服务器上为该播放列表创建的文件夹。
让我们看一下如何实现这些步骤的代码。
private void deleteplaylistbtn_Click(object sender, EventArgs e)
{
    if (playlistview.SelectedItems.Count > 0)
    {
        if (DialogResult.OK == MessageBox.Show("Are you sure you want to delete the playlist?",
                   "Delete Playlist", MessageBoxButtons.OKCancel))
        {
            UInt32 playlisttodeleteid = UInt32.Parse(playlistview.SelectedItems[0].ImageKey);
            try
            {
                if (!(user.deleteplaylist(playlisttodeleteid))) throw new Exception();
                Thread deleteplaylistthread = new Thread(deleteplaylistthreadfunction);
                deleteplaylistthread.Start(playlisttodeleteid);
            }
            catch (Exception)
            {
                MessageBox.Show("Sorry the playlist could not be deleted");
                return;
            }

            //MessageBox.Show("Playlist has been deleted.");
            #region refresh the main form
            playlistloadingindicator.Visible = true;
            playlistloadingindicator.Active = true;
            showplaylists();
            playlistloadingindicator.Active = false;
            playlistloadingindicator.Visible = false;
            audioloadingindicator.Visible = true;
            audioloadingindicator.Active = true;

            if (playlistview.Items.Count > 0)
            {
                user.currentplaylistid = Int32.Parse(playlistview.Items[0].ImageKey);
                showaudios(user.currentplaylistid);
            }
            else audiolistview.Items.Clear();
            audioloadingindicator.Active = false;
            audioloadingindicator.Visible = false;
            #endregion
        }
    }
    else MessageBox.Show("Please select the playlist to delete");
}

private void deleteplaylistthreadfunction(object data)
{
    UInt32 playlisttodeleteid = (UInt32)data;
    deleteplaylist frm = new deleteplaylist(playlisttodeleteid);
    frm.ShowDialog();
}
[main.cs]
void folderdeletionthread()
{
    #region deleting folder that were created for the playlist
            on the remote server and the local temp folder
    try
    {
        //deleting on the remote server
        string deletepath = user.ftpurl + "user_" +
                user.userid + "/playlist_" + playlisttodeleteid;
        new DeleteFTPDirectory().DeleteDirectoryHierarcy(deletepath);
        //deleting on the local temp folder
        deletepath = Application.StartupPath + "\\temp\\playlist_" + playlisttodeleteid;
        if (Directory.Exists(deletepath)) Directory.Delete(deletepath, true);
    }
    catch (Exception)
    {
        //In case the remote folders could not be deleted
        //I'll do nothing they will later be garbage collected
    }
    #endregion
}
[deleteplaylist.cs]
>添加音频
当用户在音频窗格的主窗体上点击 [ADD] 按钮时,upload [upload.cs] 窗体将打开。
让我们看一个上传窗体的屏幕截图。

[upload] 窗体要求用户填写要上传的音频的标题和描述。填写这些信息后,用户必须点击 [UPLOAD AUDIO] 按钮,该按钮将执行 fileuploadbackgroundworker_DoWork() 函数(后台工作者异步执行),该函数执行添加/上传音频的实际任务。上传音频涉及以下基本步骤:
- 在数据库的 [audio] 表中为要上传的音频添加记录。
- 将音频上传到远程服务器的音频目录(请参阅上面的目录结构部分)。音频是通过使用 .NET 的
FTPWEBREQUEST类上传的(MSDN)。 - 在音频上传过程中报告进度,即显示已上传音频的百分比和字节数(请参阅上面的屏幕截图)。
让我们看一下如何实现这些基本步骤的代码。
private void uploadfilesbtn_Click(object sender, EventArgs e)
{
    if (filename != string.Empty && titletxt.Text !=
                  string.Empty && descriptiontxt.Text != string.Empty)
    {
        uploadfilebtn.Enabled = false;
        uploadfilebtn.Text = "PLEASE WAIT";
        addcoverart(filename, "poster.jpg");
        fileuploadbackgroundworker.RunWorkerAsync(filename);
    }
    else MessageBox.Show("Please fill in all the fields");
}
private void fileuploadbackgroundworker_DoWork(object sender, DoWorkEventArgs e)
{
    string UploadPath;
    FtpWebRequest request;
    int ChunkSize = 102400, NumRetries = 0, MaxRetries = 3;
    byte[] Buffer = new byte[ChunkSize];

    //for updating status to the ui thread
    decimal totalbytes = new FileInfo(filename).Length;
    decimal totalbytesuploaded = 0;

    //end

    #region upload to remote, make database records,report progress to ui thread
    string onlyfilename = new FileInfo(filename).Name;
    bool fileuploadedremotely = true;

    try
    {
        if (fileuploadedremotely)
        {
            #region upload audio to remote server
            UploadPath = user.ftpurl + "user_" + user.userid +
               "/playlist_" + user.currentplaylistid + "/audios/" + onlyfilename;
            request = (FtpWebRequest)WebRequest.Create(UploadPath);
            request.Method = WebRequestMethods.Ftp.UploadFile;
            request.Credentials = new NetworkCredential(user.ftpusername, user.ftppassword);
            using (Stream requestStream = request.GetRequestStream())
            {
                using (FileStream fs = File.Open(filename, FileMode.Open, FileAccess.Read))
                {
                    int BytesRead = fs.Read(Buffer, 0, ChunkSize);
                    // read the first chunk in the buffer

                    // send the chunks to the web service one by one,
                    // until FileStream.Read() returns 0, meaning the entire file has been read.
                    while (BytesRead > 0)
                    {
                        try
                        {
                            requestStream.Write(Buffer, 0, BytesRead);
                            totalbytesuploaded += BytesRead;
                            #region report progress to the ui thread
                            int percentage = (int)(((float)totalbytesuploaded * 100) / ((float)totalbytes));
                            string statustext = string.Format("{0:0.00} Mb/{1:0.00} Mb",
                              (float)(totalbytesuploaded / (1024 * 1024)), (float)(totalbytes / (1024 * 1024)));
                            fileuploadbackgroundworker.ReportProgress(percentage, statustext);
                            #endregion
                        }
                        catch
                        {
                            if (NumRetries++ < MaxRetries)
                            {
                                // rewind the filestream and keep trying
                                fs.Position -= BytesRead;
                            }
                            else
                            {
                                //MessageBox.Show("Could not upload " + onlyfilename +
                                //  " after several attempts.
                                /// Please check your network connectivity. This file will be skipped.");
                                fileuploadedremotely = false;
                                break;
                            }
                        }
                        BytesRead = fs.Read(Buffer, 0, ChunkSize);
                        // read the next chunk (if it exists) into the buffer.
                        // the while loop will terminate if there is nothing left to read
                    }
                }
            }
            #endregion
        }
        if (fileuploadedremotely)
        {
            #region add record to the database
            if (!user.insertaudio(onlyfilename, titletxt.Text,
              descriptiontxt.Text, user.currentplaylistid)) fileuploadedremotely = false;
            #endregion
        }
    }
    catch
    {
        fileuploadedremotely = false;
    }

    if (!fileuploadedremotely)
    {
        user.deleteaudio(onlyfilename, user.currentplaylistid);
        MessageBox.Show("The file could not be uploaded. " +
           "The reason could be slow or no internet connectivity");
        filename = string.Empty;
        //code should be written here to delete the audio that was uploaded
        //but some database error occured but that is a rare chance, so ignoring the code piece here
    }
    else
    {
        #region report progress to the ui thread
        int percentage = 100;
        string statustext = string.Format("{0:0.00} Mb/{1:0.00} Mb",
          (float)(totalbytes / (1024 * 1024)), (float)(totalbytes / (1024 * 1024)));
        fileuploadbackgroundworker.ReportProgress(percentage, statustext);
        #endregion
        MessageBox.Show("The file has been uploaded");
        filename = string.Empty;
    }
#endregion
}

private void fileuploadbackgroundworker_ProgressChanged(object sender,
                     ProgressChangedEventArgs e)
{
    progressbar.Value = e.ProgressPercentage;
    try
    {
        numofbytesuploadedstatuslbl.Text = e.UserState.ToString();
    }
    catch (Exception)
    {
        //do nothing
    }
}

private void fileuploadbackgroundworker_RunWorkerCompleted(object sender,
                       RunWorkerCompletedEventArgs e)
{
    uploadfilebtn.Enabled = true;
    uploadfilebtn.Text = "UPLOAD AUDIO";
    progressbar.Value = 0;
    numofbytesuploadedstatuslbl.Text = "Operation Completed";
    filenametxt.Text = "";
    titletxt.Text = "";
    descriptiontxt.Text = "";
    filename = string.Empty;
}
[upload.cs]
编辑音频
当用户在音频窗格的主窗体上点击 [EDIT] 按钮时,update audio [editaudio.cs] 窗体将打开。
让我们看一个更新音频窗体的屏幕截图。

Update Audio [editaudio.cs] 窗体显示用户可以编辑的音频信息。编辑信息后,用户必须点击 [UPDATE AUDIO] 按钮,该按钮将执行 audioedit() 函数,该函数执行更新音频信息的实际任务。编辑音频涉及一个基本步骤:
- 更新正在更新的音频在 [audio] 表中的记录。
让我们看看它是如何实现的。
private void editaudiobtn_Click(object sender, EventArgs e)
{
    editaudiobtn.Enabled = false;
    titletxt.Enabled = false;
    descriptiontxt.Enabled = false;
    editaudiobtn.Text = "Please Wait...";
    Application.DoEvents();

    if (string.IsNullOrEmpty(nametxt.Text) || string.IsNullOrEmpty(titletxt.Text) ||
                  string.IsNullOrEmpty(descriptiontxt.Text))
    {
        MessageBox.Show("Please fill in all the fields");
    }
    else
    {
        string[] fields = {titletxt.Text,descriptiontxt.Text};
        editaudiothread = new Thread(audioedit);
        editaudiothread.Start(fields);
        while (editaudiothread.IsAlive) Application.DoEvents();
    }
    this.Close();
}

private void audioedit(object fields)
{
    string[] title_decription = (string[])fields;
    if (user.updateaudio(audio.id, title_decription[0], title_decription[1]))
        MessageBox.Show("The audio has been updated");
    else MessageBox.Show("The audio could not updated due to a title mismatch " +
       "or some internal errors. Try changing the title or try again later");
}
[editaudio.cs]
删除音频
当用户在音频窗格的主窗体上点击 [DELETE] 按钮时,DELETE AUDIOS [delete.cs] 窗体将打开。
让我们看一个删除音频窗体的屏幕截图。

DELETE AUDIOS [delete.cs] 窗体显示用户选择要删除的音频(可以一次删除多个音频)。当用户点击 [DELETE AUDIOS] 按钮时,将执行 deleteaudiosbackgroundworker_DoWork() 函数(这是一个异步函数),该函数执行删除音频的实际任务。删除音频涉及以下基本步骤:
- 从数据库的 [audio] 表中删除音频的记录。
- 从远程服务器的音频目录中删除音频(请参阅上面的目录结构部分)。
- 在删除音频的过程中报告进度,即显示已删除音频的百分比和数量。
让我们看一下如何实现这些基本步骤的代码。
private void deleteaudiobtn_Click(object sender, EventArgs e)
{
    Dictionary<string, string> audios = new Dictionary<string, string>();
    string[] filenames = new string[audiolistview.SelectedItems.Count];
    for (int i=0;i<audiolistview.SelectedItems.Count;i++)
    {
        audios.Add(audiolistview.SelectedItems[i].ImageKey, audiolistview.SelectedItems[i].Text);
    }
    if (audios.Count > 0)
    {
        delete frm = new delete(audios);
        frm.ShowDialog();
    }
    else MessageBox.Show("Please select some audios to delete");

    //refresh the audio view list box
    audioloadingindicator.Visible = true;
    audioloadingindicator.Active = true;
    showaudios(user.currentplaylistid);
    audioloadingindicator.Active = false;
    audioloadingindicator.Visible = false;
    //end refresh
}
[main.cs]
private void deleteaudiosbackgroundworker_DoWork(object sender, DoWorkEventArgs e)
{
    long totalfiles = audios.Keys.Count;
    long totalfilesdeleted = 0;
    long totalfilesskipped = 0;

    //selecting each audio one by one and deleting it from database,local temp and remote server
    foreach (KeyValuePair<string, string> audio in audios)
    {
        bool filedeleted = false;
        string audiofilename=user.getaudiofilename(ulong.Parse(audio.Key));

        #region deleting audio record from database
        if (user.deleteaudio(ulong.Parse(audio.Key))) filedeleted = true;
        #endregion

        if (filedeleted == true)
        {
            #region deleting audio from the local temp folder
            try
            {
                string pathtoaudio = Application.StartupPath + "\\temp\\playlist_" +
                   user.currentplaylistid + "\\audios\\" + audiofilename;
                if (File.Exists(pathtoaudio)) File.Delete(pathtoaudio);
            }
            catch
            {
                //do nothing. Later on we can do garbage collection in the local temp folder
            }
            #endregion
        }

        if (filedeleted == true)
        {
            #region deleting audio from the remote server
            try
            {
                #region deleting audio from the remote server
                string deletepath = user.ftpurl + "user_" + user.userid +
                  "/playlist_" + user.currentplaylistid + "/audios/" + audiofilename;
                FtpWebRequest request = (FtpWebRequest)FtpWebRequest.Create(deletepath);
                request.Credentials = new NetworkCredential(user.ftpusername, user.ftppassword);
                request.KeepAlive = true;
                request.Method = WebRequestMethods.Ftp.DeleteFile;
                request.GetResponse();
                #endregion
            }
            catch
            {
                //do nothing. Later on we could do garbage collection at the remote server
            }
            #endregion
        }

        if (filedeleted == true)
        {
            totalfilesdeleted++;
        }
        else
        {
            totalfilesskipped++;
        }

        long[] userstate=new long[2];
        userstate[0]=totalfilesdeleted;
        userstate[1]=totalfiles;
        int percentage = (int)((float)(totalfilesdeleted * 100) /
                              (float)(totalfiles - totalfilesskipped));
        deleteaudiosbackgroundworker.ReportProgress(percentage, userstate);
    }
    if (totalfilesskipped > 0)
        MessageBox.Show("Some of the files could not be deleted");
}

private void deleteaudiosbackgroundworker_ProgressChanged(object sender,
                 ProgressChangedEventArgs e)
{
    string labeltxt = ((long[])e.UserState)[0].ToString() +
                   "/" + ((long[])e.UserState)[1].ToString();
    deletestatuslbl.Text = labeltxt;
    deleteprogressbar.Value = e.ProgressPercentage;
}

private void deleteaudiosbackgroundworker_RunWorkerCompleted(object sender,
              RunWorkerCompletedEventArgs e)
{
    deletestatuslbl.Text = "Operation Completed";
    MessageBox.Show("The delete operation has completed");
    this.Close();
}
[delete.cs]
创建用户
当用户点击 [MANAGE USERS] 按钮时,Manage Users [manageuser.cs] 窗体将打开。该窗体包含三个选项卡,名为:Create User、Edit User 和 Delete User。
让我们看一个 Manage User 窗体中 Create User 选项卡的屏幕截图。

当用户在填写完所有信息后点击 [CREATE USER] 按钮(参见上面的屏幕截图)时,将执行 user 类 [user.cs] 中的 createuser() 方法。创建用户涉及以下基本步骤:
- 在数据库的 [user] 表中为要创建的用户添加记录。
- 在远程服务器上为用户创建一个目录,格式为 audiogallery/user_id(请参阅上面的目录结构部分)。
让我们看一下如何实现这些基本步骤的代码。
public static bool createuser(string name,string username,string password,string description)
{
    bool created = true;
    UInt32 userid=0;//Used 0 here creating a new user will never result in a 0 because
    // I create the superuser with the id=0 myself and don't let it deleted. So...
    try
    {
        #region Inserting record in the database
        if (conn.State == ConnectionState.Closed) conn.Open();
        string query = "INSERT INTO user (name,username,password,description)" +
           " VALUES(@name,@username,@password,@description)";
        MySqlCommand cmd = new MySqlCommand(query, conn);
        cmd.Parameters.AddWithValue("@name", name);
        cmd.Parameters.AddWithValue("@username", username);
        cmd.Parameters.AddWithValue("@password", password);
        cmd.Parameters.AddWithValue("@description", description);
        if (cmd.ExecuteNonQuery() < 0) throw new Exception();
        conn.Close();
        #endregion

        #region Getting the id of newly inserted user
        if (conn.State == ConnectionState.Closed) conn.Open();
        query = "SELECT id FROM user WHERE username=@username";
        cmd = new MySqlCommand(query, conn);
        cmd.Parameters.AddWithValue("@username", username);
        MySqlDataReader rdr = cmd.ExecuteReader();
        if (rdr.Read()) userid = UInt32.Parse(rdr["id"].ToString());
        else throw new Exception();
        conn.Close();
        #endregion

        #region Creating folder for user on the remote site
        string createpath = user.ftpurl + "user_" + userid;
        FtpWebRequest request = (FtpWebRequest)FtpWebRequest.Create(createpath);
        request.Credentials = new NetworkCredential(user.ftpusername, user.ftppassword);
        request.KeepAlive = true;
        request.Method = WebRequestMethods.Ftp.MakeDirectory;
        request.GetResponse();
        #endregion
    }
    catch
    {
        created = false;
        #region Deleting record from the database
        if (userid != 0)
        {
            if (conn.State == ConnectionState.Closed) conn.Open();
            string query = "DELETE FROM user WHERE id=@id";
            MySqlCommand cmd = new MySqlCommand(query, conn);
            cmd.Parameters.AddWithValue("@id", userid);
            cmd.ExecuteNonQuery();
            conn.Close();
        }
        #endregion
    }
    return created;
}
[user.cs]
>编辑用户
当用户点击 [Edit User] 选项卡时, Edit User 选项卡变得可见。
让我们看一个 Manage User 窗体中 Edit User 选项卡的屏幕截图。

当用户在更新所有/部分信息后点击 [EDIT USER] 按钮(参见上面的屏幕截图)时,将执行 user 类 [user.cs] 中的 edituser() 方法。user.edituser() 方法只需执行一个 UPDATE SQL 查询来更新特定用户的所有信息。
让我们看一下如何实现这些基本步骤的代码。
public static bool edituser(UInt32 id,string name,
                       string username, string password, string description)
{
    bool edited = true;
    try
    {
        if (conn.State == ConnectionState.Closed) conn.Open();
        string query = "UPDATE user SET name=@name,username=@username," +
           "password=@password,description=@description WHERE id=@id";
        MySqlCommand cmd = new MySqlCommand(query, conn);
        cmd.Parameters.AddWithValue("@id", id);
        cmd.Parameters.AddWithValue("@name", name);
        cmd.Parameters.AddWithValue("@username", username);
        cmd.Parameters.AddWithValue("@password", password);
        cmd.Parameters.AddWithValue("@description", description);
        if (cmd.ExecuteNonQuery() < 0) throw new Exception();
        conn.Close();
    }
    catch
    {
        edited = false;
    }
    return edited;
}
删除用户
当用户点击 [Delete User] 选项卡时, Delete User 选项卡变得可见。
让我们看一个 Manage User 窗体中 Delete User 选项卡的屏幕截图。

当用户在用户列表(下拉列表)中选择用户后点击 [DELETE USER] 按钮(参见上面的屏幕截图)时,将执行 user 类 [user.cs] 中的 deleteuser() 方法。删除用户涉及以下基本步骤:
- 从数据库的 [user] 表中删除要删除用户的记录。
- 删除在远程服务器上为该用户创建的目录(请参阅上面的“创建用户”部分)。
让我们看一下如何实现这些基本步骤的代码。
public static bool deleteuser(UInt32 id)
{
    bool deleted = true;
    try
    {
        #region Deleting record from the database
        if (conn.State == ConnectionState.Closed) conn.Open();
        string query = "DELETE FROM user WHERE id=@id";
        MySqlCommand cmd = new MySqlCommand(query, conn);
        cmd.Parameters.AddWithValue("@id", id);
        if (cmd.ExecuteNonQuery() < 0) throw new Exception();
        conn.Close();
        #endregion

        #region Delete folder of the user on the remote site
        string deletepath = user.ftpurl + "user_" + id;
        new DeleteFTPDirectory().DeleteDirectoryHierarcy(deletepath);
        #endregion
    }
    catch
    {
        deleted = false;
    }
    return deleted;
}
屏幕截图
Web 库
库软件

该项目正在 GitHub (https://github.com/robinrizvi/Audio-Gallery-Suite) 上持续开发,欢迎您提出评论、建议和疑问,以进一步改进项目。
我希望 Audio-Gallery-Suite 对任何想要实现完整音频库的人都有用。