
WPF 应用程序中的复合应用程序库
4.82/5 (29投票s)
基于复合应用程序库构建的 WPF 应用程序。如何启动、组织解决方案项目、分发资源以及使用演示模型模式构建复杂的 UI。
引言
在开发具有复杂用户界面的应用程序时,我们总是面临同样的问题:如何组织数据展示、更改视图、路由事件、共享资源等等。糟糕的项目结构规划会导致头痛和大量的返工。这就是为什么在大项目开始之前,我想做一个基于 WPF 的解决方案原型,并与大家分享我的一点经验。
在开发应用程序时,我们会遇到日益增长的复杂性——我们添加的控件、视图、菜单越多,应用程序的体系结构就越混乱。有一天,我们会意识到,与其再添加一个模块,不如将之前的所有东西都抛弃掉要容易得多。但多亏了设计模式,这个问题是可以解决的。我们所需要的只是 复合应用程序库。有了它,我们可以将用户界面划分为区域,并将模块动态加载到其中。我们可以组织不同模块之间的事件和命令路由。更重要的是——使用复合应用程序库构建的应用程序的松散耦合设计允许不同的团队独立创建和测试模块。
听起来不错,但是如果你刚刚决定使用复合应用程序库,下一个问题就是:“嗯,示例运行得很好,但我如何才能构建更真实的东西呢?”
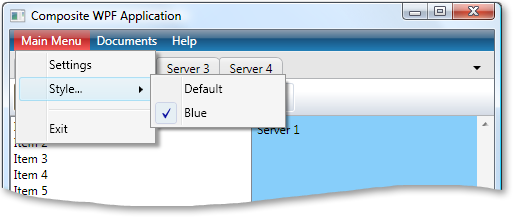
我决定创建一个小型应用程序来模拟与多个服务器的交互。工具栏依赖于服务器上下文。菜单栏包含取决于当前选定模块(文档、用户或安全)的菜单项。中心区域包含一个显示当前模块数据的视图。
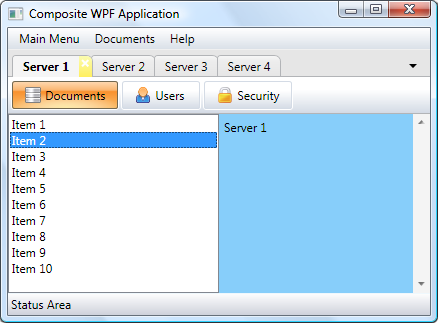
这只是一个原型。因此,只有一个模块写得比较详细——文档。我的主要目标是:
- 研究如何动态加载模块和更改视图
- 使用模型-视图-演示模型 (MVP) 模式将演示与逻辑分离
- 找到一种方法来显示和处理通用菜单项(如“帮助”)和特定于模块的菜单项
- 以一种方式共享资源,使模块能够独立开发,并且易于样式化和皮肤化
项目结构
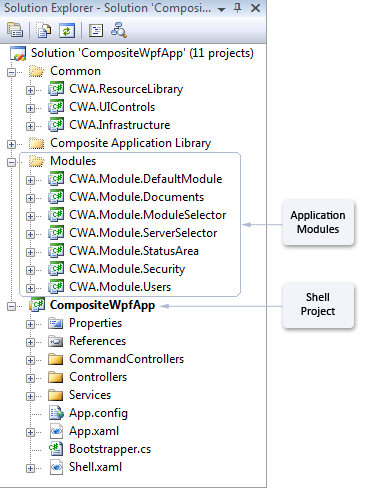
主项目是 CompositeWpfApp。它包含主应用程序窗口 - Shell。这是项目中的第一个也是最后一个 UI 元素——所有其他 UI 视图、控件和菜单都将在不同的项目中创建。
另一组项目位于Common文件夹中。
CWA.ResourceLibrary- 包含共享资源:图像、资源字典、皮肤。CWA.UIControls- 包含自定义 UI 控件和通用菜单项。CWA.Infrastructure- 包含所有项目都应该容易访问的类和接口。
这些项目可以静态链接。但是Modules文件夹中的项目将在需要时动态加载。
为了加载这些模块,它们应该被复制到 CompositeWpfApp 项目的Modules目录中。打开“Module”项目的属性(例如 CWA.Module.Documents),然后输入以下后期生成事件命令行:
xcopy "$(TargetDir)*.*" "$(SolutionDir)CompositeWpfApp\bin\
				$(ConfigurationName)\Modules\" /Y
此外,我们应该在 App.config 文件中列出模块,以便 ConfigurationModuleCatalog 能够找到并加载它们。
<?xml version="1.0" encoding="utf-8" ?>
<configuration>
  <configSections>
    <section name="modules"
	type="Microsoft.Practices.Composite.Modularity.ModulesConfigurationSection,
	Microsoft.Practices.Composite"/>
  </configSections>
  <modules>
    <module assemblyFile="Modules/CWA.Module.DefaultModule.dll"
	moduleType="CWA.Module.DefaultModule.DefaultModule,
	CWA.Module.DefaultModule" moduleName="DefaultModule"/>
    <module assemblyFile="Modules/CWA.Module.ServerSelector.dll"
	moduleType="CWA.Module.ServerSelector.ServerSelector,
	CWA.Module.ServerSelector" moduleName="ServerSelectorModule"/>
    <module assemblyFile="Modules/CWA.Module.ModuleSelector.dll"
	moduleType="CWA.Module.ModuleSelector.ModuleSelector,
	CWA.Module.ModuleSelector" moduleName="ModuleSelectorModule"/>
    <module assemblyFile="Modules/CWA.Module.StatusArea.dll"
	moduleType="CWA.Module.StatusArea.StatusArea,
	CWA.Module.StatusArea" moduleName="StatusAreaModule"/>
    <module assemblyFile="Modules/CWA.Module.Documents.dll"
	moduleType="CWA.Module.Documents.DocumentsModule,
	CWA.Module.Documents" moduleName="Documents" startupLoaded="false"/>
    <module assemblyFile="Modules/CWA.Module.Users.dll"
	moduleType="CWA.Module.Users.UsersModule,
	CWA.Module.Users" moduleName="Users" startupLoaded="false"/>
    <module assemblyFile="Modules/CWA.Module.Security.dll"
	moduleType="CWA.Module.Security.SecurityModule,
	CWA.Module.Security" moduleName="Security" startupLoaded="false"/>
  </modules>
</configuration>
请注意模块名称——它们在 CWA.Infrastructure 项目中定义。
ConfigurationModuleCatalog 在 Shell 项目的 Bootstrapper 类中被定义为我们的模块枚举器。复合应用程序库将使用它来获取有关模块及其位置的信息。
protected override IModuleCatalog GetModuleCatalog()
{
    // ConfigurationModuleCatalog class builds a catalog of modules from
    // a configuration file
    return new ConfigurationModuleCatalog();
}
除了 ConfigurationModuleCatalog,您还可以使用 DirectoryModuleCatalog 来发现存储在特定文件夹中的程序集中的模块,或者在代码或 XAML 文件中指定模块。DirectoryModuleCatalog 对于具有插件的应用程序可能特别有用。
现在我们的准备工作已经完成,可以继续进行 UI 了。
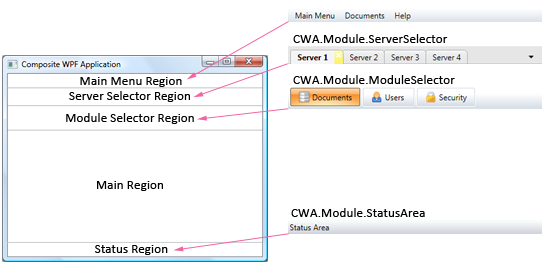
区域和视图
区域用于定义视图的布局。如果您查看 Shell.xaml,您将在其标记中看到区域名称。
<ItemsControl Name="MainMenuRegion"
	cal:RegionManager.RegionName="{x:Static inf:RegionNames.MainMenuRegion}"
    	DockPanel.Dock="Top" Focusable="False" />
<ItemsControl Name="ServerSelectorRegion"
	cal:RegionManager.RegionName="{x:Static inf:RegionNames.ServerSelectorRegion}"
    	DockPanel.Dock="Top" Focusable="False" />
<ItemsControl Name="ModuleSelectorRegion"
	cal:RegionManager.RegionName="{x:Static inf:RegionNames.ModuleSelectorRegion}"
    	DockPanel.Dock="Top" Focusable="False"/>
<ItemsControl Name="StatusRegion"
	cal:RegionManager.RegionName="{x:Static inf:RegionNames.StatusRegion}"
    	DockPanel.Dock="Bottom" Focusable="False" />
<ItemsControl Name="MainRegion"
	cal:RegionManager.RegionName="{x:Static inf:RegionNames.MainRegion}"
	Focusable="False">
这些区域将用于将模块加载到其中。
让我们看看如何将模块加载到主区域。ModuleController 负责在该区域中更改视图。首先,我们应该在 Shell 项目的 Bootstraper 类中注册此类。
Container.RegisterType<IGeneralController, ModuleController>
	(ControllerNames.ModuleController, new ContainerControlledLifetimeManager());
ModuleController 类实现了 IGeneralController 接口,该接口只有一个方法 Run() 。Bootstraper 的 CreateShell() 方法查找实现 IGeneralController 接口的类并调用它们的 Run() 方法。结果,ModuleController 订阅 ModuleChangeEvent。
public void Run()
{
    eventAggregator.GetEvent<ModuleChangeEvent>().Subscribe
			(DisplayModule, ThreadOption.UIThread, true);
}
当我们单击“文档”、“用户”或“安全”按钮时,ModuleSelectorPresententaionModel 将发布带有相应模块名称的 ModuleChangeEvent。ModuleController 捕获事件并在以下方法中显示模块(缩减版):
private void DisplayModule(string moduleName)
{
    try
    {
        moduleManager.LoadModule(moduleName);

        IModulePresentation module = TryResolve<IModulePresentation>(moduleName);

        if (module != null)
        {
            IRegion region = regionManager.Regions[RegionNames.MainRegion];
            currentView = region.GetView(RegionNames.MainRegion);

            if (currentView != null)
                region.Remove(currentView);

            currentView = module.View;
            region.Add(currentView, RegionNames.MainRegion);
            region.Activate(currentView);
        }
    }
}
RegionManager 负责创建和管理区域——一种用于包含实现 IRegion 接口的控件的容器。我们的任务是移除先前加载到区域中的内容,并向其中添加新的模块视图。模块视图的唯一要求是实现 IModulePresentation 接口,该接口公开一个 View 属性。
模型-视图-表示器
模型-视图-演示模型模式旨在将数据模型与其演示和业务逻辑分离。实践中,这意味着演示模型为视觉显示(视图)提供内容,并跟踪视觉内容和数据模型的变化。

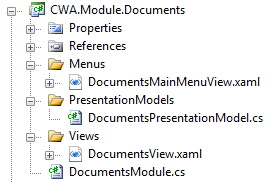
加载到主区域的模块应遵循此模式。实际上,在此演示解决方案中,只有 CWA.Module.Documents 遵循此模式。该模块包含 DocumentsPresentationModel 和 DocumentsView 。由于示例的简单性,未实现单独的数据模型类。
DocumentsView 的代码隐藏不包含任何业务逻辑。相反,所有处理都在 DocumentsPresentationModel 中执行。要将视图绑定到演示模型,我们在 DocumentsPresentationModel 构造函数中初始化视图,并将其作为 View 属性公开。
public object View
{
    get { return view; }
}

public DocumentsPresentationModel(IUnityContainer container,
				IServerContextService serverContextService)
{
    this.container = container;
    this.serverContextService = serverContextService;
    view = container.Resolve<DocumentsView>();
}
这个 View 将从 DocumentsPresentationModel 传递到 DocumentsModule ,然后加载到区域中(参见 DocumentsModule.cs)。
/// <summary>
/// A View associated with the module.
/// </summary>
public object View
{
    get
    {
        // Each ServerContext shall have a PresentationModel
        DocumentsPresentationModel presentationModel =
            (DocumentsPresentationModel)TryResolve<IPresentationModel>
		(serverContextService.CurrentServerContext.Uid);

        if (presentationModel == null)
        {
            // If there is no a PresentationModel associated with the ServerContext
            // (i.e. the module was not called/displayed
	   // for the currently selected Server), create it.
            container.RegisterType<IPresentationModel, DocumentsPresentationModel>
			(serverContextService.CurrentServerContext.Uid,
                 new ContainerControlledLifetimeManager());

            // Create a PresentationModel
            presentationModel = (DocumentsPresentationModel)container.Resolve
	      <IPresentationModel>(serverContextService.CurrentServerContext.Uid);
        }

        return presentationModel.View;
    }
}
现在我们可以在 DocumentsPresentationModel 中操作视图——例如,将某些数据绑定到视觉控件,或者在必要时显示另一种类型的视图。在后一种情况下,监督控制器模式可能更适合。
菜单
应用程序通常可以包含一些包含一组常量通用项(如“帮助”、“退出”、“关于程序”)的菜单,以及上下文相关的菜单项。在 Shell 项目中处理通用命令是有意义的,而与视图相关的命令应在相应模块中处理。
因此,我们有一些要求:
- 我们必须能够动态更改菜单
- 通用命令应在
Shell项目中处理 - 与视图相关的命令应在相应的演示模型类中处理
- 我们不应该在每个模块中重复通用菜单项
第一个要求很容易满足。Shell 项目中有一个 MenuController ,它与上面描述的 ModuleController 非常相似。它的目的是响应 MainMenuChangeEvent 在主菜单区域显示菜单视图。视图在加载和显示时(即,**激活**时)生成此事件。每个模块视图都派生自 ModuleViewBase 类,该类定义了虚拟事件处理程序 ViewActivated() 。重写的代码如下:
protected override void ViewActivated(object sender, EventArgs e)
{
    base.ViewActivated(sender, e);

    if (Menu != null)
        eventAggregator.GetEvent<MainMenuChangeEvent>().Publish(Menu);
}
其中 Menu 是一个在视图构造函数中初始化的 UserControl。
Menu = container.Resolve<DocumentsMainMenuView>();
如果您查看 DocumentsMainMenuView.xaml,您会看到以下 XAML 代码:
<UserControl x:Class="CWA.Module.Documents.DocumentsMainMenuView"
    xmlns="http://schemas.microsoft.com/winfx/2006/xaml/presentation"
    xmlns:x="http://schemas.microsoft.com/winfx/2006/xaml"
    xmlns:ctl="clr-namespace:CWA.UIControls.Menus;assembly=CWA.UIControls"
    Height="Auto" Width="Auto" Name="DocumentsMainMenu">

    <Menu>
        <ctl:MainMenuControl />
        <MenuItem Header="Documents">
            <MenuItem Header="New Document" Command="{Binding NewDocumentCommand}" />
            <MenuItem Header="Cut" Command="{Binding CutCommand}" />
            <MenuItem Header="Copy" Command="{Binding CopyCommand}" />
            <MenuItem Header="Delete" Command="{Binding DeleteCommand}" />
            <MenuItem Header="Rename" Command="{Binding RenameCommand}" />
            <Separator />
            <MenuItem Header="Properties" Command="{Binding PropertiesCommand}" />
        </MenuItem>
        <ctl:HelpMenuControl />
    </Menu>
</UserControl>
这是我们为用户单击“文档”时加载的菜单标记。您还记得我们承诺不重复通用菜单项吗?我们信守承诺——MainMenuControl 和 HelpMenuControl 定义在 CWA.UIControls 项目中。我们稍后会回到它们。
现在我们必须提供一种在演示模型而不是菜单视图类中处理菜单命令的方法。为此,我们必须将菜单的 **DataContext** 绑定到演示模型。让我们回到 DocumentsPresentationModel 构造函数:
public DocumentsPresentationModel(IUnityContainer container,
				IServerContextService serverContextService)
{
    this.container = container;
    this.serverContextService = serverContextService;

    view = container.Resolve<DocumentsView>();
    view.Menu.DataContext = this;

    view.Text = serverContextService.CurrentServerContext.Name;

    NewDocumentCommand = new DelegateCommand<object>(NewDocument, CanExecuteCommand);
    CutCommand = new DelegateCommand<object>(Cut, CanExecuteCommand);
    CopyCommand = new DelegateCommand<object>(Copy, CanExecuteCommand);
    DeleteCommand = new DelegateCommand<object>(Delete, CanExecuteCommand);
    RenameCommand = new DelegateCommand<object>(Rename, CanExecuteCommand);
    PropertiesCommand = new DelegateCommand<object>(Properties, CanExecuteCommand);
}
至于在 MainMenuControl 和 HelpMenuControl 中定义的通用菜单项——它们是 RoutedUICommand 类型命令的源。命令会冒泡到一个窗口,该窗口包含针对这些类型命令的命令绑定。我们的责任是在 Shell 项目中创建这样的绑定。为此,我创建了几个命令控制器,并在 Bootstrapper 中注册并启动了它们。
private void RegisterCommandControllers()
{
    Container.RegisterType<IGeneralController, ExitCommandController>
      (ControllerNames.ExitCommandController, new ContainerControlledLifetimeManager());
    Container.RegisterType<IGeneralController, SkinCommandController>
      (ControllerNames.SkinCommandController, new ContainerControlledLifetimeManager());
    Container.RegisterType<IGeneralController, AboutCommandController>
      (ControllerNames.AboutCommandController, new ContainerControlledLifetimeManager());
    Container.RegisterType<IGeneralController, HelpCommandController>
      (ControllerNames.HelpCommandController, new ContainerControlledLifetimeManager());
    Container.RegisterType<IGeneralController, SettingsCommandController>
   	(ControllerNames.SettingsCommandController,
	new ContainerControlledLifetimeManager());
}
这些控制器向主窗口添加了命令绑定,现在我们可以像在 HelpCommandController 中一样处理这些命令事件了。
public void Run()
{
    // Bind "Help" command to the MainWindow
    CommandBinding binding = new CommandBinding
	(GlobalCommands.HelpCommand, Command_Executed, Command_CanExecute);
    Application.Current.MainWindow.CommandBindings.Add(binding);
}

private void Command_CanExecute(object sender, CanExecuteRoutedEventArgs e)
{
    e.CanExecute = true;
    e.Handled = true;
}

private void Command_Executed(object sender, ExecutedRoutedEventArgs e)
{
    MessageBox.Show("HELP!!!");
}
就这样。
皮肤
将应用程序资源(画笔、样式、控件模板)保存在一个地方是一个好习惯。为此,我创建了 CWA.ResourceLibrary 项目。主应用程序在 App.xaml 文件的 ResourceDictionary 元素中引用它。
<Application x:Class="CompositeWpfApp.App"
    xmlns="http://schemas.microsoft.com/winfx/2006/xaml/presentation"
    xmlns:x="http://schemas.microsoft.com/winfx/2006/xaml">
    <Application.Resources>
        <ResourceDictionary>
            <ResourceDictionary.MergedDictionaries>
                <ResourceDictionary Source="/CWA.ResourceLibrary;
				component/Skins/DefaultSkin.xaml" />
            </ResourceDictionary.MergedDictionaries>
        </ResourceDictionary>
    </Application.Resources>
</Application>
DefaultSkin.xaml 包含一些画笔,并引用另一个不依赖于样式的资源文件——Resources.xaml。
如果我们希望动态更改控件的外观,我们必须满足两个条件。第一,我们应该使用 DynamicResource 引用来处理依赖于皮肤的属性,如下面的示例所示:
<Border Background="{DynamicResource ServerSelectorBackgroundBrush}"
					BorderThickness="0,1,0,0"
     BorderBrush="{DynamicResource ServerSelectorBorderBrush}">
第二个条件有点棘手。如果您查看 DefaultSkin ,您会发现它派生自 ResourceDictionary 类。为此,我建议您首先创建一个 UserControl ,然后将其基类更改为 ResourceDictionary 。而且不要忘记 XAML 中的 UserControl 元素!
现在我们可以更改皮肤。SkinCommandController 负责此操作。
private void ChangeSkin(string skinName)
{
    if (string.IsNullOrEmpty(skinName))
        throw new ArgumentException("Skin Name is empty.", "skinName");

    if (string.Compare(skinName, currentSkinName, true) != 0)
    {
        // Change the skin if it differs from the current one
        Application.Current.Resources.MergedDictionaries[0] =
				SkinFactory.GetResourceDictionary(skinName);
        currentSkinName = skinName;
    }
}
它用 SkinFactory 返回的新资源字典替换应用程序的资源字典。这就是 DefaultSkin 从 ResourceDictionary 继承的好处。
public static ResourceDictionary GetResourceDictionary(string skinName)
{
    if (string.IsNullOrEmpty(skinName))
        throw new ArgumentException("Skin Name is empty.", "skinName");

    if (skinTable.ContainsKey(skinName))
        return (ResourceDictionary)skinTable[skinName];

    ResourceDictionary resourceDictionary = null;

    switch (skinName)
    {
        case SkinNames.DefaultSkin:
            resourceDictionary = (ResourceDictionary)new DefaultSkin();
            break;

        case SkinNames.BlueSkin:
            resourceDictionary = (ResourceDictionary)new BlueSkin();
            break;

        default:
            throw new ArgumentException("Invalid Skin Name.");
    }

    if (resourceDictionary != null)
    {
        skinTable.Add(skinName, resourceDictionary);
    }

    return resourceDictionary;
}
现在,当用户选择“蓝色”样式时,他们将看到新的颜色。
我的示例应用程序非常简单。在“真实”世界中,皮肤化是一项非常棘手的任务——只需看一下 Menu.xaml 文件。
参考文献
历史
- 2009 年 3 月 1 日:初始版本