VB.NET 中 DataGridView 自定义标头
4.56/5 (15投票s)
如何为您的 DataGridView 提供自定义标题
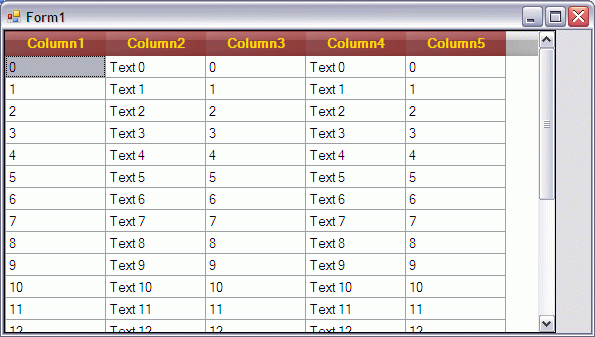
这是使用此代码将得到的内容的屏幕截图

介绍
此代码是 **Andy32** 的 自定义绘制 datagridviewcolumnheader(如 Excel 2007) 的细化版本。
通常,DataGridView 控件不允许您为其列标题设置背景图像。 此代码将以一种非常简单的方式实现这一点。
我这样做只是为了简化原始作者已经完成的工作。
我提供了一个图像,它是一个条纹(1 像素宽),用作背景。 您不需要更多,因为它将被拉伸以填充整个 columnheader。
现在,由于它是一个半透明的 PNG,您将看到 Columheader 的颜色。 这样,您就不需要为要绘制标头的每种颜色提供不同的图像 - 只需更改 ColumnHeadersDefaultCellStyle.BackColor 属性即可。
我认为这再简单不过了。
背景
与原始文章一样,此代码说明了如何自定义绘制 DataGridView 列标题。
我的版本只是原始版本的优化版本,代码更少,并且进行了一些小的改进(前面提到的允许底层颜色透视的小尺寸透明图像)。
只有很少的代码:一个枚举(一组分组的常量),一个方法及其在 DataGridView 的事件中的调用。 仅此而已!!
哦,好吧,我忘记提及需要一些初始化代码(这里我直接在 Form 的 Load 事件处理程序中执行此操作,但您可以将其放入一个方法中并从 Load 事件中调用该方法)。
Private Sub frmMain_Load(ByVal sender As Object, ByVal e As EventArgs) _
 Handles Me.Load
	' Init.
	' Set up the Header Color and Font.
	With dgvData.ColumnHeadersDefaultCellStyle
		.Alignment = DataGridViewContentAlignment.MiddleCenter
		.BackColor = Color.DarkRed
		.ForeColor = Color.Gold
		.Font = New Font(.Font.FontFamily, .Font.Size, _
		 .Font.Style Or FontStyle.Bold, GraphicsUnit.Point)
	End With
	' Fill in some Text.
	For i As Int32 = 0 To 20
		Dim arrStrings As String()
		arrStrings = New String() _
		 { _
		 i.ToString, "Text " & i.ToString, i.ToString, _
		 "Text " & i.ToString, i.ToString _
		 }
		dgvData.Rows.Add(arrStrings)
		arrStrings = Nothing
	Next i
End Sub
只是为了将一些数据放入 DataGridView 并为其列标题设置 Color。
使用方法
在 DataGridView 的 CellPainting 事件中,调用提供的 GridDrawCustomHeaderColumns 方法(如果需要,可以随意缩短名称)
Private Sub dgvData_CellPainting(ByVal sender As Object, _
	ByVal e As DataGridViewCellPaintingEventArgs) _
	Handles dgvData.CellPainting
		' Only the Header Row (which Index is -1) is to be affected.
		If e.RowIndex = -1 Then
			GridDrawCustomHeaderColumns(dgvData, e, _
			 My.Resources.Button_Gray_Stripe_01_050, _
			 DGVHeaderImageAlignments.Stretch)
		End If
End Sub
上面的代码将使用我们方法中包含的代码覆盖正常的 CellPainting:
Private Sub GridDrawCustomHeaderColumns(ByVal dgv As DataGridView, _
 ByVal e As DataGridViewCellPaintingEventArgs, ByVal img As Image, _
 ByVal Style As DGVHeaderImageAlignments)
	' All of the graphical Processing is done here.
	Dim gr As Graphics = e.Graphics
	' Fill the BackGround with the BackGroud Color of Headers.
	' This step is necessary, for transparent images, or what's behind
	' would be painted instead.
	gr.FillRectangle( _
	 New SolidBrush(dgv.ColumnHeadersDefaultCellStyle.BackColor), _
	 e.CellBounds)
	If img IsNot Nothing Then
		Select Case Style
			Case DGVHeaderImageAlignments.FillCell
				gr.DrawImage( _
				 img, e.CellBounds.X, e.CellBounds.Y, _
				 e.CellBounds.Width, e.CellBounds.Height)
			Case DGVHeaderImageAlignments.SingleCentered
				gr.DrawImage(img, _
				 ((e.CellBounds.Width - img.Width) \ 2) + _
							e.CellBounds.X, _
				 ((e.CellBounds.Height - img.Height) \ 2) + _
							e.CellBounds.Y, _
				 img.Width, img.Height)
			Case DGVHeaderImageAlignments.SingleLeft
				gr.DrawImage(img, e.CellBounds.X, _
				 ((e.CellBounds.Height - img.Height) \ 2) + _
							e.CellBounds.Y, _
				 img.Width, img.Height)
			Case DGVHeaderImageAlignments.SingleRight
				gr.DrawImage(img, _
				 (e.CellBounds.Width - img.Width) + _
							e.CellBounds.X, _
				 ((e.CellBounds.Height - img.Height) \ 2) + _
							e.CellBounds.Y, _
				 img.Width, img.Height)
			Case DGVHeaderImageAlignments.Tile
				' ***********************************************
				' To correct: It should display
				' just a stripe of images,
				' long as the whole header,
				' but centered in the header's
				' height.
				' This code WON'T WORK.
				' Any one got any better solution?
				'Dim rect As New Rectangle(e.CellBounds.X, _
				' ((e.CellBounds.Height - img.Height) \ 2), _
				' e.ClipBounds.Width, _
				' ((e.CellBounds.Height \ 2 + img.Height \ 2)))
				'Dim br As New TextureBrush_
				'(img, Drawing2D.WrapMode.Tile, _
				' rect)
				' ************************************************
				' This one works... but poorly
				' (the image is repeated
				' vertically, too).
				Dim br As New TextureBrush_
					(img, Drawing2D.WrapMode.Tile)
				gr.FillRectangle(br, e.ClipBounds)
			Case Else
				gr.DrawImage( _
				 img, e.CellBounds.X, e.CellBounds.Y, _
				 e.ClipBounds.Width, e.CellBounds.Height)
		End Select
	End If
	'e.PaintContent(e.CellBounds)
	If e.Value Is Nothing Then
		e.Handled = True
		Return
	End If
	Using sf As New StringFormat
		With sf
			Select Case dgv.ColumnHeadersDefaultCellStyle.Alignment
				Case DataGridViewContentAlignment.BottomCenter
					.Alignment = StringAlignment.Center
					.LineAlignment = StringAlignment.Far
				Case DataGridViewContentAlignment.BottomLeft
					.Alignment = StringAlignment.Near
					.LineAlignment = StringAlignment.Far
				Case DataGridViewContentAlignment.BottomRight
					.Alignment = StringAlignment.Far
					.LineAlignment = StringAlignment.Far
				Case DataGridViewContentAlignment.MiddleCenter
					.Alignment = StringAlignment.Center
					.LineAlignment = StringAlignment.Center
				Case DataGridViewContentAlignment.MiddleLeft
					.Alignment = StringAlignment.Near
					.LineAlignment = StringAlignment.Center
				Case DataGridViewContentAlignment.MiddleRight
					.Alignment = StringAlignment.Far
					.LineAlignment = StringAlignment.Center
				Case DataGridViewContentAlignment.TopCenter
					.Alignment = StringAlignment.Center
					.LineAlignment = StringAlignment.Near
				Case DataGridViewContentAlignment.TopLeft
					.Alignment = StringAlignment.Near
					.LineAlignment = StringAlignment.Near
				Case DataGridViewContentAlignment.TopRight
					.Alignment = StringAlignment.Far
					.LineAlignment = StringAlignment.Near
			End Select
			' This part could be handled...
			'Select Case dgv.ColumnHeadersDefaultCellStyle.WrapMode
			'	Case DataGridViewTriState.False
			'		.FormatFlags = StringFormatFlags.NoWrap
			'	Case DataGridViewTriState.NotSet
			'		.FormatFlags = StringFormatFlags.NoWrap
			'	Case DataGridViewTriState.True
			'		.FormatFlags = _
						StringFormatFlags.FitBlackBox
			'End Select
			.HotkeyPrefix = Drawing.Text.HotkeyPrefix.None
			.Trimming = StringTrimming.None
		End With
		With dgv.ColumnHeadersDefaultCellStyle
			gr.DrawString(e.Value.ToString, .Font, _
			 New SolidBrush(.ForeColor), e.CellBounds, sf)
		End With
	End Using
	e.Handled = True
End Sub
因此,它基本上是做什么的
绘制背景颜色,在其上叠加图像,绘制文本。
它对齐文本的方式与在任何其他控件上绘制文本的方式相同:检查用户希望如何对齐文本,并根据您将与 DrawString 方法结合使用的 StringFormat 对象进行操作。
有两个属性可以执行此操作:Alignment(水平方向)和 LineAlignment(垂直方向); 和三个值 Near(左侧或向上)、Far(右侧或向下)和 Center(中间)。
这些属性及其值的组合给出了文本的九种可能的对齐方式。
绘制图像的方式可能很棘手,所以...
...您会注意到在上面的代码中,有两个“所有星号”注释行分隔的部分。
那是改进的空间(当然是由于我对 DrawImage 方法的误解)。
我希望其他程序员会发现此代码根据他们的需要很有用。
让我知道您如何使这段代码更好。
历史
- 2009 年 3 月 9 日:初始发布
