
使用 WCF RIA 服务轻松地在 Silverlight 4 中执行 Select、Insert、Update 和 Delete
4.86/5 (21投票s)
本文介绍如何在 Silverlight 4 中轻松地与数据库进行交互。
引言
本文的主要目的是学习在 Silverlight 4 中使用 WCF RIA 服务执行基本的数据库操作。我一直在网上搜索执行这些 CRUD 操作的文章,但我找到的每篇文章都只使用了 Datagrid 控件来执行此操作。因此,我决定写一篇有助于更轻松地理解它的文章,从头开始编写代码。到本文结束时,您会发现自己在 Silverlight 4 中与数据库交互方面非常自在。
背景
众所周知,Silverlight 是一项客户端技术,它不能直接与服务器上运行的数据库进行交互。它需要像 Web 服务/WCF 服务这样的层来完成此操作。我将使用 WCF RIA 服务与 Silverlight 应用程序中的数据库进行交互。WCF RIA 服务:WCF RIA 服务基于在服务器上创建数据访问层,同时在 Silverlight 中创建客户端代码的理念。它侧重于在客户端和服务器之间共享代码,包括验证逻辑。在 RIA 服务中,您通过添加域服务将数据从服务器项目公开到客户端项目。RIA 服务框架将每个域服务实现为Windows Communication Foundation (WCF) 服务。让我们开始创建一个演示应用程序。打开 Visual Studio 2010 IDE,然后选择安装的 Silverlight Navigation 应用程序模板。
创建 Silverlight 导航应用程序

之后,请确保通过选中复选框将 Silverlight 应用程序托管在 ASP.NET Web 项目中,同时选中 Enable WCF RIA 以启用 WCF RIA 服务。

这将使单个解决方案中有两个项目:Web 项目和 Silverlight 项目。因此,通过在项目创建时启用 RIA 服务,我们将 Silverlight 项目与 Web 项目关联起来以使用 RIA 服务。
使用数据库
我将使用我已经在 SQL Server 2008 中创建的名为 WCFriadb 的数据库,该数据库有一个名为 students 的表,其架构如下:

确保 ID 字段自动递增 1。
现在,在解决方案的 Web 项目中添加一个名为 StudentModel.edmx 的 ADO.NET 实体模型(您可以在 Data 安装的模板中找到它)。

然后按照步骤连接到您的数据库并建立连接。


然后通过展开 Tables 节点选择 students 表。

然后您将拥有如下所示的 StudentModel.edmx 文件:

现在请确保生成解决方案。
创建域服务
现在,我们将在解决方案的 Web 项目中添加另一个名为 Domain Service Class 的新项,名为 StudentDomainService.cs(您可以在 Web 安装的模板中找到它)。

此类表示 Silverlight 客户端连接的服务。
然后将出现一个对话框,用于选择我们通过添加 ADO.NET 实体数据模型定义的实体。选择 student 实体,通过单击复选框使其可编辑。

现在再次生成解决方案。到目前为止,我们的解决方案看起来像这样:

如果在 SilverlightWCFRIA 项目中显示所有文件,您将看到一个 Generated_Code 文件夹,其中包含一个 SilverlightWCFRIA.Web.g.cs 文件。这包含 RIA 服务为您生成的代码。
在此,RIA 服务根据我们在中间层公开的实体和操作为客户端应用程序生成客户端代理类。每当您更改 Domain Service Class StudentDomainService.cs (例如编写任何应用程序逻辑等)并生成解决方案时,Ria 服务都会相应地在 SilverlightWCFRIA.Web.g.cs 中生成代码,您无需在此类中执行任何操作。
使用代码
让我们添加一个接口供用户对数据库执行 CRUD 操作。在views 文件夹中,我们将添加一个名为 AddData.xaml 的 Silverlight 页面来执行插入操作。

同样,再添加三个 Silverlight 页面,如 ShowData.xaml、UpdateData.xaml 和DeleteData.xaml ,分别用于检索、更新和删除。
现在,在 MainPage.xaml 中,我们将修改代码,以便导航框架链接到我们创建的页面,我们将在启动时显示 ShowData 页面。这是 MainPage.xaml 的修改代码:
<navigation:Frame x:Name="ContentFrame" Style="{StaticResource ContentFrameStyle}"
                              Source="/ShowData"
                              Navigated="ContentFrame_Navigated"
                              NavigationFailed="ContentFrame_NavigationFailed">
    <navigation:Frame.UriMapper>
      <uriMapper:UriMapper>
            <uriMapper:UriMapping Uri="" MappedUri="/Views/ShowData.xaml"/>
        <uriMapper:UriMapping Uri="/{pageName}" MappedUri="/Views/{pageName}.xaml"/>
      </uriMapper:UriMapper>
    </navigation:Frame.UriMapper>
</navigation:Frame>
并添加 HyperlinkButton 链接到页面,如下所示:
<StackPanel x:Name="LinksStackPanel" Style="{StaticResource LinksStackPanelStyle}">

    <HyperlinkButton x:Name="Link1" Style="{StaticResource LinkStyle}"
       NavigateUri="/ShowData"
       TargetName="ContentFrame" Content="Show Data"/>

    <Rectangle x:Name="Divider1" Style="{StaticResource DividerStyle}"/>

    <HyperlinkButton x:Name="Link2" Style="{StaticResource LinkStyle}"
       NavigateUri="/AddData"
       TargetName="ContentFrame" Content="Add Data"/>

    <Rectangle x:Name="Divider2" Style="{StaticResource DividerStyle}"/>

    <HyperlinkButton x:Name="Link3" Style="{StaticResource LinkStyle}"
                     NavigateUri="/UpdateData"
                     TargetName="ContentFrame" Content="Update Data"/>
    <Rectangle x:Name="Divider3" Style="{StaticResource DividerStyle}"/>
    <HyperlinkButton x:Name="Link4" Style="{StaticResource LinkStyle}"
                     NavigateUri="/DeleteData"
                     TargetName="ContentFrame" Content="Delete Data"/>
</StackPanel>
现在,让我们先进行插入操作。在 AddData.xaml 中,我们将创建一个简单的布局来输入学生姓名、年龄,并带有一个提交按钮,代码如下:
<Grid x:Name="LayoutRoot" Width="400" Height="250">
    <Grid.RowDefinitions>
        <RowDefinition ></RowDefinition>
        <RowDefinition ></RowDefinition>
        <RowDefinition ></RowDefinition>
    </Grid.RowDefinitions>
    <Grid.ColumnDefinitions>
        <ColumnDefinition Width="30*">

        </ColumnDefinition >
        <ColumnDefinition Width="70*"></ColumnDefinition>
    </Grid.ColumnDefinitions>
<sdk:Label Content="Student Name:" Grid.Row="0"
           FontSize="12" Grid.Column="0"/>
<TextBox x:Name="txtstudentName" Margin="0" HorizontalAlignment="Left"
             Grid.Row="0" Height="25"  Width="200" Grid.Column="1"/>
    <sdk:Label Content="Student Age:" Grid.Row="1" FontSize="12" Grid.Column="0"/>
    <TextBox x:Name="txtstudentage" Margin="0"
           HorizontalAlignment="Left" Grid.Row="1"
           Height="25" Width="200" Grid.Column="1"/>
<Button Grid.Row="2" Grid.Column="1" Height="30" Width="100"
   Content="Submit" x:Name="btnsubmit" Click="btnsubmit_Click" HorizontalAlignment="Left"/>
</Grid>
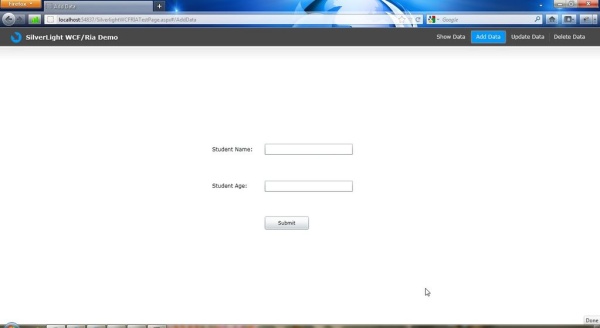
在此,我们采用了三行两列的网格布局。两个用于输入学生姓名和年龄的文本框,名称分别为 txtstudentName 和 txtstudentage,以及一个名为 btnsubmit 的按钮。创建的设计应如下所示:
现在,在 btnsubmit 的Click 事件中,我将编写插入的代码。因此,AddData.xaml.cs 中的代码如下:
namespace SilverlightWCFRIA.Views
{
    public partial class AddData : Page
    {
        StudentDomainContext objctx;
        // StudentDomainContext class in the generated code acts as
        //the "proxy" to communicate from the Silverlight client to the domain
        //service


        public AddData()
        {
           InitializeComponent();
        }

        // Executes when the user navigates to this page.
        protected override void OnNavigatedTo(NavigationEventArgs e)
        {
        }

        private void btnsubmit_Click(object sender, RoutedEventArgs e)
        {
            objctx = new StudentDomainContext();
            //creating the instance of DomainContext corresponding the
            // StudentDomainService
            student st = new student();//creating the instance of entity class
            st.StudentName = txtstudentName.Text;

            st.StudentAge = int.Parse(txtstudentage.Text);
            objctx.students.Add(st);//adding the entities to the entity set
            try
            {
               objctx.SubmitChanges();
               MessageBox.Show("Data added Successfully!");
            }
            catch (Exception ex)
            {
                MessageBox.Show("Adding Data failed due to " + ex.Message);
           }
        }
    }
}
现在运行应用程序,然后在浏览器中导航到“添加数据”页面并插入记录。

现在,我们将在 Show Data 页面显示插入的数据。打开 ShowData.xaml 并添加以下代码:
<navigation:Page xmlns:sdk="http://schemas.microsoft.com/winfx/2006/xaml/presentation/sdk"  x:Class="SilverlightWCFRIA.ShowData"
    xmlns="http://schemas.microsoft.com/winfx/2006/xaml/presentation"
    xmlns:x="http://schemas.microsoft.com/winfx/2006/xaml"
    xmlns:d="http://schemas.microsoft.com/expression/blend/2008"
    xmlns:mc="http://schemas.openxmlformats.org/markup-compatibility/2006"
    xmlns:navigation="clr-namespace:System.Windows.Controls;assembly=System.Windows.Controls.Navigation"
    mc:Ignorable="d" d:DesignWidth="640" d:DesignHeight="480"
    Title="Show Data"
    Style="{StaticResource PageStyle}">


<Grid x:Name="LayoutRoot">

<sdk:DataGrid Width="400" x:Name="studentgrid" Height="300"
  HorizontalAlignment="Center" VerticalAlignment="Center"/>

</Grid>

</navigation:Page>
在这里,我们使用了一个名为 studentgrid 的 DataGrid 控件。现在,为了从数据库检索所有数据并将其显示在此 DataGrid 中,我们将以下代码添加到 ShowData.xaml.cs 中,但在之前,我们将在 StudentDomainService.cs 中添加一个 GetStudents() 方法,该方法会触发查询以按学生姓名排序检索数据库中的所有列:
public IQueryable<student> GetStudents()
{
    return this.ObjectContext.students.OrderBy(s=>s.StudentName);
}
而 ShowData.xaml.cs 看起来像这样:
namespace SilverlightWCFRIA
{
    public partial class ShowData : Page
    {
        StudentDomainContext objctx;// StudentDomainContext class in the generated code acts as
        //the "proxy" to communicate from the Silverlight client to the domain service
        public ShowData()
        {
            InitializeComponent();
            objctx = new StudentDomainContext();//creating the instance of DomainContext
            // corresponding the StudentDomainService
            EntityQuery<student> query = objctx.GetStudentsQuery();//passing the query
            // to EntityQuery
            LoadOperation<student> loadOp = this.objctx.Load(query);

            studentgrid.ItemsSource = loadOp.Entities;
            //setting the Itemsource of DataGrid to the entities loaded.
        }


        // Executes when the user navigates to this page.
        protected override void OnNavigatedTo(NavigationEventArgs e)
        {
        }
    }
}
运行代码以在浏览器中查看输出:

现在我们将执行更新操作。为此,我们将通过添加以下代码在 UpdateData.xaml 中创建一个界面:
<navigation:Page x:Class="SilverlightWCFRIA.Views.UpdateData" xmlns:sdk="http://schemas.microsoft.com/winfx/2006/xaml/presentation/sdk"
           xmlns="http://schemas.microsoft.com/winfx/2006/xaml/presentation"
           xmlns:x="http://schemas.microsoft.com/winfx/2006/xaml"
           xmlns:d="http://schemas.microsoft.com/expression/blend/2008"
           xmlns:mc="http://schemas.openxmlformats.org/markup-compatibility/2006"
           mc:Ignorable="d"
           xmlns:navigation="clr-namespace:System.Windows.Controls;assembly=System.Windows.Controls.Navigation"
           d:DesignWidth="640" d:DesignHeight="480"
           Title="Update Data">

<Grid x:Name="LayoutRoot" Width="400" Height="250">

        <Grid.RowDefinitions>
            <RowDefinition ></RowDefinition>
            <RowDefinition ></RowDefinition>
            <RowDefinition ></RowDefinition>
            <RowDefinition ></RowDefinition>
        </Grid.RowDefinitions>
        <Grid.ColumnDefinitions>
            <ColumnDefinition Width="60*">

            </ColumnDefinition >
            <ColumnDefinition Width="70*"></ColumnDefinition>
        </Grid.ColumnDefinitions>
        <sdk:Label Content="Enter student ID to Edit:" Grid.Row="0" FontSize="12" Grid.Column="0"/>
        <TextBox x:Name="searchstudentName" Margin="0" HorizontalAlignment="Left"
           Grid.Row="0" Height="25"  Width="150" Grid.Column="1"/>
        <Button Width="30" Height="25" x:Name="btngo" Click="btngo_Click"
           Grid.Row="0" Grid.Column="1" Margin="125,0,0,0" Content="Go" />

        <sdk:Label Content="Student Name:" Grid.Row="1" FontSize="12" Grid.Column="0"/>
        <TextBox x:Name="txtstudentName" Margin="0" HorizontalAlignment="Left"
           Grid.Row="1" Height="25"  Width="200" Grid.Column="1"/>
        <sdk:Label Content="Student Age:" Grid.Row="2" FontSize="12" Grid.Column="0"/>
        <TextBox x:Name="txtstudentage" Margin="0" HorizontalAlignment="Left"
               Grid.Row="2" Height="25" Width="200" Grid.Column="1"/>
        <Button Grid.Row="3" Grid.Column="1" Height="30" Width="100"
           Content="Update" Click="btnupdate_Click" x:Name="btnupdate"  HorizontalAlignment="Left"/>
</Grid>
</navigation:Page>
其思想是将要编辑的记录获取到文本框中,然后通过单击更新按钮来更新更改。为此,设计与 AddData.xaml 类似,只是多了一个 go 按钮和一个用于接收要编辑的记录的额外文本框。
UpdateData.xaml.cs 中的代码,用于在收到 searchstudentName 文本框中的 ID 后,将要编辑的记录显示在两个文本框中,然后更新更改。但在之前,我们将在 StudentDomainService.cs 中添加一个 GetStudentsByID(int id) 方法,该方法将 student id 作为参数从 searchstudentName 文本框接收。因此,请将以下代码添加到 StudentDomainService.cs 中:
public IQueryable<student> GetStudentsByID(int id)
        {
            return this.ObjectContext.students.Where(s
=> s.ID == id);
        }
而 UpdateData.xaml.cs 看起来像这样:
namespace SilverlightWCFRIA.Views
{
    public partial class UpdateData : Page
    {
        StudentDomainContext objctx;// StudentDomainContext class in the generated code acts as
        // the "proxy" to communicate from the Silverlight client to the domain service
        public UpdateData()
        {
           InitializeComponent();
        }

        // Executes when the user navigates to this page.
        protected override void OnNavigatedTo(NavigationEventArgs e)
        {
        }
        //code for Retrieving the record and filling it in two textboxes
        private void btngo_Click(object sender, RoutedEventArgs e)
        {
           objctx = new StudentDomainContext();
           //creating the instance of DomainContext corresponding the StudentDomainService
           var studentid=int.Parse(searchstudentName.Text);
           var query = objctx.GetStudentsByIDQuery(studentid);
           objctx.Load(query, LoadData, null);//LoadData is a callback function for Load operation
        }
        private void LoadData(LoadOperation lo)
        {
            foreach (student st in lo.Entities)
            {
                txtstudentName.Text = st.StudentName;
                txtstudentage.Text = st.StudentAge.ToString();
            }
        }
        //code for updating the changes made in two textboxes back to database
        private void btnupdate_Click(object sender, RoutedEventArgs e)
        {
           objctx = new StudentDomainContext();
           var studentid = int.Parse(searchstudentName.Text);
           var query = objctx.GetStudentsByIDQuery(studentid);
           objctx.Load(query, EDitData, null);//LoadData is a callback function for Load operation
        }
        private void EDitData(LoadOperation<student> lo)
        {
            student st = lo.Entities.First();
            st.StudentName = txtstudentName.Text;
            st.StudentAge = int.Parse(txtstudentage.Text);
            try
            {
                objctx.SubmitChanges();
                MessageBox.Show("Data updated successfully!");
            }
            catch(Exception ex)
            {
                MessageBox.Show("Data updation failed due to "+ex.Message);
            }
        }
    }
}
现在运行应用程序并转到“更新数据”页面将产生以下输出:

现在最后一件事是删除。用于删除记录的 DeleteData.xaml 中的设计将与 UpdateData.xaml 相同,只是有一个删除按钮而不是更新按钮。因此,我们快速转到 DeleteData.xaml.cs 代码:
namespace SilverlightWCFRIA.Views
{
    public partial class DeleteData : Page
    {
        StudentDomainContext objctx;
        // StudentDomainContext class in the generated code acts as
        // the "proxy" to communicate from the Silverlight client to the domain service
        public DeleteData()
        {
           InitializeComponent();
        }

        // Executes when the user navigates to this page.
        protected override void OnNavigatedTo(NavigationEventArgs e)
        {
        }
        //code for Retrieving the record which to be deleted and
        //filling it in two textboxes
        private void btngo_Click(object sender, RoutedEventArgs e)
        {
           objctx = new StudentDomainContext();
           //creating the instance of DomainContext corresponding the StudentDomainService
           var studentid = int.Parse(searchstudentName.Text);
           var query = objctx.GetStudentsByIDQuery(studentid);
           objctx.Load(query, LoadData, null);//LoadData is a callback function for Load operation
        }
        private void LoadData(LoadOperation lo)
        {

            foreach (student st in lo.Entities)
            {
                txtstudentName.Text = st.StudentName;
                txtstudentage.Text = st.StudentAge.ToString();
            }
        }
        //code for deleting the record shown in two textboxes from the database
        private void btndelete_Click(object sender, RoutedEventArgs e)
        {
            objctx = new StudentDomainContext();
            var studentid = int.Parse(searchstudentName.Text);
            var query = objctx.GetStudentsByIDQuery(studentid);
            objctx.Load(query, Datadelete, null);//Datadelete is a callback function for Load operation
        }
        private void Datadelete(LoadOperation<student> lo)
        {
            student st = lo.Entities.First();
            objctx.students.Remove(st);//Removing the entity from the students entity set.
            try
            {
                objctx.SubmitChanges();
                MessageBox.Show("Data deleted successfully!");
            }
            catch (Exception ex)
            {
                MessageBox.Show("Data deletion failed due to " + ex.Message);
            }
        }
    }
}
Delete Data 页面的输出:
