
在 SharePoint 2007 中分步创建带有分页、排序功能的 CheckAll UncheckAll Gridview Webpart
4.82/5 (9投票s)
一篇关于在 SharePoint 2007 中分步创建带有分页、排序功能的 CheckAll UncheckAll Gridview Webpart 的文章
引言
本文有助于
- 了解如何在 SharePoint 中为
gridview提供排序、分页、全选和取消全选功能 - 读取 SharePoint 自定义列表并将其绑定到 ASP.NET
Gridview控件 - 了解如何在 SharePoint Web Part 中调用用户控件
- 了解如何部署 Web Part
- 了解如何调试 Web Part
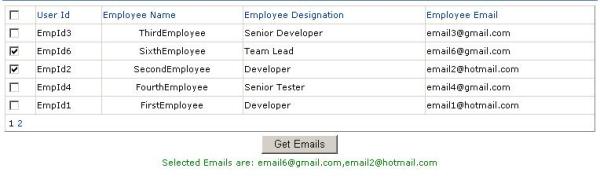
这是我们在本文结束时将要实现的目标
SharePoint 中的用户控件
通常,Web Part 中的所有控件都是在运行时创建的。但是,当这项任务变得非常繁琐时,就可以编写 ASP.NET 用户控件并在 SharePoint Web Part 中使用它们。
如何使用代码
解压提供的示例代码 GridView 控件。该解决方案包含两个项目。第一个项目用于创建 ASP.NET Gridview 用户控件以及一个测试网页。第二个项目用于使用上述 Gridview 用户控件创建 SharePoint Web Part。
在 SharePoint 中创建自定义列表
在示例代码中,在 SharePoint 网站(http://[systemnumber]:[portnumber])中创建了一个名为“EmployeeList”的自定义列表,用于填充 gridview。
创建 SharePoint 自定义列表的步骤
- 在 SharePoint 网站(即 http://[systemnumber]:[portnumber])上,单击“网站操作”>>“创建”。
- 在“创建”页面上,单击“自定义列表”类别下的“自定义列表”链接。
- 在“新建”页面上,输入标题“
EmployeeList”,然后单击“创建”按钮。 - 然后,在新建列表的页面上,单击“设置”菜单下的“创建列”链接。
- 在“创建列”页面上,输入列名和类型,例如
SingleLineofText。 - 对所有列 [
Title,EmployeeName,EmployeeDesignation,EmployeeEmail] 重复步骤 4 和 5。
创建完所有列后,单击列表“新建”菜单下的“新建项目”链接以向列表中添加项目。并为“EmployeeList”输入一些记录。
创建用户控件
- 打开 Visual Studio IDE,选择“文件”>>“新建”>>“项目”,选择“Visual C#”作为语言,然后在“Web”下选择“Web 应用程序”模板。
- 现在,“解决方案资源管理器”中会显示解决方案文件。
- 右键单击“引用”并选择“添加引用”选项。
- 从 .NET 选项卡中选择“Windows SharePoint Services”,然后将 Microsoft.Sharepoint.dll 添加到“引用”中。
- 右键单击项目 >> 添加 >> 新建项 >> 选择
WebUserControl。 Gridview用户控件提供了以下功能:- 从 SharePoint 列表获取数据
- 在运行时创建
Gridview标题行 - 分页
- 排序
CheckAll&UncheckAll复选框 - 用于获取选定行的 ID,在下面的示例中以电子邮件 ID 为例。将
Gridview控件从工具箱拖放到 ascx 页面。
为gridview控件中的checkall和UncheckAll功能编写 JavaScript。
示例用户控件 ascx 代码
检查 GridViewUsercontrol.ascx 代码中的 JavaScript。
<asp:GridView ID="gvMail" runat="server" AutoGenerateColumns="False"
	Width="752px" AllowPaging="True" AllowSorting="True" PageSize="5"
	OnPageIndexChanging="gvMail_PageIndexChanging" OnSorting="gvMail_Sorting"
	HorizontalAlign="Left" UseAccessibleHeader="false">
<Columns>
<asp:TemplateField HeaderText="All" ItemStyle-HorizontalAlign="Left">
<HeaderTemplate>
<asp:CheckBox ID="chkAll" runat="server" onclick="SelectOrUnselectAll(this,'chkRow')" />
</HeaderTemplate>
<ItemTemplate>
<asp:CheckBox ID="chkRow" runat="server" onclick="Check('chkRow')" />
</ItemTemplate>
</asp:TemplateField>
<asp:BoundField DataField="Title" HeaderText="User Id"
SortExpression="Title" ItemStyle-HorizontalAlign="Left"
/>
<asp:BoundField DataField="EmployeeName" HeaderText="Employee Name"
	SortExpression="EmployeeName" ItemStyle-HorizontalAlign="Center" />
<asp:BoundField DataField="EmployeeDesignation" HeaderText="Employee Designation"
SortExpression="EmployeeDesignation"
ItemStyle-HorizontalAlign="Left" />
<asp:BoundField DataField="EmployeeEmail" HeaderText="Employee Email"
	SortExpression="EmployeeEmail"
ItemStyle-HorizontalAlign="Left" />
<asp:TemplateField SortExpression="EmployeeEmail"
Visible="false">
<HeaderTemplate>
Employee Email
</HeaderTemplate>
<ItemTemplate>
<asp:Label ID="lblEmail" Text='<%# Bind("EmployeeEmail") %>' runat="server" />
</ItemTemplate>
</asp:TemplateField>
</Columns>
</asp:GridView>
(a) 从 SharePoint 列表获取数据的示例代码
在下面的代码中,“EmployeeList”是 SharePoint 自定义列表的名称,http://[systemnumber]:[portnumber] 是部署 Web Part 的网站。
将数据保存在会话中。
protected void GetData()
{
    SPSecurity.RunWithElevatedPrivileges(delegate()
    {
        using (SPSite site = new SPSite("http://systemno:portnumber"))
        {
            using (SPWeb web = site.OpenWeb())
            {
                SPList list = web.Lists["EmployeeList"];
                SPListItemCollection itemColl;
                SPQuery query = new SPQuery();

                itemColl = list.GetItems(query);

                string employeeId = string.Empty;
                string employeeName = string.Empty;
                string employeeDesignation = string.Empty;
                string employeeEmail = string.Empty;

                if (itemColl.Count > 0)
                {
                    for (int icount = 0; icount < itemColl.Count; icount++)
                    {
                        SPListItem listItem = itemColl[icount];
                        if (listItem["Title"] != null)
                        {
                            employeeId = listItem["Title"].ToString();
                        }
                        if (listItem["EmployeeName"] != null)
                        {
                            employeeName = listItem["EmployeeName"].ToString();
                        }
                        if (listItem["EmployeeDesignation"] != null)
                        {
                            employeeDesignation =
				listItem["EmployeeDesignation"].ToString();
                        }
                        if (listItem["EmployeeEmail"] != null)
                        {
                            employeeEmail = listItem["EmployeeEmail"].ToString();
                        }
                        AddDataToTable(employeeId, employeeName,
				employeeDesignation, employeeEmail,
				(DataTable)Session[GridValues]);
                    }
                }
            }
        }
    });
}
(b) 排序示例代码
将排序表达式,即列名和升序或降序的排序方向保存在 viewstate 变量中。
DataTable dtSort = ((DataTable)Session[GridValues]);
string lastExpression = string.Empty;
if (ViewState["SortExpression"] != null)
lastExpression = ViewState["SortExpression"].ToString();

string lastDirection = "asc";
if (ViewState["SortDirection"] != null)
lastDirection = ViewState["SortDirection"].ToString();

string newDirection = "asc";
if (e.SortExpression == lastExpression)
newDirection = (lastDirection == "asc") ? "desc" : "asc";

ViewState["SortExpression"] = e.SortExpression;
ViewState["SortDirection"] = newDirection;

DataView dvSort = new DataView(dtSort);
dvSort.Sort = e.SortExpression + " " + newDirection;
gvMail.DataSource = dvSort;
gvMail.DataBind();
(c) 分页示例代码
在分页时注意排序。因此,从 viewstate 中读取 SortExpression ,即列名和排序方向。
this.gvMail.PageIndex = e.NewPageIndex;
DataTable dtPagination = ((DataTable)Session[GridValues]);
DataView dvPagination = new DataView(dtPagination);

if (ViewState["SortExpression"] != null && ViewState["SortDirection"] != null)

dvPagination.Sort = ViewState["SortExpression"] + " " + ViewState["SortDirection"];

gvMail.DataSource = dvPagination;

gvMail.DataBind();
(d) 选择电子邮件的示例代码
循环遍历所有 checkbox ,并使用 FindControl 方法查找选定的 checkbox ,并根据需要(例如向这些人发送电子邮件或删除记录)进行实现。
foreach (GridViewRow i in gvMail.Rows)
{
    CheckBox chkRowItem = (CheckBox)i.FindControl("chkRow");
    if (chkRowItem.Checked)
    {
        emailIds += ((Label)i.FindControl("lblEmail")).Text.ToString() + ",";
    }
}
测试用户控件
为了在将用户控件添加到 Web Part 之前测试其功能,请向项目中添加一个 Web 窗体,并在网页中调用用户控件,以便可以测试用户控件。查找附加的源代码以检查用户控件在网页中的功能。
在 Gridview 的 ascx 页面中,此属性“UseAccessibleHeader=false”对于标题 checkbox 与其他 checkbox 的正确对齐至关重要。
将用户控件添加到 Web Part
- 向同一解决方案添加新项目,选择 Visual C# 作为语言,然后选择 Windows >> 类库。
- 在项目的“引用”中添加“System.Web”作为引用。
- 添加一个类文件。
- 在类文件中调用用户控件,使其成为 Web Part。
在类库中调用用户控件的示例代码
GridViewUserControl.ascx 是前面步骤中创建的用户控件的名称。
WebUserControl = (UserControl)Page.LoadControl
(@"/_controltemplates/GridViewUserControl.ascx");

if (WebUserControl == null)
{
    this.Page.Response.Write("usercontrol null");
}

else
{
    this.Controls.Add(WebUserControl);
}
- 构建解决方案。
部署 Web 部件
- 将用户控件文件(*.ascx)复制到路径 - “SharePoint Installation Drive\Program Files\Common Files\Microsoft Shared\Web Server Extensions\12\TEMPLATE\CONTROLTEMPLATE/usercontrolfilename.ascx”
- 将用户控件的 DLL 复制到路径 - “SharePoint Installation Drive\Inetpub\wwwroot\wss\VirtualDirectories\[Site Port No.]\bin\”
- 创建强名称密钥。
- 右键单击 Web Part 项目,选择“属性”。
- 从左侧选择“签名”选项卡。
- 选中“签名程序集”复选框。
- 从下方的下拉列表中选择“新建”。“创建强名称密钥”窗口将打开。
- 取消选中“使用密码保护我的密钥文件”,在“密钥文件名”文本框中输入名称,然后单击“确定”。
参考下图。

- 将 Web Part DLL 拖放到 GAC(在“开始”->“运行”中输入“assembly”可以直接打开程序集文件夹)。
-
在路径 SharePoint Installation Drive\Inetpub\wwwroot\wss\VirtualDirectories\[Site Port No.]\web.config 的 web.config 文件中添加 Safe Control 标记。
<SafeControl Assembly="[Web
part Assembly Name], Version=1.0.0.0, Culture=neutral,
	PublicKeyToken=[PublicKeyTokenValue]"
Namespace="[Web Part Namespace Name]"

TypeName="*" Safe="True"
AllowRemoteDesigner="True"/>
注意
有两种方法可以获取公钥令牌值:
- 从“程序集”文件夹中,右键单击 DLL(或已部署的程序集)并选择“属性”,然后复制公钥令牌值。
- 使用 Lutz Reflector。有助于获取有关 .NET 程序集的更多信息。可在此处下载:here。

- 执行 iisreset。
将 Web Part 添加到 Web Part 库
- 导航到网站 URL – http://[Site Port No.]
- 转到“网站操作”>>“网站设置”>>“库”>>“Web Parts”>>“Web Part Gallery”。
- 在“Web Parts Gallery”页面上,单击“新建”按钮。“Web Part Gallery: New Web Parts”页面将打开,从下面的列表中选择已部署的 Web Part,然后单击“Populate Gallery”按钮。
- 如果 Web Part 已存在,请选中“如果文件已存在,则覆盖”
checkbox,然后单击“Populate Gallery”按钮。
在站点主页中使用 Web Part
- 导航到站点主页。
- 转到“网站操作”>>“编辑页面”。
- 单击“添加 Web Part”,打开的窗口包含所有 Web Part 的列表。
- 在“Miscellaneous”部分,选择之前部署的 Web Part,然后单击“Add”按钮。
- 单击“退出编辑模式”。
现在将显示带有分页、排序和 CheckAll 以及 UnCheckAll 选项的 Gridview Web Part。
调试 Web Part
- 开始 >> 运行 >> 输入 cmd。
- 在命令提示符窗口中输入“cd\”,然后输入 IISAPP.vbs 并按 Enter。IISAPP.vbs 用于获取 SharePoint 站点的进程 ID。
(参考下图,在本例中,进程 ID 为 2784)。

- 在 Visual Studio 中,转到“调试”>>“附加到进程”,然后查找名为“w3wp.exe”且进程 ID 为 2784 的进程。
- 选择进程并单击“附加”按钮。

- 在应用程序中添加断点,并像调试任何其他 .NET 项目一样调试 Web Part。
历史
- 2009年4月7日:初稿