
WPF 中的吸管控件
3.93/5 (7投票s)
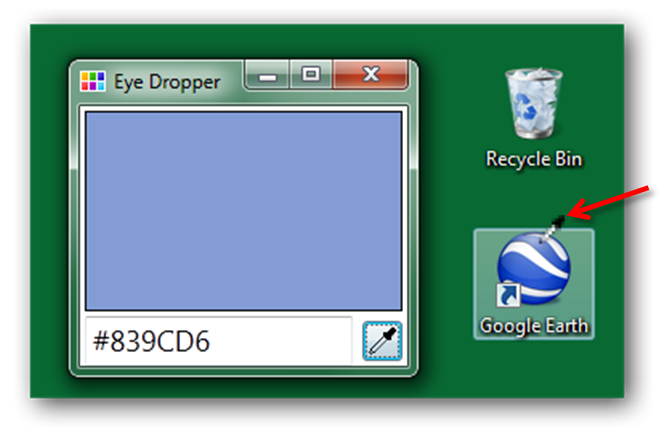
吸色器控件,用于从环境中拾取颜色,就像 Expression Blend 或 Visual Studio 设计器中的吸色器一样。
介绍
我们通常会在设计器中遇到不同类型的吸色器控件。我们可以将鼠标移动到桌面和其他应用程序上以拾取鼠标下的颜色。普通的吸色器只能在应用程序内拾取颜色,例如 Adobe Illustrator 或 Photoshop 中的吸色器。但是,我在这里发布的控件可以帮助您从任何地方选择颜色,即使是在应用程序外部,就像 Expression Blend 或 Visual Studio 设计器中的吸色器一样。
背景
http://wpfplayground.blogspot.in/2012/04/change-windows-cursor-globally-in-wpf.html
http://wpfplayground.blogspot.in/2012/04/capture-screenshot-in-wpf.html
使用代码
基本思想是从屏幕上拾取鼠标移动到的任何位置的颜色。实现背后的关键在于需要截取整个桌面的快照。对于每次鼠标移动,我们将从图像中拾取相应的像素信息。
捕获屏幕截图
让我们从捕获屏幕截图开始,
使用 Windows 窗体捕获屏幕截图非常容易。但在 WPF 中,我们需要调用pinvoke 方法来实现。我们需要来自 User32.dll 和 gdi32.dll 的一些方法。
public class InteropHelper
    {
        [DllImport("user32.dll")]
        public static extern IntPtr GetDesktopWindow();

        // http://msdn.microsoft.com/en-us/library/dd144871(VS.85).aspx
        [DllImport("user32.dll")]
        public static extern IntPtr GetDC(IntPtr hwnd);

        // http://msdn.microsoft.com/en-us/library/dd183370(VS.85).aspx
        [DllImport("gdi32.dll")]
        [return: MarshalAs(UnmanagedType.Bool)]
        public static extern bool BitBlt(IntPtr hDestDC, int x, int y, int nWidth, int nHeight, IntPtr hSrcDC, int xSrc, int ySrc, Int32 dwRop);

        // http://msdn.microsoft.com/en-us/library/dd183488(VS.85).aspx
        [DllImport("gdi32.dll")]
        public static extern IntPtr CreateCompatibleBitmap(IntPtr hdc, int nWidth, int nHeight);

        // http://msdn.microsoft.com/en-us/library/dd183489(VS.85).aspx
        [DllImport("gdi32.dll", SetLastError = true)]
        public static extern IntPtr CreateCompatibleDC(IntPtr hdc);

        // http://msdn.microsoft.com/en-us/library/dd162957(VS.85).aspx
        [DllImport("gdi32.dll", ExactSpelling = true, PreserveSig = true, SetLastError = true)]
        public static extern IntPtr SelectObject(IntPtr hdc, IntPtr hgdiobj);

        // http://msdn.microsoft.com/en-us/library/dd183539(VS.85).aspx
        [DllImport("gdi32.dll")]
        public static extern bool DeleteObject(IntPtr hObject);

        // http://msdn.microsoft.com/en-us/library/dd162920(VS.85).aspx
        [DllImport("user32.dll")]
        public static extern int ReleaseDC(IntPtr hwnd, IntPtr dc);
}
使用这些 Interop 帮助程序来截取桌面屏幕截图。屏幕截图方法将获取 X、Y、宽度和高度等参数。由于我们将截取整个屏幕的快照,因此使用静态类SystemParameters 获取屏幕的宽度和高度。
public static BitmapSource CaptureRegion(IntPtr hWnd, int x, int y, int width, int height)
        {
            IntPtr sourceDC = IntPtr.Zero;
            IntPtr targetDC = IntPtr.Zero;
            IntPtr compatibleBitmapHandle = IntPtr.Zero;
            BitmapSource bitmap = null;

            try
            {
                // gets the main desktop and all open windows
                sourceDC = InteropHelper.GetDC(InteropHelper.GetDesktopWindow());

                //sourceDC = User32.GetDC(hWnd);
                targetDC = InteropHelper.CreateCompatibleDC(sourceDC);

                // create a bitmap compatible with our target DC
                compatibleBitmapHandle = InteropHelper.CreateCompatibleBitmap(sourceDC, width, height);

                // gets the bitmap into the target device context
                InteropHelper.SelectObject(targetDC, compatibleBitmapHandle);

                // copy from source to destination
                InteropHelper.BitBlt(targetDC, 0, 0, width, height, sourceDC, x, y, InteropHelper.SRCCOPY);

                // Here's the WPF glue to make it all work. It converts from an
                // hBitmap to a BitmapSource. Love the WPF interop functions
                bitmap = System.Windows.Interop.Imaging.CreateBitmapSourceFromHBitmap(
                    compatibleBitmapHandle, IntPtr.Zero, Int32Rect.Empty,
                    BitmapSizeOptions.FromEmptyOptions());

            }
            catch (Exception ex)
            {

            }
            finally
            {
                DeleteObject(compatibleBitmapHandle);
                ReleaseDC(IntPtr.Zero, sourceDC);
                ReleaseDC(IntPtr.Zero, targetDC);
            }

            return bitmap;
        }
方法调用
InteropHelper.CaptureRegion(InteropHelper.GetDesktopWindow(),(int)SystemParameters.VirtualScreenLeft,(int)SystemParameters.VirtualScreenTop, (int)SystemParameters.PrimaryScreenWidth,(int)SystemParameters.PrimaryScreenHeight); 全局鼠标位置
现在我们完成了屏幕截图的截取。让我们通过匹配鼠标位置从相应的像素中拾取颜色。所以现在我们需要不仅针对整个应用程序,还需要针对应用程序外部的鼠标移动事件来获取鼠标位置。为了实现全局鼠标移动钩子,我们需要一些本机方法调用,如这篇文章中所述。但这有点复杂。所以在点击吸色器按钮时我启动了一个计时器。计时器的每次滴答,我都会使用以下代码获取鼠标位置:
System.Drawing.Point _point = System.Windows.Forms.Control.MousePosition;
复制像素信息
现在我们已经完成了鼠标位置的获取。使用此位置从我们已获取的BitmapSource 中获取相应的像素信息。BitmapSource.CopyPixel 将为您提供一个字节数组,其中前 3 个值足以找到颜色。
int stride = (screenimage.PixelWidth * screenimage.Format.BitsPerPixel + 7) / 8;
pixels = new byte[screenimage.PixelHeight * stride];
Int32Rect rect = new Int32Rect((int)point.X, (int)point.Y, 1, 1);
screenimage.CopyPixels(rect, pixels, stride, 0);
rectcolor.Fill = new SolidColorBrush(Color.FromRgb(pixels[2], pixels[1], pixels[0]));
全局鼠标光标
(出于安全原因,以下实现未包含在附带的示例和源代码中,因为它会影响客户端注册表值。我们认为以下代码在某些情况下可能存在风险,因此在示例中忽略了它。)
除了鼠标光标之外,一切正常。很明显,我们可以使用FrameworkElement.Cursor 在 WPF 中更改光标。但技巧在于,它只在应用程序内有效,而不在应用程序主窗口之外有效。如果您想更改整个操作系统的鼠标光标,那么在 WPF 中没有任何直接的方法。但大多数开发人员担心为什么我们需要更改整个 Windows 光标。但是,举个例子,如果我们在 WPF 中开发一个吸色器控件(用于拾取颜色)。不像 Illustrator 或 Photoshop 中的吸色器(无法在应用程序外部拾取颜色),而是 Expression Blend 或 Visual Studio 设计器中的吸色器(甚至可以在应用程序外部拾取颜色)。
在这种情况下,应该更改光标,因为箭头光标并不适合拾取颜色。通常情况下,光标值位于注册表中。
注册表项:HKEY_CURRENT_USER\Control Panel\Cursors
更改此处的数值将更改光标,但您的系统需要重新启动才能生效(我可以理解,没有哪个开发人员会接受这一点)。为了避免这种情况并使您的应用程序立即生效,您需要调用pinvoke 调用。
以下方法将刷新光标值:
[DllImport("user32.dll", EntryPoint = "SystemParametersInfo")]
public static extern bool SystemParametersInfo(int uAction, int uParam, string lpvParam, int fuWinIni);
遍历注册表值并更改光标路径。
private void ChangeCursor()
        {
            RegistryKey pRegKey = Registry.CurrentUser;
            pRegKey = pRegKey.OpenSubKey(@"Control Panel\Cursors");
            paths.Clear();
            foreach (var key in pRegKey.GetValueNames())
            {
                Object _key = pRegKey.GetValue(key);
                //Take a backup.

                paths.Add(key, _key.ToString());
                Object val = Registry.GetValue(@"HKEY_CURRENT_USER\Control Panel\Cursors", key, null);
                Registry.SetValue(@"HKEY_CURRENT_USER\Control Panel\Cursors", key, "foo.cur");
            }

            SystemParametersInfo(InteropHelper.SPI_SETCURSORS, 0, null, InteropHelper.SPIF_UPDATEINIFILE | InteropHelper.SPIF_SENDCHANGE);
        }
请确保在更改注册表值之前存储它们,以便您可以将光标恢复为默认值。
 private void ResetCursorToDefault()
        {
            RegistryKey pRegKey = Registry.CurrentUser;
            pRegKey = pRegKey.OpenSubKey(@"Control Panel\Cursors");
            foreach (string key in paths.Keys)
            {
                string path = paths[key];
                Registry.SetValue(@"HKEY_CURRENT_USER\Control Panel\Cursors", key, path);
            }
            InteropHelper.SystemParametersInfo(InteropHelper.SPI_SETCURSORS, 0, null, InteropHelper.SPIF_UPDATEINIFILE | InteropHelper.SPIF_SENDCHANGE);
        }