
三种不同的 ASP.NET MVC 视图实现方式
4.86/5 (18投票s)
实现 MVC 应用程序中视图角色的三种不同方法。
引言
ASP.NET MVC 框架允许将一个 Web 应用程序构建为三个角色(Model、View 和 Controller)的组合。视图角色可以通过多种方式实现。ASP.NET MVC 3 框架中流行的视图引擎是 Razor 视图引擎 和 Web Forms (ASPX) 视图引擎。除此之外,还可以通过使用 jQuery 访问 Controller 方法来实现视图。本文将说明 MVC 应用程序中实现视图的所有这些方式。
创建 MVC 应用程序
首先,让我们创建一个 MVC 应用程序并开发 Model 和 Controller 部分。创建一个空的 MVC3 应用程序。将“View engine”设置为 ASPX。

将创建一个具有以下文件夹结构的工程

创建 Model 部分
为了创建 Model,请在“Model”文件夹下添加以下类
public class Product
{
    public string ProductID { get; set; }
    public string ProductName { get; set; }
    public int Quantity { get; set; }
    public decimal Price { get; set; }
}
实现 Controller 方法
为了创建一个 Controller 方法,右键单击“Controller”文件夹,然后选择 **Add - > Controller**。将 Controller 命名为 ProductController。

ProductController 包含一个名为 Index 的操作方法,如下所示
public class ProductController : Controller
{
    //
    // GET: /Product/

    public ActionResult Index()
    {
        return View();
    }
}
该方法返回一个 ActionResult。Controller 类中的每个方法默认都返回一个 ActionResult。ActionResult 是 Controller 方法(也称为操作方法)的返回类型。ActionResult 封装了操作方法的执行结果,并代表操作方法在框架级别执行操作。
让我们修改操作方法,以便使用 Product 模型返回一个 Product 列表
public ActionResult ProductList()
{
    List<Product> productLst = new List<Product>{
        new Product{ProductID="P01",ProductName="Pen",Quantity=10,Price=12},
        new Product{ProductID="P02",ProductName="Copy",Quantity=12,Price=20},
        new Product{ProductID="P03",ProductName="Pencil",Quantity=15,Price=22},
        new Product{ProductID="P04",ProductName="Eraser",Quantity=20,Price=27}
                                                       };
    return View();
}
完成 Controller 实现后,我们就可以将结果路由到某个视图接口。在此之前,我们需要了解 MVC 框架的路由构造。
操作方法、操作结果和路由
在每个 MVC 应用程序中,操作方法和路由系统协同工作。MVC 通过使用 global.asax.cs 文件中定义的一组约定(即路由模式)来实现此目的。这些模式将 HTTP 请求与 Controller 和操作方法连接起来。当 HTTP 请求进入路由系统时,它会确定哪个 Controller 应该为哪个视图(如果有)提供数据。
global.asax.cs 定义了默认路由模式 {controller}/{action}/{id},如下所示
routes.MapRoute(
                "Default", // Route name
                "{controller}/{action}/{id}", // URL with parameters
在我们的示例中,Controller 名称是“Product”,操作名称是“ProductList”。我们的 Controller 或操作方法没有任何参数。因此,路由结果的 URL 应该是“Product/ProductList”。
方法 1 - 使用 ASPX 引擎实现视图
完成 Model 和 Controller 的实现后,现在是时候实现视图了。构建项目。右键单击 Controller 方法,然后选择“Add View”

将视图名称设为“ProductView”。选中“Create a strongly-typed view”(创建强类型视图)。从 View data class(视图数据类)下拉列表中选择 Product 作为模型。别忘了在添加视图之前构建项目。否则,视图数据类将不会被填充。
选择“View Engine”(视图引擎)为 **ASPX(C#)**。选择“View Content”(视图内容)为“List”。

通过此屏幕,ASP.NET MVC 框架可帮助我们在应用程序中实现经典的 MVC 设计模式。我们将模型作为“View data class”(视图数据类)传递给相应的视图。此外,我们还可以选择一个“View Engine”(视图引擎)来渲染 Controller 方法返回的结果。除此之外,我们还可以指定视图的表示结构(List、Detail 等)在“View content”部分。
单击“Add”(添加)以添加视图。
将创建一个与 Controller 名称(Product)同名的新文件夹,并将视图文件(“ProductView.aspx”)添加到其中。

修改 Controller 方法,以便为新创建的视图“ProductView.aspx”提供数据。
public ActionResult ProductList()
{
    List<Product> productLst = new List<Product>{
      new Product{ProductID="P01",ProductName="Pen",Quantity=10,Price=12},
      new Product{ProductID="P02",ProductName="Copy",Quantity=12,Price=20},
      new Product{ProductID="P03",ProductName="Pencil",Quantity=15,Price=22},
      new Product{ProductID="P04",ProductName="Eraser",Quantity=20,Price=27}
                                               };
    return View("ProductView", productLst);
}
打开视图文件“ProductView.aspx”。由于我们将视图渲染的责任交给了 ASPX 引擎,因此布局已使用 ASP.NET 现有的 .ASPX 标记语法,并使用 <%= %> 块进行开发

现在我们已经完成了视图的实现,接下来是开发一个锚点页面并通过其路由逻辑访问视图。在根目录下创建一个名为“default.aspx”的“aspx”页面,并通过它访问视图。此页面需要以不同于普通 ASPX 页面的方式处理。为了实现 MVC 框架的行为,页面需要由特殊的 HttpHandler MvcHttpHandler 处理。
在页面的加载事件中添加以下代码
public partial class _Default : Page
{
    public void Page_Load(object sender, System.EventArgs e)
    {
        HttpContext.Current.RewritePath(Request.ApplicationPath);
        IHttpHandler httpHandler = new MvcHttpHandler();
        httpHandler.ProcessRequest(HttpContext.Current);
    }
}
根据 Global.asax 中定义的路由模式(“{controller}/{action}/{id}”),Product 视图页面的路由 URL 将是*“Product/ProductList”*。
在 default.aspx 页面中添加一个链接,以便使用其路由结构访问视图,如下所示
此外,使页面继承“System.Web.Mvc.ViewPage”命名空间。

将“default.aspx”设置为启动页并运行应用程序。

单击链接以查看由 **ASPX** 视图引擎渲染的产品列表。

方法 2 - 使用 Razor 引擎实现视图
在上一节中,我们使用 **ASPX** 视图引擎实现了 MVC 应用程序的视图角色。现在,我们将使用 Razor 视图引擎来实现该应用程序的视图角色。
让我们创建另一个模型 Supplier
public class Supplier
{
   public string SupplierID { get; set; }
   public string SupplierName { get; set; }
   public string SupplierAddress { get; set; }
}
为了创建一个 Controller 方法,右键单击“Controller”文件夹,然后选择 **Add - > Controller**。将 Controller 命名为 SupplierController。
让我们修改操作方法,以便使用 Supplier 模型返回一个 Suppliers 列表
public ActionResult SupplierList()
{
    List<Supplier> supplierList = new List<Supplier>{
     new Supplier{SupplierID="S01", SupplierName="Kausik",SupplierAddress="Kolkata"},
     new Supplier{SupplierID="S02", SupplierName="Sandeep",SupplierAddress="Delhi"},
     new Supplier{SupplierID="S03", SupplierName="Soumick",SupplierAddress="Chennai"},
     new Supplier{SupplierID="S04", SupplierName="Arindam",SupplierAddress="Mumbai"}
                                                       };
    return View();
}
完成 Model 和 Controller 的实现后,现在是时候实现视图了。构建项目。右键单击 Controller 方法,然后选择“Add View”
将视图名称设为“SupplierView”。选中“Create a strongly-typed view”(创建强类型视图)。从 View data class(视图数据类)下拉列表中选择 Supplier 作为模型。
选择“View Engine”(视图引擎)为 **Razor(CSHTML)**。选择“View Content”(视图内容)为“List”。

在这里,我们可以选择一个与 **ASPX** 不同的“View Engine”(视图引擎)来渲染 Controller 方法返回的结果。由于我们选择了 **Razor(CSHTML)** 引擎,我们的视图将由 Razor 视图引擎处理。
单击“Add”(添加)以添加视图。
将创建一个与 Controller 名称 (Supplier) 同名的新文件夹,并将视图文件(“SupplierView.cshtml”)添加到其中。视图页面不再是 .aspx 页面,而是 .cshtml 页面。

修改 Controller 方法,以便为新创建的视图“SupplierView.aspx”提供数据。
public ActionResult SupplierList()
{
   List<Supplier> supplierList = new List<Supplier>{
    new Supplier{SupplierID="S01", SupplierName="Kausik",SupplierAddress="Kolkata"},
    new Supplier{SupplierID="S02", SupplierName="Sandeep",SupplierAddress="Delhi"},
    new Supplier{SupplierID="S03", SupplierName="Soumick",SupplierAddress="Chennai"},
    new Supplier{SupplierID="S04", SupplierName="Arindam",SupplierAddress="Mumbai"}
                                                   };
   return View("SupplierView", supplierList);
}
打开视图文件“SupplierView.cshtml”。由于我们将视图渲染的责任交给了 Razor 引擎,因此布局已使用 Razor 的标记语法,并使用 @ 字符进行开发。与 <% %> 代码片段不同,Razor 不需要您显式关闭代码块。

根据 Global.asax 中定义的路由模式(“{controller}/{action}/{id}”),Suppliers 视图页面的路由 URL 将是*“Supplier/SupplierList”*。
在 default.aspx 页面中添加一个链接,以便使用其路由结构访问视图,如下所示

将“default.aspx”设置为启动页并运行应用程序。

单击链接以查看由 **Razor** 视图引擎渲染的 Suppliers 列表。

方法 3 - 使用 jQuery 实现视图
在本节中,我们将使用 jQuery 实现视图角色。视图将由 ASPX 引擎处理,但我们不会使用 <% %> 代码片段来操作表示。相反,我们将通过 jQuery/Ajax 调用访问 Controller 方法,并在前端操作 Controller 方法返回的值。
让我们创建另一个模型 Order
public class Order
{
   public string OrderID { get; set; }
   public int OrderQty { get; set; }
   public decimal OrderPrice { get; set; }
}
为了创建一个 Controller 方法,右键单击“Controller”文件夹,然后选择 **Add - > Controller**。将 Controller 命名为 OrderController。在 Controller 中添加一个新的操作方法 GetOrderList。
该方法将使用 Order 模型返回一个订单列表。在这种情况下,我们将把返回的结果包装成 JSON 格式。因此,Controller 方法的返回类型是 JsonResult。此外,Suppliers 列表对象正被传递到 Framework 方法 Json。该方法将列表对象序列化为 JSON 格式。
public JsonResult GetOrderList()
{
    List<Order> OrderLst = new List<Order>{
        new Order{ OrderID="101", OrderQty=10, OrderPrice=12},
        new Order{ OrderID="201", OrderQty=12, OrderPrice=15},
        new Order{ OrderID="301", OrderQty=15, OrderPrice=17}
                                                  };
    return Json(OrderLst, JsonRequestBehavior.AllowGet);
}
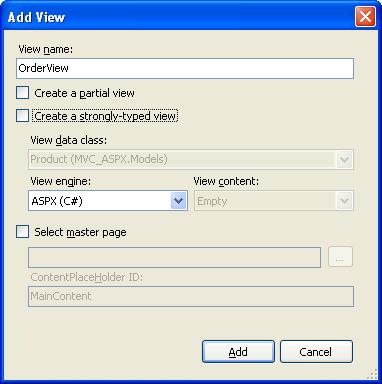
右键单击 Controller 方法,然后选择“Add View”。将视图名称设为“OrderView”。取消选中“Create a strongly-typed view”(创建强类型视图)。
选择“View Engine”(视图引擎)为 **ASPX(C#)**。将“View Content”(视图内容)设为“Empty”。
在之前的实现中,我们向视图传递了一个特定的模型,并使我们的视图成为强类型的。但在这里,我们将通过 jQuery 的 AJAX 调用来访问 Controller 方法。因此,我们不需要传递任何模型。
此外,在之前的实现中,我们选择了“View content”(视图内容)为“List”。实际上,我们选择了一个表示格式,并允许 **ASPX** 或 **Razor** 视图引擎使用它们的本机语法(<% %> 或 @)来操作表示层。但在这里,我们将使用简单的 HTML 手动实现表示层。
将创建一个与 Controller 名称 (Order) 同名的新文件夹,并将视图文件(“OrderView.aspx”)添加到其中。
修改 Controller 方法,以便为新创建的视图“OrderView.aspx”提供数据。
public ActionResult OrderList()
{
    return View("OrderView");
}
现在,为了调用 Controller 方法 GetOrderList*,*我们需要从“OrderView.aspx”页面发起 AJAX 调用。我们将使用 jQuery 实现 AJAX 调用。首先包含 jQuery 库。项目中的“Script”文件夹包含 jQuery 库。包含“Script”文件夹的路径以访问 jQuery 库。
<script type="text/javascript" src="../../Scripts/jquery-1.4.1.js">
Controller 方法 GetOrderList 将以 JSON 格式返回订单列表。我们需要解析 JSON 中的值并使用 HTML 表表示它。为此,我们需要使用 jQuery 编写一个函数。让我们在“Script”文件夹下创建一个名为 JQScript.js 的单独脚本文件中编写一个名为 CreateHTMLTableFromJSON 的函数。此外,在“OrderView.aspx”页面中包含该脚本文件。
<script type="text/javascript" src="../../Scripts/JQScript.js">
</script>
现在,按如下方式发起 AJAX 调用

在上面的代码中,Controller 方法 GetOrderList 被 jQuery AJAX 调用。方法返回的 JSON 响应被客户端函数 CreateHTMLTableFromJSON(用 jQuery 编写)解析成一个 HTML 表。最后,HTML 表被追加到一个名为“OrderGrid”的“div”中。
根据 Global.asax 中定义的路由模式(“{controller}/{action}/{id}”),Product 视图页面的路由 URL 将是*“Order/OrderList”*。
default.aspx 页面应包含一个链接,以便使用其路由结构访问视图,如下所示

将“default.aspx”设置为启动页并运行应用程序。
单击链接以查看使用 jQuery 获取的订单列表。

有时在 Internet Explorer 中,需要连续刷新几次才能从 jQuery AJAX 调用中获得结果。在这种情况下,请尝试 Firefox。
我试图探讨实现 MVC 应用程序视图角色的三种不同方法。应采用其中一种特定方法来开发应用程序中健壮的视图。