
创建动态阴影
4.75/5 (12投票s)
如何创建一个容器控件,用于在任何包含的控件上创建完全夸张的动态阴影。

引言
本文说明了如何创建一个容器控件,用于在任何包含的控件上创建完全夸张的动态阴影。它还展示了创建自定义 WPF 控件的原理。这些阴影可能会为您的应用程序带来额外的关注,或者如果用在所有控件上,可能会毁掉它。
背景
我看到一个 jQuery 示例展示了动态阴影,并认为在 WPF 中会更好。因此,我决定尝试一下……
解决方案
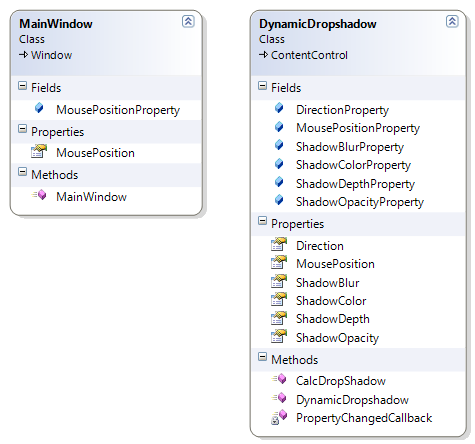
我创建了一个包含自定义 WPF 容器控件的单个项目。类 MainWindow 包含一个依赖属性 MousePosition。所有容器控件都绑定到此属性,以获取鼠标位置的更新。
类图
使用 DynamicDropshadow 控件
<Window x:Class="Dk.Nmt.Development.MainWindow"
    xmlns="http://schemas.microsoft.com/winfx/2006/xaml/presentation"
    xmlns:x="http://schemas.microsoft.com/winfx/2006/xaml"
    xmlns:my="clr-namespace:Dk.Nmt.Development"
    Title="MainWindow" Height="449" Width="567">
  <Grid>
    <my:DynamicDropshadow Height="131" HorizontalAlignment="Left" Margin="325,63,0,0"
        x:Name="dynamicDropshadow1" VerticalAlignment="Top" Width="178"
        MousePosition="{Binding Path=MousePosition, RelativeSource={RelativeSource AncestorType=Window}}">
      <Label>Wrapped control goes here...</Label>
    </my:DynamicDropshadow>
...
DynamicDropshadow 的样式实现了一个控件模板,该模板使用边框来放置阴影
<Style x:Key="DynamicDropshadowStyle" TargetType="{x:Type Development:DynamicDropshadow}">
    <Setter Property="OverridesDefaultStyle" Value="True" />
    <Setter Property="Foreground" Value="White" />
    <Setter Property="FontFamily" Value="Tahoma" />
    <Setter Property="FontSize" Value="11px" />
    <Setter Property="Padding" Value="6" />
    <Setter Property="Background" Value="Transparent"/>
    <Setter Property="Template">
    <Setter.Value>
        <ControlTemplate TargetType="{x:Type Development:DynamicDropshadow}">
            <Border x:Name="PART_DropShadowBorder" CornerRadius="5"
                Background="{TemplateBinding Background}">
                <Border.Effect>
                    <DropShadowEffect
                        Color="{Binding ShadowColor, RelativeSource={RelativeSource TemplatedParent}}"
                        Opacity="{Binding ShadowOpacity, RelativeSource={RelativeSource TemplatedParent}}"
                        Direction="{Binding Direction, RelativeSource={RelativeSource TemplatedParent}}"
                        ShadowDepth="{Binding ShadowDepth, RelativeSource={RelativeSource TemplatedParent}}"
                        BlurRadius="{Binding ShadowBlur, RelativeSource={RelativeSource TemplatedParent}}"/>
                </Border.Effect>
                <ContentPresenter x:Name="PART_DropShadowContent"
                  SnapsToDevicePixels="{TemplateBinding SnapsToDevicePixels}"/>
            </Border>
        </ControlTemplate>
    </Setter.Value>
    </Setter>
</Style>
阴影的计算是在鼠标移动时完成的。计算是基于鼠标指针的方向和距离进行的
public void CalcDropShadow()
{
    // Get the position to the mouse, relative to the center of the control
    var p = Mouse.GetPosition(this);
    p.Offset(-Width / 2, -Height / 2);
    // Calculate the angle to the mouse position
    if (p.X > 0 && p.Y < 0)
    Direction = Math.Atan(-p.Y / p.X) * (180f / Math.PI) - 180;
    if (p.X < 0)
    Direction = Math.Atan(-p.Y / p.X) * (180f / Math.PI);
    if (p.X > 0 && p.Y > 0)
    Direction = Math.Atan(-p.Y/p.X)*(180f/Math.PI) + 180;
    // Calculate distance, depth and blur
    double distance = Math.Sqrt(Math.Pow(p.X, 2) + Math.Pow(p.Y, 2));
    ShadowDepth = 1 + .1 * distance;
    ShadowBlur = Math.Max(20 - .1 * distance,5);
}
我选择让阴影随着与鼠标的距离增加而变得更深、更不模糊。
关注点
一些控件,如 Calendar,似乎在应用效果时会丢失 ClearType。
历史
这是版本 1.0.0.0。