
如何使用 WCF 服务而不添加服务引用或代理
4.78/5 (15投票s)
展示如何松散耦合您的 WCF 服务。
引言
在我最近的一次面试中,我被问到如何在 ASP.NET 项目中使用 WCF 服务而不添加服务引用或代理。当时我只知道通过 Visual Studio 添加服务引用或使用 svcutil.exe 生成代理类来实现。当时我没有答案(当然我通过了面试)。但过了一段时间,我找到了解决方案,这个解决方案可能会让其他人受益。
背景
假设您正在开发一个网站项目,并且您使用 WCF 服务来获取数据或其他原因,而您的客户需求变化非常迅速;为了满足新需求,您可能需要在 WCF 服务中添加新功能,但您无法承担添加新的服务引用、重新生成代理类或停止应用程序并重新启动。但是,如果我告诉您,无需进行所有这些操作,您仍然可以修改 WCF 服务来添加新功能,并且无需中断正在运行的应用程序呢?
使用代码
让我们详细了解一下这个解决方案。您可以通过两种方式在 Visual Studio 中创建 ASP.NET 用户界面项目。您可以创建 ASP.NET Web 应用程序 或 ASP.NET 网站。互联网上有很多关于 ASP.NET Web 应用程序与 ASP.NET 网站的文章,因此我不会深入探讨细节,只需知道网站是动态编译的,源代码随其分发,而 Web 应用程序可以编译成单个 DLL 并进行部署。因此,使用 ASP.NET Web 应用程序或 ASP.NET Web 网站都有其优缺点。我推荐的解决方案仅适用于 ASP.NET 网站,您很快就会知道为什么它只适用于 ASP.NET 网站。那么,让我们开始吧……
- 我们将创建三个不同的项目:ISampleService、WCFSampleService 和 SampleServiceHost。
- ISampleService:我们将把所有接口单独放在这个项目中。
- WCFSampleService:我们将定义服务公开的所有函数。
- SampleServiceHost:这将托管我们的 WCFSampleService。
- 创建一个空的解决方案 SampleServiceSolution,并向其中添加一个 WCF 服务库项目 ISampleService。项目创建完成后,从其中删除 Service1.cs 和 App.config 文件,因为我们只希望在此项目中包含接口。
- 向解决方案 SampleServiceSolution 中添加第二个 WCF 服务库项目 WCFSampleService。项目创建完成后,从中删除 IService1.cs 和 App.config 文件。向其中添加 ISampleService 的引用。
- 由于我们的 WCFSampleService 已经准备就绪,现在我们将创建一个宿主应用程序来托管该服务。为了本文的需要,我们将把服务托管在 IIS 上,为此我们将创建一个新的网站项目 SampleServiceHost 并将其添加到 SampleServiceSolution 中。这里会有点棘手,我将一步一步地向您展示。

以下是 IService1 的代码。我们将定义一个服务契约。在本文中,我将只定义一个简单的服务契约 GetMessage,稍后我们将在 IService1 中添加更多服务契约。
using System;
using System.Collections.Generic;
using System.Linq;
using System.Runtime.Serialization;
using System.ServiceModel;
using System.Text;

namespace SampleService
{
    [ServiceContract]
    public interface IService1
    {
        [OperationContract]
        string GetMessage();
    }
}
[注意:两个项目都使用命名空间 SampleService。]

以下是 Service1 的代码。现在我们将实现我们在 IService1 中定义的服务契约。
using System;
using System.Collections.Generic;
using System.Linq;
using System.Runtime.Serialization;
using System.ServiceModel;
using System.Text;

namespace SampleService
{
    public class Service1 : IService1
    {
        public string GetMessage()
        {
            return "Hello World";
        }
    }
}
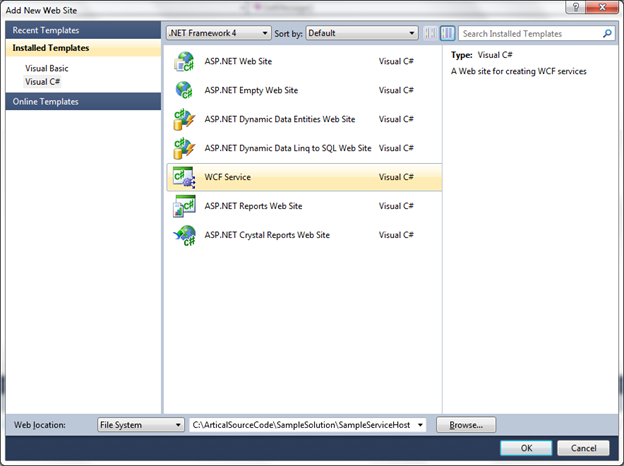
在 Visual Studio 中,右键单击 SampleServiceSolution,然后单击“添加”,再单击“新建网站”。

选择项目模板 WCF Service,然后单击“确定”。
这将会在 SampleServiceSolution 解决方案中创建一个 WCF 服务网站 SampleServiceHost。我们已经在单独的项目中创建了 WCFSampleService。我们将在 Service.svc 中引用它。我们将从 App_Code 文件夹中删除 IService.cs 和 Service.cs 文件。右键单击 SampleServiceHost,添加对其的 WCFSampleService 引用。

打开 SampleServiceHost 中的 Service.svc 文件并进行修改,使其看起来像这样
<%@ ServiceHost Language="C#" Debug="true" Service="SampleService.Service1""%>
现在让我们检查一下我们到目前为止所做的,让我们将 SampleServiceHost 设置为启动项目,并将 Service.svc 文件设置为启动页,然后运行 SampleServiceHost。
如果一切正常,您的屏幕应该看起来像这样

现在让我们修改 SampleServiceHost 的 Web.Config,如下所示。您可以根据项目需求修改 System.ServiceModel 部分。
例如,您的绑定、端点地址等。
//
// Web.Config of SampleServiceHost
//
<?xml version="1.0" encoding="UTF-8"?>
<configuration>
  <system.web>
    <compilation debug="true" targetFramework="4.0" />
  </system.web>
  <system.serviceModel>
    <bindings>
      <basicHttpBinding>
        <binding name="BasicHttpBinding_IService1" closeTimeout="00:01:00"
              openTimeout="00:01:00" receiveTimeout="00:10:00" sendTimeout="00:01:00"
              allowCookies="false" bypassProxyOnLocal="false" hostNameComparisonMode="StrongWildcard"
              maxBufferSize="65536" maxBufferPoolSize="524288" maxReceivedMessageSize="65536"
              messageEncoding="Text" textEncoding="utf-8"
              transferMode="Buffered" useDefaultWebProxy="true">
          <readerQuotas maxDepth="32" maxStringContentLength="8192"
             maxArrayLength="16384" maxBytesPerRead="4096" maxNameTableCharCount="16384" />
          <security mode="None">
            <transport clientCredentialType="None" proxyCredentialType="None" realm="" />
            <message clientCredentialType="UserName" algorithmSuite="Default" />
          </security>
        </binding>
      </basicHttpBinding>
    </bindings>
    <services>
      <service behaviorConfiguration="mexBehavior" name="EnterpriseService.Service1">
        <endpoint address="https:///SampleService/Service.svc"
           binding="basicHttpBinding" bindingConfiguration="BasicHttpBinding_IService1"
           contract="EnterpriseService.IService1" />
      </service>
    </services>
    <behaviors>
      <serviceBehaviors>
        <behavior name="">
          <serviceMetadata httpGetEnabled="true" />
          <serviceDebug includeExceptionDetailInFaults="false" />
        </behavior>
        <behavior name="mexBehavior">
          <serviceMetadata httpGetEnabled="true" />
        </behavior>
      </serviceBehaviors>
    </behaviors>
    <serviceHostingEnvironment multipleSiteBindingsEnabled="false" />
  </system.serviceModel>
  <system.webServer>
    <modules runAllManagedModulesForAllRequests="true" />
    <defaultDocument>
      <files>
        <add value="Service.svc" />
      </files>
    </defaultDocument>
  </system.webServer>
</configuration>
现在是时候将我们的 SampleServiceHost 网站部署到 IIS 了,这样它就可以被外部世界访问。我将其部署在 IIS 上的 https:///SampleService/Service.svc。
部署 SampleServiceHost 后,就可以测试我们的 WCFSampleService 了。我们将创建一个单独的网站项目 TestClientForSampleService。向其添加 ISampleService 的引用。

接下来,我们将修改 TestClientForSampleService 网站的 Web.Config,如下所示
//
// modify Web.Config of TestClientForSampleService
// add servicemodel section
//
<system.serviceModel>
    <bindings>
      <basicHttpBinding>
        <binding name="BasicHttpBinding_IService1" closeTimeout="00:01:00"
            openTimeout="00:01:00" receiveTimeout="00:10:00" sendTimeout="00:01:00"
            allowCookies="false" bypassProxyOnLocal="false" hostNameComparisonMode="StrongWildcard"
            maxBufferSize="65536" maxBufferPoolSize="524288" maxReceivedMessageSize="65536"
            messageEncoding="Text" textEncoding="utf-8" transferMode="Buffered"
            useDefaultWebProxy="true">
          <readerQuotas maxDepth="32" maxStringContentLength="8192" maxArrayLength="16384"
              maxBytesPerRead="4096" maxNameTableCharCount="16384" />
          <security mode="None">
            <transport clientCredentialType="None" proxyCredentialType="None"
                realm="" />
            <message clientCredentialType="UserName" algorithmSuite="Default" />
          </security>
        </binding>
      </basicHttpBinding>
    </bindings>
    <client>
      <endpoint address="https:///SampleService/Service.svc"
          binding="basicHttpBinding" bindingConfiguration="BasicHttpBinding_IService1"
          contract="SampleService.IService1" name="BasicHttpBinding_IService1" />
    </client>
</system.serviceModel>
接下来,我们将在 App_Code 文件夹下创建一个 ServiceClient 类,如下所示
using System;
using System.Collections.Generic;
using System.Linq;
using System.Web;
using System.ServiceModel;
using System.Configuration;

public class ServiceClient<T> : ClientBase<T> where T : class
{
    private bool _disposed = false;
    public ServiceClient()
        : base(typeof(T).FullName)
    {
    }
    public ServiceClient(string endpointConfigurationName)
        : base(endpointConfigurationName)
    {
    }
    public T Proxy
    {
        get { return this.Channel; }
    }
    protected virtual void Dispose(bool disposing)
    {
        if (!this._disposed)
        {
            if (disposing)
            {
                if (this.State == CommunicationState.Faulted)
                {
                    base.Abort();
                }
                else
                {
                    try
                    {
                        base.Close();
                    }
                    catch
                    {
                        base.Abort();
                    }
                }
                _disposed = true;
            }
        }
    }
}
接下来,我们将在 default.aspx 上添加两个 ASP.NET Label 控件,如下所示
<%@ Page Title="Home Page" Language="C#"
    MasterPageFile="~/Site.master" AutoEventWireup="true"
    CodeFile="Default.aspx.cs" Inherits="_Default" %>
<asp:Content ID="HeaderContent" runat="server" ContentPlaceHolderID="HeadContent">
</asp:Content>
<asp:Content ID="BodyContent" runat="server" ContentPlaceHolderID="MainContent">
    <h2>
        Welcome to ASP.NET!
    </h2>
    <div>
        <asp:Label ID="Label1" runat="server" /><br />
        <asp:Label ID="Label2" runat="server" /><br />
    </div>
</asp:Content>
接下来,在代码隐藏文件 Default.aspx.cs 的 Page_Load 事件中,我们将使用我们的 ServiceClient 类来调用 WCFSampleService。
using System;
using System.Collections.Generic;
using System.Linq;
using System.Web;
using System.Web.UI;
using System.Web.UI.WebControls;
using SampleService;
public partial class _Default : System.Web.UI.Page
{
    protected void Page_Load(object sender, EventArgs e)
    {
        using (ServiceClient<IService1> ServiceClient = new ServiceClient<IService1>("BasicHttpBinding_IService1"))
        {
            this.Label1.Text = ServiceClient.Proxy.GetMessage();
        }
    }
}
现在是运行我们的 TestClientForSampleService 网站的时候了。您的屏幕应该看起来像这样。

现在是真正的神奇之处了,假设我的客户希望我添加一个显示客户地址的新功能,我所要做的就是修改我的 ISampleService 来添加一个新的服务契约,并修改我的 WCFSampleService 来添加一个实现新服务契约的新函数。在我的 TestClientForSampleService 网站中,我不需要再次添加 ISampleService 引用,这是因为 TestClientForSampleService 网站会自动获取更改后的引用的 DLL,因此,无需修改对其的 ISampleService 引用,我仍然可以在我的 TestClientForSampleService 网站中使用新功能。
因此,让我们修改 ISampleService 来添加一个新的服务契约 GetAddress,如下所示,然后构建项目。
namespace SampleService
{
    [ServiceContract]
    public interface IService1
    {
        [OperationContract]
        string GetMessage();
        [OperationContract]
        string GetAddress();
    }
}
修改 WCFSampleService 来实现一个新的服务契约,然后构建项目
namespace SampleService
{
    public class Service1 : IService1
    {
        public string GetMessage()
        {
            return "Hello World";
        }
        public string GetAddress()
        {
            return "123 New Street, New York, NY 12345";
        }
    }
}
最后,构建 SampleServiceHost 项目。接下来,构建 TestClientForSampleService 项目,您无需更改对其的 ISampleService 引用。然后,修改 TestClientForSampleService 网站的 default.aspx.cs 文件,如下所示
protected void Page_Load(object sender, EventArgs e)
{
    using (ServiceClient<IService1> ServiceClient =
           new ServiceClient<IService1>("BasicHttpBinding_IService1"))
    {
        this.Label1.Text = ServiceClient.Proxy.GetMessage();
        //once you have done the build inteli sense
            //will automatically gets the new function
        this.Label2.Text = ServiceClient.Proxy.GetAddress();
    }
}
关注点
我在这里所做的是向您展示如何松散耦合您的 WCF 服务。
历史
- 2012 年 6 月 1 日:第一个版本。