
手势驱动的 Windows Phone 待办事项列表
4.94/5 (63投票s)
本文描述了 Windows Phone 待办事项列表应用程序的开发,该应用程序摒弃了按钮和复选框,转而使用手势。
目录
本文描述了一个 Windows Phone 待办事项列表应用程序的开发,该应用程序具有非常简化的用户界面,完全没有复选框、按钮和其他常见的 UI 控件。相反,该应用程序通过滑动、下拉添加、点击并按住以及其他直观的手势进行控制。这个应用程序最初是我博客上的一些文章,最初受到 iPhone 应用程序 Clear 的启发。随着我开发的方法的成熟,我决定重新组织和重新设计各种代码片段来创建这篇文章。
您可以在下面的视频中看到该应用程序的实际运行效果:
该应用程序的完整源代码随本文提供。
引言 – 手势,为什么我们不多用用它们?
Windows Phone 用户界面 (UI) 遵循 Metro 设计语言,因此其界面与以前基于 Windows 的手机截然不同。Metro 主题摆脱了其同类(iPhone)和前身(Windows Mobile)的拟物化界面,用纯色扁平区域取代了赋予按钮深度、高光和阴影的装饰性特征。深度的唯一提示是用户与这些元素交互时微妙的倾斜。

但是 Metro 界面到底有多激进呢?乍一看,它确实与同类产品大相径庭,但它仍然保留了常见的 UI 功能和控件,例如按钮、滑块和复选框,尽管它们以更简单的图形表示。除了偶尔的手势,我们与 Windows Phone 的交互方式与我们与桌面 Windows 界面的交互方式大同小异。顺便说一句,这就是为什么您可以在没有触摸显示器的桌面计算机上舒适地控制您的 Windows Phone 模拟器。
除了文本输入,大多数日常用户主要通过鼠标与他们的计算机进行交互。如果您观察一个非常小的孩子尝试控制电脑鼠标,您会意识到它并不是最直观的输入设备。幸运的是,一旦掌握了这项技能;它确实开始感觉自然——有点像骑自行车!鼠标指针稍微脱离的性质确实有一些小的优势,例如,如果 UI 稍微滞后于您的鼠标移动,例如在执行拖动操作时,您不太可能注意到。
通过触摸界面,我们失去了这种脱节。虽然使用鼠标时,我们的“触摸”是通过某种人工屏幕指针或光标进行通信的,但使用触摸界面时,没有必要这样做,因为我们直接与对象进行交互。
由于触摸允许更直接的交互,移动和平板电脑界面被设计成利用惯性和弹性物理。这些使得屏幕上的对象看起来更真实,进一步增加了您正在直接与它们交互的错觉,而不是它们仅仅是一堆像素。这样做的副作用是,性能对于触摸界面更为关键。如果您触摸拖动一个对象,但应用程序性能问题意味着它无法跟上您的交互,那么这是一个真实对象的错觉会立即破灭。
移动多点触控界面允许比简单的鼠标指针设备更多的控制和表达。已经开发了标准手势,例如捏合/拉伸、轻拂、平移、点击并按住,但是这些手势很少使用;一个值得注意的例外是捏合/拉伸,它是操纵图像的标准机制。尽管触摸具有表现力,我们仍然回到旧的 UI 范式,按钮、滑块和复选框。
当一个充分利用手势的应用程序出现时,它确实会脱颖而出。Realmac software 的 iPhone “Clear” 应用程序就是这样一款应用程序,它是一个简单的待办事项列表,没有一个按钮或复选框。您可以在下面看到该应用程序的实际运行情况
有趣的是,它使用捏合手势导航三级菜单的方式与 Windows 8 的 “语义缩放” 概念相似。
当我第一次看到 Clear 时——它干净、无杂乱的界面对我而言就是“Metro”!……我立即想将此功能带到 Windows Phone 上。我的原因有两方面;首先,它看起来是一个具有挑战性的应用程序,而我喜欢挑战!其次,我想使用这个应用程序来鼓励其他开发人员更多地思考如何使用手势来取代老旧的桌面界面概念。
我发现我对手势以及如何用它们取代经典 UI 组件的想法并非独一无二,这并不奇怪。我的朋友 Graham Odds (@g_odds) 在网上找到了一些关于题为 “按钮是权宜之计” 的演讲的精彩笔记,非常值得一读。
注意:我在 CodeProject 上分享的所有作品均受 Code Project Open License 许可。对于本文,我只想补充一点,我不希望有人拿这段代码在 Windows Phone 市场上发布“Clear”克隆版。Clear 的创作者因创造了一个高度创新和独特的应用程序而获得所有荣誉。请受到启发,但不要复制。
基本应用结构
该应用程序是最基本的待办事项列表形式,可以添加、删除和编辑其文本。列表中的各个项目由 ToDoItemViewModel 表示。
/// <summary>
/// A single todo item.
/// </summary>
public class ToDoItemViewModel : INotifyPropertyChanged
{
  private string _text;

  private bool _completed;

  private Color _color = Colors.Red;

  public string Text
  {
    get { return _text; }
    set
    {
      _text = value;
      OnPropertyChanged("Text");
    }
  }

  public bool Completed
  {
    get { return _completed; }
    set
    {
      _completed = value;
      OnPropertyChanged("Completed");
    }
  }

  public Color Color
  {
    get { return _color; }
    set
    {
      _color = value;
      OnPropertyChanged("Color");
    }
  }

  public ToDoItemViewModel(string text)
  {
    Text = text;
  }

  public event PropertyChangedEventHandler PropertyChanged;

  protected void OnPropertyChanged(string property)
  {
    if (PropertyChanged != null)
    {
      PropertyChanged(this, new PropertyChangedEventArgs(property));
    }
  }
}
每个项目都有一个描述任务的 `Text` 属性,以及描述任务是否完成及其颜色的其他属性。应用程序的 UI 以颜色渲染项目列表,使其从顶部的红色渐变为底部的黄色,因此待办事项项目存在 `Color` 属性(正是这个属性使其成为 ViewModel 而不仅仅是 Model)。
项目集合包含在 ToDoListViewModel 中
/// <summary>
/// A collection of todo items
/// </summary>
public class ToDoListViewModel
{
  private ResettableObservableCollection<ToDoItemViewModel> _todoItems =
          new ResettableObservableCollection<ToDoItemViewModel>();

  public ToDoListViewModel()
  {
    _todoItems.CollectionChanged += (s, e) => UpdateToDoColors();
  }

  public ObservableCollection<ToDoItemViewModel> Items
  {
    get
    {
      return _todoItems;
    }
  }

  private void UpdateToDoColors()
  {
    double itemCount = _todoItems.Count;
    double index = 0;
    foreach (var todoItem in _todoItems)
    {
      double val = (index / itemCount) * 155.0;
      index++;

      if (!todoItem.Completed)
      {
        todoItem.Color = SystemColor.FromArgb(255, 255, (byte)val, 0);
      }
    };
  }
}
项目集合以 `ResettableObservableCollection` 的形式公开,它是 `ObservableCollection` 的一个子类,允许我们触发“重置”集合更改事件(稍后详述)。此视图模型还内部处理 `CollectionChanged` 事件,以便我们可以在列表更改时更新每个项目的颜色。
UI 的 XAML 使用 ItemsControl 渲染项目,使用简单的模板和一些基本的值转换器。
<phone:PhoneApplicationPage
    ...>

  <phone:PhoneApplicationPage.Resources>
    <conv:ColorToBrushConverter x:Key="ColorToBrushConverter"/>
    <conv:BoolToVisibilityConverter x:Key="BoolToVisibilityConverter"/>
  </phone:PhoneApplicationPage.Resources>

  <!--LayoutRoot is the root grid where all page content is placed-->
  <Grid x:Name="LayoutRoot" Background="Transparent">
    <Grid x:Name="ContentPanel" Margin="12,0,12,0">
      <ItemsControl ItemsSource="{Binding}">
        <ItemsControl.ItemTemplate>
          <DataTemplate>
            <Border Background="{Binding Path=Color, Converter={StaticResource ColorToBrushConverter}}"
                    Height="75"
                    Loaded="Border_Loaded">


              <Grid Background="{StaticResource itemGradient}">
                <!-- task text -->
                <TextBlock Text="{Binding Text}"
                           Margin="15,15,0,15" FontSize="30"
                           x:Name="taskText"/>

                <!-- the strike-through that is shown when a task is complete -->
                <Line Visibility="{Binding Path=Completed, Converter={StaticResource BoolToVisibilityConverter}}"
                      X1="0" Y1="0" X2="1" Y2="0"
                      Stretch="UniformToFill"
                      Stroke="White" StrokeThickness="2"
                      Margin="8,5,8,0"/>

              </Grid>
            </Border>
          </DataTemplate>
        </ItemsControl.ItemTemplate>
      </ItemsControl>
    </Grid>
</Grid>
</phone:PhoneApplicationPage>
项目渐变是应用程序级别的资源,因为它在应用程序的其他地方使用。
<Application.Resources>
  <LinearGradientBrush EndPoint="0,1" StartPoint="0,0" x:Key="itemGradient">
    <GradientStop Color="#22FFFFFF"/>
    <GradientStop Color="#00000000" Offset="0.05"/>
    <GradientStop Color="#00000000" Offset="0.9"/>
    <GradientStop Color="#22000000" Offset="1"/>
  </LinearGradientBrush>
</Application.Resources>
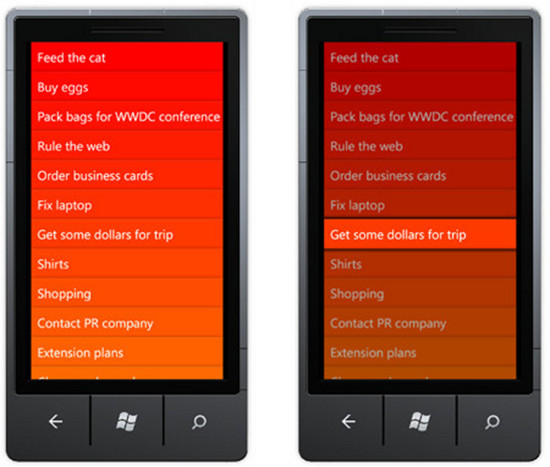
以上 XAML 产生了以下简单的 UI,其中每个项目都使用非常微妙的渐变来区分相邻项目
![]()
尽管有微妙的渐变,这通常不被看好(内容优先于外观!),但这对我来说仍然感觉很像 Metro UI 设计。
管理交互
当我第一次开始为待办事项应用程序实现各种手势时,我只是简单地在代码后端添加了各种操作事件处理程序,并通过一系列变量管理状态。随着我向应用程序添加更多手势,它很快变得难以管理,尤其是在操作事件根据当前“执行”的手势具有不同含义的情况下。为了使代码更面向对象且状态更易于管理,我将每个交互分离到一个可以轻松添加/从应用程序中删除的类中。
在这种情况下,交互是用户为了改变应用程序状态而执行的一系列手势。例如,“重新排序”交互由点击并按住手势和随后的拖动手势发起。
每个交互都必须实现以下接口
/// <summary>
/// An interaction is handles gestures from the UI in order to perform actions
/// on the model. Interactions have the concpet of Enabled and Active in order
/// that the InteractionManager can ensure that only one interaction is
/// active at one time
/// </summary>
public interface IInteraction
{
  /// <summary>
  /// Initialises the interaction, providing it with todo model items and the UI that renders then.
  /// </summary>
  void Initialise(ItemsControl todoList, ResettableObservableCollection<ToDoItemViewModel> todoItems);

  /// <summary>
  /// Invoked when a new element that is the ItemsContainer
  /// for a ToDoViewModelItem is added to the list. This allows
  /// the interaction to add event handlers to the element.
  /// </summary>
  void AddElement(FrameworkElement element);

  bool IsActive { get; }

  bool IsEnabled { get; set; }

  /// <summary>
  /// Occurs when this interaction becomes active
  /// </summary>
  event EventHandler Activated;

  /// <summary>
  /// Occurs when this interaction completes
  /// </summary>
  event EventHandler DeActivated;
}
`Initialise` 方法提供模型项目列表,以及渲染它们的 `ItemsControl`。交互具有状态,`IsActive`,表示用户当前正在“执行”此交互。对于我们前面“重新排序”交互的示例,如果用户执行了点击并按住手势并且当前正在拖动项目,则交互处于活动状态。交互还具有 `IsEnabled` 属性,表示是否可以启动交互。这允许我们禁用除活动交互之外的所有交互。最后,还有一个 `AddElement` 方法,每次在 UI 中渲染新项目时都会调用该方法。这允许交互向单个项目添加手势事件处理程序。
该项目还包括 `InteractionBase`,这是一个实现 `IInteraction` 的抽象类,用于提供公共逻辑,并在状态更改时触发 `Active` / `DeActivated` 事件。当您有多个实现时,提供接口的抽象实现是很常见的做法,因为通常有一组“核心”函数在所有实现中都是通用的。
管理各种交互的任务落在了 `InteractionManager` 的肩上/// <summary>
/// Manages a collection of interactions, multicasting various functions to each interaction (such
/// as the need to attached to a new element), and also manages the enabled state of each interaction.
/// </summary>
public class InteractionManager
{
private List<IInteraction> _interactions = new List<IInteraction>();
public void AddInteraction(IInteraction interaction)
{
_interactions.Add(interaction);
interaction.Activated += Interaction_Activated;
interaction.DeActivated += Interaction_DeActivated;
}
/// <summary>
/// 'multicast' AddELement to all interactions
/// </summary>
public void AddElement(FrameworkElement element)
{
foreach (var interaction in _interactions)
{
interaction.AddElement(element);
}
}
private void Interaction_DeActivated(object sender, EventArgs e)
{
// when an interactions is de-activated, re-enable all interactions
foreach(var interaction in _interactions)
{
interaction.IsEnabled = true;
}
}
private void Interaction_Activated(object sender, EventArgs e)
{
// when an interaction is activated, disable all others
foreach(var interaction in _interactions.Where(i => i != sender))
{
interaction.IsEnabled = false;
}
}
}
这个简单的类执行几个任务,它确保当一个交互变得活跃时,所有其他交互都被禁用,而当一个交互变得不活跃(即完成)时,所有交互都变得活跃。因为交互使用广泛的手势和其他事件,所以没有简单的方法可以集中禁用交互,因此每个交互都必须确保“遵守”自己的 `IsEnabled` 属性。最后,`InteractionManager` “多播”前面描述的 `AddElement` 方法。
将交互添加到 UI 中就像创建它们并将它们添加到管理器一样简单。当加载新的待办事项时,我们处理用于渲染每个项目的模板的 `Loaded` 事件,并将其呈现给管理器,管理器依次通知每个交互,允许它们添加事件处理程序。下面显示了我们视图的完整代码后端
public partial class MainPage : PhoneApplicationPage
{
  // the model objects
  private ToDoListViewModel _viewModel = new ToDoListViewModel();

  private InteractionManager _interactionManager = new InteractionManager();

  // Constructor
  public MainPage()
  {
    InitializeComponent();

    // view model populated with test data here

    this.DataContext = _viewModel.Items;

    var dragReOrderInteraction = new DragReOrderInteraction(dragImageControl);
    dragReOrderInteraction.Initialise(todoList, _viewModel.Items);

    var swipeInteraction = new SwipeInteraction();
    swipeInteraction.Initialise(todoList, _viewModel.Items);

    var tapEditInteraction = new TapEditInteraction();
    tapEditInteraction.Initialise(todoList, _viewModel.Items);

    var addItemInteraction = new PullDownToAddNewInteraction(tapEditInteraction, pullDownItemInFront);
    addItemInteraction.Initialise(todoList, _viewModel.Items);

    var pinchAddNewItemInteraction = new PinchAddNewInteraction(tapEditInteraction, pullDownItemInFront);
    pinchAddNewItemInteraction.Initialise(todoList, _viewModel.Items);

    _interactionManager.AddInteraction(swipeInteraction);
    _interactionManager.AddInteraction(dragReOrderInteraction);
    _interactionManager.AddInteraction(addItemInteraction);
    _interactionManager.AddInteraction(tapEditInteraction);
    _interactionManager.AddInteraction(pinchAddNewItemInteraction);

  }

  private void Border_Loaded(object sender, RoutedEventArgs e)
  {
    _interactionManager.AddElement(sender as FrameworkElement);
  }
}
这感觉非常优雅!
无论如何,基础设施代码就到此为止,让我们看看这些交互是如何实现的……
用于删除/完成的滑动交互
对于希望支持标准或自定义手势的 Silverlight 开发人员来说,有多种选项可用。我们将在接下来的几段中简要介绍这些选项。
适用于 Windows Phone 的 Silverlight 通过 `Touch.FrameReported` 提供低级触摸事件,您可以处理这些事件以跟踪用户何时将一个或多个手指放在屏幕上并移动它们。将低级操作事件转换为高级手势实际上相当棘手。与鼠标驱动的替代方案相比,触摸设备在拖动对象或轻弹它们时提供了更大的控制,但对于更常见的尝试点击屏幕上特定位置的任务来说,精度要低得多。因此,手势具有内置的容忍度。例如,如果用户的手指移动了一个像素,则不会启动拖动操作手势。
适用于 Windows Phone 的 Silverlight 暴露高级操作事件,这些事件获取低级触摸事件并使其更易于使用。`ManipulationStarted`、`-Delta` 和 `-Ended` 事件包含描述平移(单指拖动)和缩放(多指捏合)的组件,它们还提供最终速度,以便您可以为对象赋予惯性,让它们在操作后缓慢减速,而不是突然停止。不幸的是,操作事件没有如上所述的容忍度,因此如果用户的手指在任何方向上移动一个像素,则会触发 `ManipulationStarted` 后跟 `ManipulationDelta`。
Silverlight 工具包包含一个 `GestureListener`,它为处理触摸事件以构建手势提供了一个替代方案。`GestureListener` 拖动确实提供了所需的容忍度,但是 `GestureListener` 最近被 弃用,这很可惜,因为框架事件无法完全取代此类的功能。我发现它仍然有效,但在与其他框架提供的手势集成时确实会导致问题,所以我建议您避免使用它。
在待办事项应用程序中,我主要使用了框架操作事件,并使用适当的容忍度来检测轻拂手势并防止拖动手势过早触发,尽管,当需要更多控制自定义手势时,我也使用了低级触摸事件。在待办事项应用程序中,向右水平滑动将待办事项标记为完成,而向左滑动则删除项目。
为了支持这些手势,我们在每个元素添加到列表时处理它们的 `ManipulationDelta` 和 `ManipulationCompleted` 事件。
public override void AddElement(FrameworkElement element)
{
  element.ManipulationDelta += Element_ManipulationDelta;
  element.ManipulationCompleted += Element_ManipulationCompleted;
}<span style="white-space: normal; ">
</span>
`ManipulationDelta` 处理程序需要执行几项任务。如果交互未激活,它需要确定用户拖动元素的距离,以判断我们是否将其视为拖动手势。如果交互处于激活状态,则增量用于偏移正在拖动的元素。
// the drag distance required to consider this a swipe interaction
private static readonly double DragStartedDistance = 5.0;

private void Element_ManipulationDelta(object sender, ManipulationDeltaEventArgs e)
{
  if (!IsEnabled)
    return;

  if (!IsActive)
  {
    // has the user dragged far enough?
    if (Math.Abs(e.CumulativeManipulation.Translation.X) < DragStartedDistance)
      return;

    IsActive = true;

    // initialize the drag
    FrameworkElement fe = sender as FrameworkElement;
    fe.SetHorizontalOffset(0);
  }
  else
  {
    // handle the drag to offset the element
    FrameworkElement fe = sender as FrameworkElement;
    double offset = fe.GetHorizontalOffset().Value + e.DeltaManipulation.Translation.X;
    fe.SetHorizontalOffset(offset);
  }
}<span style="white-space: normal; ">
</span>
注意,如前所述,每个交互都必须处理自己的启用状态。但是,上述代码中的 `SetHorizontalOffset` 和 `GetHorizontalOffset` 这些神秘方法是什么呢?它们在 `FrameworkElement` 中找不到。偏移元素的任务通过 `TranslateTransform` 相当简单,但是,为了避免在多个位置重复此代码,它被“隐藏”在 Set / `GetHortizontalOffset` 扩展方法之后。这些方法还处理元素尚未应用 `TranslateTransform` 的情况: public static void SetHorizontalOffset(this FrameworkElement fe, double offset)
{
var translateTransform = fe.RenderTransform as TranslateTransform;
if (translateTransform == null)
{
// create a new transform if one is not alreayd present
var trans = new TranslateTransform()
{
X = offset
};
fe.RenderTransform = trans;
}
else
{
translateTransform.X = offset;
}
}
public static Offset GetHorizontalOffset(this FrameworkElement fe)
{
var trans = fe.RenderTransform as TranslateTransform;
if (trans == null)
{
// create a new transform if one is not alreayd present
trans = new TranslateTransform()
{
X = 0
};
fe.RenderTransform = trans;
}
return new Offset()
{
Transform = trans,
Value = trans.X
};
}
public struct Offset
{
public double Value { get; set; }
public TranslateTransform Transform { get; set; }
}
返回偏移量为 `Offset` 结构的原因将在稍后动画化元素位置时变得更清楚。
当操作完成后,我们需要确定元素是否已被拖动超过屏幕一半的距离,或者它是否具有足够的滚动速度,以便我们将其视为轻拂手势。在这两种情况下,我们都会根据移动方向删除或标记完成该项目。
private static readonly double FlickVelocity = 2000.0;

private void Element_ManipulationCompleted(object sender, ManipulationCompletedEventArgs e)
{
  if (!IsActive)
    return;

  FrameworkElement fe = sender as FrameworkElement;
  if (Math.Abs(e.TotalManipulation.Translation.X) > fe.ActualWidth / 2 ||
    Math.Abs(e.FinalVelocities.LinearVelocity.X) > FlickVelocity)
  {
    if (e.TotalManipulation.Translation.X < 0.0)
    {
      ToDoItemDeletedAction(fe);
    }
    else
    {
      ToDoItemCompletedAction(fe);
    }
  }
  else
  {
    ToDoItemBounceBackAction(fe);
  }

  IsActive = false;
}<span style="white-space: normal; ">
</span>
如果未达到任一阈值,项目会弹回原位,这通过以下“操作”实现: private void ToDoItemBounceBackAction(FrameworkElement fe)
{
var trans = fe.GetHorizontalOffset().Transform;
trans.Animate(trans.X, 0, TranslateTransform.XProperty, 300, 0, new BounceEase()
{
Bounciness = 5,
Bounces = 2
});
} Animate 是我创建的另一个扩展方法,用于快速为元素的属性创建 `DoubeAnimations`。public static void Animate(this DependencyObject target, double from, double to,
object propertyPath, int duration, int startTime,
IEasingFunction easing = null, Action completed = null)
{
if (easing == null)
{
easing = new SineEase();
}
var db = new DoubleAnimation();
db.To = to;
db.From = from;
db.EasingFunction = easing;
db.Duration = TimeSpan.FromMilliseconds(duration);
Storyboard.SetTarget(db, target);
Storyboard.SetTargetProperty(db, new PropertyPath(propertyPath));
var sb = new Storyboard();
sb.BeginTime = TimeSpan.FromMilliseconds(startTime);
if (completed != null)
{
sb.Completed += (s, e) => completed();
}
sb.Children.Add(db);
sb.Begin();
}<span style="white-space: normal; ">
</span>当一个项目被拖动或轻弹到右侧时,将调用以下“动作”,该动作设置视图模型状态,并重新使用“弹回”动作将项目返回到其原始位置
private void ToDoItemCompletedAction(FrameworkElement fe)
{
  // set the ToDoItem to complete
  ToDoItem completedItem = fe.DataContext as ToDoItem;
  completedItem.Completed = true;
  completedItem.Color = Colors.Green;

  // bounce back into place
  ToDoItemBounceBack(fe);
}<span style="white-space: normal; ">
</span>
绑定负责更新 UI,以便我们的项目现在变为绿色。我还添加了一个 `Line` 元素,其 `Visibility` 绑定到 `ToDoItem` 的 `Completed` 属性:

如果用户向左滑动或轻拂,我们希望删除该项目。执行删除的方法如下所示
private void ToDoItemDeletedAction(FrameworkElement deletedElement)
{
  _deleteSound.Play();

  var trans = deletedElement.GetHorizontalOffset().Transform;
  trans.Animate(trans.X, -(deletedElement.ActualWidth + 50),
                TranslateTransform.XProperty, 300, 0, new SineEase()
                {
                  EasingMode = EasingMode.EaseOut
                },
  () =>
  {
    // find the model object that was deleted
    ToDoItemViewModel deletedItem = deletedElement.DataContext as ToDoItemViewModel;

    // determine how much we have to 'shuffle' up by
    double elementOffset = -deletedElement.ActualHeight;

    // find the items in view, and the location of the deleted item in this list
    var itemsInView = _todoList.GetItemsInView().ToList();
    var lastItem = itemsInView.Last();
    int startTime = 0;
    int deletedItemIndex = itemsInView.Select(i => i.DataContext)
                                      .ToList().IndexOf(deletedItem);

    // iterate over each item
    foreach (FrameworkElement element in itemsInView.Skip(deletedItemIndex))
    {
      // for the last item, create an action that deletes the model object
      // and re-renders the list
      Action action = null;
      if (element == lastItem)
      {
        action = () =>
        {
          // clone the list
          _todoItems.Remove(deletedItem);

          // re-populate our ObservableCollection
          _todoItems.Reset();
        };
      }

      // shuffle this item up
      TranslateTransform elementTrans = new TranslateTransform();
      element.RenderTransform = elementTrans;
      elementTrans.Animate(0, elementOffset, TranslateTransform.YProperty, 200, startTime, null, action);
      startTime += 10;
    }
  });
}
那个方法里其实有很多东西。首先,删除的项目会被动画化,使其向左飞出屏幕。一旦这个动画完成,我们希望下面的项目“洗牌”向上填充空间。为此,我们测量删除项目的大小,然后遍历当前视图中所有位于删除项目下方的项目,并对每个项目应用一个动画。代码使用了我为 Windows Phone JumpList 控件 编写的 `GetItemsInView` 扩展方法——它返回当前对用户可见的项目列表,同时考虑垂直滚动。
一旦所有元素都向上移动,我们的 UI 现在包含了一些“人为”偏移的 `ToDoItems`。与其试图跟踪每个项目的偏移方式,此时我们强制 `ItemsControl` 重新渲染整个列表。这就是 `ResettableObservableCollection` 的目的变得清晰的地方,它只是公开了一个 `Reset` 方法,该方法会触发一个集合更改事件,强制绑定到该集合的任何 `ItemsControl` 完全重新渲染自身。
public class ResettableObservableCollection<T> : ObservableCollection<T>
{
  public void Reset()
  {
    OnCollectionChanged(new NotifyCollectionChangedEventArgs(
      NotifyCollectionChangedAction.Reset));
  }
}
这个删除动画的结果看起来相当酷……

情境提示
我的朋友 Graham Odds 写了一篇关于 UI 提示的精彩文章,这些提示是视觉上向用户传达应用程序功能的微妙效果。用 Graham 的话说,“它们在有效传达我们日益复杂的应用程序界面的功能和行为方面具有不可估量的价值。”
待办事项列表应用程序使用手势来删除/完成项目,然而,这些并非常见的用户交互,因此用户很可能需要通过尝试来发现此功能。他们很可能需要先错误地删除一个待办事项,然后才能理解如何执行删除,这可能会令人沮丧!
为了帮助用户理解这个稍微新颖的界面,我们将添加一些非常简单的情境提示。在下面的 XAML 中,`TickAndCross` 控件已添加到项目模板中。
<Grid>

  <!-- task text -->
  <TextBlock Text="{Binding Text}" Margin="15,15,0,15" FontSize="30"/>

  <!-- the strike-through that is shown when a task is complete -->
  <Line Visibility="{Binding Path=Completed, Converter={StaticResource BoolToVisibilityConverter}}"
        X1="0" Y1="0" X2="1" Y2="0"
        Stretch="UniformToFill"
        Stroke="White" StrokeThickness="2"
        Margin="8,5,8,0"/>

  <!-- a tick and a cross, rendered off screen -->
  <local:TickAndCross Opacity="0" x:Name="tickAndCross"/>

</Grid>
`TickAndCross` 控件是一个简单的用户控件,它在屏幕右侧渲染一个勾号,在屏幕左侧渲染一个叉号。
<UserControl ...>
  <Canvas>
    <TextBlock Text="×" FontWeight="Bold" FontSize="35"
                             Canvas.Left="470" Canvas.Top="8"/>
    <TextBlock Text="✔" FontWeight="Bold" FontSize="35"
                             Canvas.Left="-50" Canvas.Top="8"/>
  </Canvas>
</UserControl>
当滑动交互启动时,我们可以使用 LINQ-to-VisualTree 找到此控件,然后设置其不透明度,使其淡入视图,并且随着用户滑动距离的增加,勾号和叉号元素变得更加突出。

通过这种微妙的视觉效果,滑动交互就完成了!
拖动以重新排序交互
拖动交互在用户执行点击并按住交互时启动,该交互通过框架的 Hold 事件公开。一旦他们执行了此手势,他们就可以将项目在列表中上下拖动。
让用户“拿起”并拖动项目的最简单方法是使用 `WriteableBitmap` 克隆它,隐藏原始项目。这种技术允许我们将项目放置在比它所属列表更高的 Z 轴上,这样它在列表中上下移动时将始终位于最顶层。
我们将创建一个 `DragImage` 用户控件,其中包含一个图像以及几个微妙的渐变,这些渐变使用 `TranslateTransforms` 将它们推到项目的上方和下方。
 <UserControl ...>

  <Grid x:Name="LayoutRoot">
    <!-- the image that displays the dragged item -->
    <Image x:Name="dragImage"
            VerticalAlignment="Top">
    </Image>

    <!-- lower drop shadow -->
    <Rectangle Height="10"
                  VerticalAlignment="Bottom">
      <Rectangle.Fill>
        <LinearGradientBrush EndPoint="0,1" StartPoint="0,0">
          <GradientStop Color="#AA000000"/>
          <GradientStop Color="#00000000" Offset="1"/>
        </LinearGradientBrush>
      </Rectangle.Fill>
      <Rectangle.RenderTransform>
        <TranslateTransform Y="10"/>
      </Rectangle.RenderTransform>
    </Rectangle>

    <!-- upper drop shadow -->
    <Rectangle Height="10"
                  VerticalAlignment="Top">
      <Rectangle.Fill>
        <LinearGradientBrush EndPoint="0,1" StartPoint="0,0">
          <GradientStop Color="#00000000"/>
          <GradientStop Color="#AA000000" Offset="1"/>
        </LinearGradientBrush>
      </Rectangle.Fill>
      <Rectangle.RenderTransform>
        <TranslateTransform Y="-10"/>
      </Rectangle.RenderTransform>
    </Rectangle>
  </Grid>
</UserControl>
此控件的一个实例已添加到 *MainPage.xaml* 并传递给 `DragReOrderInteraction`。
该交互处理添加到列表中的每个元素的各种事件,就像滑动交互一样。当发生 `Hold` 事件时,我们克隆正在按下的项目并使列表的其余部分淡出。
private void Element_Hold(object sender, GestureEventArgs e)
{
  if (IsEnabled == false)
    return;

  IsActive = true;

  // copy the dragged item to our 'dragImage'
  FrameworkElement draggedItem = sender as FrameworkElement;
  var bitmap = new WriteableBitmap(draggedItem, null);
  _dragImage.Image.Source = bitmap;
  _dragImage.Visibility = Visibility.Visible;
  _dragImage.Opacity = 1.0;
  _dragImage.SetVerticalOffset(draggedItem.GetRelativePosition(_todoList).Y);

  // hide the real item
  draggedItem.Opacity = 0.0;

  // fade out the list
  _todoList.Animate(1.0, 0.7, FrameworkElement.OpacityProperty, 300, 0);

  _initialDragIndex = _todoItems.IndexOf(((ToDoItemViewModel)draggedItem.DataContext));
}
拖动项目只是处理 `ManipulatonDelta` 并偏移项目的问题:
private void Element_ManipulationDelta(object sender, ManipulationDeltaEventArgs e)
{
  if (!IsActive)
    return;

  // set the event to handled in order to avoid scrolling the ScrollViewer
  e.Handled = true;

  // move our 'drag image'.
  _dragImage.SetVerticalOffset(_dragImage.GetVerticalOffset().Value + e.DeltaManipulation.Translation.Y);

  ShuffleItemsOnDrag();
}
`SetVerticalOffset` 是另一个应用 `TranslateTransform` 的扩展方法。
`ShuffleItemsOnDrag` 方法是乐趣开始的地方,我们很快就会讲到。首先,我们来看看一个简单的实用方法,它用于确定被拖动的项目如果在当前位置放下会占据的索引。这通过一个简单的测量实现。
 // Determines the index that the dragged item would occupy when dropped
private int GetDragIndex()
{
  double dragLocation = _dragImage.GetRelativePosition(_todoList).Y +
                          _scrollViewer.VerticalOffset +
                          _dragImage.ActualHeight / 2;
  int dragIndex = (int)(dragLocation / _dragImage.ActualHeight);
  dragIndex = Math.Min(_todoItems.Count - 1, dragIndex);
  return dragIndex;
}
上述代码需要考虑当前的滚动位置,这就是 `_scrollViewer`(承载 `ItemsControl` 内容的 `ScrollViewer`)的引用发挥作用的地方。
在 `ShuffleItemsOnDrag` 中,我们希望创建一种效果,即拖动的项目在悬停在其他项目上方时将其“推开”,从而给人一种列表在拖动时正在重新排序的印象。
下面的方法遍历列表中的所有项目,以确定它们是否需要偏移。如果一个项目位于当前拖动的项目索引和项目原始位置之间,则需要偏移它。
private void ShuffleItemsOnDrag()
{
  // find its current index
  int dragIndex = GetDragIndex();

  // iterate over the items in the list and offset as required
  double offset = _dragImage.ActualHeight;
  for (int i = 0; i < _todoItems.Count; i++)
  {
    FrameworkElement item = _todoList.ItemContainerGenerator.ContainerFromIndex(i) as FrameworkElement;

    // determine which direction to offset this item by
    if (i <= dragIndex && i > _initialDragIndex)
    {
      OffsetItem(-offset, item);
    }
    else if (i >= dragIndex && i < _initialDragIndex)
    {
      OffsetItem(offset, item);
    }
    else
    {
      OffsetItem(0, item);
    }
  }
}
`OffsetItem` 方法通过动画化每个项目的 Y 位置来执行实际的偏移。目标位置存储在元素的 `Tag` 属性中,这样我们就不会在同一个元素上重复触发相同的动画。
 private void OffsetItem(double offset, FrameworkElement item)
{
  double targetLocation = item.Tag != null ? (double)item.Tag : 0;
  if (targetLocation != offset)
  {
    var trans = item.GetVerticalOffset().Transform;
    trans.Animate(null, offset, TranslateTransform.YProperty, 500, 0);
    item.Tag = offset;
    _moveSound.Play();
  }
}

当用户停止拖动项目时,会触发 `ManipulationCompleted` 事件。在这里,我们执行一些任务。
- 将列表淡回完全不透明
- 动画拖动的项目,使其“卡入”位置。
- 当上述操作完成后,我们需要重新排序底层的模型项目集合,然后重新填充暴露给视图的 `ObservableCollection`。这将导致所有项目重新渲染,从而移除已应用的所有 `TranslateTransforms`。
- 最后,删除作为拖动项目副本的图像。
这听起来工作量很大,但我们的 `Animate` 实用方法使其变得相当简单。
private void Element_ManipulationCompleted(object sender, ManipulationCompletedEventArgs e)
{
  IsActive = false;

  int dragIndex = GetDragIndex();

  // fade in the list
  _todoList.Animate(null, 1.0, FrameworkElement.OpacityProperty, 200, 0);

  // animated the dragged item into location
  double targetLocation = dragIndex * _dragImage.ActualHeight - _scrollViewer.VerticalOffset;
  var trans = _dragImage.GetVerticalOffset().Transform;
  trans.Animate(null, targetLocation, TranslateTransform.YProperty, 200, 0, null,
    () =>
    {
      // move the dragged item
      var draggedItem = _todoItems[_initialDragIndex];
      _todoItems.Remove(draggedItem);
      _todoItems.Insert(dragIndex, draggedItem);

      // re-populate our ObservableCollection
      _todoItems.Reset();

      // fade out the dragged image and collapse on completion
      _dragImage.Animate(null, 0.0, FrameworkElement.OpacityProperty, 1000, 0, null, ()
        => _dragImage.Visibility = Visibility.Collapsed);
    });
}
当前实现只允许用户在当前屏幕范围内拖动项目。如果列表比屏幕大,并且用户想从底部一直拖到顶部呢?解决这个问题的一个常见方案是,如果项目被拖到顶部附近,则自动滚动列表。以下方法由计时器定期调用,以查看项目是否被拖动到顶部或底部“滚动区域”内。滚动的速度与项目被拖入这些区域的距离成正比。滚动只是设置我们之前找到的 `ScrollViewer` 上的滚动位置的问题。
 // checks the current location of the item being dragged, and scrolls if it is
// close to the top or the bottom
private void AutoScrollList()
{
  // where is the dragged item relative to the list bounds?
  double draglocation = _dragImage.GetRelativePosition(_todoList).Y + _dragImage.ActualHeight / 2;

  if (draglocation < AutoScrollHitRegionSize)
  {
    // if close to the top, scroll up
    double velocity = (AutoScrollHitRegionSize - draglocation);
    _scrollViewer.ScrollToVerticalOffset(_scrollViewer.VerticalOffset - velocity);
  }
  else if (draglocation > _todoList.ActualHeight - AutoScrollHitRegionSize)
  {
    // if close to the bottom, scroll down
    double velocity = (AutoScrollHitRegionSize - (_todoList.ActualHeight - draglocation));
    _scrollViewer.ScrollToVerticalOffset(_scrollViewer.VerticalOffset + velocity);
  }
}
您可以在下面看到滚动区域的图示:

至此,我们的下一个交互完成了!
点击编辑交互
现在我们可以标记完成、删除和移动项目了,是时候添加一些编辑功能了。对于这种交互,我们不打算实现任何花哨的手势,一个简单的点击就足够了。
为了支持这一点,我们将修改项目模板,使其包含一个 `TextBox` 以及只读的 `TextBlock`,两者都将渲染相同的任务文本:
<Grid Background="{StaticResource itemGradient}">
  <!-- task text -->
  <TextBlock Text="{Binding Text}"
              Margin="15,15,0,15" FontSize="30"
              x:Name="taskText"/>

  <!-- editable task text -->
  <TextBox Text="{Binding Text, Mode=TwoWay}"
            Template="{StaticResource textBoxTemplate}"
            FontSize="30"
            Foreground="White"
            VerticalAlignment="Center"
            Visibility="Collapsed"
            x:Name="taskTextEdit"/>

	...
</Grid>
我确实尝试过只使用 `TextBox` 并在非编辑模式下将其设置为只读,但发现它会干扰我的其他手势。`TapEditInteraction` 只处理 `Tap` 事件,当该事件发生时,我们找到待办事项 UI 的各个组件(`FindNamedDescendant` 是基于 Linq-to-VisualTree 构建的实用方法)并淡出所有其他项目。
 private TextBlock _taskText;
private TextBox _taskTextEdit;
private string _originalText;
private ToDoItemViewModel _editItem;

...

public override void AddElement(FrameworkElement element)
{
  element.Tap += Element_Tap;
}

private void Element_Tap(object sender, GestureEventArgs e)
{
  if (!IsEnabled)
    return;

  IsActive = true;

  var border = sender as Border;
  EditItem(border.DataContext as ToDoItemViewModel);
}

public void EditItem(ToDoItemViewModel editItem)
{
  _editItem = editItem;

  // find the edit and static text controls
  var container = _todoList.ItemContainerGenerator.ContainerFromItem(editItem);
  _taskTextEdit = FindNamedDescendant<TextBox>(container, "taskTextEdit");
  _taskText = FindNamedDescendant<TextBlock>(container, "taskText");

  // store the original text to allow undo
  _originalText = _taskTextEdit.Text;

  EditFieldVisible(true);

  // set the caret position to the end of the text field
  _taskTextEdit.Focus();
  _taskTextEdit.Select(_originalText.Length, 0);
  _taskTextEdit.LostFocus += TaskTextEdit_LostFocus;

  // fade out all other items
  ((FrameworkElement)_todoList.ItemContainerGenerator.ContainerFromItem(_editItem)).Opacity = 1;
  var elements = _todoItems.Where(i => i != _editItem)
                            .Select(i => _todoList.ItemContainerGenerator.ContainerFromItem(i))
                            .Cast<FrameworkElement>();
  foreach (var el in elements)
  {
    el.Animate(1.0, 0.7, FrameworkElement.OpacityProperty, 800, 0);
  }
}

private void EditFieldVisible(bool visible)
{
  _taskTextEdit.Visibility = visible ? Visibility.Visible : Visibility.Collapsed;
  _taskText.Visibility = visible ? Visibility.Collapsed : Visibility.Visible;

}
有了上面的代码,点击一个项目允许用户编辑文本。

剩下的就是在用户停止编辑时“提交”更新的文本。
编辑完成有两种方式,要么是用户按下回车键,要么是 `TextBox` 失去焦点:
private void ItemsControl_KeyUp(object sender, KeyEventArgs e)
{
  if (e.Key == Key.Enter)
  {
    EditFieldVisible(false);
    IsActive = false;
  }
}

private void TaskTextEdit_LostFocus(object sender, RoutedEventArgs e)
{
  TextBox tx = sender as TextBox;
  tx.LostFocus -= TaskTextEdit_LostFocus;

  tx.Visibility = Visibility.Collapsed;

  TextBlock tb = FindNamedDescendant<TextBlock>(tx.Parent,"taskText");
  tb.Visibility = Visibility.Visible;

  EditFieldVisible(false);
  IsActive = false;
}
我们不需要直接设置 `ToDoItemViewModel` 的 `Text` 属性,因为它通过 `TwoWay` 绑定绑定到 UI。
待办事项应用程序正在变得相当实用,尽管缺少一个关键功能。他们可以编辑和删除项目,但没有办法添加任何新的待办事项!
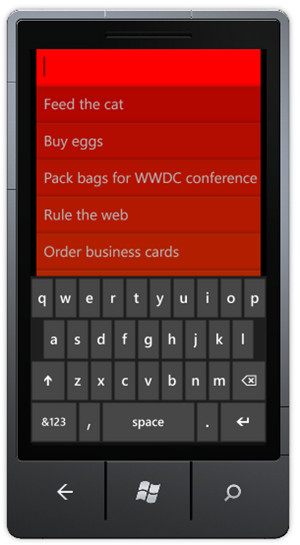
下拉以添加新项目交互
大多数待办事项列表应用程序都有一个“添加新”按钮,而 iPhone Clear 应用程序则使用一种非常新颖的替代方案。新项目可以通过下拉手势添加到列表顶部,并通过捏合手势添加到列表主体内。在本节中,我们将介绍如何实现下拉交互。
下拉手势变得越来越流行,最典型的用途是刷新或获取更多数据,例如在 Twitter 应用程序中。Windows Phone Silverlight 对列表到达顶部或底部时应用的“压缩”效果并非为扩展而设计,没有事件表明正在发生压缩,也没有事件指示移动距离。幸运的是,Jason Ginchereau 发现框架通过将 `RenderTransform` 应用于 `ScrollViewer` 的内容来实现此效果,我们可以观察此变换的存在以检测压缩。但在达到这一点之前,我们将添加一个新的用户控件 `PullDownItem`,它是此交互从屏幕顶部拉下的占位符。
<UserControl ...>

  <Grid Background="Red"
        x:Name="LayoutRoot">

    <Grid Background="{StaticResource itemGradient}"
              Height="75">
      <!-- task text -->
      <TextBlock Text="Pull to create new item"
                     Margin="15,15,0,15" FontSize="30"
                     x:Name="pullText"/>
    </Grid>
  </Grid>
</UserControl>
与拖动交互一样,此用户控件的一个实例被添加到 *MainPage.xaml* 并将其引用传递给我们的交互。
`PullToAddNewInteraction` 检测 `ScrollViewer`(位于我们 `ItemsControl` 的模板中)上的 `MouseMove` 事件,以检测压缩。
private void ScrollViewer_MouseMove(object sender, MouseEventArgs e)
{
  if (!IsEnabled)
    return;

  // determine whether the user is pulling the list down by inspecting the ScrollViewer.Content abd
  // looking for the required transform.
  UIElement scrollContent = (UIElement)_scrollViewer.Content;
  CompositeTransform ct = scrollContent.RenderTransform as CompositeTransform;
  if (ct != null && ct.TranslateY > 0)
  {
    IsActive = true;

    // offset the pull-down element, set its text and opacity
    _distance = ct.TranslateY;
    _pullDownItem.VerticalOffset = _distance - ToDoItemHeight;

    if (_distance > ToDoItemHeight && !_effectPlayed)
    {
      _effectPlayed = true;
      _popSound.Play();
    }

    _pullDownItem.Text = _distance > ToDoItemHeight ? "Release to create new item"
                                                    : "Pull to create new item";

    _pullDownItem.Opacity = Math.Min(1.0, _distance / ToDoItemHeight);
  }
}
(别问我为什么你需要检测鼠标事件才能实现这种效果——我们在这里稍微“入侵”了框架的内部,所以我们只使用任何有效的方法!)当检测到正确的条件时,`PullDownItem` 控件会偏移,使其看起来像从屏幕顶部被拉下。它的不透明度随着用户拉动的距离增加而增加,其文本也从“下拉创建新项目”变为“释放创建新项目”。作为最后一个“花哨”之处,播放一个弹出音效,表示用户已下拉足够远以创建新项目。

当用户释放列表时,会触发 `MouseLeftButtonUp`(是的,即使这是触摸设备也会触发鼠标事件!)。交互处理事件,检查用户拉动的距离,如果超过阈值,则向列表中添加一个新项目。
private void ScrollViewer_MouseLeftButtonUp(object sender, MouseButtonEventArgs e)
{
  if (!IsActive)
    return;

  // hide the pull down item by locating it off screen
  _pullDownItem.VerticalOffset = -ToDoItemHeight;

  // if the list was pulled down far enough, add a new item
  if (_distance > ToDoItemHeight)
  {
    var newItem = new ToDoItemViewModel("");
    _todoItems.Insert(0, newItem);

    // when the new item has been rendered, use the edit interaction to place the UI
    // into edit mode
    _todoList.InvokeOnNextLayoutUpdated(() => _editInteraction.EditItem(newItem));
  }

  IsActive = false;
  _effectPlayed = false;
}
当新项目添加到我们的模型对象列表时,它不会立即添加到 UI 中,这是异步发生的。为了允许用户编辑这个新创建的项目,我们需要等待项目渲染。`InvokeOnNextLayoutUpdated` 扩展方法正是这样做的,它在下一个 `LayoutUpdated` 事件之后执行提供的操作。这允许应用程序立即进入编辑模式。
捏合以添加新交互
我们要添加到应用程序的最后一个交互是捏合手势,它允许用户将两个项目分开以在它们之间添加一个新项目。没有框架级别的事件可以直接支持这种交互,因此我们将直接使用低级触摸事件。

为了确定捏合交互何时开始,会处理触摸帧报告事件。首先检查触摸点的数量,以查看是否有两根手指放在屏幕上。如果是,则定位用户手指所在的两个项目。如果这两个项目是相邻的,则启动捏合交互,这包括记录初始增量(手指之间的垂直距离),定位占位符(与下拉添加新交互使用的用户控件相同),并对列表中的所有元素应用平移变换。
private void Touch_FrameReported(object sender, TouchFrameEventArgs e)
{
  ...
  var touchPoints = e.GetTouchPoints(_todoList);
  if (touchPoints.Count == 2)
  {

    // find the items that were touched ...
    var itemOne = GetToDoItemAtLocation(touchPoints[0].Position);
    var itemTwo = GetToDoItemAtLocation(touchPoints[1].Position);
    if (itemOne != null && itemTwo != null)
    {
        // find their indices
        _itemOneIndex = _todoItems.IndexOf(itemOne);
        _itemTwoIndex = _todoItems.IndexOf(itemTwo);

        // are the two items next to each other?
        if (Math.Abs(_itemOneIndex - _itemTwoIndex) == 1)
        {
          // if so – initiate the interaction
          IsActive = true;

         _addNewThresholdReached = false;
         _effectPlayed = false;


          // determine where to locate the new item placeholder
          var itemOneContainer = _todoList.ItemContainerGenerator.ContainerFromItem(itemOne) as FrameworkElement;
          var itemOneContainerPos = itemOneContainer.GetRelativePosition(_todoList);
          _newItemLocation = itemOneContainerPos.Y + ToDoItemHeight - (ToDoItemHeight / 2);

          // position the placeholder and add a scale transform
          _pullDownItem.VerticalOffset = _newItemLocation;
          _pullDownItem.Opacity = 0;
          _pullDownItem.RenderTransform = new ScaleTransform()
          {
            ScaleY = 1,
            CenterY = ToDoItemHeight / 2
          };

          // record the initial distance between touch point
          _initialDelta = GetDelta(touchPoints[0], touchPoints[1]);

          AddTranslateTransfromToElements();

          _pullDownItem.Opacity = 1;
        }
      }
    }
  }
}
当交互处于活动状态时,在后续触摸帧报告时,当前增量用于确定用户捏合列表的程度。在捏合期间,列表中的项目会偏移以“分开”捏合位置周围,并且占位符元素会缩放并应用不透明度“淡入淡出”。当捏合足够宽以使占位符完全可见时,会播放“弹出”音效。但是,如果触摸帧指示用户不再有两根手指在屏幕上,交互结束,编辑交互用于编辑新添加的项目。
private void Touch_FrameReported(object sender, TouchFrameEventArgs e)
{

  if (IsActive)
  {
    var touchPoints = e.GetTouchPoints(_todoList);

    // if we still have two touch points continue the pinch gesture
    if (touchPoints.Count == 2)
    {
      double currentDelta = GetDelta(touchPoints[0], touchPoints[1]);

      double itemsOffset = 0;

      // is the delta bigger than the initial?
      if (currentDelta > _initialDelta)
      {
        double delta = currentDelta - _initialDelta;
        itemsOffset = delta / 2;

        // play a sound effect if the users has pinched far enough to add a new item
        if (delta > ToDoItemHeight && !_effectPlayed)
        {
          _effectPlayed = true;
          _popSound.Play();
        }

        _addNewThresholdReached = delta > ToDoItemHeight;

        // stretch and fade in the new item
        var cappedDelta = Math.Min(ToDoItemHeight, delta);
        ((ScaleTransform)_pullDownItem.RenderTransform).ScaleY = cappedDelta / ToDoItemHeight;
        _pullDownItem.Opacity = cappedDelta / ToDoItemHeight;

        // set the text
        _pullDownItem.Text = cappedDelta < ToDoItemHeight ?
                 "Pull to create new item" : "Release to add new item";
      }

      // offset all the items in the list so that they 'part'
      for (int i = 0; i < _todoItems.Count; i++)
      {
        var container = _todoList.ItemContainerGenerator.ContainerFromIndex(i) as FrameworkElement;
        var translateTransform = (TranslateTransform)container.RenderTransform;
        translateTransform.Y = i <= _itemOneIndex ? -itemsOffset : itemsOffset;
      }
    }
    else
    {
      // if we no longer have two touch points, end the interactions
      IsActive = false;

      RefreshView();

      // hide the pull-down item
      _pullDownItem.VerticalOffset = -ToDoItemHeight;

      if (_addNewThresholdReached)
      {
        var newItem = new ToDoItemViewModel("");
        _todoItems.Insert(_itemOneIndex, newItem);

        // when the new item has been rendered, use the edit interaction to place the UI
        // into edit mode
        _todoList.InvokeOnNextLayoutUpdated(() => _editInteraction.EditItem(newItem));
      }
    }
  }
...

}

总而言之,对于这种感觉相当高级和复杂的交互,这是一个令人惊讶的简单实现。
结论
这篇文章变成了一部史诗……希望你们还有人在我身边?
我必须承认,这个小应用程序可能是我写过的最有趣、最引人入胜的 Windows Phone 应用程序。开发桌面和移动应用程序之间最大的区别可能不是屏幕更小,而是我们与这个小屏幕交互的方式。开发手势、交互以及充分利用触摸优先界面的新颖 UI 非常有趣!
我强烈建议任何开发 Windows Phone 应用程序的人,考虑如何利用手势来替代那些老旧的按钮、复选框和其他桌面风格的控件。这可能不像你想象的那么难。
最后,我只想重申,我在本文中描述的应用程序是 iPhone Clear 应用程序的 Windows Phone 克隆版。我向该应用程序的开发者致以充分的敬意,感谢他们提出了如此新颖的界面。我在此的目的是展示,这种风格的界面在 Windows Phone 上与在 iPhone 上一样可能实现。
玩得开心!