
代码优化教程 - 第三部分
4.82/5 (15投票s)
初学者优化教程
引言
欢迎来到代码优化教程的第 3 部分!
在本部分中,我们将研究使用线程解决问题时可以应用的技术。
我将解决与上次相同的问题,这次利用多个处理器核心。
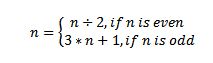
问题陈述 (完整问题): 对于 1 到 1000000 之间的每个数字 n,应用以下函数:直到该数字变为 1,计算应用该函数的次数。
由于硬件限制,该算法将对 1 到 100000 之间的所有数字执行。不会从键盘读取任何输入数字,程序将打印结果和计算结果所需的时间(以毫秒为单位)。
测试机器将是一台笔记本电脑,其规格如下:AMD Athlon 2 P340 双核 2.20 GHz,4 GB 内存,ATI Mobility Radeon 5470 图形适配器,Windows 7 Ultimate x64。
用于实现的语言:C++ (Visual Studio 2010)。
DirectCompute 也可以在 C# 中使用,使用 SharpDX 或 SlimDX 或 OpenCL(但我还没有探索这些可能性)。
另外,对于 OpenCL 实现,我无法获取 GPU 上下文。 我认为这是一个驱动程序问题。
必备组件
您应该阅读我之前的文章:代码优化教程 - 第 1 部分,代码优化教程 - 第 2 部分。
此外,建议具备一些关于 WinAPI 的知识,但不是强制性的。
SSE2 实现
首先,我将使用 SSE2 内部函数实现该算法 (main_v10.cpp)。 由于我的 CPU 不支持 SSE4(它增加了对打包相等比较指令的支持),我被迫减少了要处理的数字范围(最大 100000)。
我一次从队列中提取 4 个数字,并将它们打包成一个 128 位变量,然后我进入一个 while 循环并计算每个数字的当前周期
while ((comparedValue.m128i_i64[0] != 0) || (comparedValue.m128i_i64[1] != 0))<o:p />
{
  //compute last bit of every number
  oddBit = _mm_and_si128(numbersToProcess, oneValue);
  //compute numbers / 2
  tempNumber = _mm_srli_epi32(numbersToProcess, 1);
  //compute bit mask
  mask = _mm_cmpeq_epi32(oddBit, oneValue);
  //add 1 to (odd number)/2
  tempNumber = _mm_add_epi32(tempNumber, oddBit);
  //mask out even numbers
  numbersToProcess = _mm_and_si128(numbersToProcess, mask);
  //increment current number of cycles
  currentCycles = _mm_add_epi32(currentCycles, oneValue);
  //update the numbers to process
  numbersToProcess = _mm_add_epi32(tempNumber, numbersToProcess);
  //add to the current cycle count for the odd numbers
  currentCycles = _mm_add_epi32(currentCycles, oddBit);
  //check if the number is equal to 1
  comparedValue = _mm_cmpeq_epi32(numbersToProcess, oneValue);
  //check if the number is smaller than 1
  mask = _mm_cmplt_epi32(numbersToProcess, oneValue);
  //or the results together from the operations
  comparedValue = _mm_or_si128(comparedValue, mask);
  //invert the results of the or operation
  comparedValue = _mm_xor_si128(comparedValue, ffValue);
  //0 the bit of the numbers smaller or equal
  //to 1 to avoid side effects(like infinite loops)
  numbersToProcess =_mm_and_si128(numbersToProcess, comparedValue);
}
退出 while 循环后,将计算最大循环计数。
此实现的执行时间为:23.97 毫秒。
DirectCompute 实现
在 DirectCompute 实现 (shader.hlsl/main_v11.cpp) 中,我在 GPU 上运行该算法。
ComputeShader 通过使用线程 ID 作为要处理的数字并对其应用以下算法来工作
while(nr > 1)
{
   nr2 = nr >> 1;

   if(nr & 0x1)
   {
      nr2 = nr2 + nr + 1;
      count++;
   }

   count++;
   nr = nr2;
}
在 CPU 上运行的部分中,我创建了 Direct3D 设备,我设置了输出缓冲区和非结构化访问视图,然后我调用 Dispatch 函数来处理 100000 个数字。 ComputeShader 完成后,我将输出复制到 CPU 可以读取的缓冲区中,并计算最大值。
此版本的执行时间为:185.97 毫秒。
我假设这个时间是由于将输出数据从 GPU 内存复制到系统 RAM 所需的耗时复制操作造成的,或者是由我没有正确执行线程分发造成的。(这是我第一个使用 DirectCompute 的程序,我对分发过程不太熟悉)。
OpenCL 实现
代码的 OpenCL 版本的问题在于我无法获得 GPU 设备(我认为这是一个驱动程序问题,因为我可以在我的计算机上运行 DirectCompute 程序)。
在设置部分,程序获取一个设备,它创建一个命令队列,然后创建输入和输出缓冲区,然后它加载程序并编译它,最后,它获取内核函数。
为了解决这个问题,我应用了以下策略
我将 100000 分成 320 个数字的块(我使用此块大小获得最佳结果),我将数字上传到输入缓冲区,然后我运行内核,然后我读取结果并计算最大值。
执行时间为:46.19 毫秒。
关注点
本文的结论是,您应该始终尝试利用 CPU 或 GPU 的 SIMD(单指令多数据)处理单元。
对于 DirectCompute 版本,需要从 GPU 内存复制到 CPU 内存的数据量非常大,因此,可能的优化是将数据分成批次。 另一个可能的优化是在 GPU 上计算最大循环计数,并且仅在 CPU 上读取该值。
对于 OpenCL 版本,看看当代码能够获得 GPU 上下文时会发生什么将会很有趣。
历史
- 2012 年 7 月 30 日 - 初始版本。