
设计模式 2/3 -结构型设计模式
4.94/5 (134投票s)
在这篇关于设计模式的第二篇文章中,我将讨论结构型设计模式,并将在实际示例中展示如何实现它们。
- 下载 StructuralPatterns_StructuralCodeExamples-noexe.zip - 22.7 KB
- 下载 StructuralPatterns_StructuralCodeExamples.zip - 127.1 KB
- 下载 StructuralPatterns_RealWorldExamples-noexe.zip - 36.1 KB
- 下载 StructuralPatterns_RealWorldExamples.zip - 198.3 KB
- 引言
- 适配器模式 (Adapter pattern)
- 桥接模式 (Bridge pattern)
- 组合模式 (Composite pattern)
- 装饰器模式 (Decorator pattern)
- 外观模式 (Facade pattern)
- 享元模式 (Flyweight pattern)
- 代理模式 (Proxy pattern)
引言
这是关于设计模式的第二篇文章。在第一篇文章中,我讨论了创建型设计模式,现在我将介绍另一组称为结构型设计模式的模式。
在软件工程中,结构型设计模式是旨在通过识别实现实体之间关系的简单方法来简化设计的模式。
适配器模式 (Adapter pattern)
适配器模式是一种用于允许两个不兼容类型进行通信的设计模式。当一个类依赖于一个未被另一个类实现的特定接口时,适配器充当这两个类型之间的翻译器。
适配器模式是一种结构型模式,它定义了创建对象之间关系的方式。此模式将一个类的接口转换为另一个兼容的接口。适配器模式通常在新系统创建时使用。它通常在需求发生变化,而我们必须实现一些接口不兼容的类的功能时实施。
结构代码示例

下图的 UML 图描述了适配器设计模式的实现。图包含四个部分:
- 客户端 (Client): 代表需要使用不兼容接口的类。此不兼容接口由
Adaptee实现。 - ITarget: 定义客户端使用的特定于域的接口。在这种情况下,它是一个简单的接口,但在某些情况下,它可能是一个适配器继承的抽象类。在这种情况下,必须由具体的适配器重写此抽象类的方法。
- Adaptee: 代表提供客户端所需功能的类。
- Adapter: 是适配器的具体实现。此类将 Adaptee 的不兼容接口转换为
Client的接口。
    static class Program
    {
        static void Main()
        {
            var client = new Client(new Adapter());
            client.Request();
        }

        public interface ITarget
        {
            void MethodA();
        }

        public class Client
        {
            private readonly ITarget _target;

            public Client(ITarget target)
            {
                _target = target;
            }

            public void Request()
            {
                _target.MethodA();
            }
        }

        public class Adaptee
        {
            public void MethodB()
            {
                Console.WriteLine("Adaptee's MethodB called");
            }
        }

        public class Adapter : ITarget
        {
            readonly Adaptee _adaptee = new Adaptee();

            public void MethodA()
            {
                _adaptee.MethodB();
            }
        }
    }
真实世界示例
在这个例子中,我决定创建一个简单的序列化应用程序,允许您将对象序列化为 JSON 或 XML 格式。例如,我创建了 PersonInfo 类用于序列化。对于序列化,我使用了 JavaScriptSerializer 和 XmlSerializer 类。在示例中,这些类充当接口不兼容的 Adaptee。ISerializerAdapter (ITarget) 是具体适配器必须实现的接口。它有一个名为 Serialize 的方法,用于将对象序列化为适当的格式。JSONSerializerAdapter 和 XMLSerializerAdapter 类实现了 ISerializerAdapter 接口。这两个类就是适配器。
    public interface ISerializerAdapter
    {
        string Serialize<T>(object objectToSerialize);
    }

    public class JSONSerializerAdapter:ISerializerAdapter
    {
        public string Serialize<T>(object objToSerialize)
        {
            var serializer = new JavaScriptSerializer();
            return serializer.Serialize(objToSerialize);
        }
    }

    public class XMLSerializerAdapter:ISerializerAdapter
    {
        public string Serialize<T>(object objToSerialize)
        {
            using(var writer = new StringWriter())
            {
                var serializer = new XmlSerializer(typeof(T));
                serializer.Serialize(writer, objToSerialize);
                return writer.ToString();
            }
        }
    }

    public class PersonInfo
    {
        public string FirstName { get; set; }
        public string LastName { get; set; }
        public DateTime BirthDate { get; set; }
        public double Height { get; set; }
        public double Weight { get; set; }
    }

    class Program
    {
        static void Main()
        {
            var serializer = new DataSerializer(new XMLSerializerAdapter());
            Console.WriteLine(serializer.Render());

            serializer = new DataSerializer(new JSONSerializerAdapter());
            Console.WriteLine(serializer.Render());
        }
    }

    public class DataSerializer
    {
        private readonly ISerializerAdapter _serializer;

        public DataSerializer(ISerializerAdapter serializer)
        {
            _serializer = serializer;
        }

        public string Render()
        {
            var sb = new StringBuilder();

            var list = new List<PersonInfo>
                               {
                                   new PersonInfo
                                       {
                                           FirstName = "Robert",
                                           LastName = "Kanasz",
                                           BirthDate = new DateTime(1985,8,19),
                                           Height = 168,Weight = 71
                                       },
                                   new PersonInfo
                                       {
                                           FirstName = "John",
                                           LastName = "Doe",
                                           BirthDate = new DateTime(1981,9,25),
                                           Height = 189,
                                           Weight = 80
                                       },
                                   new PersonInfo
                                       {
                                           FirstName = "Jane",
                                           LastName = "Doe",
                                           BirthDate = new DateTime(1989,12,1),
                                           Height = 164,
                                           Weight = 45
                                       }
                               };

            foreach (var personInfo in list)
            {
                sb.AppendLine(_serializer.Serialize<PersonInfo>(personInfo));
            }

            return sb.ToString();
        }

    }
桥接模式 (Bridge pattern)
桥接模式是一种设计模式,它将类的抽象元素与其技术实现分离开来。这提供了更清晰的实际对象实现,并允许轻松更改实现细节。
桥接模式是一个非常有价值的模式,因为它允许您将类的抽象元素与实现细节分离开来。当类经常发生变化时,可以使用此模式,因为可以通过最少的程序知识轻松地对代码库进行更改。
有时,一个实现可能有两个或多个不同的实现。让我们考虑一个处理不同平台对象持久化的程序。一些对象应该保存在数据库中,而其他对象应该保存在文件系统中。如果简单地通过扩展程序来添加此功能,可能会导致问题,因为我们将抽象与实现绑定在一起。在这种情况下,使用桥接模式并将抽象与其实现分离开来更合适。如果我们不使用此模式,我们会发现实现细节包含在抽象中。
桥接模式的最大优点之一是能够实时更改实现细节。这可以允许用户切换实现,以确定软件如何与其他系统进行互操作。
结构代码示例

下图的 UML 图描述了桥接设计模式的实现。图包含四个部分:
- Abstraction: 定义一个抽象接口。它充当其他精炼抽象类的基类。它还持有对其正在使用的特定实现的引用,用于平台特定的功能。
- RefinedAbstraction: 它提供了抽象的更具体的变体,但不包含任何实现细节。实际上,它只扩展了抽象。
- Implementor: 定义实现类的接口。
- ConcreteImplementor: 此类继承自 RefinedAbstraction 类。可能存在多个 Implementor 类的实例,它们提供相同的接口但具有特定于平台的特定功能。
    static class Program
    {
        static void Main()
        {
            Abstraction abstraction = new RefinedAbstraction
                                          {
                                              Implementor = new ConcreteImplementorA()
                                          };

            abstraction.Operation();
        }
    }

    abstract class Implementor
    {
        public abstract void Operation();
    }

    class Abstraction
    {
        protected Implementor implementor;

        public Implementor Implementor
        {
            set { implementor = value; }
        }

        public virtual void Operation()
        {
            implementor.Operation();
        }
    }

    class RefinedAbstraction : Abstraction
    {
        public override void Operation()
        {
            implementor.Operation();
        }
    }

    class ConcreteImplementorA : Implementor
    {
        public override void Operation()
        {
            Console.WriteLine("ConcreteImplementor's Operation");
        }
    }
真实世界示例
在这个例子中,我决定创建一个简单的消息应用程序。为此,创建了 Message 类。此类充当 UserEditedMessage 类的 Abstraction。此类有一个类型为 MessageSenderBase 的受保护字段。MessageSender 基类是所有具体消息发送者实现的实现者和抽象类。创建了三个消息发送者:EmailSender、MsmqSender 和 WebServiceSender。这只是一个演示示例,因此没有实现这些发送者的实际功能。
    public class Message
    {
        protected MessageSenderBase messageSender { get; set; }
        public string Title { get; set; }
        public string Body { get; set; }
        public int Importance { get; set; }


        public Message()
        {
            messageSender = new EmailSender();
        }

        public virtual void Send()
        {
            messageSender.SendMessage(Title, Body, Importance);
        }
    }

    public class EmailSender : MessageSenderBase
    {
        public override void SendMessage(string title, string body, int importance)
        {
            Console.WriteLine("Email\n{0}\n{1}\n{2}\n", title, body, importance);
        }
    }

    public class MsmqSender : MessageSenderBase
    {
        public override void SendMessage(string title, string body, int importance)
        {
            Console.WriteLine("MSMQ\n{0}\n{1}\n{2}\n", title, body, importance);
        }
    }

    public class WebServiceSender : MessageSenderBase
    {
        public override void SendMessage(string title, string body, int importance)
        {
            Console.WriteLine("Web Service\n{0}\n{1}\n{2}\n", title, body, importance);
        }
    }

    public abstract class MessageSenderBase
    {
        public abstract void SendMessage(string title, string details, int importance);
    }

    public class UserEditedMessage : Message
    {
        public string UserComments { get; set; }

        public UserEditedMessage(MessageSenderBase messageSender)
        {
            this.messageSender = messageSender;
        }

        public override void Send()
        {
            string fullBody = string.Format("{0}\nCOMMENTS\n{1}", Body, UserComments);
            messageSender.SendMessage(Title, fullBody, Importance);
        }
    }
    class Program
    {
        static void Main()
        {
            var listOfMessages = new List<Message>
                                     {
                                                   new Message
                                                       {
                                                           Body = "Hello World 1",
                                                           Importance = 1,
                                                           Title = "Hello World Title 1"
                                                       },
                                                   new UserEditedMessage(new EmailSender())
                                                       {
                                                           Body = "User Edited Message",
                                                           Importance = 3,
                                                           UserComments = "Comments",
                                                           Title = "User Edited Title"
                                                       }
                                               };
            foreach (var message in listOfMessages)
            {
                message.Send();
            }
        }
    }
组合模式 (Composite pattern)
组合模式是一种用于创建分层对象模型的设计模式。该模式定义了一种设计对象递归树结构的方式,其中单个对象和组可以以相同的方式被访问。
当程序需要操作对象的树状结构时,可以使用组合设计模式。此设计模式的目的是将对象组合成树状结构,以表示部分-整体层次结构。组合模式允许客户端统一地处理单个对象和对象组合。
结构代码示例

下图的 UML 图描述了组合设计模式的实现。此图包含三个部分:
- Component: 是所有组件(包括复合组件)的抽象。它声明了组合中对象的接口。有时它定义了一个接口,用于访问递归结构中组件的父对象,并在适当的情况下实现它。
- Composite: 这是此设计模式的关键元素。它代表复合组件。复合元素是包含子元素的元素。它实现了添加和删除子元素的方法,并实现了所有 Component 方法,通常通过将它们委托给其子对象来实现。
- Leaf: 代表组合中的叶对象,并实现所有 Component 方法。
    static class Program
    {
        static void Main()
        {
            var root = new Composite("root");
            root.AddChild(new Leaf("Leaf 1"));
            root.AddChild(new Leaf("Leaf 2"));

            var comp = new Composite("Composite C");
            comp.AddChild(new Leaf("Leaf C.1"));
            comp.AddChild(new Leaf("Leaf C.2"));

            root.AddChild(comp);
            root.AddChild(new Leaf("Leaf 3"));

            var leaf = new Leaf("Leaf 4");
            root.AddChild(leaf);
            root.RemoveChild(leaf);

            root.Display(1);
        }
    }

    public abstract class Component
    {
        protected readonly string name;

        protected Component(string name)
        {
            this.name = name;
        }

        public abstract void Operation();
        public abstract void Display(int depth);
    }

    class Composite : Component
    {
        private readonly List<Component> _children = new List<Component>();

        public Composite(string name)
            : base(name)
        {
        }

        public void AddChild(Component component)
        {
            _children.Add(component);
        }

        public void RemoveChild(Component component)
        {
            _children.Remove(component);
        }

        public override void Display(int depth)
        {
            Console.WriteLine(new String('-', depth) + name);

            foreach (Component component in _children)
            {
                component.Display(depth + 2);
            }
        }
        public override void Operation()
        {
            string message = string.Format("Composite with {0} child(ren).", _children.Count);
            Console.WriteLine(message);
        }
    }

    public class Leaf : Component
    {
        public Leaf(string name)
            : base(name)
        {
        }

        public override void Operation()
        {
            Console.WriteLine("Leaf.");
        }

        public override void Display(int depth)
        {
            Console.WriteLine(new String('-', depth) + name);
        }
    }
真实世界示例
在实际世界中演示此设计模式的绝佳示例是图形编辑器。图形编辑器可以创建的每个形状都可以是基本形状或复杂形状。简单形状的示例是一条线。复杂形状由许多简单形状组成。这些形状(复杂和简单)在许多操作上是相同的。其中一个操作是将形状渲染到屏幕上。由于形状遵循部分-整体层次结构,因此可以使用组合模式使程序能够统一处理所有形状。在此示例中,我创建了充当 Component 的 IShape 接口。所有复合对象和叶对象都必须实现此接口。此接口由公共属性 Name 和方法 Render() 组成。另一个名为 ComplexShape 的类是 Composite 类。它有一个子形状的私有集合 _shapes。此集合由 AddShape() 和 RemoveShape() 方法管理。此集合可以包含实现 IShape 接口的任何对象。ComplexShape 类的 Render 方法循环遍历子元素集合 _shapes 并调用它们的 Render() 方法。最后三个类:Rectangle、Circle 和 Line 代表 Leaf 类。
    public interface IShape
    {
        string Name { get; set; }
        void Render(int depth);
    }

    public class ComplexShape:IShape
    {
        public ComplexShape(string name)
        {
            Name = name;
        }

        private readonly List<IShape> _shapes = new List<IShape>();

        public string Name { get; set; }

        public void Render(int depth)
        {
            Console.WriteLine(new String('-', depth) + Name);
            foreach (var shape in _shapes)
            {
                shape.Render(depth+1);
            }
        }

        public void AddShape(IShape shape)
        {
            _shapes.Add(shape);
        }

        public void RemoveShape(IShape shape)
        {
            _shapes.Remove(shape);
        }
    }

    public class Circle : IShape
    {
        public Circle(string name)
        {
            Name = name;
        }

        public string Name { get; set; }

        public void Render(int depth)
        {
            Console.WriteLine(new String('-', depth) + Name);
        }
    }

    public class Line : IShape
    {
        public Line(string name)
        {
            Name = name;
        }

        public string Name { get; set; }

        public void Render(int depth)
        {
            Console.WriteLine(new String('-', depth) + Name);
        }
    }

    public class Rectangle:IShape
    {
        public Rectangle(string name)
        {
            Name = name;
        }

        public string Name { get; set; }

        public void Render(int depth)
        {
            Console.WriteLine(new String('-', depth) + Name);
        }
    }

    class Program
    {
        static void Main(string[] args)
        {

            ComplexShape shape1= new ComplexShape("Complex Shape #1");
            Line line1 = new Line("Blue Line #1");
            Line line2 = new Line("Blue Line #2");

            shape1.AddShape(line1);
            shape1.AddShape(line2);

            ComplexShape shape2 = new ComplexShape("Complex Shape #2");
            Circle circle1 = new Circle("Yellow Circle #1");
            shape2.AddShape(circle1);
            shape1.AddShape(shape2);

            shape1.Render(1);

        }
    }
装饰器模式 (Decorator pattern)
装饰器模式是一种设计模式,它通过用一个或多个装饰器类包装单个对象来扩展其功能。这些装饰器可以在运行时修改现有成员并添加新方法和属性。
可以通过静态方式(在编译时)使用继承来扩展对象的功能,或者通过将其包装在装饰器类的对象中以动态方式(在运行时)扩展。装饰器模式应用于单个对象,而不是类。装饰器模式是继承的替代方案。此模式允许您创建可以堆叠在一起的多个装饰器,每次都为被重写的方法添加新功能。
结构代码示例
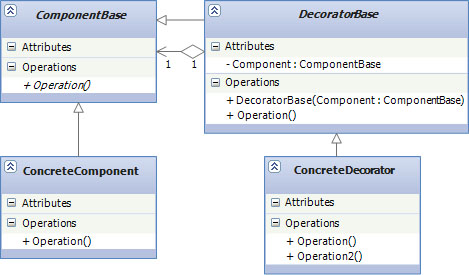
下图的 UML 图描述了装饰器设计模式的实现。此图包含四个部分:
- ComponentBase: 是所有具体组件和装饰器的基本抽象类。此类定义了此类型类必须实现的标准成员。
- ConcreteComponent: 此类继承自
ComponentBase。可能存在多个具体组件类,每个类定义了可以被装饰器包装的对象类型。 - DecoratorBase: 代表所有装饰器的抽象基类。它添加了一个接受
ComponentBase对象作为参数的构造函数。传递的对象是要包装的组件。由于被包装的对象必须继承自ComponentBase,因此它可以是具体组件或另一个装饰器。这允许将多个装饰器应用于单个对象。 - ConcreteDecorator: 此类代表组件的具体装饰器。它可能包含一些附加方法来扩展组件的功能。操作成员可以有两种方式使用。它们可以保持不变,在这种情况下会调用组件的基方法,或者操作可能会被更改,在这种情况下,操作方法会被更改或完全被新实现替换。
    static class Program
    {
        static void Main()
        {
            var component = new ConcreteComponent();
            var decorator = new ConcreteDecorator(component);
            decorator.Operation();
        }
    }

    public abstract class ComponentBase
    {
        public abstract void Operation();
    }

    class ConcreteComponent : ComponentBase
    {
        public override void Operation()
        {
            Console.WriteLine("ConcreteComponent.Operation()");
        }
    }

    public abstract class DecoratorBase : ComponentBase
    {
        private readonly ComponentBase _component;

        protected DecoratorBase(ComponentBase component)
        {
            _component = component;
        }

        public override void Operation()
        {
            _component.Operation();
        }
    }

    public class ConcreteDecorator : DecoratorBase
    {
        public ConcreteDecorator(ComponentBase component) : base(component) { }

        public override void Operation()
        {
            base.Operation();
            Console.WriteLine("[ADDITIONAL CODE BLOCK]");
        }
    }
真实世界示例
让我们看一个实际的例子。在这个例子中,您可以准备您最喜欢的定制三明治。在这种情况下,我们有一个 Sandwich 类,它是一个组件基类。此类有两个公共抽象方法。GetDescription 方法返回包含所有配料的三明治的完整名称。第二个方法 GetPrice 返回当前三明治的价格。我创建了两个三明治:TunaSandwich 和 VeggieSandwich。这两个类都继承自 Sandwich 类。SandwichDecorator 类是所有装饰器的基类。此类也继承自 Sandwich 类。准备了三个装饰器:Olives、Cheese、Corn。这些装饰器重写了 Sandwich 类的 GetDescription 和 GetPrice 方法。第一步是创建一个具体的三明治。您可以选择两种选项:VeggieSandwich 和 TunaSandwich。完成此操作后,您可以通过创建适当的装饰器并用该装饰器包装三明治来添加一些配料。如果要添加其他配料,只需创建装饰器的新实例并用该新装饰器包装三明治。通过调用 GetDescription 方法,您将获得包含所有配料的三明治名称。
    public abstract class Sandwich
    {
        public abstract string GetDescription();

        public abstract double GetPrice();

        public string Description { get; set; }
    }

    public class TunaSandwich : Sandwich
    {
        public TunaSandwich()
        {
            Description = "Tuna Sandwich";
        }

        public override string GetDescription()
        {
            return Description;
        }

        public override double GetPrice()
        {
            return 4.10;
        }
    }

    public class VeggieSandwich : Sandwich
    {
        public VeggieSandwich()
        {
            Description = "Veggie Sandwich";
        }

        public override string GetDescription()
        {
            return Description;
        }

        public override double GetPrice()
        {
            return 3.45;
        }
    }

    public class Cheese:SandwichDecorator
    {
        public Cheese(Sandwich sandwich) : base(sandwich)
        {
            Description = "Cheese";
        }

        public override string GetDescription()
        {
            return Sandwich.GetDescription()+", "+Description;
        }

        public override double GetPrice()
        {
            return Sandwich.GetPrice()+ 1.23;
        }
    }

    public class Corn : SandwichDecorator
    {
        public Corn(Sandwich sandwich)
            : base(sandwich)
        {
            Description = "Corn";
        }

        public override string GetDescription()
        {
            return Sandwich.GetDescription()+", "+Description;
        }

        public override double GetPrice()
        {
            return Sandwich.GetPrice()+ 0.35;
        }
    }

    public class Olives : SandwichDecorator
    {
        public Olives(Sandwich sandwich)
            : base(sandwich)
        {
            Description = "Olives";
        }

        public override string GetDescription()
        {
            return Sandwich.GetDescription()+", "+Description;
        }

        public override double GetPrice()
        {
            return Sandwich.GetPrice()+ 0.89;
        }
    }

    public class SandwichDecorator : Sandwich
    {
        protected Sandwich Sandwich;

        public SandwichDecorator(Sandwich sandwich)
        {
            Sandwich = sandwich;
        }

        public override string GetDescription()
        {
            return Sandwich.GetDescription();
        }

        public override double GetPrice()
        {
            return Sandwich.GetPrice();
        }
    }

    class Program
    {
        static void Main(string[] args)
        {
            Sandwich mySandwich = new VeggieSandwich();
            Console.WriteLine(mySandwich.GetPrice());
            Console.WriteLine(mySandwich.GetDescription());
            mySandwich = new Cheese(mySandwich);
            Console.WriteLine(mySandwich.GetPrice());
            Console.WriteLine(mySandwich.GetDescription());
            mySandwich = new Corn(mySandwich);
            Console.WriteLine(mySandwich.GetPrice());
            Console.WriteLine(mySandwich.GetDescription());
            mySandwich = new Olives(mySandwich);
            Console.WriteLine(mySandwich.GetPrice());
            Console.WriteLine(mySandwich.GetDescription());
        }
    }
外观模式 (Facade pattern)
外观模式是一种设计模式,用于简化对复杂或设计不佳的子系统的功能访问。外观类提供了一个简单的、单一的类接口,隐藏了底层代码的实现细节。
外观模式通常用于简化对大量代码的接口。当处理许多独立类或需要使用多个方法的类时,此模式非常有用,尤其是当它们难以使用或难以理解时。我们可以说外观模式是一种包装器,它包含一组易于理解和使用的成员。当被包装的子系统设计不佳且您无法重构其代码时,就会使用此模式。
外观模式使软件库更易于使用、理解和测试。它可以提高库的可读性,并可以减少依赖性。
结构代码示例
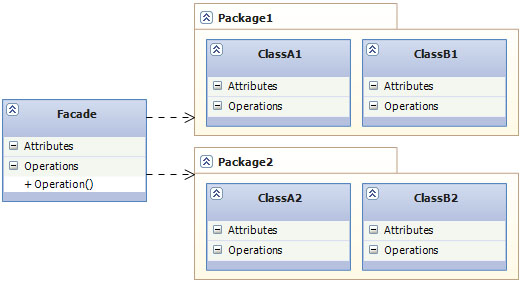
下图的 UML 图描述了外观设计模式的实现。此图包含三个部分:
- Facade: 此类包含一组简单的函数,这些函数提供给用户使用,并隐藏了难以使用的子系统的复杂性。
- PackageA/B: 通过外观类访问的复杂功能不一定存在于单个程序集中。图中的包说明了这一点,因为每个包都可以是包含类的程序集。
- ClassA/B: 这些类包含通过外观类提供的功能。
    static class Program
    {
        static void Main()
        {
            Facade facade = new Facade();
            facade.PerformAction();
        }
    }

    public class Facade
    {
        public void PerformAction()
        {
            var c1a = new Class1A();
            var c1b = new Class1B();
            var c2a = new Class2A();
            var c2b = new Class2B();

            var result1a = c1a.Method1A();
            var result1b = c1b.Method1B(result1a);
            var result2a = c2a.Method2A(result1a);
            c2b.Method2B(result1b, result2a);
        }
    }

    public class Class1A
    {
        public int Method1A()
        {
            Console.WriteLine("Class1A.Method1A return value: 1");
            return 1;
        }
    }

    public class Class1B
    {
        public int Method1B(int param)
        {
            Console.WriteLine("Class1B.Method1B return value: {0}",param+1);
            return param+1;
        }
    }

    public class Class2A
    {
        public int Method2A(int param)
        {
            Console.WriteLine("Class2A.Method2A return value: {0}",param+2);
            return param+2;
        }
    }

    public class Class2B
    {
        public void Method2B(int param1, int param2)
        {
            Console.WriteLine("Class2B.Method2B return value: {0}", param1+param2 );
        }
    }
真实世界示例
在这个例子中,我们需要启动计算机。Computer 类充当前置,它封装了其他复杂类,这些类由 HardDrive 类、Memory 类和 CPU 类表示。当调用 Computer 类的 Start() 方法时,这些类中的每个类都必须执行一些操作。
    public class Computer
    {
        private readonly CPU _cpu;
        private readonly HardDrive _hardDrive;
        private readonly Memory _memory;

        private const long BootAddress = 1;
        private const long BootSector = 1;
        private const int SectorSize = 10;

        public Computer()
        {
            _cpu = new CPU();
            _hardDrive = new HardDrive();
            _memory = new Memory();
        }

        public void Start()
        {
            _cpu.Freeze();
            _memory.Load(BootAddress, _hardDrive.Read(BootSector, SectorSize));
            _cpu.Jump(BootAddress);
            _cpu.Execute();
        }
    }

    public class CPU
    {
        public void Freeze()
        {
            Console.WriteLine("CPU is frozen");
        }

        public void Jump(long position)
        {
            Console.WriteLine("Jumping to position: {0}", position);
        }

        public void Execute()
        {
            Console.WriteLine("Executing...");
        }
    }

    public class HardDrive
    {

            public byte[] Read(long lba, int size)
            {
                var bytes = new byte[size];
                var random = new Random();
                random.NextBytes(bytes);
                return bytes;
            }
    }

    public class Memory
    {
        public void Load(long position, byte[] data)
        {
            Console.WriteLine("Loading data: ");
            foreach (var b in data)
            {
                Console.Write(b+ " ");
                Thread.Sleep(1000);
            }

            Console.WriteLine("\nLoading compleded");
        }
    }

    class Program
    {
        static void Main()
        {
            var computer = new Computer();
            computer.Start();
        }
    }
享元模式 (Flyweight pattern)
享元模式是一种设计模式,用于在处理大量对象时最小化资源使用。在创建数千个相同的对象时,无状态的享元可以降低内存使用,使其达到可管理的水平。
有时程序会处理大量具有相同结构的对象,其中一些对象的状态不会随时间而变化。当我们使用传统方法并创建这些对象的实例并用值填充状态变量时,内存和存储要求可能会不成比例地增加。为了解决这个问题,我们可以使用享元模式。
享元对象是一种通过尽可能多地与其他类似对象共享数据来最小化内存使用的对象;它是在对象数量庞大时使用对象的一种方式,而简单的重复表示将使用不可接受的内存量。对于使用共享数据的每个对象,只保存对共享对象的引用。
享元设计模式通常使用工厂方法模式的变体来生成共享对象。工厂接收对享元实例的请求。如果匹配的对象已经在使用中,则返回该特定对象。如果不是,则生成一个新的享元。
结构代码示例

下图的 UML 图描述了享元设计模式的实现。此图包含四个部分:
- FlyweightBase: 声明了一个接口,通过该接口,享元可以接收和处理外部状态。
- ConcreteFlyweight: 实现
Flyweight接口并添加内部状态(共享状态)的存储(如果有)。ConcreteFlyweight对象必须是可共享的。它存储的任何状态都必须是内部的,即它必须独立于ConcreteFlyweight对象本身的上下文。 - UnsharedFlyweight: 并非所有 Flyweight 子类都需要共享。Flyweight 接口启用了共享,但并未强制执行。
UnsharedFlyweight对象在享元对象结构的某个级别上以ConcreteFlyweight对象作为子对象是很常见的。 - FlyweightFactory: 工厂创建和管理享元对象。此外,工厂确保享元对象的共享。工厂维护一个不同的享元对象池,如果对象已创建,则从池中返回一个对象,如果对象是新的,则将其添加到池中并返回。
    static class Program
    {
        static void Main()
        {
            int extrinsicstate = 22;

            var factory = new FlyweightFactory();
            var flyweightA = factory.GetFlyweight("A");
            flyweightA.StatefulOperation(--extrinsicstate);

            var flyweightB = factory.GetFlyweight("B");
            flyweightB.StatefulOperation(--extrinsicstate);

            var flyweightC = factory.GetFlyweight("C");
            flyweightC.StatefulOperation(--extrinsicstate);

            var unsharedFlyweight = new UnsharedFlyweight();
            unsharedFlyweight.StatefulOperation(--extrinsicstate);

        }
    }

    public abstract class FlyweightBase
    {
        public abstract void StatefulOperation(object o);
    }


    public class FlyweightFactory
    {
        private readonly Hashtable _flyweights = new Hashtable();

        public FlyweightBase GetFlyweight(string key)
        {
            if (_flyweights.Contains(key))
            {
                return _flyweights[key] as FlyweightBase;
            }
            var newFlyweight = new ConcreteFlyweight();

            _flyweights.Add(key, newFlyweight);
            return newFlyweight;
        }
    }


    public class ConcreteFlyweight : FlyweightBase
    {
        public override void StatefulOperation(object o)
        {
            Console.WriteLine(o);
        }
    }


    public class UnsharedFlyweight : FlyweightBase
    {
        private object _state;

        public override void StatefulOperation(object o)
        {
            _state = o;
            Console.WriteLine(_state);
        }
    }
真实世界示例
在战争游戏示例中,UnitFactory 可以创建军事单位。在此示例中,我创建了两种类型的单位:Soldier 和 Tank。这些类是继承自 Unit 享元基类的具体享元。
UnitFactory 类包含一个名为 GetUnit 的方法,该方法接受一个参数来指定要创建的单位类型。此类有一个私有的单位类型字典。当需要新单位时,第一步是检查该字典是否已创建过该类型的单位。如果是,程序将返回该单位的引用。如果不是,它将创建一个新单位并将其放入字典中。您可以通过静态字段 NumberOfInstances 来控制每个单位类型的实例数量。
    public class Soldier:Unit
    {
        public static int NumberOfInstances;

        public Soldier()
        {
            NumberOfInstances++;
        }

        public override void FireAt(Target target)
        {
            Console.WriteLine("Shooting at unit {0} with power of {1}."
                , target.ID, FirePower);
        }
    }

    public class Tank:Unit
    {
        public static int NumberOfInstances;

        public Tank()
        {
            NumberOfInstances++;
        }

        public override void FireAt(Target target)
        {
            Console.WriteLine("Firing at {0} with power of {1}.", target.ID, FirePower);
        }
    }

    public abstract class Unit
    {
        public string Name { get; internal set; }
        public int Armour { get; internal set; }
        public int Speed { get; internal set; }
        public int RotationRate { get; internal set; }
        public int FireRate { get; internal set; }
        public int Range { get; internal set; }
        public int FirePower { get; internal set; }
        public abstract void FireAt(Target target);
    }

    public class UnitFactory
    {
        private readonly Dictionary<string, Unit> _units = new Dictionary<string, Unit>();

        public Unit GetUnit(string type)
        {
            if (_units.ContainsKey(type))
            {
                return _units[type];
            }
            Unit unit;

            switch (type)
            {
                case "Infantry":
                    unit = new Soldier
                               {
                                   Name = "Standard Infantry",
                                   Armour = 5,
                                   Speed = 4,
                                   RotationRate = 180,
                                   FireRate = 5,
                                   Range = 100,
                                   FirePower = 5
                               };
                    break;

                case "Marine":
                    unit = new Soldier
                               {
                                   Name = "Marine",
                                   Armour = 25,
                                   Speed = 4,
                                   RotationRate = 180,
                                   FireRate = 3,
                                   Range = 200,
                                   FirePower = 10
                               };
                    break;

                case "Tank":
                    unit = new Tank
                               {
                                   Name = "Tank",
                                   Armour = 1000,
                                   Speed = 25,
                                   RotationRate = 5,
                                   FireRate = 30,
                                   Range = 1000,
                                   FirePower = 250
                               };
                    break;

                default:
                    throw new ArgumentException();
            }

            _units.Add(type, unit);
            return unit;
        }
    }

    public class Target
    {
        public Unit UnitData;
        public Guid ID;
    }

    class Program
    {
        static void Main(string[] args)
        {
            UnitFactory factory = new UnitFactory();

            Target tank1 = new Target();
            tank1.ID = Guid.NewGuid();
            tank1.UnitData = factory.GetUnit("Tank");

            Target tank2 = new Target();
            tank2.ID = Guid.NewGuid();
            tank2.UnitData = factory.GetUnit("Tank");

            bool result = tank1.UnitData == tank2.UnitData;     // result = true
            int firepower = tank1.UnitData.FirePower;

            Console.WriteLine("Tank Instances: "+ Tank.NumberOfInstances);

            Target soldier1 = new Target();
            soldier1.ID = Guid.NewGuid();
            soldier1.UnitData = factory.GetUnit("Marine");

            var soldier2 = new Target();
            soldier2.UnitData = factory.GetUnit("Infantry");
            soldier2.ID = Guid.NewGuid();

            var soldier3 = new Target();
            soldier3.UnitData = factory.GetUnit("Infantry");
            soldier3.ID = Guid.NewGuid();

            Console.WriteLine("Soldier Instances: " + Soldier.NumberOfInstances);
        }
    }
代理模式 (Proxy pattern)
代理在最一般的形式下是另一个事物(Subject 类)的接口。当由于某些权限基础或不想暴露 Subject 类的所有方法而不想直接访问资源或 Subject 时,可以使用代理。在某些情况下,代理可以添加一些额外的功能。当我们需要访问难以实例化、执行缓慢或资源敏感的资源时,使用代理非常有用。
结构代码示例

下图的 UML 图描述了代理设计模式的实现。此图包含三个部分:
- SubjectBase: 由
RealSubject实现的接口(或抽象类),代表其服务。代理也必须实现此接口,以便代理可以在RealSubject可用的任何位置使用。 - RealSubject: 代表一个复杂的类或资源敏感类,我们希望以更有效的方式使用它。
- Proxy: 这是该模式的关键。它引用
RealSubject对象。应用程序执行代理类的所有方法,这些方法会转移到 RealSubject 的方法。
    static class Program
    {
        static void Main()
        {
            var proxy = new Proxy();
            proxy.Operation();
        }
    }

    public abstract class SubjectBase
    {
        public abstract void Operation();
    }

    public class RealSubject : SubjectBase
    {
        public override void Operation()
        {
            Console.WriteLine("RealSubject.Operation");
        }
    }

    public class Proxy : SubjectBase
    {
        private RealSubject _realSubject;

        public override void Operation()
        {
            if (_realSubject == null)
                _realSubject = new RealSubject();

            _realSubject.Operation();
        }
    }
真实世界示例
在这个例子中,我创建了一个订单应用程序,用于显示选定订单的信息。我们有一个 OrderRepositoryBase 类,它是 ProxyOrderRepository 和 RealOrderRepository 类的抽象类。RealOrderRepository 类是我们希望通过 ProxyOrderRepository 被应用程序使用的 RealSubject。
我们还有一组表示 RealOrderRepository 类数据的实体。在此示例中,订单可以有多个 OrderDetails,但只有一个 Customer。这些属性可以通过 RealObjectReporsitor 的方法(GetOrderDetails 和 GetOrderCustomer)来填充。这意味着如果我们想获取订单的所有信息,我们必须调用 RealOrderRepository 类的三个不同方法(GetOrder、GetOrderDetails 和 GetOrderCustomer)。ProxyOrderRepository 也具有所有这些方法。对于 GetOrderDetails 和 GetOrderCustomer,它直接调用 RealObjectRepository 类的相应方法。对于 GetOrder,情况略有不同。它不仅调用 RealObjectRepository 的方法,还会设置 RealObjectRepository 的 GetOrder 方法返回的 Order 对象 的 OrderDetails 和 Customer 属性。当 Order 对象的所有属性都填充完毕后,Order 会返回给调用应用程序。
    public class Customer
    {
        public int Id { get; set; }
        public string FirstName { get; set; }
        public string LastName { get; set; }
    }

    public class Order
    {
        public int Id { get; set; }
        public DateTime OrderDate { get; set; }
        public Customer Customer { get; set; }
        public IEnumerable<OrderDetail> Details { get; set; }
    }

    public class OrderDetail
    {
        public int Id { get; set; }
        public int OrderId { get; set; }
        public string Description { get; set; }
    }

    public class ProxyOrderRepository:OrderRepositoryBase
    {
        private RealOrderRepository _repository;

        public ProxyOrderRepository()
        {
            _repository = new RealOrderRepository();
        }

        public override Order GetOrder(int id)
        {
            var order = _repository.GetOrder(id);
            order.Customer = GetOrderCustomer(order.Id);
            order.Details = GetOrderDetails(order.Id);
            return order;
        }

        public override IEnumerable<OrderDetail> GetOrderDetails(int orderId)
        {
            return _repository.GetOrderDetails(orderId);
        }

        public override Customer GetOrderCustomer(int orderId)
        {
            return _repository.GetOrderCustomer(orderId);
        }
    }

    public class RealOrderRepository:OrderRepositoryBase
    {
        private List<Order> _orders = new List<Order>
                                          {
                                              new Order(){Id=1, OrderDate = new DateTime(2012,7,17)},
                                              new Order(){Id=2, OrderDate = new DateTime(2012,6,16)}
                                          };

        private List<OrderDetail> _orderDetails = new List<OrderDetail>
                                                      {
                                                          new OrderDetail(){Description = "Order Item #1",Id = 1,OrderId = 1},
                                                          new OrderDetail(){Description = "Order Item #2",Id = 2,OrderId = 1},
                                                          new OrderDetail(){Description = "Order Item #1",Id = 3,OrderId = 2}
                                                      };

        private List<Customer> _customers = new List<Customer>()
                                                {
                                                    new Customer(){FirstName = "John",LastName = "Doe",Id=1},
                                                    new Customer(){FirstName = "Jane",LastName = "Doe",Id=2}
                                                };

        private Dictionary<int, int> _orderCustomers = new Dictionary<int, int>();


        public RealOrderRepository()
        {
            _orderCustomers.Add(1, 1);
            _orderCustomers.Add(2, 2);
        }

        public override Order GetOrder(int id)
        {
            var order = (from o in _orders where o.Id == id select o).SingleOrDefault();
            return order;
        }

        public override IEnumerable<OrderDetail> GetOrderDetails(int orderId)
        {
            var orderDetails =
                from o in _orderDetails
                where o.OrderId == orderId
                select o;
            return orderDetails;
        }

        public override Customer GetOrderCustomer(int orderId)
        {
            int cutomerId = _orderCustomers[orderId];
            var customer = (from c in _customers where c.Id == cutomerId select c).SingleOrDefault();
            return customer;
        }
    }

    public abstract class OrderRepositoryBase
    {
        public abstract Order GetOrder(int id);

        public abstract IEnumerable<OrderDetail> GetOrderDetails(int orderId);

        public abstract Customer GetOrderCustomer(int orderId);
    }

    class Program
    {
        static void Main(string[] args)
        {
            ProxyOrderRepository repository = new ProxyOrderRepository();

            Order order = repository.GetOrder(1);

            Console.WriteLine("Order Id: {0}",order.Id );
            Console.WriteLine("Date: {0}", order.OrderDate);
            Console.WriteLine("Customer: {0}, {1}", order.Customer.LastName, order.Customer.FirstName);
            Console.WriteLine("# of items: {0}",order.Details.Count());
        }
    }
历史
- 8月11日 - 发布原始版本