
油画效果:图像上的油画效果实现
4.89/5 (41投票s)
为图像应用油画效果。
目录
引言
本文介绍了一个用于创建图像油画效果的应用程序。 基本原理是通过检查所有像素的邻近像素来实现的。对于每个像素,它会找到出现次数最多的颜色,并将该颜色作为输出。这样,我们会得到一个信息量较少、块状的图像,类似于图像的绘画效果。


油画算法的详细说明如下。
油画效果详情
邻近像素的分析通过一个实际示例进行说明。以上图像中的一个像素用于分析油画算法。该示例考虑半径为 2,强度为 10。
对于每个像素,都会分析其周围的像素。在区域内找到出现次数最多的像素,并将其作为输出。像素 [X,Y] 的处理会分析从 [X-Radius,Y-Radius] 到 [X+Radius,Y+Radius] 的像素。
/*
/// Function to process Oil Painting Effect.
// Parameters:
pbyDataIn_i: Input RGB buffer of input image.
nRadius:     Radius of processing. This values is used to consider nearest pixels.
             If this value is high, processing cost will increase. 2 ~5 are good values.
fIntensityLevels: Applied to r,g,b values intensity.
                  Increasing this values will create blocky output image.
nWidth: Width of image.
nHeight: Height of image.
pbyDataOut_o : Output RGB buffer.
*/
void PaintEffect::Process( const BYTE* pbyDataIn_i,
                           const int nRadius_i,
                           const float fIntensityLevels_i,
                           const int nWidth_i,
                           const int nHeight_i,
                           BYTE* pbyDataOut_o )
{
    // nRadius pixels are avoided from left, right top, and bottom edges.
    for( int nY = nRadius_i; nY < nHeight_i - nRadius_i; nY++)
    {
        for( int nX = nRadius_i; nX < nWidth_i - nRadius_i; nX++)
        {
            // Find intensities of nearest nRadius pixels in four direction.
            for( int nY_O = -nRadius_i; nY_O <= nRadius_i; nY_O++ )
            {
                for( int nX_O = -nRadius_i; nX_O <= nRadius_i; nX_O++ )
                {
                    int nR = pbyDataIn_i[( nX+nX_O) * 3  + ( nY + nY_O ) * nBytesInARow ];
                    int nG = pbyDataIn_i[( nX+nX_O) * 3  + ( nY + nY_O ) * nBytesInARow + 1];
                    int nB = pbyDataIn_i[( nX+nX_O) * 3  + ( nY + nY_O ) * nBytesInARow + 2];

                    // Find intensity of RGB value and apply intensity level.
                    int nCurIntensity =  ( ( ( nR + nG + nB ) / 3.0 ) * fIntensityLevels_i ) / 255;
                    if( nCurIntensity > 255 )
                        nCurIntensity = 255;
                    int i = nCurIntensity;
                    nIntensityCount[i]++;

                    nSumR[i] = nSumR[i] + nR;
                    nSumG[i] = nSumG[i] + nG;
                    nSumB[i] = nSumB[i] + nB;
                }
            }

            int nCurMax = 0;
            int nMaxIndex = 0;
            for( int nI = 0; nI < 256; nI++ )
            {
                if( nIntensityCount[nI] > nCurMax )
                {
                    nCurMax = nIntensityCount[nI];
                    nMaxIndex = nI;
                }
            }

            pbyDataOut_o[( nX) * 3 + ( nY ) * nBytesInARow ] = nSumR[nMaxIndex] / nCurMax;
            pbyDataOut_o[( nX) * 3 + ( nY ) * nBytesInARow + 1] = nSumG[nMaxIndex] / nCurMax;
            pbyDataOut_o[( nX) * 3 + ( nY ) * nBytesInARow + 2] = nSumB[nMaxIndex] / nCurMax;
        }
    }
}
此处 分析像素 (X,Y) 的邻近像素, 在本例中,X,Y 位于蓝色矩形的中心。像素 X,Y 的邻近像素显示在右上方。我们将分析这些邻近像素的强度,并找出像素 (X,Y) 的最终 R、G、B 值,这将有助于创建油画效果。
![]()
邻近像素的 RGB 值显示在下图中。
![]()
上述像素的强度通过以下逻辑计算。R、G、B 的平均值乘以强度,然后得出最终的强度值。
// Find intensity of RGB value and apply intensity level.
int nCurIntensity =  ( ( ( nR + nG + nB ) / 3.0 ) * fIntensityLevels_i ) / 255;
计算出的邻近像素强度值显示在下图中。
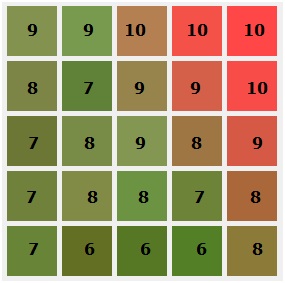
邻近像素的强度值范围从 6 到 10。最终像素值取决于 强度值 的出现次数。出现次数最多的强度值被考虑用于输出。从上图中可以看出,出现次数最多的强度是 8。七个邻近像素的强度值为 8。在计算每个像素的强度时,还会计算每个强度对应的 R、G、B 之和。
// Sum of each pixels intensity is calculated.
nSumR[nCurIntensity] = nSumR[nCurIntensity] + nR;
nSumG[nCurIntensity] = nSumG[nCurIntensity] + nG;
nSumB[nCurIntensity] = nSumB[nCurIntensity] + nB;
每个强度值的 R、G、B 分量之和如下所示。

从上表中可以看出,强度值 8 是出现次数最多的强度。七个邻近像素的强度值为 8,因此输出像素将根据与强度 8 对应的 R、G、B 分量之和来生成。
Final R = 949 / 7 = 135
Final G = 902 / 7 = 128
Final B = 458 / 7 = 65
最后, RGB (131,151,82) 在 X,Y 处,在分析邻近像素的 RGB 值后,变为 RGB (135,128,65)。

输出像素根据邻近像素的强度而改变。输出图像是通过对所有像素应用相同的算法创建的。出现次数最多的像素被考虑用于输出,并且它会消除图像中的微小(平滑)变化。因此,我们会得到一个粗糙/块状的图像。它将类似于油画效果。
绘画效果参数
半径
此参数决定了要分析的邻近像素。对于每个像素 (X,Y),都会分析从 (X-Radius, Y-Radius) 到 ( X+Radius, Y+Radius) 的邻近像素来生成输出图像。
如果半径增大,处理成本将随之增加。PaintEffectImpl 内部的迭代次数如下:Width * Height * (2 * Radius + 1 ) * (2 * Radius + 1 )。
如果半径增大,算法的计算成本也会增加,并且会得到一个更块状的图像。半径的合适值从 3 到 7,可以产生良好的油画效果。
强度
此参数用于确定像素的强度。像素的最终强度通过以下逻辑计算:
// Calculating intensity with R,G,B values and Intensity parameter.
int nActualIntensity =  ( ( ( nR + nG + nB ) / 3.0 ) * IntensityParameter ) / 255;
此参数有助于改变强度,从而使输出图像变得块状。
PaintEffect 应用详情
加载新图像时,将借助 PaintEffectImpl 类应用效果。 PaintEffectImpl::Process 用于生成应用了油画效果的图像。PaintEffectImpl::Process 的原型如下。
/*
Function to prepare Oil Painting Effect.
// Parameters:
pbyDataIn_i: Input RGB buffer of input image.
nRadius:     Radius of processing. This values is used to consider nearest pixels.
             If this value is high, processing cost will increase. 2 ~5 are good values.
fIntensityLevels: Applied to r,g,b values intensity.
                  Increasing this values will create blocky output image.
nWidth: Width of image.
nHeight: Height of image.
pbyDataOut_o : Output RGB buffer.
 */
void PaintEffect::Process( const BYTE* pbyDataIn_i,
                           const int nRadius_i,
                           const float fIntensityLevels_i,
                           const int nWidth_i,
                           const int nHeight_i,
                           BYTE* pbyDataOut_o );
输出图像(应用了绘画效果的图像)将在 m_pbyEffectAppliedData 中可用。该图像将被复制到位图对象。在对话框的每次重绘时,此位图将被绘制到静态控件上。
以下代码用于将应用了效果的图像复制到 CBitmap 对象。
// Code to copy effect applied data to Bitmap object.
HBITMAP hbmDest = ::CreateCompatibleBitmap(hdc, m_nImageWidth, m_nImageHeight);

if (hbmDest)
{
    if (SetDIBits(hdc, hbmDest, 0, m_nImageHeight, m_pbyEffectAppliedData, &stBitmapInfo, DIB_RGB_COLORS))
    {
        m_BitmapObject.DeleteObject();
        m_BitmapObject.Attach( hbmDest );
    }
}
将图像绘制到屏幕
输出位图使用 GDI 显示到屏幕。StretchBlit 用于将 调整大小 后的位图显示到输出窗口。
void CPaintEffectDlg::DrawWithGDI()
{
    // Use GDI method to draw the bitmap to screen.
    CDC* pDC = GetDlgItem( IDC_STATIC_IMAGE )->GetDC();

    if (m_BitmapObject.GetSafeHandle())
    {
        CDC dcMem;

        if (dcMem.CreateCompatibleDC(pDC))
        {
            CBitmap* pOldBM = dcMem.SelectObject(&m_BitmapObject);
            BITMAP BM;

            m_BitmapObject.GetBitmap(&BM);

            RECT ClientRegion;
            GetDlgItem( IDC_STATIC_IMAGE )->GetClientRect( &ClientRegion );

            // StretchBlt is used to resize the actual image to region of static window.
            pDC->StretchBlt( 0, 0, ClientRegion.right, ClientRegion.bottom,
                             &dcMem, 0, 0, m_nImageWidth, m_nImageHeight, SRCCOPY );

            dcMem.SelectObject(pOldBM);

        }
        GetDlgItem( IDC_STATIC_IMAGE )->ReleaseDC( pDC );
    }
}
为何选择 OpenGL 显示?
最初,此应用程序是在没有 OpenGL 支持的情况下创建的。GDI 用于将输出图像显示到静态控件。但是,加载不同尺寸的图像会导致图像的纵横比不正确,并生成质量较差的图像。应用程序中的静态控件[显示输出图像]可以显示尺寸为 [400,300] 的图像。当用户加载不同尺寸的新图像时,会创建一个实际尺寸的新 Bitmap 对象,并在实际尺寸图像上应用算法。但是,我们必须将新图像显示到尺寸为 400x300 的静态控件中。因此,使用 CDC::StretchBlit API 将实际尺寸的 Bitmap 显示为 400x300。
// StretchBlt is used to resize the actual image to region of static window.
pDC->StretchBlt( 0, 0, ClientRegion.right, ClientRegion.bottom,
                             &dcMem, 0, 0, m_nImageWidth, m_nImageHeight, SRCCOPY );
有时,图像的缩放会导致图像质量下降,如下图“OpenGL 显示关闭”的截图所示。如果使用 OpenGL 纹理映射进行缩放,则输出质量会很好。OpenGL 纹理使用 GL_LINEAR 插值类型创建,用于 MIN(缩小)和 MAG(放大)插值类型。因此,纹理缩放使用双线性插值来创建高质量的图像。
下图显示了 StretchBlit 和 OpenGL 显示之间的区别。

加载图像
可以使用此按钮加载新图像。GDI+ 库用于获取所有类型图像文件的图像缓冲区。加载新图像后,将油画效果应用于图像并重新绘制到屏幕。
void CPaintEffectDlg::OnButtonLoadBitmap()
{
    // Create a file open Dialog for opening .bmp file.
    CFileDialog* pFileOpenDlg = new CFileDialog( TRUE,L"image", NULL, OFN_HIDEREADONLY | OFN_OVERWRITEPROMPT,
                                                 L"Input Image (*.bmp;*.jpg;*.png;*.tga)|*.bmp;*.jpg;*.png;*.tga||");
    if( IDOK == pFileOpenDlg->DoModal())
    {
        CString csFileName = pFileOpenDlg->GetPathName();
        int nWidth = 0;
        int nHeight = 0;
        BYTE* pbyData = 0;
        BMPLoader BMPLoaderObj;
        if( !BMPLoaderObj.LoadBMP( csFileName.GetBuffer( 0 ), nWidth, nHeight, pbyData ))
        {
            AfxMessageBox( L"BMP Loading failed" );
            return;
        }

        ProcessEffect();

        Invalidate( false );
    }
}
保存图像
可以将应用了效果的图像保存到文件。输入图像的尺寸将用作输出图像的尺寸。PaintEffect 对话框将显示调整大小后的图像,但保存调整大小后的图像并不理想。文件名将根据半径和强度参数生成。
// To save the processed image.
void CPaintEffectDlg::OnBnClickedButtonSave()
{
    // Construct file name. Radius and Intensity parameters are added in the deafult file name.
    CString csFileName;
    csFileName.Format( L"OilPaintEffect_radius%d_Intensity%d.bmp",m_nRadius, m_nIntensity );
    CFileDialog SaveDlg( false, L"*.bmp", csFileName );
    if( IDOK == SaveDlg.DoModal())
    {
        CString csFileName = SaveDlg.GetPathName();
        BMPLoader SaveBmp;
        SaveBmp.SaveBMP( csFileName, m_nImageWidth, m_nImageHeight, m_pbyEffectAppliedData );
    }
}
调整对话框大小
输出图像通过调整输出图像的大小以适应对话框中的静态控件来绘制到屏幕。因此,加载不同尺寸的新图像可能会 拉伸 或扭曲图像。如果对话框可以调整大小,用户就可以以所需的尺寸查看图像。 WM_SIZE 消息被处理,显示图像的静态控件会根据对话框的新尺寸进行调整。除显示图像的静态控件外,所有控件都会根据新窗口的大小在 X 方向上移动。
// All windows other than image display window is moved in X direction.
MoveWindowInXDirection( IDC_EDIT_RADIUS, nParamWindowMoveX );
MoveWindowInXDirection( IDC_STATIC_RADIUS, nParamWindowMoveX );
MoveWindowInXDirection( IDC_EDIT_INTENSITY, nParamWindowMoveX );
MoveWindowInXDirection( IDC_STATIC_INTENSITY, nParamWindowMoveX );
MoveWindowInXDirection( IDC_STATIC_PARAM, nParamWindowMoveX );
MoveWindowInXDirection( IDC_BUTTON_LOAD_BITMAP, nParamWindowMoveX );
MoveWindowInXDirection( IDC_BUTTON_SAVE, nParamWindowMoveX );
MoveWindowInXDirection( IDC_BUTTON_ABOUT, nParamWindowMoveX );
MoveWindowInXDirection( IDC_CHECK_PAINTING_EFFECT, nParamWindowMoveX );
MoveWindowInXDirection( IDC_STATIC_STATUS, nParamWindowMoveX );
MoveWindowInXDirection( IDC_CHECK_OPENGL_DISPLAY, nParamWindowMoveX );
问题与局限性
- 处理大图像的时间太长。目前,绘画效果是在 GUI 线程中应用的,因此处理大尺寸图像可能需要时间来显示图像。
- 如果半径值很大,则处理时间会非常长。没有尝试并行处理方法。当我尝试准备着色器时,cg 在没有循环变量的情况下不支持数组访问。尝试为该效果准备 GPU 实现。
值得关注的点
- 准备一个实际示例有些复杂。我准备了另一个应用程序来放大绘制邻近像素,并准备了“算法详情”部分使用的图像。
- 我可以轻松生成算法的输出。但是,将输出正确复制到屏幕花费了很长时间。准备一个
BITMAP对象并将此图像复制到内存 DC。在WM_PAINT消息中,将此内存 DC 复制到输出窗口。 - 对话框的调整大小以特殊方式处理。创建了
MoveWindowInXDirection函数以在 X 方向上移动控件。每次调整大小时,都会确定所需的 X 方向移动,并为所有控件调用MoveWindowInXDirection。MoveWindowInXDirection获取控件的先前位置并计算新位置,然后调用SetWindowPos来应用新位置。 - 更改与油画效果相关的参数或加载新图像时,对话框会停止响应,用户也不会收到任何通知。因此,添加了一个静态按钮来指示算法正在处理中。“正在处理效果...”消息表示算法正在处理中,我们需要等待几秒钟才能显示新 图像。
- 在第一个版本中,在桌面和 PaintEffect 应用程序之间切换时出现了一些绘画问题。经过长时间的分析,我注意到
WM_PAINT被调用,并且整个场景被绘制了。但有时并不合适。我通过调用 GetDlgItem() 来使用静态控件的 DC 进行绘制,这导致了绘画问题。 当我从静态控件准备 CPaintDC 时,绘画问题得到了解决。
参考文献
- http://angeljohnsy.blogspot.jp/2011/06/oil-painting-in-matlab.html
- http://supercomputingblog.com/graphics/oil-painting-algorithm/
修订历史
- 2012 年 10 月 8 日:初始版本。
- 2012 年 10 月 13 日:解决了绘画问题,添加了滑块控件来更改半径和强度。