
数字系统转换器 Android 应用
4.86/5 (9投票s)
本文演示了如何创建一个 Android 应用程序来进行数字系统转换。

引言
Android 是一个激动人心的移动设备应用程序开发平台。 任何熟悉 Java 的程序员都可以快速学习 Android 并开始开发 Android 应用程序。 Android 的类库是 Java SE 的一个子集。 Android 的两个主要组成部分是 Android SDK 和一个名为“Android 开发工具 (ADT)”的 Eclipse 插件。 在开始开发之前,您必须确保已正确安装 SDK 和 ADT。
在本文中,我将介绍如何创建一个 Android 应用程序,以执行十进制数到二进制、八进制和十六进制格式的转换。
背景
任何 Android 应用程序都有四个构建块:
- Activities(活动):Android 中用户界面的基本构建块是 Activity(活动)。 活动代表用户可以与应用程序交互的主屏幕。
- Content Providers(内容提供器):内容提供器为多个应用程序所需的数据提供抽象。
- Intents(意图):意图是系统消息,例如,事件通知,例如,硬件更改(如 SD 卡插入)、传入数据(如 SMS)等。
- Services(服务):服务是不具有界面的独立活动,例如,音乐播放。
Activities(活动)是从 android.app.Activity 基类派生的公共类。 以下代码表示应用程序中的一个活动
public class MyActivity extends Activity
{
   public void onCreate(Bundle savedInstanceState)
   {
       super.onCreate(savedInstanceState);
   }
}
当活动启动时,会调用 onCreate() 方法。 此方法中的第一个语句必须是调用基类的 onCreate() 方法来初始化 Android 活动。
Android 中的用户界面可以通过 Java 代码或 XML 文件创建。 强烈建议使用 XML 文件创建用户界面,因为它提供了用户界面代码与业务逻辑代码的分离。
以下是一个 LinearLayout 定义的示例。
<?xml version="1.0" encoding="utf-8"?>
<LinearLayout xmlns:android="http://schemas.android.com/apk/res/android"
    android:orientation="vertical"
    android:layout_width="fill_parent"
    android:layout_height="fill_parent">
</LinearLayout>
每个 Android 项目都有一个自动生成的 R.java 文件。 此文件用于引用项目中的资源。 例如,如果 main.xml 布局文件定义了以下资源
<Button android:text="My Button" android:id="@+id/button1"
   android:layout_width="wrap_content" android:layout_height="wrap_content"></Button>
那么可以通过编写以下代码在 activity 类中使用它
Button btn=(Button)findViewById(R.id.button1);
Android 中的事件处理方式与 Java SE 中相同。 例如,一个 activity 类可以实现 View.onClickListener 接口,该接口具有 onClick() 方法来处理按钮的点击事件。 类似地,TextWatcher 接口可用于处理 EditText 控件中的文本更改事件。 TextWatcher 接口有三个方法,beforeTextChanged()、afterTextChanged() 和 onTextChanged()。
Android 中的用户界面组件由 Views(视图)表示。 View 类是所有组件的基类。 一些视图是 TextView、EditText、Button、RadioButton 和 Checkbox。 View 可以使用监听器响应事件。 将监听器分配给 View 的方式与 Java 2 SE 中相同。
例如,以下代码设置按钮的监听器以响应点击事件
button1.setOnClickListener(this);
以下代码设置 EditText 的监听器以响应文本更改事件
txtDecimal.addTextChangedListener(this);
对话框使用 Builder 类在 Android 中创建。 Builder 类具有以下方法
setTitle():设置对话框的标题setMessage():设置对话框的消息setCancelable():允许/禁止取消对话框show():显示对话框
可以使用以下代码创建一个对话框并显示它。
Builder builder=new Builder(this);
builder.setCancelable(true);
builder.setTitle("Title");
builder.setMessage("Message");
builder.show();
使用代码
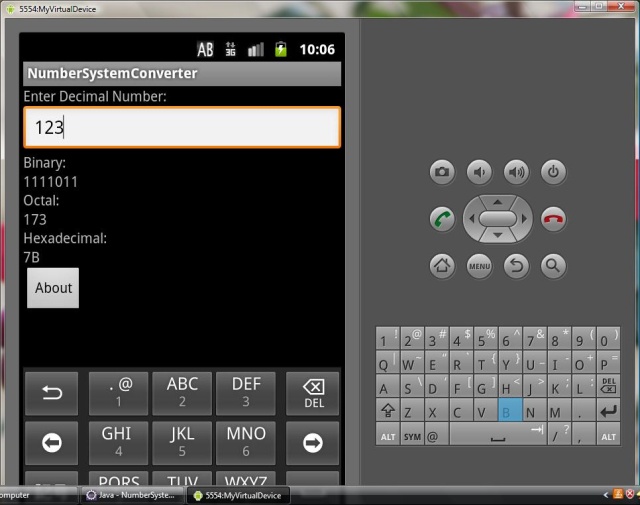
在我的应用程序中,我创建了一个 EditText 控件,其 ID 为 txtDecimal,用于接受十进制格式的数字,以及三个 TextView 控件,其 ID 为 txtBinary、txtOctal 和 txtHexadecimal,用于以二进制、八进制和十六进制格式显示数字。
以下是 main.xml 布局文件的完整代码
<?xml version="1.0" encoding="utf-8"?>
<LinearLayout xmlns:android="http://schemas.android.com/apk/res/android"
    android:orientation="vertical"
    android:layout_width="fill_parent"
    android:layout_height="fill_parent"
    >
    <TextView android:text="Enter Decimal Number: " android:id="@+id/textView1"
      android:layout_width="wrap_content" android:layout_height="wrap_content"></TextView>
    <EditText android:text="" android:id="@+id/txtDecimal" android:layout_width="match_parent"
      android:layout_height="wrap_content"></EditText>
    <TextView android:text="Binary: " android:id="@+id/textView2"
      android:layout_width="wrap_content" android:layout_height="wrap_content"></TextView>
    <TextView android:text="" android:id="@+id/txtBinary"
      android:layout_width="wrap_content" android:layout_height="wrap_content"></TextView>
    <TextView android:text="Octal: " android:id="@+id/textView4"
      android:layout_width="wrap_content" android:layout_height="wrap_content"></TextView>
    <TextView android:text="" android:id="@+id/txtOctal" android:layout_width="wrap_content"
      android:layout_height="wrap_content"></TextView>
    <TextView android:text="Hexadecimal: " android:id="@+id/textView6"
      android:layout_width="wrap_content" android:layout_height="wrap_content"></TextView>
    <TextView android:text="" android:id="@+id/txtHexadecimal"
      android:layout_width="wrap_content" android:layout_height="wrap_content"></TextView>
    <Button android:text="About" android:id="@+id/button1"
      android:layout_width="wrap_content" android:layout_height="wrap_content"></Button>
</LinearLayout>
以下是 main activity 的代码
package com.azim;

import java.util.Stack;
import android.app.Activity;
import android.app.AlertDialog.Builder;
import android.os.Bundle;
import android.widget.Button;
import android.widget.EditText;
import android.widget.TextView;
import android.view.View;
import android.text.Editable;
import android.text.TextWatcher;

public class MyActivity extends Activity implements TextWatcher,View.OnClickListener
{
    EditText txtDecimal;
    TextView txtBinary,txtOctal,txtHexadecimal;
    Button btnAbout;

    /** Called when the activity is first created. */
    @Override
    public void onCreate(Bundle savedInstanceState)
    {
        super.onCreate(savedInstanceState);
        setContentView(R.layout.main);
        txtDecimal=(EditText)findViewById(R.id.txtDecimal);
        txtBinary=(TextView)findViewById(R.id.txtBinary);
        txtOctal=(TextView)findViewById(R.id.txtOctal);
        txtHexadecimal=(TextView)findViewById(R.id.txtHexadecimal);
        txtDecimal.addTextChangedListener(this);
        btnAbout=(Button)findViewById(R.id.button1);
        btnAbout.setOnClickListener(this);
    }
    public void beforeTextChanged(CharSequence sequence,int start,int count,int after)
    {
    }
    public void afterTextChanged(Editable editable)
    {
    }
    public void onTextChanged(CharSequence sequence,int start,int before,int count)
    {
        calculate(2,txtBinary);        // for base 2 (binary)
        calculate(8,txtOctal);        // for base 8 (octal)
        calculate(16,txtHexadecimal);    // for base 16 (hexadecimal)
    }
    public void calculate(int base,TextView txtView)
    {
        if(txtDecimal.getText().toString().trim().length()==0)
        {
            txtView.setText("");
            return;
        }
        try
        {
            Stack<Object> stack=new Stack<Object>();
            int number=Integer.parseInt(txtDecimal.getText().toString());
            while (number>0)
            {
                int remainder=number%base; // find remainder
                if(remainder<10)
                // for remainder smaller than 10
                {
                    stack.push(remainder);
                    // push remainder in stack
                }
                else
                {
                    switch (remainder)
                    // for remainder larger than 9 (for hexadecimal values)
                    {
                    case 10:
                        stack.push("A");
                        break;
                    case 11:
                        stack.push("B");
                        break;
                    case 12:
                        stack.push("C");
                        break;
                    case 13:
                        stack.push("D");
                        break;
                    case 14:
                        stack.push("E");
                        break;
                    case 15:
                        stack.push("F");
                        break;
                }
            }
            number/=base;
        }
        StringBuffer buffer=new StringBuffer();
        while (!stack.isEmpty())
        {
                buffer.append(stack.pop().toString());
        }
        txtView.setText(buffer.toString());
    }
       catch (Exception e)
    {
        txtView.setText(e.getMessage());
    }
}

public void onClick(View view)
// to display Information in a dialog box
{
   // create a dialog box
   Builder builder=new Builder(this);
   // to allow cancelling the dialog box
   builder.setCancelable(true);
   // set title
   builder.setTitle("About NumberSystemConverter");
   // set message
   builder.setMessage("Made by Azim");
   // display dialog box
   builder.show();
}
上面的代码使用 onTextChanged() 方法获取用户输入的十进制数,并调用用户定义的方法 calculate() 将十进制数转换为二进制、八进制和十六进制格式。 每当 EditText 控件中的文本发生更改时,就会执行 onTextChanged() 方法。 calculate() 方法接受两个参数。 第一个参数表示目标数字系统的基数,第二个参数表示用于显示结果的目标 TextView 控件。
执行程序后,将出现以下屏幕
单击“关于”按钮会显示以下屏幕

关注点
执行该程序会在 bin 文件夹中生成 NumberSystemConverter.apk 文件。 可以将此文件复制到 Android 设备上,以便在该设备上执行该应用程序。 下图显示了在我 HTC Explorer Android 手机上执行的应用程序

我希望我的文章对 Android 平台的新手开发者有所帮助。