
理解和实现 C# 中的装饰器模式
4.93/5 (61投票s)
本文将介绍装饰器模式的基础知识,并探讨何时使用该模式会很有用。
引言
本文将介绍装饰器模式的基础知识,并探讨何时使用该模式会很有用。我们还将实现一个基础的 C# 装饰器模式。
背景
在我们的应用程序中,有时我们需要创建一个具有基本功能的的**对象**,并能够动态地向该对象添加额外的功能。例如,假设我们需要创建一个 Stream 对象来处理某些数据,但在某些情况下,我们需要该流对象能够加密流。那么我们可以准备好基本的 Stream 对象,然后在需要时动态添加加密功能。
你可能会说,为什么不直接在流类本身中包含此加密逻辑,并通过布尔属性来启用或禁用它呢?但这种方法会有问题,例如:如何在类中添加自定义加密逻辑?现在,可以通过继承现有类并为派生类添加自定义加密逻辑来轻松实现这一点。
这是一个有效的解决方案,但仅限于此加密是该类唯一需要的功能。但如果存在多种可以动态添加到该类中的功能,以及功能的组合呢?如果我们使用继承方法,最终将得到与所有功能和实际对象的组合数量相等的派生类。
这正是装饰器模式可以派上用场的情况。GoF 将装饰器模式定义为“*动态地为对象附加附加职责。装饰器提供了灵活的替代继承的方法来扩展功能。*”
在深入了解装饰器模式的细节之前,让我们先来看一下该模式的类图,并了解每个类的职责。
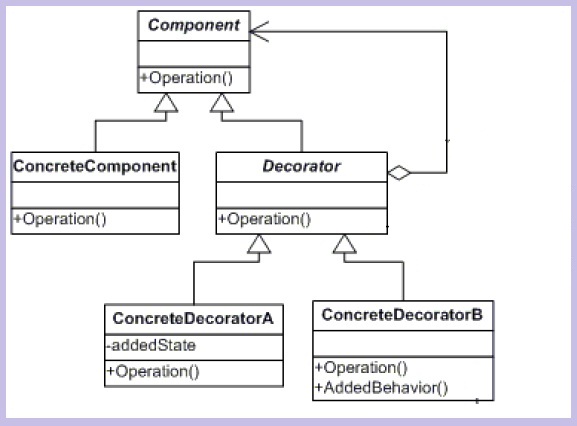
Component:定义了需要动态添加功能的**实际对象**的接口,这些功能将添加到ConcreteComponents。ConcreteComponent:可以动态添加功能的**实际对象**。Decorator:定义了可以添加到ConcreteComponent的所有动态功能的接口。ConcreteDecorator:可以添加到ConcreteComponent的所有功能。每个需要的功能将是一个ConcreteDecorator类。
使用代码
为了理解装饰器模式,让我们以烘焙店的计费系统为例。这家烘焙店专营蛋糕和糕点。顾客可以购买蛋糕和糕点,然后选择在基本产品上添加额外的东西。额外产品包括奶油、樱桃、香料和姓名卡。
现在,如果我们采用经典的继承方法来创建这个计费系统,我们将得到如下类:
- 仅蛋糕
- 带奶油和樱桃的蛋糕
- 带奶油、樱桃和香料的蛋糕
- 带奶油、樱桃、香料和姓名卡的蛋糕
- 仅带樱桃的蛋糕
- 仅糕点
- 带奶油和樱桃的糕点
- 带奶油、樱桃和香料的糕点
- 带奶油、樱桃、香料和姓名卡的糕点
- 仅带樱桃的糕点
- 以及更多更多..............
这种方法不仅是开发难题,更是维护噩梦。创建和维护这些类集将是一个巨大的问题。因此,让我们看看如何通过使用装饰器模式来优雅地设计此解决方案。
让我们从创建 Component 接口开始。
public abstract class BakeryComponent
{
    public abstract string GetName();
    public abstract double GetPrice();
}
此类定义了需要动态添加功能的**实际对象**的接口,这些功能将添加到 ConcreteComponents。所以,现在让我们创建 ConcreteComponent 类。
class CakeBase : BakeryComponent
{
    // In real world these values will typically come from some data store
    private string m_Name = "Cake Base";
    private double m_Price = 200.0;

    public override string GetName()
    {
        return m_Name;
    }

    public override double GetPrice()
    {
        return m_Price;
    }
}

class PastryBase : BakeryComponent
{
    // In real world these values will typically come from some data store
    private string m_Name = "Pastry Base";
    private double m_Price = 20.0;

    public override string GetName()
    {
        return m_Name;
    }

    public override double GetPrice()
    {
        return m_Price;
    }
}
现在我们已经准备好了基础对象。接下来,我们将研究如何将其他所需功能动态地添加到其中。让我们从查看 Decorator 类开始。
public abstract class Decorator : BakeryComponent
{
    BakeryComponent m_BaseComponent = null;

    protected string m_Name = "Undefined Decorator";
    protected double m_Price = 0.0;

    protected Decorator(BakeryComponent baseComponent)
    {
        m_BaseComponent = baseComponent;
    }

    #region BakeryComponent Members

    string BakeryComponent.GetName()
    {
        return string.Format("{0}, {1}", m_BaseComponent.GetName(), m_Name);
    }

    double BakeryComponent.GetPrice()
    {
        return m_Price + m_BaseComponent.GetPrice();
    }
    #endregion
}
这里有两点需要注意。首先,此类实现了 BakeryComponent 接口。这样做的原因是,一个带有组件的蛋糕也将是一个蛋糕,因此蛋糕上可能进行的所有操作也应该可以在装饰后的蛋糕上进行。第二件有趣的事情是,它还在内部持有 BakeryComponent 对象。这样做的原因是,我们需要蛋糕和装饰项之间存在逻辑上的“is-a”关系,但实际上并非如此,因此我们内部持有一个 BakeryComponent 对象来模仿这种“is-a”关系。
简而言之,我们所做的是,我们没有通过继承拥有静态的“is-a”关系,而是通过组合拥有动态的“is-a”关系。
现在,让我们看看如何实现 ConcreteDecorators 。
class ArtificialScentDecorator : Decorator
{
    public ArtificialScentDecorator(BakeryComponent baseComponent)
        : base(baseComponent)
    {
        this.m_Name = "Artificial Scent";
        this.m_Price = 3.0;
    }
}

class CherryDecorator : Decorator
{
    public CherryDecorator(BakeryComponent baseComponent)
        : base(baseComponent)
    {
        this.m_Name = "Cherry";
        this.m_Price = 2.0;
    }
}

class CreamDecorator : Decorator
{
    public CreamDecorator(BakeryComponent baseComponent)
        : base(baseComponent)
    {
        this.m_Name = "Cream";
        this.m_Price = 1.0;
    }
}
在这些类中,我们只是设置了项目的装饰器特定值,而没有自定义任何行为。但是,如果我们愿意,我们甚至可以在 ConcreteDecorator 对象中自定义行为或添加更多状态变量。为了说明这一点,假设每当客户选择在他的蛋糕上添加姓名卡时,他就有资格获得一张下次购买的折扣卡,并且我们需要在收据中显示此消息。让我们看看 ConcreteDecorator 在这种情况下如何添加其自身的状态和行为。
class NameCardDecorator : Decorator
{
    private int m_DiscountRate = 5;

    public NameCardDecorator(BakeryComponent baseComponent)
        : base(baseComponent)
    {
        this.m_Name = "Name Card";
        this.m_Price = 4.0;
    }

    public override string GetName()
    {
        return base.GetName() +
            string.Format("\n(Please Collect your discount card for {0}%)",
            m_DiscountRate);
    }
}
现在,我们的客户端应用程序可以创建 ConcreteComponents 与任何 Decorator 的组合。让我们看一下客户端的示例代码实现。
static void Main(string[] args)
{
    // Let us create a Simple Cake Base first
    CakeBase cBase = new CakeBase();
    PrintProductDetails(cBase);

    // Lets add cream to the cake
    CreamDecorator creamCake = new CreamDecorator(cBase);
    PrintProductDetails(creamCake);

    // Let now add a Cherry on it
    CherryDecorator cherryCake = new CherryDecorator(creamCake);
    PrintProductDetails(cherryCake);

    // Lets now add Scent to it
    ArtificialScentDecorator scentedCake = new ArtificialScentDecorator(cherryCake);
    PrintProductDetails(scentedCake);

    // Finally add a Name card on the cake
    NameCardDecorator nameCardOnCake = new NameCardDecorator(scentedCake);
    PrintProductDetails(nameCardOnCake);

    // Lets now create a simple Pastry
    PastryBase pastry = new PastryBase();
    PrintProductDetails(pastry);

    // Lets just add cream and cherry only on the pastry
    CreamDecorator creamPastry = new CreamDecorator(pastry);
    CherryDecorator cherryPastry = new CherryDecorator(creamPastry);
    PrintProductDetails(cherryPastry);
}
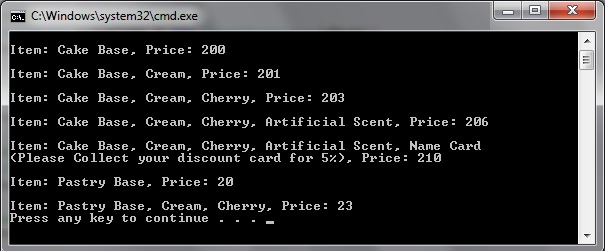
当我们运行应用程序时。
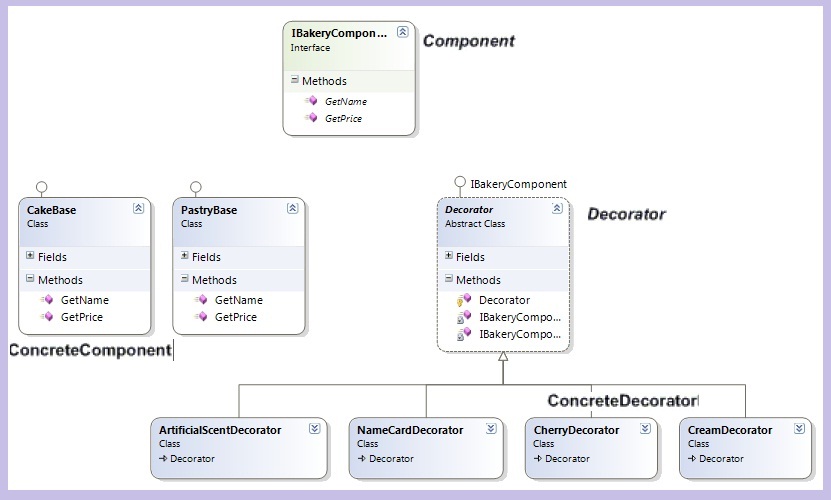
在总结之前,让我们看看我们的示例应用程序在类图方面是如何实现装饰器模式的,并将其与装饰器模式的类图进行比较。
看点
在这篇入门文章中,我们探讨了装饰器模式。何时可以使用它以及如何在 C# 中实现装饰器模式。装饰器模式是 开放-封闭原则 的一个很好的例子,其中我们所有的类都对扩展开放,对修改关闭。希望这篇文章有所帮助。
历史
- 2012 年 10 月 19 日:初稿。